Getting Started - XMPieLab/XMPL-V5 GitHub Wiki
The following tutorial will take you through the basics of creating a sample Circle project and a simple XMPL V5 personalized web page.
Before you begin, download the tutorial materials that are needed for this getting started tutorial.
In order to complete this tutorial, you should have:
- Access to a PersonalEffect TransMedia, TransMedia Pro or Enterprise server,
- An XMPie Circle account and have your XMPL server connected to it, and
- At least a basic understanding of HTML and JavaScript.
To start, we need to set up the Circle project so that the personalized pages can connect to it. The Circle project is linked to:
- Your uProduce server on which we will define a campaign to hold the project plan, recipient list (data) and project assets (variable images and preset texts).
- Your XMPL server which will host the final personalized web pages.
The tutorial materials folder contains:
- A sample campaign package (CPKG) that we will use to setup the sample campaign,
- A copy of the data file used in the campaign package,
- A website folder to start the tutorial, and
- A website folder which is completed and can be used as a reference.
Use the following steps to create a new project with the sample campaign package.
- Log in to Circle and create a new project (File > Open/Organize > New project).
- Save the project (File > Save) and enter a unique name for the project.
- Go to the "Build" tab and click the "Connect" button.
- Select your uProduce server from the drop-down list, and click "+" to create a new account.
- Enter an account name, confirm the other default settings and click to save the account.
- Click to go to the next step of the uProduce Connection dialog.
- Click to "Upload a Campaign Package File (.cpkg)".
- Click "Choose file" and select the "GettingStarted.cpkg" file provided in the tutorial materials. Click "Upload". Close the dialog when done.
- You will see Master List dialog, and now need to configure the Recipient ID that will be used to identify users in the URL. Click "database field".
- Click Next.
- In the Recipient Key Format field, enter:
[[firstname]].[[lastname]]. (You can place the cursor in the box, and click the field names from the list, as well as type manually.) - Click Finish, then Close, then Save.
Note: In step 9, for good security, you would generally click to "auto-generate a secure ID" so that personalized URLs are difficult to guess. But to make it easier to test the web pages in this tutorial, we will use the firstname and lastname in the URL.
Now that the project is setup in Circle and uProduce, we can download the web configuration file from Circle.
The file includes JavaScript code that defines the project connection information needed on the XMPL web pages.
To download the file do the following:
- If the Circle Library window was closed, open it by clicking the "Library" button on the project's "Build" tab.
- Select "Website" from the list on the left.
- Click the down arrow next to "Configuration file".
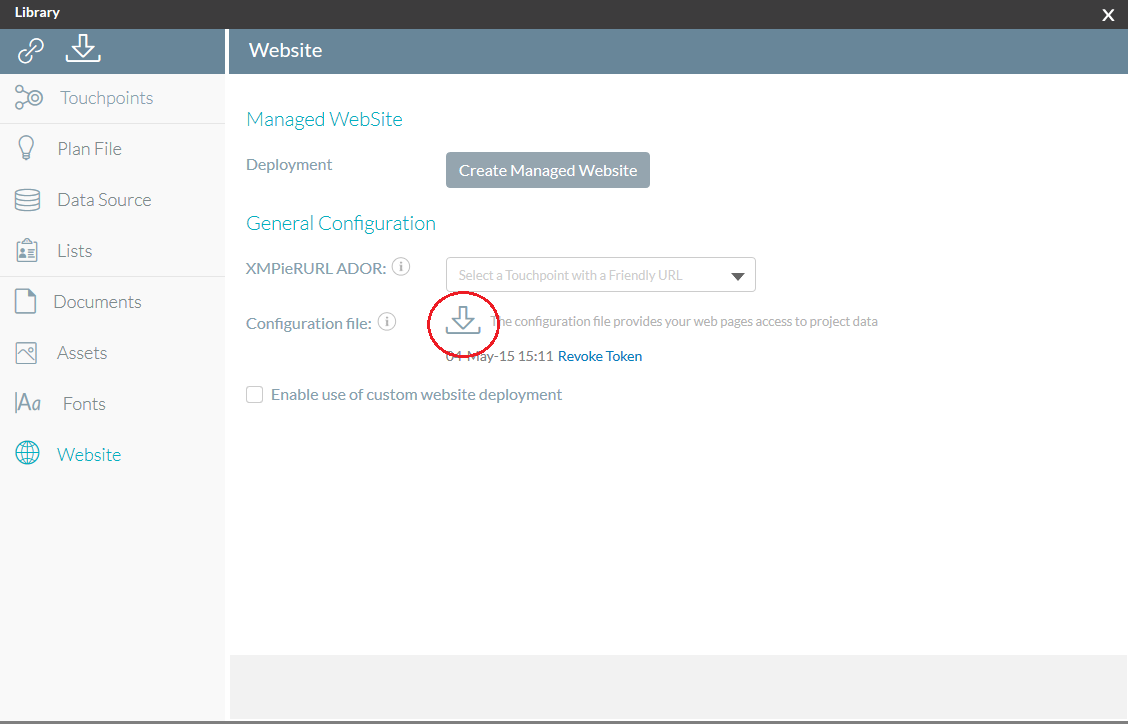
- Save the file as "xmpcfg.js" in the "web pages - start here" folder provided in the "tutorial materials" download.
- If you also wish to use the completed web pages, you should also save a second copy of the "xmpcfg.js" into the "web pages - completed" folder provided in the "tutorial materials" download.
To understand the basic concepts, we will ignore the sample web pages to start with and create a very basic "hello world" example.
- In the "web pages - start here" folder where you just saved your xmpcfg.js file, create a new text document named "hello.html".
- Open the "hello.html" document in your favorite text or HTML editor.
- Copy the following code sample:
<html>
  <head>
    <title>My first personalized web page</title>
    <script src="./xmpcfg.js"></script>
    <script src="https://ajax.xmcircle.com/ajax/libs/XMPL-V5/5.0/xmpl.min.js"></script>
  </head>
  <body>
    <div xmp-personalized-controller xmp-cloak>
      <h1>Hello world!</h1>
      <p>
        This web page is personalized for:
        <span xmp-text="xmp.r['firstname']"></span>
        <span xmp-text="xmp.r['lastname']"></span>
      </p>
      <div><img width="500px" xmp-image-asset="xmp.r['photo1']"/></div>
    </div>
  </body>
</html>- Paste the code sample into your hello.html file and save the file.
- Double-click the hello.html file to load it in your default web browser.
- At first, you will see nothing, and after a few seconds you will see an XMPL error that the Recipient ID is not valid. You will have to add a Recipient ID to the file URL to see some personalized data.
- In your browser, at the end of the URL, change "hello.html" to "hello.html?rid=Jane.Jones" and press Enter.
- The web page should now look like this:

- You can see your hello.html page personalized for other recipients by providing a different recipient ID. Try for example "hello.html?rid=Jerry.Jones", "index.html?rid=Sandra.Smith", or "index.html?rid=Sam.Smith"
Congratulations! You've created a personalized web page with XMPL V5!
- There are two script tags loaded in the <head> section.
- The first reads the xmpcfg.js to get the information on how to connect to your Circle project.
- The second loads the XMPL V5 library that is used to put the personalized values into the web page.
- Text ADORs are placed into the document by adding the
xmp-textattribute to an element that can hold text like the span tag. - The value of the xmp-text attribute is the name of a text ADOR in the campaign plan.
- Graphic ADORs are placed into the document by adding the
xmp-image-assetattribute to an image (img) element. - The value of the xmp-image-asset attribute is the name of a graphic ADOR in the campaign plan.
Because we are previewing the HTML by double-clicking the file on your desktop, there is no web server involved, and if we click a link to go to another personalized page, the recipient information is not passed to the second page.
If you would like to have the recipient information remembered when you are testing pages on your local desktop, you may want to install and configure a light web server for local testing. The following steps provide instructions on how to install and use the http-server of NodeJS.
This step is entirely optional. If you prefer, you can use any other local web server software, or simply use the Circle Project Library to Create a Managed Website and copy or upload your test web pages to folder created on your XMPL server.
If you wish to use NodeJS http-server on your desktop, here are the steps:
- Go to https://nodejs.org/, download the NodeJS installer for your OS.
- Install NodeJS.
- Open terminal/command prompt.
- Install HTTP server by typing
npm install http-server -g. Hit enter. This should install the HTTP server. - To run the tutorial website via http-server, use the terminal/command prompt to change directory into tutorial website folder, and type
http-server. - The site should now be available in your web browser via
http://localhost:8080/hello.html?rid=Jane.Jones. - To stop the server when it has finished playing the sample, press Ctrl-c.
In Your First Personalized Page we will take plain HTML pages and make them dynamic or personalized by adding the XMPL V5 scripts and attributes to the page.