Reference - Waffelo/HydraFlasher GitHub Wiki
Reference
Keyboard shortcuts
| Keys | Action |
|---|---|
| Ctrl+P | Probe |
| Ctrl+R | Read |
| Ctrl+V | Verify |
| Ctrl+E | Erase |
| Ctrl+W | Write |
| Enter | Run batch (production mode) |
| Esc | Stop |
| Alt+1 to Alt+4 | Select socket CS0 to CS3 (Alt+1 to Alt+9, and Alt+0 for the 10th socket, with more sockets) |
| Alt+A | Select ALL (broadcast); not with a single socket |
| Ctrl+L | Clear the log |
| Ctrl+, | Open or close the settings page |
| Esc | On the settings page, while no job runs: back to the main view |
| Ctrl+C (also Ctrl+Shift+C, Ctrl+Insert) | In the log: copy the selected text |
| Ctrl+A | In the log: select everything |
| Right-click | In the log: Copy, Copy all, Select all |
| Drop a file on a socket card | Write it to that socket (see Drag and drop) |
| Drop a file on the log | Verify the selected target against it |
| Ctrl+Q | Quit |
Shortcuts are ignored while you're typing in a text field (for example the port box), so Ctrl+V still pastes there. Click anywhere outside the field to use them again.
Files
| What | Linux / macOS | Windows |
|---|---|---|
| Settings | ~/.config/hydra_flasher.json |
~/.hydra_flasher.json |
| Flash log | ~/.local/share/hydra-flasher/flash_log.csv |
%APPDATA%\HydraFlasher\flash_log.csv |
| Windows install (installer) | — | C:\Program Files\HydraFlasher\ (or your user's programs folder) |
| Downloaded firmware | ~/.local/share/hydra-flasher/firmware/ |
%APPDATA%\HydraFlasher\firmware\ |
| Instance lock | ~/.local/share/hydra-flasher/hydra_flasher.lock |
%APPDATA%\HydraFlasher\hydra_flasher.lock |
The settings file remembers:
- the port, the speed and the selected socket;
- the socket count: auto or manual (
sockets_auto,sockets,sockets_detected, see Socket count) and the socket names (socket_names); - the live scan settings (
live_scan,scan_interval,scan_speed) and whether the status LEDs are on (leds); - the toggles: force, progress, skip verify, verify on Pico, used blocks only and one-by-one;
- the light or dark theme and whether desktop notifications are on;
- the flashprog path, the last folder and the recent files;
- the chip names learned from probes;
- how long your jobs usually take, for the time left estimate (
job_times).
The chip override and production mode are not remembered; they start as Auto-detect and off.
Socket count
By default the socket count is detected: with firmware 1.2 or newer, the Pico reports which CS lines lead to a socket, and the app shows exactly those. This needs one resistor per socket on your board:
Pico GPIO (CS) ───────●──────── socket /CS
                      │
                    10 kΩ
                      │
                     3V3
Put a 10 kΩ resistor from each socket's /CS line to 3V3 (Pico pin 36). Where along the wire doesn't matter; on a breadboard, the CS row and the + rail. It's good practice anyway: it keeps the chips deselected while the Pico starts. To detect, the Pico briefly reads each CS pin as an input against its own weak pull-down (50–80 kΩ): a line with the resistor reads high, an open one low. Values from 4.7 kΩ to 10 kΩ work; 22 kΩ or more is too weak.
The Pico is asked when it's plugged in (and when the app starts), or with detect again on the settings page. The count runs up to the highest wired socket. A socket in between without a resistor shows as not wired: it isn't scanned, probed, included in ALL or available for jobs.
If the Pico finds no pull-up resistors at all, auto switches to manual, with your manual count, and says so once in the log (No pull-up resistors found on the CS lines: socket count switched to manual …). That way a board without the resistors, or with wiring you're still working on, doesn't change the socket row at every reconnect. After adding the resistors, press detect again on the settings page: when it finds them, the count goes back to auto. With firmware before 1.2, which can't detect, auto uses the count set next to otherwise, 4 by default.
Keep the resistors connected to 3V3. Tied only to each other, they still seem to work while the Pico runs (its other CS pins, driven high, feed the shared line), but while the Pico starts, resets or updates, nothing holds the CS lines high and all chips are selected at once. To set the count by hand regardless of the board, pick a number instead of auto. It applies at once, but not while jobs run or wait.
The manual count is saved as sockets in the settings file (see Files), auto as sockets_auto, and the last detected count as sockets_detected, which the app starts with so the cards don't change a moment after starting. If you edit the file by hand, close HydraFlasher first: it rewrites the file when it quits.
- 1 to 10 sockets use CS0 to CS9 (GP5 to GP14, see Pinout). Cards, shortcuts (Alt+1 to Alt+n, Alt+0 for the 10th) and the live scan follow the count.
- Older firmware has only six chip selects (see Updating from older firmware). With more than 6 sockets configured, the log warns once after connecting, the extra cards show
no CS line in firmware, and jobs on them are refused. - With a single socket there's no ALL card and no Alt+A, since a broadcast would only reach that one chip.
- Any other value (0, 11, text) logs
Config "sockets": … is not a number from 1 to 10 – using 4.and the app uses 4.
Status LEDs on the Pico
| LED (GPIO) | Meaning |
|---|---|
| Orange (GP16) | A job is running |
| Green (GP17) | The last job succeeded |
| Red (GP18) | The last job failed |
| All off | Idle |
They can be turned off on the settings page (status LEDs).
Pinout
| Signal | Pico GPIO |
|---|---|
| SCK | GP2 |
| MOSI | GP3 |
| MISO | GP4 (pull-up) |
| CS0 to CS9 | GP5 to GP14 (the app uses CS0 to CS3 unless you change the socket count) |
| CS10 | Not a pin: broadcast, selects all CS lines at once (CS6 on older firmware) |
| LEDs | GP16 / GP17 / GP18 |
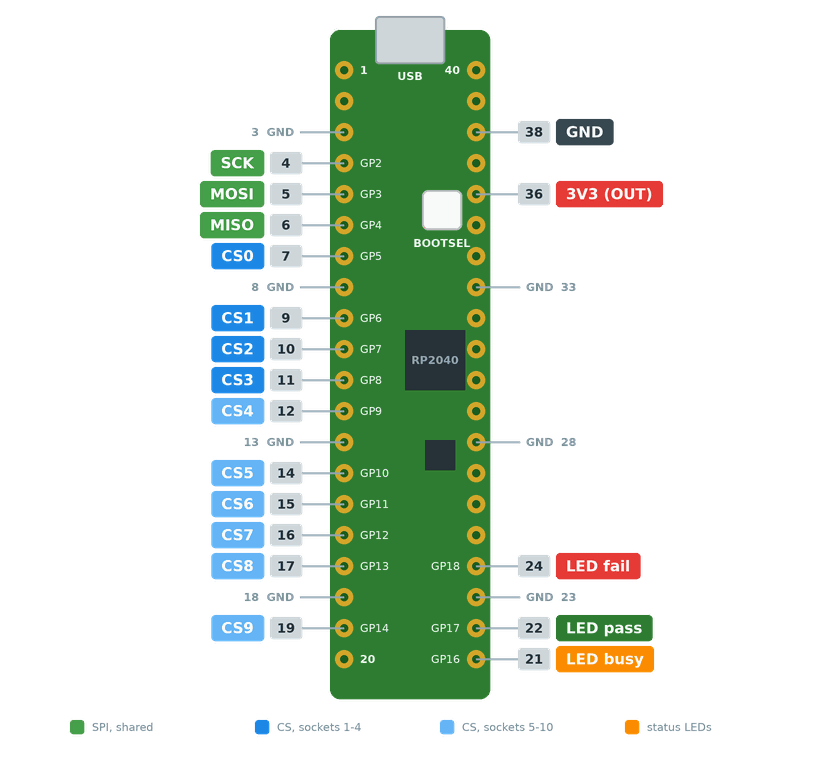
Under the hood
- Probe, read, erase, write and flashprog verify run the
flashprogcommand; the socket is selected with the serprog optioncs=<n>. - The live scan, verify on Pico, the blank check and the LEDs talk to the Pico directly over the same serial port, using custom serprog commands (
0x20LED,0x21reboot to bootloader,0x22CRC32,0x23number of chip selects,0x24wired sockets). The firmware version comes from serprog's standard program-name query (HydraFlasher 1.1). HydraFlasher makes sure only one of the two uses the port at any moment. - If the firmware doesn't support the CRC32 command, or the port needs sudo, verify on Pico and used blocks only quietly fall back to plain flashprog.