Export Levels, Maps, Dungeons to Unreal Engine 4 - VenoMKO/RealEditor GitHub Wiki
This guide will show you how to export a map from Tera and Import this map to Unreal Engine 4
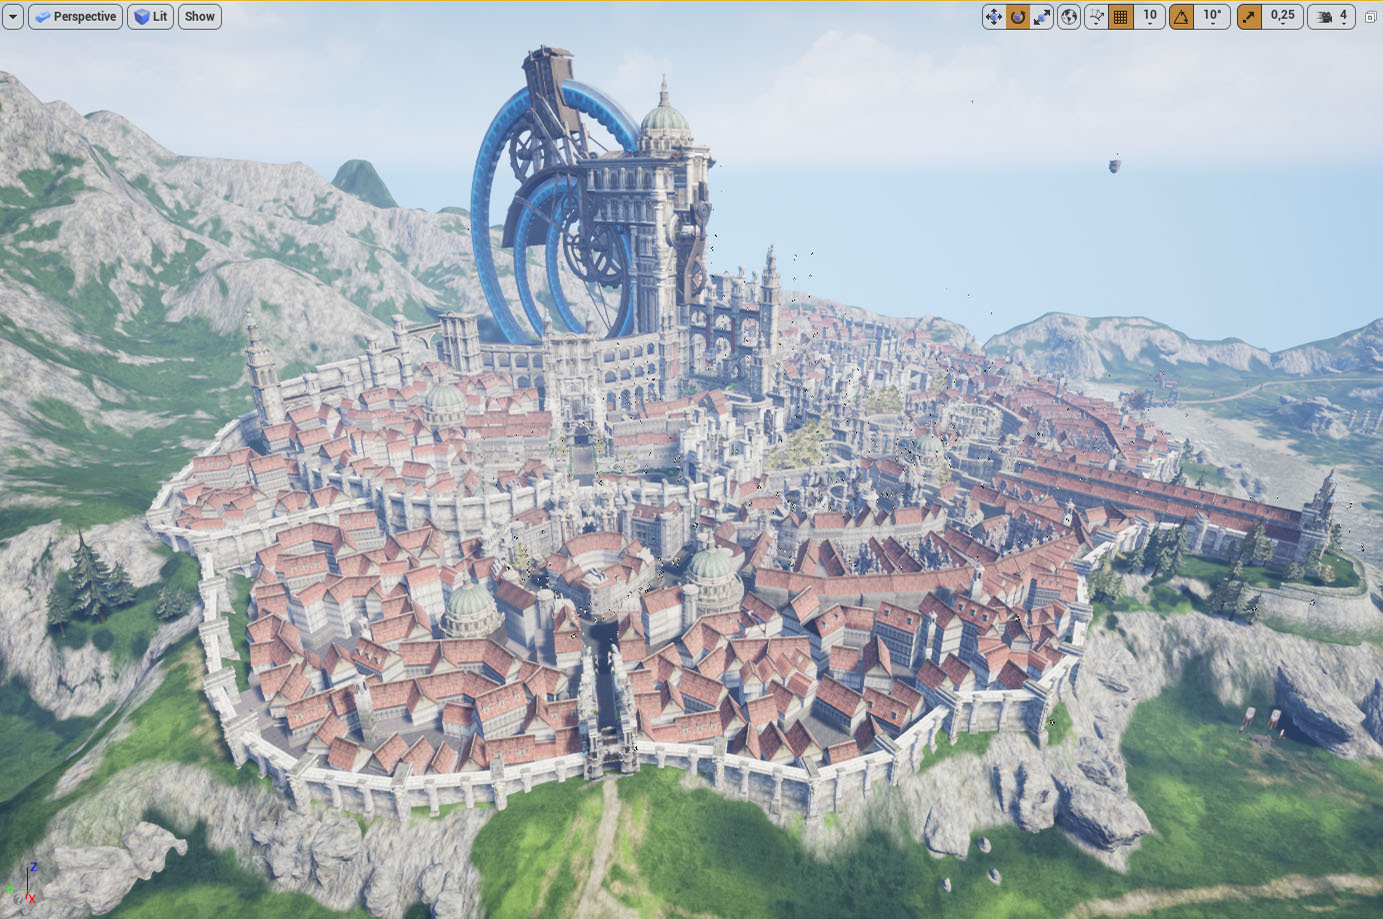
Table Of Contents
- Requirements
- Limitations
- GMP lookup
- Export configuration
- Install RE Helper plugin
- Import textures
- Import sounds
- Import skeletal meshes
- Import SpeedTrees
- Import static meshes
- Import material placeholders
- Import landscape
- Create complex collisions
- Import actors
- Re-create materials
- Fix SpeedTrees
- Interp animations
- Aero Volumes
- Summary
- Troubleshooting
Requirements
The guide expects you to have some basic UE4 experience and an intermediate-advansed knowledge of UE Materials.
- Unreal Engine 4.27 - www.unrealengine.com
- Real Editor v.1.70 or higher - GitHub
- RE Helper plugin for Unreal Engine - GitHub
- Spt2Fbx for SpeedTree conversion - GitHub
RE Helper was made for UE 4.27. If you want to use a different version of UE, you'll need to recompile the plugin.
Limitations
RE won't export:
- Animations
- Brushes
- Cameras
- Particle Systems
- SkySystems
- Procedural Foliage
- Level Sequences (including actors, dynamically spawned by a sequencer/manteene)
- Level Streaming setups
- Dynamically spawned actors(Castles, Mobs, NPCs, etc.)
GMP lookup
The maps are stored in GMP packages in S1Game\CookedPC\Art_Data\Maps\. Some GMP names are not very obvious, so I made a list with the in-game names here: Map names. Some old GMP names from the list do not exist in the 64-bit client but may be added in the future by BHS.
Tip: You can open a GPK or GMP by its name. In any package window press File -> Open by name... and type the package name.
When you open a GMP, RE finds and selects the persistent level automatically. You can press Preview to check if the GMP is the one you are looking for. RE won't show you terrain, and there will be some missing textures or wrong colors, but this should be enough to recognize the level.
Export configuration
Press Export. You'll see a window with various settings. Select an empty destination folder and set up the desired options.
Destination folder must be empty. Alternatively, check the Override files option.

Actors:
The actors table contains a list of actor classes that RE can export. If you don't want to export some actors, uncheck their classes.
| Class | Description |
|---|---|
| Aero Volumes | Areas on the map with specific lighting and post-process settings. RE converts these to Trigger volumes. |
| Blocking Volumes | Areas with restricted movement (e.g., invisible walls). |
| Lights | Various lights(e.g., point, spot, directional). |
| Emitters | RE can't export particle systems, but this option allows you to export emitter nodes with correct world transforms. |
| Interp Actors | Static Meshes with Interpolated animations(you will need to recreate these animations). |
| Prefabs | Premade actors. UE4 does not have this class. Thus, RE will build each prefab as an individual actor with multiple components. |
| Skeletal Meshes | 3D objects capable of vertex animations(RE can't export animations yet). |
| Sounds | Ambient sound actors, S1MusicVolumes, and ReverbVolumes. |
| SpeedTrees | Trees and/or billboard leaves. |
| Static Meshes | Static 3D objects(e.g., buildings, props, etc.). |
| Terrains | Actors that represent soil/landscape. |
| Water Volumes | Waterbodies. RE converts these to Trigger volumes. |
Options:
- General
-
- Global scale - RE will scale exported level by this value.
-
- Override files - allow RE to overwrite existing files in the destination folder.
-
- Make all visible - remove Hidden flag from actors.
-
- Split T3D - group actors from streamed levels to individual files.
- Materials
-
- Export materials - create material lists for RE plugin.
-
- Export textures - self-explanatory.
- Lights
-
- Point lights scale - multiply Point Light's brightness by this value.
-
- Spot lights scale - multiply Spot Light's brightness by this value.
-
- Use inverse squared falloff - force UE4 to use physically based inverse squared distance falloff.
-
- Force dynamic shadows - enable dynamic shadows for actors that have this option off.
- Terrains
-
- Resample Terrain - scale-up terrains heightmap to match weightmaps resolution.
-
- Split weightmaps - save weightmaps to individual files. If unchecked RE will export splat maps instead.
- Models
-
- Export LODs - save static mesh LODs(you will need to configure LOD distances in UE4).
-
- Export MLODs - save MLOD actors.
-
- Export collisions - save convex collisions.
-
- Export lightmap UVs - self-explanatory.
Tip: To preserve original coordinates set Global scale to "1.0".
Tip: this guide shows how to export all streaming levels to a single persistent level. If you want to create a proper level streaming, you would want to enable the Split T3D option to group actors.
Press Export and wait for RE to complete. Any error will be saved to the Errors.txt file in the destination folder.
Add RE Helper to your UE4 project
If you don't have a UE4 project, create one(C++ or Blueprints does not matter).
Open your UE4 project folder and copy the REHelper folder to the Plugins folder. If you don't have the Plugins folder, create one.

Now open your project in Unreal Editor, and you should see the RE icon in the toolbar. If you have a different version of UE4, you might need to recompile the plugin.

Import textures
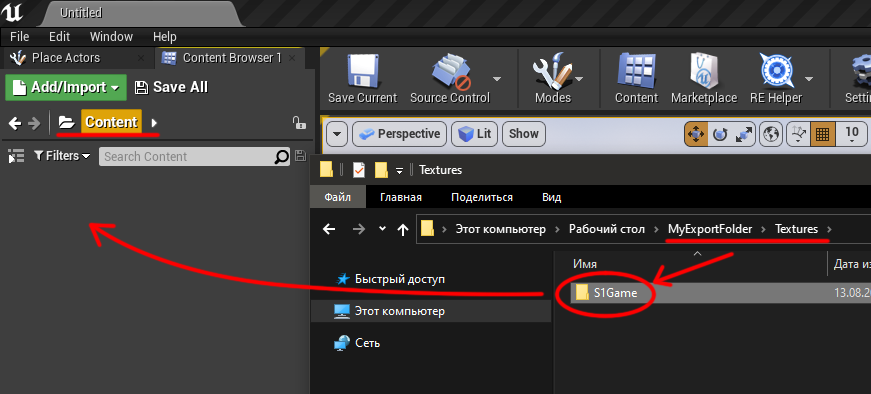
- Open the
Contentfolder in UE Content Browser. - Open the
Texturesfolder in your export folder in File Explorer(e.g.,MyExportFolder\Textures). - Drag the
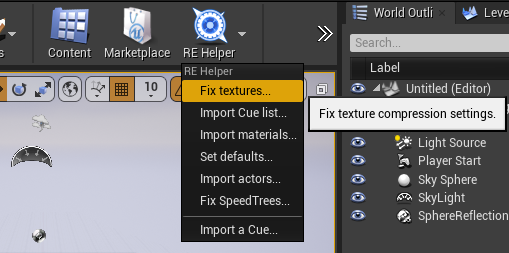
S1Gamefolder fromTexturesto UE Content Browser and wait till Unreal Editor completes the import operation. - Click on the RE Plugin icon and select Fix textures... menu.
- In the dialog, select the
Textures.txtfile in your export folder.
Import sounds
Skip this step if you don't have the
Wavesfolder.
Important! To properly import sound cues you need to use RE Helper v.2.0 or higher.
- Open the
Contentfolder in UE Content Browser - Open the
Wavesfolder in your export folder in File Explorer(e.g.,MyExportFolder\Waves). - Drag the
S1Gamefolder fromWavesto UE Content Browser and wait till Unreal Editor completes the import operation. - Click on the RE Plugin icon and select Import Cue list... menu.
- In the dialog, select the
Cues.txtfile in your export folder.
Import skeletal meshes
Skip this step if you don't have the
SkeletalMeshesfolder.
- Open the
Contentfolder in UE Content Browser. - Open the
SkeletalMeshesfolder in your export folder in Explorer(e.g.,MyExportFolder\SkeletalMeshes). - Drag the
S1Gamefolder fromSkeletalMeshesto UE Content Browser. - In the Fbx Import Options window change these settings:
-
- Mesh > Normal Import Method - Import Normals and Tangents
-
- Material > Search Location - Do Not Search
-
- Material > Material Import Method - Do Not Create Material
- Press Import All.
Import SpeedTrees
Skip this step if you don't have the
SpeedTreesfolder.
Tera uses the dated SpeedTree format SPT v.4.X. UE4 does not support it, and it's impossible to convert it to a modern SpeedTree format. The only way is to build static meshes from SPTs. To do this, you will need my Spt2Fbx tool(Link in the Requirements). Alternatively, you can use SpeedTree CAD 4 with a paid license.
Convert SPT to FBX
- Open the
SpeedTreesfolder in your export folder in Explorer(e.g.,MyExportFolder\SpeedTrees). - In another Explorer window, open the Spt2Fbx folder.
- Drag the
S1Gamefolder fromSpeedTreeson toSpt2Fbx.exe.
Import converted models to UE4
- Open the
Contentfolder in UE Content Browser. - Drag the
S1Gamefolder fromSpeedTreesto UE Content Browser. - In the Fbx Import Options window, change these settings:
-
- Mesh > Generate Missing Collision - Disable.
-
- Mesh > Normal Import Method - Import Normals and Tangents
-
- Material > Search Location - Do Not Search
-
- Material > Material Import Method - Do Not Create Material
- Press Import All. Ignore error messages about unsupported SPT format.
Import static meshes
Skip this step if you don't have the
StaticMeshesfolder.
- Open the
Contentfolder in UE Content Browser. - Open the
StaticMeshesfolder in your export folder in Explorer(e.g.,MyExportFolder\StaticMeshes). - Drag the
S1Gamefolder from theStaticMeshesto UE Content Browser. - In the Fbx Import Options window change these settings:
-
- Mesh > Generate Missing Collision - Disable.
-
- Mesh > Vertex Color Import Option - Replace.
-
- Mesh > One Convex Hull Per UCX - Enable.
-
- Mesh > Import Mesh LODs - Enable, if you turned on LOD export in RE(off by default).
-
- Mesh > Normal Import Method - Import Normals and Tangents
-
- Material > Search Location - Do Not Search
-
- Material > Material Import Method - Do Not Create Material
- Press Import All.
Materials
Import materials
- Click on the RE Plugin icon and select the Import materials... menu.
- In the dialog, select the
MaterialsList.txtfile in your export folder. The plugin will create all material dummies with their parameters and material instances with the correct texture, vector, and scalar parameter overrides.
Assign correct default materials to previously imported models
- Click on the RE Plugin icon and select the Set defaults... menu.
- In the dialog, select the
DefaultMaterials.txtfile in your export folder. RE Plugin will assign correct materials to the imported assets.
Landscape aka Terrain
Skip this step if you don't have a
Terrainsfolder in your export folder.
Terrain information is exported to a separate folder for each GMP file(e.g., VK_4258). Since one GMP can host multiple terrains, Real Editor saves each terrain into its own folder(e.g., Terrain_7):
MyExportFolder\Terrains\VK_4258\Terrain_7\HeightMap.png- heightmap used to create the geometry of the terrain namedTerrain_7from theVK_4258.gmp.MyExportFolder\Terrains\VK_4258\Terrain_7\VisibilityMap.png- visibility map for this terrain. It is optional.MyExportFolder\Terrains\VK_4258\Terrain_7\WeightMaps\- weight maps for each layer of the terrain.MyExportFolder\Terrains\VK_4258\Terrain_7\Setup.txt- an info file made by Real Editor. It contains the location and scale of the terrain and a layer setup needed for the material.MyExportFolder\Terrains.txt- list of all exported terrains with their transforms.
Reconstructing terrain geometry
Open the Terrains.txt file in your export folder. You should see a list of Terrain actors.
Repeat these steps for each terrain actor:
- Select the Landscape mode in the UE4 by pressing the Modes button in the toolbar and clicking Landscape.
- Select the Manage tab and press New.
- In the appeared panel, click on Import from file.
- Press a button with three dots and select the heightmap(e.g.,
MyExportFolder\Terrains\Gmp Name\Actor Name\HeightMap.png). - Set Location to 0, 0, 0.
- Set Scale using values from the
Terrains.txtfile(e.g., 16, 16, 64). - Press Import.
- Select landscape actor you've just created in the World Outliner.
- Rename it to match the name in
Terrains.txt. - Set Location using values from the
Terrains.txtfile(e.g., 15360, 15360, 0).

Texture landscape
Create master materials
You will need to create layer blended materials for your terrain actors. Go through all Setup.txt files of your terrains and check what materials you need(e.g., 5, 6, 7, and 8 layers materials)
I prefer to have multiple template materials with custom layers count, e.g.,
Terrain5L,Terrain6L, etc. All templates share the same layer naming scheme:Layer_N. This makes texturing much more straightforward, and I don't need to create new materials for each map/level.
Your material needs a scalar parameter that will multiply landscape coordinates. Create this parameter for each layer. The result of multiplication must be divided by 4 (scaling difference between Tera Online and UE4). Here is an example:

Here is an example of a simple 4-layered material:

Tip: you might need a masked version of this material. Create a copy of the material with the Masked blend mode and add a Landscape Visibility Mask to the material's Opacity Mask input.
Creating material instance
Once you have made all the terrain master materials, you can start creating instances for each of your terrain actors.
Create a new Material Instance by right-clicking in the Content Browser and selecting Materials and Textures -> Material Instance. Name it after your Terrain.

Select a master material with the correct number of layers, as a Material Instances Parent material.

Now copy all parameters to the corresponding layers:

Repeat this for every landscape. When you are done, assign the material instances to corresponding landscape actors. Now all your landscapes should be pitch-black.

Import layer weights
Make sure to set Layer Alphamap Type to Layered
- Select your landscape and switch to the Landscape mode.
- Open Paint tab.
You should see a list of your layers. Starting from the first layer, press the + button and select Weight-Blended Layer(normal). Save LayerInfo files to a folder of your choice. Repeat this for every layer.

Now your landscape should be filled with a base layer texture.
Right-click the second layer and press Import from file. In the navigation dialog, go to the MyExportFolder\Terrains\VK_4258\Terrain_7\WeightMaps and select the second layer image 2_VK_Rock_ALL_13.png. Repeat this for every other layer except the first one.

Tip: If your landscape has gray checkboard squares, your material ran out of texture sampler slots. Open the material and change Sampler Source of every texture sampler to Shared: Wrap. This will free some sampler slots.
Import visibility maps
Some terrains should have hidden parts or holes. RE generates a VisibilityMap.png for every terrain with transparency.
If any of your terrains have such maps, you'll need to:
- Duplicate terrains Material Instance and change its parent to a masked one with a Landscape Visibility Mask expression.
- Assign this Material Instance to the landscape's hole material socket.
- Switch to landscape mode and select the Sculpt tab.
- Press Visibility in the toolbar.
- In the tool's panel, right-click the Visibility layer and import the
VisibilityMap.png.

Tip: If after importing a visibility map, the terrain has black squares along the border, switch to paint mode, fill the first layer, and reimport weight maps.
Landscape result
Now you should see something like this:

Complex collisions
Skip this step if you don't have the
ComplexCollisions.txtfile in your export folder.
Open the MyExportFolder\ComplexCollisions.txt in any text editor. This file contains a list of meshes that need complex collisions.
Find each mesh from the file in UE4 Content Browser, and change these properties:
- Collision > Collision Complexity - Use Complex Collisions As Simple
- Collision > Customized Collision - Enable

Importing actors
- Click on the RE Plugin icon and select the Import actors... menu.
- In the dialog, select a *.T3D file.
Tip: Unreal Editor may freeze for a few seconds or even minutes, depending on the level. Importing light actors may take up to 15 minutes. Give UE some time.
Repeat this for every T3D file in your export folder. Make sure you don't import the same file twice!
Fix SpeedTrees
Skip this step if you don't have SpeedTrees
- Click on the RE Plugin icon and select the Fix SpeedTrees... menu.
- In the dialog, select the
SpeedTreeOverrides.txtfile.
RE Helper will assign correct material overrides to SpeedTree actors.
Result
At this point, you should have all the geometry of the level in the scene. The textures will look glossy, and some objects won't have any textures at all. It's Ok.

Materials
To fix the issues with textures, you need to make proper materials. This is the hardest part since UDK and UE4 have different lighting calculations.
In the Content Browser, go to the S1Game folder and turn on a filter to show only materials.
You should see a list of master materials or material templates. On the good side, most of these materials are shared across maps, so you need to create them only once.
Skip all the materials with a _leafs suffix. These are billboard materials for Speed Trees.
Converting UDK materials to UE4
If you are going to create your own materials, skip this step.
As an example, I will show how to convert MatTemplet0000.
Hover your mouse cursor on the MatTemplet0000 in Content Browser. You will see a tooltip with the material details.

There is a Path attribute: /Game/S1Game/S1_MI/Mat. Use it to find Tera material.
RE creates all objects in such a way that you can find original objects in Tera. If you ignore the /Game/S1Game part of the path, you get Tera path /S1_MI/Mat plus object name MatTemplet0000.
S1_MI is a GPK name this object lives in, and Mat is an internal GPK path. Switch to RE window and press File -> Open by name... and enter S1_MI. Then navigate to the Mat folder. You should see the MatTemplet0000 object. Select it.

There is a material graph in the center of the window. This graph describes material in UDK. In UDK, materials go from right to left, and in UE4 from left to right. Also, as I said earlier, UDK and UE4 have different light calculations and shading models. Thus there is no 1 to 1 conversion. For example, UE4 has no Specular Color and Speculat Power, but it has a Specular input that takes a scalar value from 0 to 1 to describe non-metallic surfaces' specularity. Some materials use custom shading model MLM_S1Phong that has additional inputs like Backface Color.
Now open the MatTemplet0000 in UE4:

You will see a material generated by RE. It contains all material parameters and a chain of Adds to connect everything. Delete all the nodes with Delete me description.
Now recreate the graph from RE in UE4:

Keep in mind that UE4 does not support a normal map compression with an alpha channel. As a workaround, RE saves normal maps' alpha channel as a separate texture with the _Alpha suffix and creates a separate texture parameter with the same suffix.
You don't need to recreate the exact copy of the material. Create one that looks good for you.
Tip: Some materials have non-opaque blending(Masked, Translucent, etc.). RE shows this info in the Properties panel:
Tip: Tera has copies of the same material in different packages. You can check if they are equal and copy-paste material expressions between these materials to save time.
Speed Trees
Skip this step if you don't have Speed Trees.
Now you need to create all billboard materials ending with the _leafs suffix.
Let's say your material is called MatTemplet0003A_leafs. Open the MatTemplet0003A material and copy all expressions. Now open the MatTemplet0003A_leafs and paste the expressions there. Now you need to make this material act like a billboard or sprite. To do that create this additional graph:
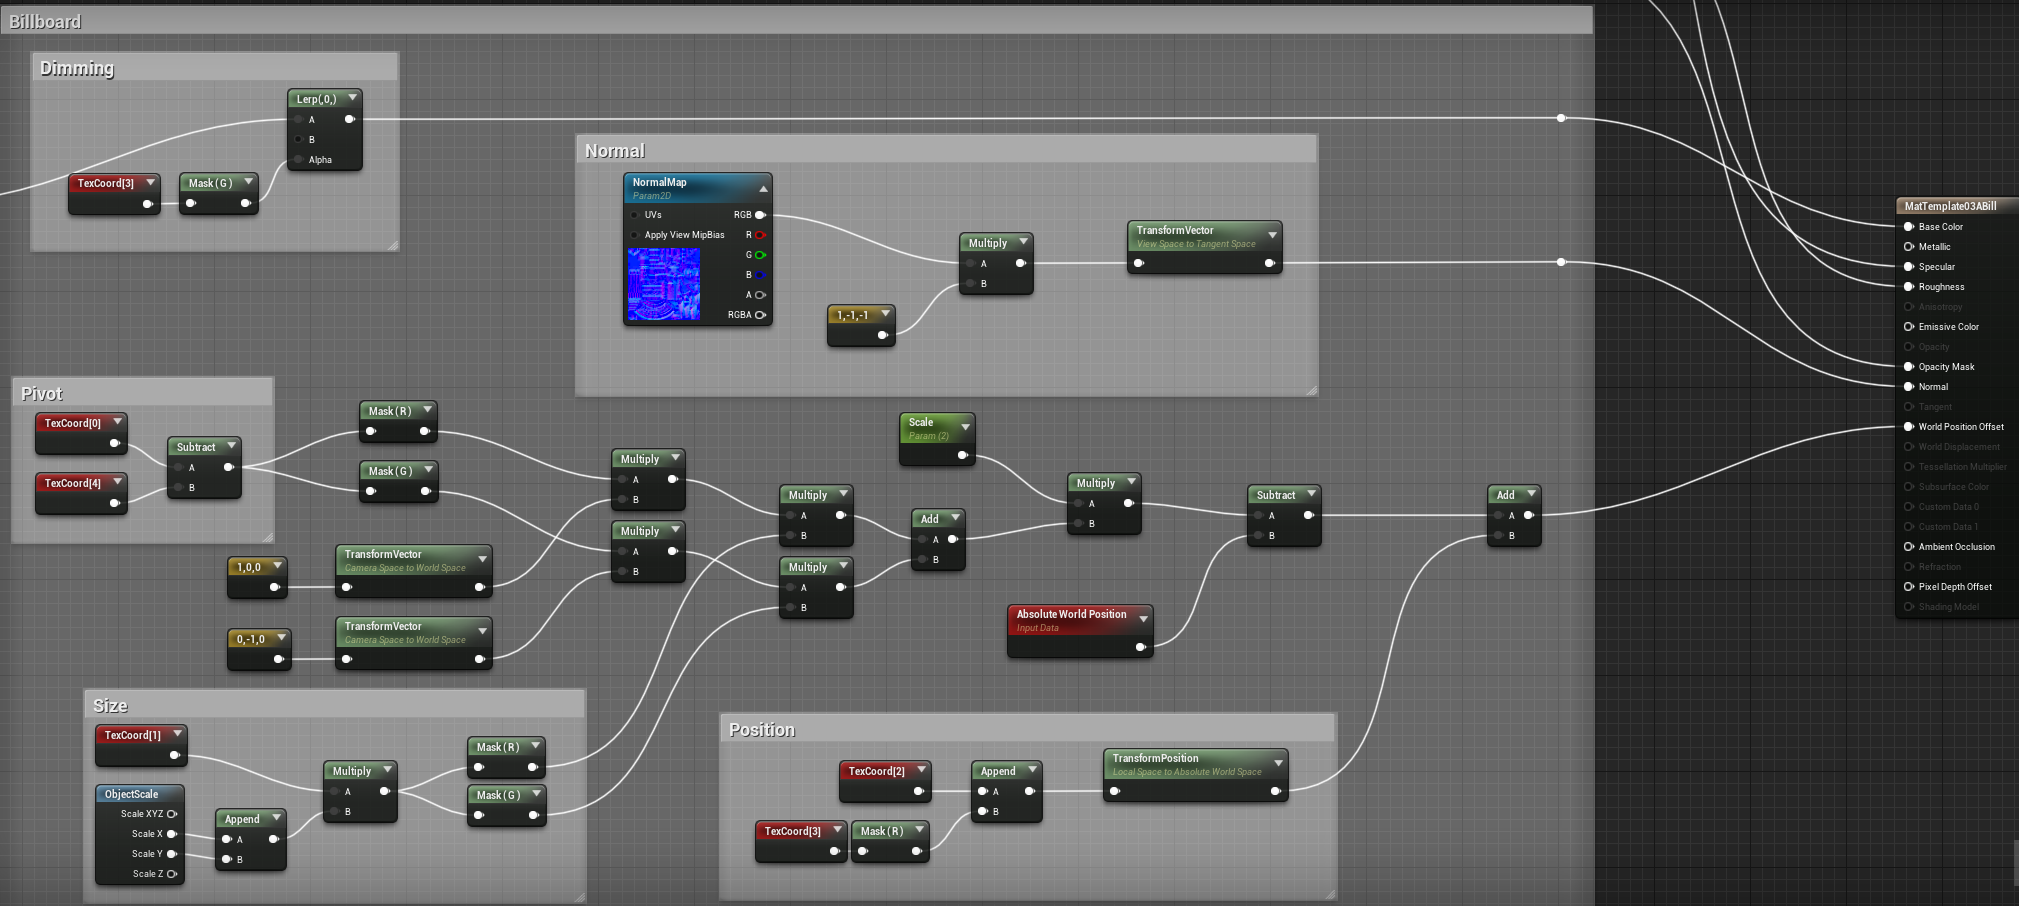
Now connect the Diffuse node to the Lerp in the Dimming section and replace the normal map with yours:

Now your Speed Tree should look like one in Tera:

Interp actor animations
Skip this step if you don't have Interp actors.
Type "InterpActor" in the World Outliner to find all your Interp Actors:

You will need to create interp animations for each of these actors. To find actors in RE split the actor name into two pieces:
VK_4258_InterpActor_1 -> VK_4258 and InterpActor_1. The first part is the GMP name, the second part is the object name. You can find all actors under the PersistentLevel object.

You can see the Physics parameter in the Properties panel on the right. This parameter describes the animation type. In this case, it is Rotating. And below there is a property called Rotation Rate. This property is shown in internal UDK angle values. To convert these values to Euler angles use this formula: Value x (180 / 32768). For example 218 x (180 / 32768) = 1.197. This value is the rotation rate you want to use in UE4. Now you can create a blueprint that will rotate your actor at this rate.
Aero Volumes
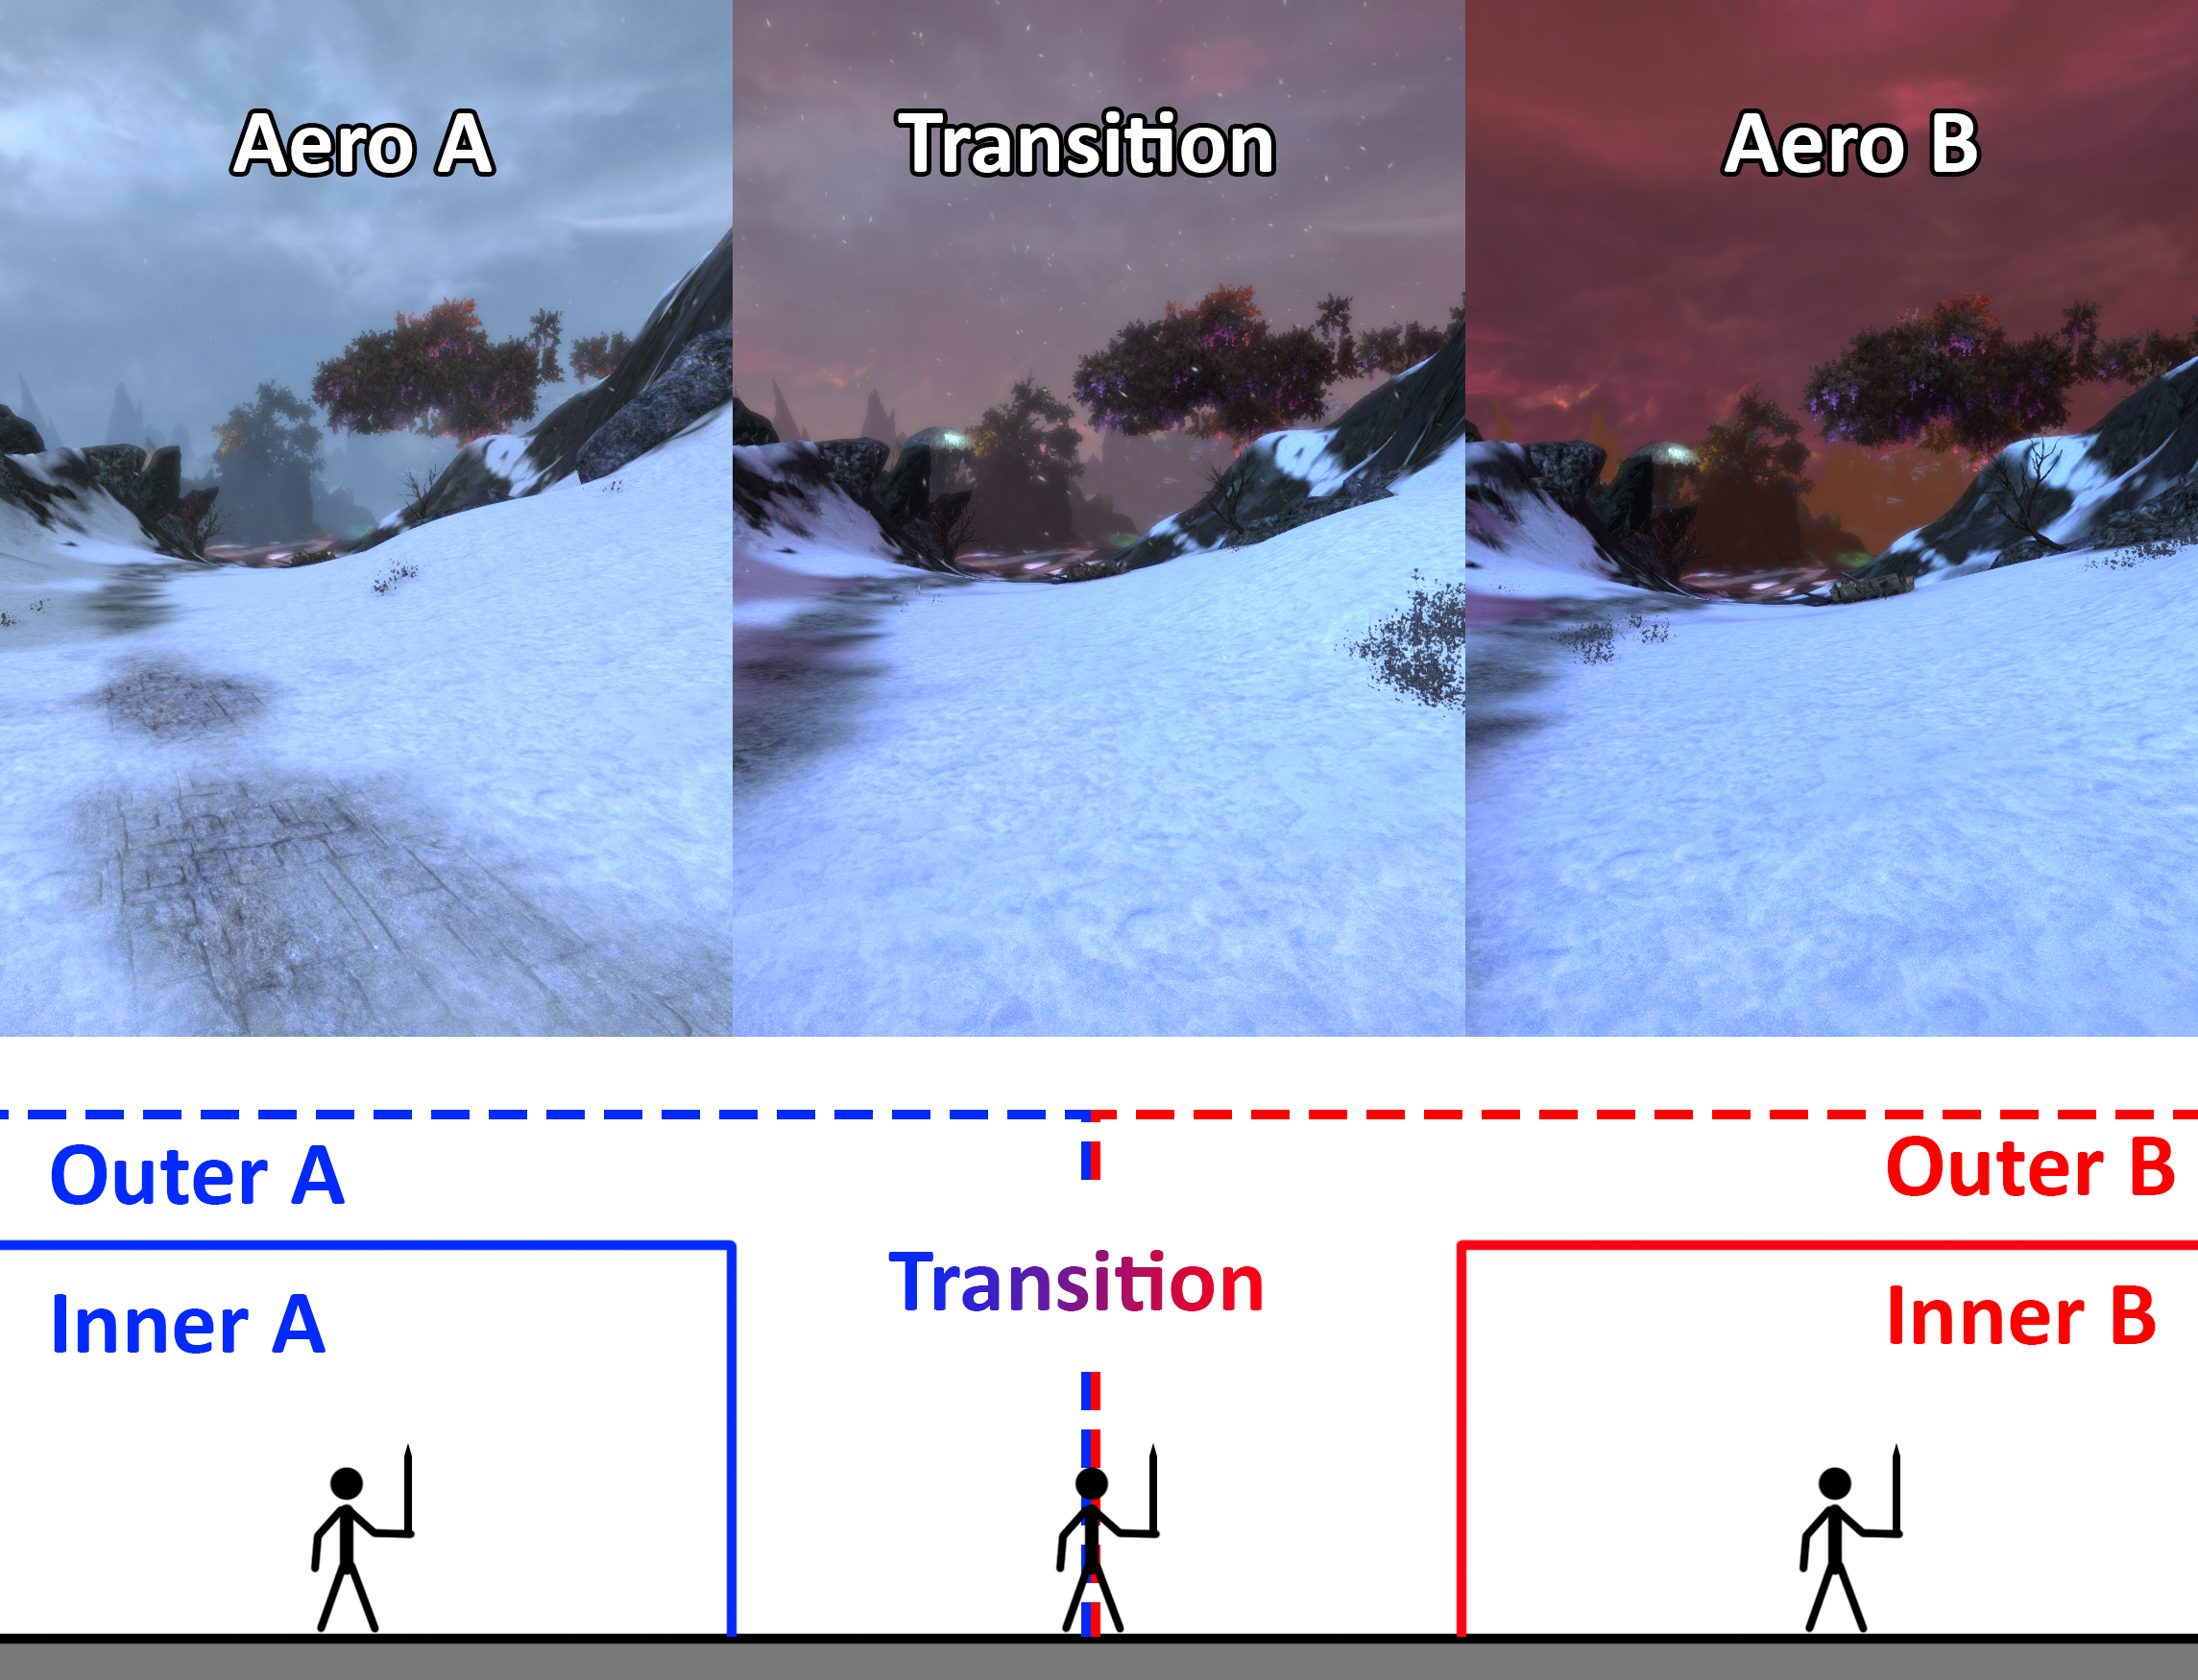
Unfortunately, Unreal Engine 4 does not have any alternative for these actors. Real Editor converts these volumes to basic Trigger volumes. To properly handle aero changes you will need to implement a custom blueprint/class that would interpolate light and post-process settings based on character position. Here is a small diagram showing how Aero Volumes interact:
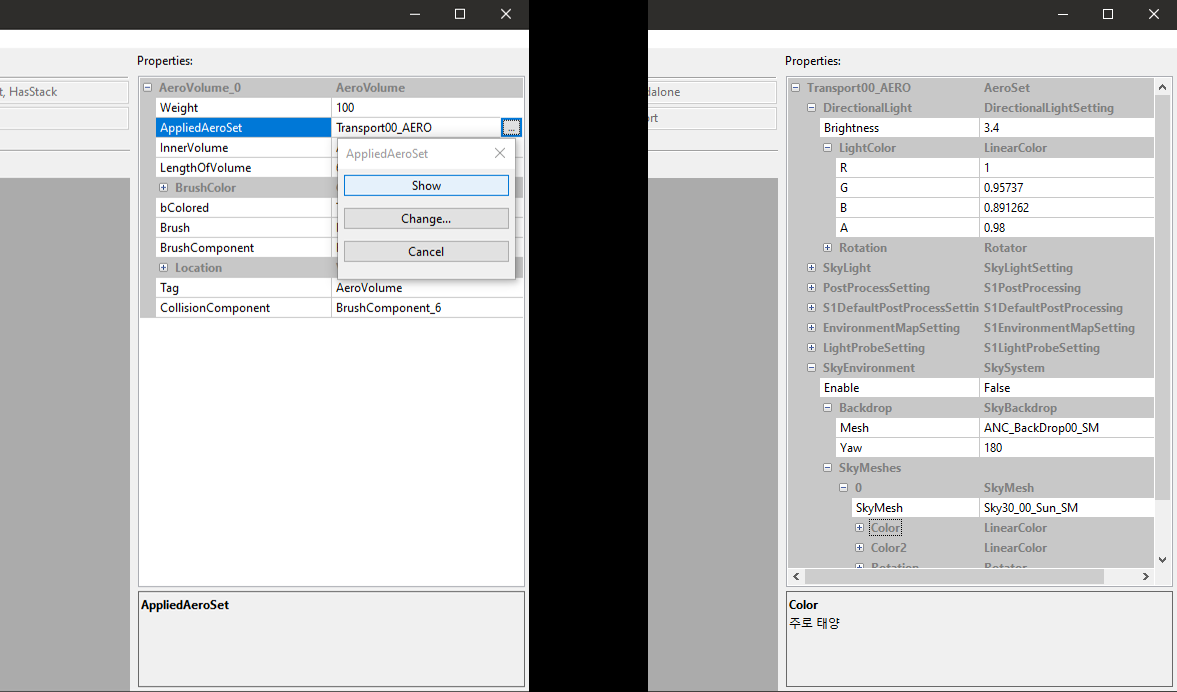
To find correct aero settings use Real Editor. Open the GMP with your Aero Volume and find the corresponding Actor(e.g., AeroVolume_0). Select the AppliedAeroSet property In the properties panel, click the text field, and press the ... button. In the opened dialog click Show.
Result and what to do next
From here you would want to fix lights since they work differently in UE4. Also, you could export the level's SkySystem from RE. Anyway, this is all for this guide. You can literally do anything with this level as long as you don't break the copyright law :)

Troubleshooting
-
Errors in the Errors.txt like
Error! Failed to load streamed level: SomeName.gmp! -
- Check if the particular file exists. If it does, export it separately to a different folder. If the GMP does not exist, ignore the error.
-
Some actors are misplaced or clipping.
-
- Check these objects in Tera. If they are OK in-game, send me the GMP name.
-
Some actors with multiple materials have odd textures.
-
- Find the actor in RE and check it's Materials property. Change your materials accordingly.
-
- Make sure the object's Normal map uses Normalmap(DXT5, BC5 on DX11) compression. Also, check that Material samples Normal Map as Normal texture.
-
Missing collisions
-
- Make sure actors don't have No Collisions profile in UE4. If they do, Tera level artists disabled collisions for that object. If not, make sure you've created all Complex Collisions from the
ComplexCollisions.txt.
- Make sure actors don't have No Collisions profile in UE4. If they do, Tera level artists disabled collisions for that object. If not, make sure you've created all Complex Collisions from the
-
- RE can't export Blocking Volumes and kDOP collisions.
-
Exported level is too big/small
-
- Use the Global Scale option in the export options to adjust the level scale.
-
Exported level coordinates are different from the
DataCenter.binor server'sDatasheetfolder -
- Set Global Scale to "1.0" in the Level Export Options window.
-
Landscape has some parts that are hidden in the game
-
- You forgot to import a VisiblityMap for this terrain. Import visibility maps
-
Landscape has a few gray squares
-
- Your material ran out of Texture Sampler sockets. Change Sampler Source to Shared: Wrap for every Texture Sample in your material.
-
Objects have no transparency
-
- Set the correct Blend Mode(i.e. Masked) for your material. You can find it the same way as described here: Converting UDK materials to UE4.


