Inference of DNNs with the DNNDK package examples - UviDTE-FPSoC/Zynq7000-dnn-inference GitHub Wiki
This page covers the execution deep neural network models using the DNNDK v3.1 package. The section reviews some of the examples the package has prepared to try out the DNNDK package tools.
Table of Contents
- Network Deployment of DNNDK host examples
Network Deployment of DNNDK host examples
There are two stages for developing deep learning applications, training and inference. The training stage is used to design a neural network for a specific task (such as image classification) using a huge amount of training data. The inference stage involves the deployment of the previously designed neural network to handle new input data not seen during the training stage. The DNNDK tool chain provides an innovative workflow to efficiently deploy deep learning inference applications on the DPU.
In this section we guide you through the creation of an inference application, having an already trained model. In this case we use the already existing models in the /<dnndk-package-download directory>/xilinx_dnndk_v3.1/host/models/ directory, both for Caffe and TensorFlow frameworks. The steps followed to generate the application are now listed down.
The examples the DNNDK package provides cannot be executed in the custom created PetaLinux project of this repository. They are compiled to use with a ZedBoard image Xilinx provides here. To mount this ZedBoard image on the SD card, go tho the DNNDK v3.1 User Guide section Flash the OS Image to the SD Card at page 17.
- Compress the neural network model. This is a method to reduce the size of the network by executing pruning or quantization. Pruning consists in modifying the weights that have very close to zero with a zero. This means less network connections are going to be executed during inference, reducing the computational needs to run the models. Quantization, on the other hand, modifies the weight, biases and activation bit width of the models from a 32-bit floating point to fixed point datatype. When working with FPGA, this datatype can be custom made, and according to several studies the bit width could go down to almost 5-bits with no accuracy loss of the DNN. In this case, as the DPU internal variables are represented with signed 8-bit integers, quantization has to be performed to 8-bit width. Both of this operations have the capability of highly reducing the memory space needed to execute a DNN while barely reducing the efficiency.
NOTE: The pruning tool is not supported in the DNNDK v3.1 open source release, and a license is needed to try the pruning tool.
-
Compile the neural network model. Used to create the binary file of the model that can be later on called by the ZedBoard application we create.
-
Program with DNNDK APIs.
-
Compile the hybrid DPU application.
-
Run the hybrid DPU executable.
The execution of all the examples needs a calibration data set of 100 to 1000 images that can be downloaded from the ImageNet dataset here. In this page you can download a 147 GB file with training images, which you don't need for the DNNDK package, or a 6.74 GB file with validation images. This smaller set should be downloaded, and can be done here. The .tar arquive you can download here contains up to 50000 images. The problem with this images is that there is no .txt file with them that contains a list of all the images with no labels. We are going to create this list with a python script. The content of this file would be the following:
# -*- coding: utf-8 -*-

def main():

    # Open the file for writing and create it if it doesn't exist
    f = open("imagenet_calib.txt","w+")

    # Write the name of the images from 1 to 1000
    i = 1
    while i<10:
        f.write("ILSVRC2012_val_0000000{}.JPEG\n".format(i))
        i = i + 1

    while i<100:
        f.write("ILSVRC2012_val_000000{}.JPEG\n".format(i))
        i = i + 1

    while i<1000:
        f.write("ILSVRC2012_val_00000{}.JPEG\n".format(i))
        i = i + 1

    while i<5001:
        f.write("ILSVRC2012_val_0000{}.JPEG\n".format(i))
        i = i + 1

    #Close the file when finished
    f.close()


if __name__== "__main__":
    main()
You can copy this text to a <name_of_the_file>.py file and create the imagenet_calib.txt file by running the command python <name_of_the_file>.py in the terminal.
To download both the validation data list and training data list for both imagenet datasets, with lists containing the labels, is using the script here.
TensorFlow version of resnet_v1_50
This section guides you through the compression and compilation process of an inference application for a resnet_v1_50 model in the TensorFlow framework. We will be using the already existing scripts in the /<xilinx-dnndk-v3.1-download_directory/xilinx_dnndk_v3.1/host/models/TensoFlow/resnet_v1_50 directory. This example follows the steps of the DNNDK User Guide.
This example's directory contains several scripts. First of all it has the pre-trained model of resnet_v1_50 in the float_graph folder. The files within this folder are used by the freeze_graph.sh to generate the .pb file used as input of the quantization tool. This file's content is now displayed.
#!/bin/sh
set -e

freeze_graph \
  --input_graph=./float_graph/resnet_v1_50_inf_graph.pb \
  --input_checkpoint=./float_graph/resnet_v1_50.ckpt \
  --input_binary=true \
  --output_graph=./frozen_resnet_v1_50.pb \
  --output_node_names=resnet_v1_50/predictions/Reshape_1
In this script we have the output_node_names field to fill up, and in future scripts, we will also have the input_node_names one. To obtain an estimation of what names you should put in here, run the following command.
$ cd /<xilinx-dnndk-v3.1-download_directory/xilinx_dnndk_v3.1/host/models/TensoFlow/resnet_v1_50/float_graph

$ decent_q inspect --input_frozen_graph resnet_v1_50_inf_graph.pb
The result should be similar to the following, where the possible input and output node names that can be used are indicated.
Op types used: 533 Const, 267 Assign, 267 VariableV2, 267 Identity, 70 Add, 54 Conv2D, 54 Mul, 54 TruncatedNormal, 53 FusedBatchNorm, 49 Relu, 45 Fill, 4 MaxPool, 4 Pad, 2 Reshape, 1 BiasAdd, 1 Mean, 1 Placeholder, 1 Shape, 1 Softmax, 1 Squeeze

Found 1 possible inputs: (name=input, type=float(1), shape=[?,224,224,3])
Found 1 possible outputs: (name=resnet_v1_50/predictions/Reshape_1, op=Reshape)
To execute this script, execute the following commands. It is not necessary to execute them though, as the directory already contains the output frozen_resnet_v1_50.pb file needed by the quantization tool.
$ cd /<xilinx-dnndk-v3.1-download_directory/xilinx_dnndk_v3.1/host/models/TensoFlow/resnet_v1_50

$ source activate decent

$ sh freeze_graph.sh
Prepare floating point frozen model and dataset for resnet50 example
The image pre-processing is not included in the .pb output of the frozen graph. The application is going to need this pre-processing though, therefore it is included in the resnet_v1_50_input_fn.py python script. This script crops the images to a 224x224 size and performs mean_image_subtraction.
from resnet_v1_50_preprocessing import *

def eval_input(iter, eval_image_dir, eval_image_list, class_num, eval_batch_size):
  images = []
  labels = []
  line = open(eval_image_list).readlines()
  for index in range(0, eval_batch_size):
    curline = line[iter * eval_batch_size + index]
    [image_name, label_id] = curline.split(' ')
    image = cv2.imread(eval_image_dir + image_name)
    image = central_crop(image, 224, 224)
    image = mean_image_subtraction(image, MEANS)
    images.append(image)
    labels.append(int(label_id))
  lb = preprocessing.LabelBinarizer()
  lb.fit(range(0, class_num))
  labels = lb.transform(labels)
  return {"input": images, "labels": labels}

# calib_image_dir = "../../calibration_data/imagenet_images/"
calib_image_dir = "/media/arroas/HDD/MinhasCousas/EEI/Mestrado/2_Curso/TFM/Inference_Images/calibration_data/imagenet_images/"
# calib_image_list = "../../calibration_data/imagenet_calib.txt"
calib_image_list = "/media/arroas/HDD/MinhasCousas/EEI/Mestrado/2_Curso/TFM/Inference_Images/calibration_data/imagenet_calib.txt"
calib_batch_size = 50
def calib_input(iter):
  images = []
  line = open(calib_image_list).readlines()
  for index in range(0, calib_batch_size):
    curline = line[iter * calib_batch_size + index]
    calib_image_name = curline.strip()
    image = cv2.imread(calib_image_dir + calib_image_name)
    image = central_crop(image, 224, 224)
    image = mean_image_subtraction(image, MEANS)
    images.append(image)
  return {"input": images}
The crop and mean_image_subtraction functions are defined in the resnet_v1_50_preprocessing.py script.
import cv2
from sklearn import preprocessing

_R_MEAN = 123.68
_G_MEAN = 116.78
_B_MEAN = 103.94

MEANS = [_B_MEAN,_G_MEAN,_R_MEAN]

def mean_image_subtraction(image, means):
  B, G, R = cv2.split(image)
  B = B - means[0]
  G = G - means[1]
  R = R - means[2]
  image = cv2.merge([R, G, B])
  return image

def central_crop(image, crop_height, crop_width):
  image_height = image.shape[0]
  image_width = image.shape[1]
  offset_height = (image_height - crop_height) // 2
  offset_width = (image_width - crop_width) // 2
  return image[offset_height:offset_height + crop_height, offset_width:
               offset_width + crop_width]
In this script you only need to modify the calib_image_dir and the calib_image_list to the directory where you downloaded your images.
Resnet50 example Quantization
To run quantization, execute the decent_q.sh script with the decent conda environment activated.
sh decent_q.sh
This script configures the quantization tool, indicating the previously created frozen graph as an input, with the image size after the pre-processing and the input_fn file that creates the pre-procesing of the images.
decent_q quantize \
    --input_frozen_graph frozen_resnet_v1_50.pb \
    --input_nodes input \
    --input_shapes ?,224,224,3 \
    --output_nodes resnet_v1_50/predictions/Reshape_1 \
    --input_fn resnet_v1_50_input_fn.calib_input \
    --method 1 \
    --gpu 0 \
    --calib_iter 10 \
    --output_dir ./quantize_results \
Note that the input_fn graph is a resnet_v1_50_input_fn.py file in our directory, but in the script above is indicated as a resnet_v1_50_input_fn.calib_input file.
Executing this file though will generate an error if you have downloaded images from the link we previously indicated. The reason is that the resnet_v1_50_input_fn.py script shown before has a crop function with size 224x224, while some of the images in the database of the link are smaller. This will create an error when performing calibration in the quantization script.
To avoid this problem follow these steps.
- In the
resnet_v1_50_input_fn.pyyou have selected a batch size of 50, and in thedecent_q.sh, a number of 10 calibration iterations. This means that you need a total of 500 images to calibrate the model. - Go to the images list created with the python script shown in section Network Deployment of DNNDK host examples, and erase the names with the numbers
87, 157, 188, 199, 436, 504. This way you will ensure that the first 500 images of the list are big enough. - If you want to use more images for you calibration, check that all the images have a size bigger than
224x224. - Execute the quantization tool,
sh decent_q.sh.
Once the quantization has been performed, the output should be similar to this one:
(decent) arroas@arroas-GL65-9SEK:~/Xilinx-AI_Tools/xilinx_dnndk_v3.1/host_x86/models/tensorflow/resnet_v1_50$ sh decent_q.sh
INFO: Checking Float Graph...
INFO: Float Graph Check Done.
INFO: Calibrating for 10 iterations...
100% (10 of 10) |#############################################| Elapsed Time: 0:08:53 Time:  0:08:53
INFO: Calibration Done.
INFO: Generating Deploy Model...
[DEPLOY WARNING] Node resnet_v1_50/predictions/Reshape_1(Type: Reshape) is not quantized and cannot be deployed to DPU,because it has unquantized input node: resnet_v1_50/predictions/Softmax. Please deploy it on CPU.
INFO: Deploy Model Generated.
********************* Quantization Summary *********************
INFO: Output:
  quantize_eval_model: ./quantize_results/quantize_eval_model.pb
  deploy_model: ./quantize_results/deploy_model.pb
The quantized model will be saved to the quantize_results folder, within the directory of the example.
Resnet50 example Compilation
To compile the example for ZedBoard, execute the dnnc_ZedBoard.sh script:
sh dnnc_ZedBoard.sh
The content of this script should be the following:
#!/usr/bin/env bash

net="resnet_v1_50"
CPU_ARCH="arm64"
DNNC_MODE="debug"
dnndk_board="ZedBoard"
dnndk_dcf="../../../dcf/ZedBoard.dcf"

echo "Compiling Network ${net}"

# Work space directory
work_dir=$(pwd)

# Path of caffe quantization model
model_dir=${work_dir}/quantize_results
# Output directory
output_dir="dnnc_output"

tf_model=${model_dir}/deploy_model.pb

DNNC=dnnc

# Get DNNDK config info
if [ ! -f /etc/dnndk.conf ]; then
    echo "Error: Cannot find /etc/dnndk.conf"
    exit 1
else
    tmp=$(grep "DNNDK_VERSION=" /etc/dnndk.conf)
    dnndk_version=${tmp#DNNDK_VERSION=}
    dnndk_version=${dnndk_version#v}
    echo "DNNDK      : $dnndk_version"
    echo "Board Name : $dnndk_board"
    echo "DCF file   : $dnndk_dcf"
fi

if [ ! -d "$model_dir" ]; then
    echo "Can not found directory of $model_dir"
    exit 1
fi

[ -d "$output_dir" ] || mkdir "$output_dir"

echo "CPU Arch   : $CPU_ARCH"
echo "DNNC Mode  : $DNNC_MODE"
echo "$(dnnc --version)"
$DNNC   --parser=tensorflow                         \
       --frozen_pb=${tf_model}                     \
       --output_dir=${output_dir}                  \
       --dcf=${dnndk_dcf}                          \
       --mode=${DNNC_MODE}                         \
       --cpu_arch=${CPU_ARCH}                      \
       --net_name=${net}
You shouldn't need to make any changes to this script. The results of this script should be the files with the kernels of the DPU, for all the layers supported by it, and the kernels of the CPU, for all the layers not supported. The communication between the kernels of DPU and CPU has to be done manually in the application script. In this case, the output of the dnnc_ZedBoard.sh should be the following:
(decent) arroas@arroas-GL65-9SEK:~/Xilinx-AI_Tools/xilinx_dnndk_v3.1/host_x86/models/tensorflow/resnet_v1_50$ sh dnnc_ZedBoard.sh
Compiling Network resnet_v1_50
DNNDK      : 3.1
Board Name : ZedBoard
DCF file   : ../../../dcf/ZedBoard.dcf
CPU Arch   : arm64
DNNC Mode  : debug
dnnc version v3.00
DPU Target : v1.4.0
Build Label: Aug  9 2019 05:23:25
Copyright @2019 Xilinx Inc. All Rights Reserved.

[DNNC][Warning] layer [resnet_v1_50_SpatialSqueeze] (type: Squeeze) is not supported in DPU, deploy it in CPU instead.
[DNNC][Warning] layer [resnet_v1_50_predictions_Softmax] (type: Softmax) is not supported in DPU, deploy it in CPU instead.

DNNC Kernel topology "resnet_v1_50_kernel_graph.jpg" for network "resnet_v1_50"
DNNC kernel list info for network "resnet_v1_50"
                               Kernel ID : Name
                                       0 : resnet_v1_50_0
                                       1 : resnet_v1_50_1

                             Kernel Name : resnet_v1_50_0
--------------------------------------------------------------------------------
                             Kernel Type : DPUKernel
                               Code Size : 0.99MB
                              Param Size : 24.35MB
                           Workload MACs : 6964.51MOPS
                         IO Memory Space : 2.25MB
                              Mean Value : 0, 0, 0,
                              Node Count : 58
                            Tensor Count : 59
                    Input Node(s)(H*W*C)
            resnet_v1_50_conv1_Conv2D(0) : 224*224*3
                   Output Node(s)(H*W*C)
           resnet_v1_50_logits_Conv2D(0) : 1*1*1000


                             Kernel Name : resnet_v1_50_1
--------------------------------------------------------------------------------
                             Kernel Type : CPUKernel
                    Input Node(s)(H*W*C)
             resnet_v1_50_SpatialSqueeze : 1*1*1000
                   Output Node(s)(H*W*C)
        resnet_v1_50_predictions_Softmax : 1*1*1000
The result files would be a .elf kernel, resnet_v1_50_0, to deploy in the DPU, and the resnet_v1_50_1, which has to be created by the user and deployed in the CPU of your target board.
TensorFlow version of inception_v1
This section guides you through the steps to quantize and compile inception_v1 model in the TensorFlow framework. We will be using the already existing scripts in the /<xilinx-dnndk-v3.1-download_directory/xilinx_dnndk_v3.1/host/models/TensoFlow/resnet_v1_50 directory. This example follows the steps of the DNNDK User Guide.
This example's directory contains several scripts. First of all it has the pre-trained model of inception_v1 in the float_graph folder. The files within this folder are used by the freeze_graph.sh to generate the .pb file used as imput of the quantization tool. This file's content is now displayed.
#!/bin/sh
set -e

freeze_graph \
  --input_graph=./float_graph/inception_v1_inf_graph.pb \
  --input_checkpoint=./float_graph/inception_v1.ckpt \
  --input_binary=true \
  --output_graph=./frozen_inception_v1.pb \
  --output_node_names=InceptionV1/Logits/Predictions/Reshape_1
To check the input and output node names, which are necesary in this and future scripts, run the following command.
$ cd /<xilinx-dnndk-v3.1-download_directory/xilinx_dnndk_v3.1/host/models/TensoFlow/inception_v1/float_graph

$ decent_q inspect --input_frozen_graph inception_v1_inf_graph.pb
The result should be the following:
Op types used: 529 Const, 231 Identity, 230 Assign, 230 VariableV2, 58 Conv2D, 58 Mul, 58 TruncatedNormal, 58 Add, 57 FusedBatchNorm, 57 Relu, 13 MaxPool, 9 ConcatV2, 2 Reshape, 1 BiasAdd, 1 Fill, 1 AvgPool, 1 Placeholder, 1 Shape, 1 Softmax, 1 Squeeze

Found 1 possible inputs: (name=input, type=float(1), shape=[?,224,224,3])
Found 1 possible outputs: (name=InceptionV1/Logits/Predictions/Reshape_1, op=Reshape)
To execute the script that freezes the model, use the following commands. It is not necessary to execute it though, as the directory already contains the output frozen_inception_v1.pb file needed by the quantization tool.
$ cd /<xilinx-dnndk-v3.1-download_directory/xilinx_dnndk_v3.1/host/models/TensoFlow/resnet_v1_50

$ source activate decent

$ sh freeze_graph.sh
Once this operation has finished, you can evaluate the frozen_inception_v1.pb freezed model with the evaluate_frozen_graph.sh.
#!/bin/sh

set -e

# Please set your imagenet validation dataset path here,
IMAGE_DIR=/media/arroas/HDD/MinhasCousas/EEI/Mestrado/2_Curso/TFM/Inference_Images/calibration_data/imagenet_images/
IMAGE_LIST=/media/arroas/HDD/MinhasCousas/EEI/Mestrado/2_Curso/TFM/Inference_Images/calibration_data/val.txt

# Please set your batch size settings here, #IMAGES = VAL_BATCHES * BATCH_SIZE
# Commonly there are 5w image in total for imagenet validation dataset
EVAL_BATCHES=10     #1000
BATCH_SIZE=50

python inception_v1_eval.py \
  --input_frozen_graph frozen_inception_v1.pb \
  --input_node input \
  --output_node InceptionV1/Logits/Predictions/Reshape_1 \
  --eval_batches $EVAL_BATCHES \
  --batch_size $BATCH_SIZE \
  --eval_image_dir $IMAGE_DIR \
  --eval_image_list $IMAGE_LIST \
  --gpu 0
NOTE: the val.txt with the image names and labels can be downloaded from the link indicated in section Network Deployment of DNNDK host examples
Evaluation should be run with the 1000 batches, but we don't have that many images. The results with 10 batches are the following.
Use tf.gfile.GFile.
Start Evaluation for 10 Batches...
100% (10 of 10) |#############################################| Elapsed Time: 0:00:20 Time:  0:00:20
Accuracy: Top1: 0.6320000052452087, Top5: 0.8519999921321869
Prepare floating point frozen model and dataset for inceptionv1 example
The image pre-processing is not included in the .pb output of the frozen graph. The application is going to need this pre-processing, therefore it is included in the inception_v1_input_fn.py python script. This script crops the images to a 224x224 size and performs mean_substraction, but the user can define any pre-procesing sequence they need.
from inception_v1_preprocessing import *

def eval_input(iter, eval_image_dir, eval_image_list, class_num, eval_batch_size):
  images = []
  labels = []
  line = open(eval_image_list).readlines()
  for index in range(0, eval_batch_size):
    curline = line[iter * eval_batch_size + index]
    [image_name, label_id] = curline.split(' ')
    image = cv2.imread(eval_image_dir + image_name)
    image = central_crop(image, 224, 224)
    image = mean_image_subtraction(image, MEANS)
    image = normalize(image)
    images.append(image)
    labels.append(int(label_id) + 1)
  lb = preprocessing.LabelBinarizer()
  lb.fit(range(0, class_num))
  labels = lb.transform(labels)
  return {"input": images, "labels": labels}


# calib_image_dir = "../../calibration_data/imagenet_images/"
calib_image_dir = "/media/arroas/HDD/MinhasCousas/EEI/Mestrado/2_Curso/TFM/Inference_Images/calibration_data/imagenet_images/"
# calib_image_list = "../../calibration_data/imagenet_calib.txt"
calib_image_list = "/media/arroas/HDD/MinhasCousas/EEI/Mestrado/2_Curso/TFM/Inference_Images/calibration_data/imagenet_calib.txt"
calib_batch_size = 1
def calib_input(iter):
  images = []
  line = open(calib_image_list).readlines()
  for index in range(0, calib_batch_size):
    curline = line[iter * calib_batch_size + index]
    calib_image_name = curline.strip()
    image = cv2.imread(calib_image_dir + calib_image_name)
    image = central_crop(image, 224, 224)
    image = mean_image_subtraction(image, MEANS)
    image = normalize(image)
    images.append(image)
  return {"input": images}
In this script, it is important to specify the directory where the images you downloaded in section Network Deployment of DNNDK host examples are located. This images have a problem that was already indicated with the resnet_v1_50 example. Some of them are smaller than 224x224 pixels, therefore an error occurs when performing the crop function to those images. For the first 500 images, the list of images you should get rid of is 87, 157, 188, 199, 436, 504. If you use any of the remaining 49500 images that you can download, have in mind that there can be more images smaller than the required size for this crop function.
The functions of this script are defined in the inception_v1_preprocessing.py script.
import cv2
from sklearn import preprocessing

_R_MEAN = 0
_G_MEAN = 0
_B_MEAN = 0

MEANS = [_B_MEAN,_G_MEAN,_R_MEAN]

def mean_image_subtraction(image, means):
  B, G, R = cv2.split(image)
  B = B - means[0]
  G = G - means[1]
  R = R - means[2]
  image = cv2.merge([R, G, B])
  return image

def central_crop(image, crop_height, crop_width):
  image_height = image.shape[0]
  image_width = image.shape[1]

  offset_height = (image_height - crop_height) // 2
  offset_width = (image_width - crop_width) // 2

  return image[offset_height:offset_height + crop_height, offset_width:
               offset_width + crop_width]

def normalize(image):
  image=image/256.0
  image=image-0.5
  image=image*2
  return image
Inceptionv1 example Quantization
To run quantization, execute the decent_q.sh script.
sh decent_q.sh
The content of this script should look like below.
decent_q quantize \
  --input_frozen_graph frozen_inception_v1.pb \
  --input_nodes input \
  --input_shapes ?,224,224,3 \
  --output_nodes InceptionV1/Logits/Predictions/Reshape_1 \
  --input_fn inception_v1_input_fn.calib_input \
  --method 1 \
  --gpu 0 \
  --calib_iter 100 \
It is clearly seen that the input and output nodes are filed with the names obtained from running the decent_q inspect command. The calib_iter field indicates how many iterations are made. As we are using a batch size of 1, the total images needed for the calibration process are 100. This is better explained in section TensorFlow model's third step.
The output you get from a succesfull quantization should look like this.
INFO: Checking Float Graph...
INFO: Float Graph Check Done.
INFO: Calibrating for 100 iterations...
100% (100 of 100) |###########################################| Elapsed Time: 0:00:39 Time:  0:00:39
INFO: Calibration Done.
INFO: Generating Deploy Model...
[DEPLOY WARNING] Node InceptionV1/Logits/Predictions/Reshape_1(Type: Reshape) is not quantized and cannot be deployed to DPU, because it has unquantized input node: InceptionV1/Logits/Predictions/Softmax. Please deploy it on CPU.
INFO: Deploy Model Generated.
********************* Quantization Summary *********************
INFO: Output:
  quantize_eval_model: ./quantize_results/quantize_eval_model.pb
  deploy_model: ./quantize_results/deploy_model.pb
Once quantization has been performed, we can evaluate the model again, to see if there is any significant loss in accuracy. We would now use the evaluate_quantized_graph.sh script.
#!/bin/sh

set -e

# Please set your imagenet validation dataset path here,
IMAGE_DIR=/media/arroas/HDD/MinhasCousas/EEI/Mestrado/2_Curso/TFM/Inference_Images/calibration_data/imagenet_images/
IMAGE_LIST=/media/arroas/HDD/MinhasCousas/EEI/Mestrado/2_Curso/TFM/Inference_Images/calibration_data/val.txt

# Please set your batch size settings here, #IMAGES = VAL_BATCHES * BATCH_SIZE
# Commonly there are 5w image in total for imagenet validation dataset
EVAL_BATCHES=10		#1000
BATCH_SIZE=50

python inception_v1_eval.py \
  --input_frozen_graph quantize_results/quantize_eval_model.pb \
  --input_node input \
  --output_node InceptionV1/Logits/Predictions/Reshape_1 \
  --eval_batches $EVAL_BATCHES \
  --batch_size $BATCH_SIZE \
  --eval_image_dir $IMAGE_DIR \
  --eval_image_list $IMAGE_LIST \
  --gpu 0
NOTE: the val.txt with the image names and labels can be downloaded from the link indicated in section Network Deployment of DNNDK host examples
The val.text file has to contain a list with all the image names and the labels of each image. The result of the evaluation is now showed, although it would be better to use the 50000 images, and not only 500.
Start Evaluation for 10 Batches...
100% (10 of 10) |#############################################| Elapsed Time: 0:00:29 Time:  0:00:29
Accuracy: Top1: 0.6020000040531158, Top5: 0.8339999973773956
| Accuracy | Frozen Graph | Quantized Graph |
|---|---|---|
| Top1 | 0.6320000052452087 | 0.6020000040531158 |
| Top5 | 0.8519999921321869 | 0.8339999973773956 |
A comparison between the frozen and quantized graph is made in the previous table, and the accuracy drop is lower than a 5%.
After evaluation, we perform the dump operation, to compare the DPU results to the CPU/GPU ones. To dump the quantized model, run the dump.sh script. The input of this tool is the quantization output used previously in the evaluation process. For the input_fn script, the best idea is to use the same script as for quantization, but changing the batch size to 1.
decent_q dump \
  --input_frozen_graph quantize_results/quantize_eval_model.pb \
  --input_fn resnet_v1_50_input_fn.calib_input \
  --max_dump_batches 2 \
  --dump_float 0 \
  --output_dir ./quantize_results \
The output of runing the dump functionality, (decent) $ sh dump.sh, is now shown.
INFO: Start Dumping for 2 batches
INFO: Dumping for batch: 1/2 ...
INFO: Dumping for batch: 2/2 ...
INFO: Dump results are saved in ./quantize_results.
Inceptionv1 example Compilation
To compile the example for ZedBoard, execute the dnnc_ZedBoard.sh script:
sh dnnc_ZedBoard.sh
The content of this script should be the following:
#!/usr/bin/env bash

net="inception_v1"
CPU_ARCH="arm32"
DNNC_MODE="debug"
dnndk_board="ZedBoard"
dnndk_dcf="../../../dcf/custom_zedboard.dcf"

echo "Compiling Network ${net}"

# Work space directory
work_dir=$(pwd)

# Path of caffe quantization model
model_dir=${work_dir}/quantize_results
# Output directory
output_dir="dnnc_output"

tf_model=${model_dir}/deploy_model.pb

DNNC=dnnc

# Get DNNDK config info
if [ ! -f /etc/dnndk.conf ]; then
    echo "Error: Cannot find /etc/dnndk.conf"
    exit 1
else
    tmp=$(grep "DNNDK_VERSION=" /etc/dnndk.conf)
    dnndk_version=${tmp#DNNDK_VERSION=}
    dnndk_version=${dnndk_version#v}
    echo "DNNDK      : $dnndk_version"
    echo "Board Name : $dnndk_board"
    echo "DCF file   : $dnndk_dcf"
fi

if [ ! -d "$model_dir" ]; then
    echo "Can not found directory of $model_dir"
    exit 1
fi

[ -d "$output_dir" ] || mkdir "$output_dir"

echo "CPU Arch   : $CPU_ARCH"
echo "DNNC Mode  : $DNNC_MODE"
echo "$(dnnc --version)"
$DNNC   --parser=tensorflow                         \
       --frozen_pb=${tf_model}                     \
       --output_dir=${output_dir}                  \
       --dcf=${dnndk_dcf}                          \
       --mode=${DNNC_MODE}                         \
       --cpu_arch=${CPU_ARCH}                      \
       --net_name=${net}
After compilation is succesful, the results should be sabed to the dnnc_output folder. The message printed in the terminal is the following.
USE DLET TO CREATE CONFIGURATION DCF
Compiling Network inception_v1
DNNDK : 3.1
Board Name : ZedBoard
DCF file : ../dcf/custom_zedboard.dcf
CPU Arch : arm32
DNNC Mode : debug
dnnc version v3.00
DPU Target : v1.4.0
Build Label: Aug 9 2019 05:23:25
Copyright @2019 Xilinx Inc. All Rights Reserved.
[DNNC][Warning] layer [InceptionV1_Logits_SpatialSqueeze] (type: Squeeze) is not supported in DPU, deploy it in CPU instead.
[DNNC][Warning] layer [InceptionV1_Logits_Predictions_Softmax] (type: Softmax) is not supported in DPU, deploy it in CPU instead.
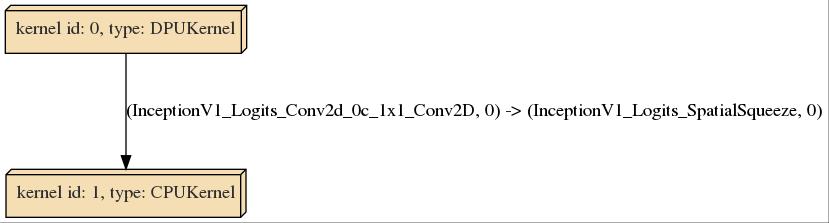
DNNC Kernel topology "inception_v1_kernel_graph.jpg" for network "inception_v1"
DNNC kernel list info for network "inception_v1"
Kernel ID : Name
0 : inception_v1_0
1 : inception_v1_1
Kernel Name : inception_v1_0
--------------------------------------------------------------------------------
Kernel Type : DPUKernel
Code Size : 0.27MB
Param Size : 6.31MB
Workload MACs : 2996.75MOPS
IO Memory Space : 0.76MB
Mean Value : 0, 0, 0,
Node Count : 76
Tensor Count : 110
Input Node(s)(H*W*C)
InceptionV1_InceptionV1_Conv2d_1a_7x7_Conv2D(0) : 224*224*3
Output Node(s)(H*W*C)
InceptionV1_Logits_Conv2d_0c_1x1_Conv2D(0) : 1*1*1001
Kernel Name : inception_v1_1
--------------------------------------------------------------------------------
Kernel Type : CPUKernel
Input Node(s)(H*W*C)
InceptionV1_Logits_SpatialSqueeze : 1*1*1001
Output Node(s)(H*W*C)
InceptionV1_Logits_Predictions_Softmax : 1*1*1001
The compilation process outputs two kernels, one to deploy in the DPU, inception_v1_0.elf, and another one to implement in the CPU with the DNNDK APIs. The compilation tool DNNC also outputs a graph that ilustrates how to interconnect the kernels.