placement management - Unity-Technologies/unity-ads GitHub Wiki
/* Title: Placement management and eCPM targets Sort: 4 */
Mediated customers can use Placements to set desired eCPM thresholds for advertisers to bid on Ad Units. eCPM (effective cost per mille) is the average price your game earns from advertisers per thousand impressions. When setting eCPM targets, Unity will target that price and optimize to deliver the maximum demand at the desired eCPM.
- A Placement always adheres to a single Ad Unit, and cannot exist without one.
- Placements inherit the ad format settings of their associated Ad Units. This means you can quickly adjust the ad format settings of many eCPM targets within the single Ad Unit they are linked to.
- Each Placement can target one or multiple countries with unique pricing.
Important: While eCPM targets can help drive your desired eCPM, implementing these restrictions will limit delivery and potentially impact your overall revenue. Higher targets have a higher risk of decreasing overall revenue by filling less.
To manage Placements from the Operate dashboard, select the Project you want to configure, then select Monetization > Placement Management on the left navigation bar.
Use the Placement Management dashboard interface to set eCPM targets by app store, country, and Ad Unit. To set a new Placement, locate the Ad Unit you want it to adhere to, then click Add Placement.
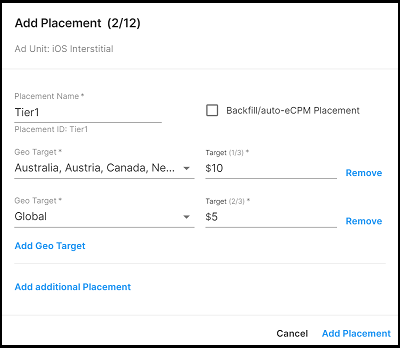
In the creation modal, specify the Placement Name, Geo Target, and eCPM Target for each corresponding geo.
The Placement Name is an identifier by which to recognize the Placement in the dashboard. Placement IDs are based on your initial name, so this field can be helpful when managing large numbers of Placements across multiple mediators. Click + Additional Placement to add another Placement to the Ad Unit. If you have multiple Placements in the modal and need to remove one, click Remove entire Placement.
Important: If you use a mediation provider to optimize across multiple networks, you must also configure any Placement IDs used for eCPM targeting in your mediation platform.
Check this box to remove targets for the Placement, effectively configuring it to accept bids at any price. This is commonly used for backfill, as a catch-all at the bottom of a mediation waterfall, or if you’re using auto-eCPM, in which case the Placement will move up and down in the waterfall depending on its performance.
Use the Geo Target field to select which countries to target. The default setting (Global) includes all countries. You can select from Geo Collection presets (recommended), or choose which countries to include manually.
You can have multiple Geo targets for a given Placement, but you must specify at least one Geo target to create the Placement. Click Add Geo Target to add additional Geo targets with distinct price points.
Note: Placements prioritize geo-specific prices over the global price setting, which is a blended average for all other countries (excluding those with specified targets).
Use the Target field to set the desired eCPM for each corresponding Geo Target.
The following example shows an Ad Unit configuration for a single Placement, targeting the United States and Canada with one price, and a global target for all other regions.
You can import a .csv file to bulk-add or -edit eCPM targets. You can download the template can from the dashboard help text, or export your existing configuration by clicking the Download button.
Edit the form by filling out the following columns:
-
countryCode is the 2-letter country code for the desired geo target. For more information, see the section on Geo Targets. Use
GLOBALfor the global designation. Note that exporting your targets to CSV converts any applied Geo Collections into a list of countries when you re-import. - targetPrice is the eCPM value you're targeting for the corresponding geos. Note that prices must use General format (as opposed to Number, Currency, or Accounting).
Once you’ve made your edits, save the document as a .csv file and use the Upload button in the dashboard to import your changes. You must verify any changes before saving them to the dashboard. If any errors exist in your file, the verification modal will advise you.