dashboard guide - Unity-Technologies/unity-ads GitHub Wiki
/*
Title: The Unity Dashboard guide
Sort: 1
*/
The new Unity Dashboard design unifies all your Unity services in a single interface, allowing you to navigate between them with greater ease and convenience. This section guides you through the highlights, new features, and navigation flows of the redesign.
As you get used to navigating the redesigned dashboard, you may want to switch to the previous version for reference or comparison. During the beta period, you can freely switch between dashboards by selecting your user profile icon, then Revert to Old Dashboard from the dropdown (or Try the new beta dashboard to switch back).

For detailed information about each dashboard page, skip to the Monetize dashboard walkthrough.
If you’re wondering what’s new in the Unity Dashboard, take a guided tour to learn about the new layout and navigation.
To start, select the help icon from the header menu, then Dashboard tour.

The new homepage lets you explore all Unity services available to you, along with a description and link to each service. You can filter which services to display by category, using the ribbon navigation.
For example, if you select Backend from the ribbon, the landing page only displays Unity backend services to explore.

The header menu persists throughout the dashboard, so you can access its tools at any time, from anywhere in your workflow.
Have you ever made a series of changes, then noticed a revenue difference, but you weren't sure which change might have led to that? Or, if you are in an organization with multiple users, have you ever needed to learn details about changes made by other members?
With the new change history setting, you can look through recent activity to confirm or troubleshoot changes so that you can correlate them to different results, leading to useful insights.
To access this feature, click the clock icon at the top of the Monetization dashboard.

After you access Change history, you can further refine results by selecting a tab at the top.

For example, if you select the tab Item:Geo collections, you'll see additions, changes, and edits.

The overflow menu (☰) now includes navigation to all services from anywhere in the dashboard, organized by service category. The navigation menu offers more intuitive workflows with project-level navigation to distinguish between Organization- and project-level operations. Select any service to expand its context menu and choose an operation specific to your Organization or desired project.

Menu personalization lets you customize the navigation menu.
- Pin frequently-used services to the top of the menu for quick access.
- Drag to reorder pinned services.
- Collapse lesser-used services for a cleaner interface.

Select Billing to manage your Organization’s invoices, or purchase Unity Game Simulation, Cloud Content Delivery, and Unity Simulation services directly from the dashboard.

The dedicated Settings menu item takes you directly to an Organization’s or project’s settings. If you select a project settings option, a selection modal allows you to specify which project you want to configure.

Switch between projects at any time from any page, directly from the header menu.

Click Create project at any time from any page, directly from the header menu.

Click the help icon in the header menu to contact support.

Access the Monetize dashboard from the navigation menu (☰) by selecting Monetize. If you're using the old dashboard interface, click the Operate tab.
The Dashboard home page displays your Organization’s at-a-glance revenue report. The overview shows the following performance metrics across your Organization’s entire project portfolio:
- Ad revenue over the last 24 hours
- Ad revenue over the last 30 days
- Average daily active users (DAU)
- Available balance (see documentation on automated payouts)
Beginning with iOS 14, Apple will begin phasing in a requirement that mobile apps, including games, prompt users to decide if they want to opt out of advertiser tracking. Advertiser tracking means that an app is collecting the IDFA (Identifier for Advertisers) of the user, and that advertisers can follow (or track) that IDFA as they visit different apps.
This framework is known also as App Tracking Transparency, or ATT. App Tracking means that an app is collecting the IDFA (Identifier for Advertisers) of the user, and that advertisers can follow that IDFA as they visit different apps. Cross-app tracking allows advertisers to utilize knowledge of probable preferences and interests across applications for ad targeting.
Prior to iOS 14, users could opt out of tracking by navigating to a setting called Limited Ad Tracking (LAT) on their phone. With iOS 14, the game or app is required to present a message the first time the user opens the app:

An ATT-enabled user is a user who has clicked Allow Tracking.
SDK 3.5.1 and higher support the new iOS 14 features. Please check here for updates, and here for more information.
Discovering the impact of privacy selections
Use Unity's new privacy dashboard to learn how a user's ATT choices impact revenue. The dashboard displays:
- The number of users who opt in or opt out of tracking
- How opting in or out of tracking affects revenue
Note: Apple has not yet enforced the App Tracking Transparency framework for iOS 14. The data that you will see is preliminary, based on limited sample sizes, and might not be a true indicator of performance after the release of this framework.

- Displays a chart of your iOS 14 ATT user statuses (see table on app-tracking statuses below).
- Click** See More** to view the more detailed App Tracking Transparency (ATT) Report.
- Compare the eCPM of those who have enabled tracking to those who have not.
| App Tracking Status | Chart Color | Description | SDK Related Notes |
|---|---|---|---|
| Tracking Enabled | Green | User authorizes access. App-related data can be used for tracking the user or the device. | If the app is not on SDK 3.4.8 or above and the user's IDFA is present, we will infer a user has Allowed Tracking. |
| Tracking Not Enabled | Blue | User denies access. Or, user is restricted (for example, COPPA). Or, user enabled LAT prior to iOS14. In these cases, access to app-related data that can be used for tracking the user or the device is denied. | If an app is not on SDK 3.4.8 or above, we will infer a user has chosen Tracking Not Enabled when their IDFA is not present (if it is all zeros) |
| Unavailable | Gray | User has not yet received an authorization request to authorize access to app-related data. Due to the delay in the enforcement of the ATT framework, the majority of users are likely to be in this category since they have not yet received an authorization request. | As apps upgrade to SDK 3.4.8 and later, users may shift from the other statuses to Unavailable. |
Also see App Tracking Transparency Report.
This report interface shows the 5 projects with have the largest percentage change in ad revenue over the last 7 days. This includes both revenue increases and decreases.
Specify Projects to highlight in your Organization dashboard by clicking Add favorites (or navigating to the Projects menu), then clicking the star icon next to desired Projects.
You can filter the following metrics by date range and platform:
- Ad revenue displays the total revenue from ads.
- Revenue displays the total revenue from ads and IAP.
- New Users displays the unique users that installed your game.
- Average DAU displays the daily active users.
- ARPDAU displays the average revenue per daily active user.
This report tracks ad performance metrics across your Organization’s portfolio. You can filter the following metrics by date range and platform:
- Ads Revenue shows the total revenue from ads.
- eCPM (effective cost per mille) shows the average revenue you generate per 1000 impressions.
- Impressions shows the number of times a video ad played.
- Fill Rate shows the rate of available ads served divided by the number of ad requests.
To view a more detailed report, click See more or navigate to the Ad Revenue section.
This report provides a snapshot of your apps' performance over the specified period, compared to the previous equivalent period. You can filter the following metrics by date range and platform:
- Average DAU displays the daily active users.
- New Users displays the unique users that installed your game.
- Sessions displays the number of unique play sessions your users engaged in.
- MAU displays the monthly active users.
The ATT report compares metrics for iOS 14+ users across all your projects by ATT status over the last 7 days. Use the drop-down menu on the left to filter data by metric (Revenue, eCPM, or Impressions). Use the drop-down menu on the right to filter projects.

Tip: Hover over a section of a report to view more details.
Click the download button at the bottom of the report to save the report in CSV format. This will automatically download reports for your top 5 games, unless you specify otherwise in the projects filter.
For more about this topic, including how to interpret ATT status, see this section.
Select Projects from the left navigation bar to view a list of your Organization’s projects. The list view provides at-a-glance information about each project’s Total Revenue, Ad Revenue, New Users, Average DAU (average daily active users), and ARPDAU (average revenue per daily active user).
Select any Project from the list to manage that project’s monetization settings (see section on Project-level navigation).
Click New Project to create a project under your selected Organization. You must have a Manager or Owner role to create new projects for your Organization.
Enter the following information in the Add new project prompt:
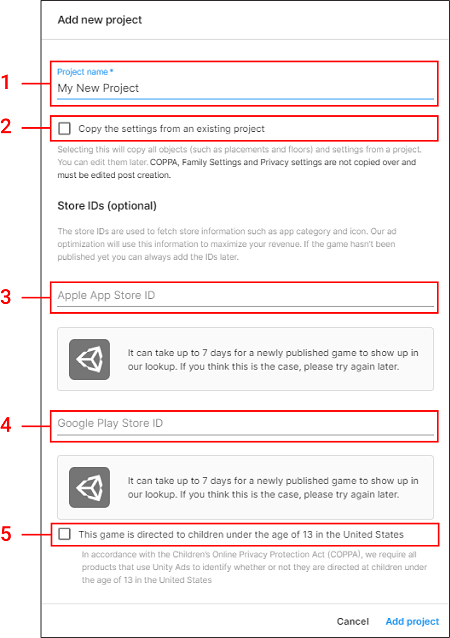
- Project name is the title that will appear on the dashboard.
- Click Copy the settings from an existing project to copy advertising strategies from an existing project to the new project. This can save you significant time when creating similar projects. After you enable the copy option, select the project you want to duplicate. This will copy all aspects of the original project except the COPPA setting, App store compliance settings, and privacy settings.
Note: You can only duplicate settings from another project during the creation of a new project. - An Apple App Store ID is optional, but recommended for published games to maximize access to third-party advertising partners.
- A Google Play Store ID is optional, but recommended for published games to maximize access to third-party advertising partners.
Note: You can always add store IDs later by selecting the project, then Monetization > Platforms > ADD STORE DETAILS. For more information on locating the relative store IDs, see store IDs.
- Check the COPPA compliance designation if your game will target an audience under 13 years old in the United States.
Click Add Project to create your project. Creating a project in the Monetize dashboard automatically enables monetization services.
Projects created in the Unity Editor do not enable monetization services by default. If a project’s monetization services are not enabled, selecting it in the dashboard will prompt you to enable them.
Click TURN ON OPERATE, then set the app store IDs and COPPA compliance designation appropriately to enable services.
To edit your project name, transfer it to a different organization, or archive it, select the header menu (☰), then Settings > Project > General.
Use the Rename this project field to edit the project's name. Your new project name must be unique within your Organization.
Use the Select an organization dropdown to transfer the project to another Organization. You can only transfer a project to another Organization where you are also an owner or manager.
Use the Archive button to archive old projects that are cluttering your dashboard. To view archived projects, elect the header menu (☰), then Settings > Organization > Projects, and check the Show archived box. To unarchive a project, click the Unarchive button that appears next to it.
The ad revenue report gives you detailed ad performance metrics for your Organization. Use the filters to isolate data by date range, platform, countries, projects, or ad format.
The chart provides a visualization of each performance metric. Use the dropdown menu to plot results by date, platform, country, Ad Unit, or project. Click the chart icons to toggle between bar and line graphs.
The table below provides performance metric data as well. Click the tabs to parse results by date, project, platform, country, Ad Unit, or ad format.
Select Ads Data Export > Email & CSV from the left navigation bar to export a monetization report for your Organization.
For more information on configuring reports, see documentation on Monetization statistics.
Select Ads Data Export > Test Devices from the left navigation bar to register an iOS or Android device for testing your Unity Ads or IAP integration without monetizing the device. This is important for testing integration in unpublished games, to avoid being flagged for fraud. Click Add New Device to register a new test device.
Enter your device's name in the first input field, and your IDFA (ID for advertising) in the second input field. For more information on locating your device's IDFA, see documentation on How to find your mobile device identifiers.
Select Ads Data Export > API Access from the left navigation bar to locate your Organization’s API key. This key is required for generating reports through the Monetization statistics API.
Select Finance from the left navigation bar to configure automated payouts and view payout transaction history. For more information, see documentation on revenue and payment.
Unity allows you to allocate a portion of your ad revenue into an advertising budget on the Acquire dashboard. For more information, see documentation on transferring revenue.
Learn more about driving user acquisition with Unity advertising.
The Settings menu contains information pertinent to your Organization and related services. Note that these settings are different than those accessed through the navigation (☰) menu.
- Organization name is your Organization’s identifier on the developer dashboard.
- Organization Core ID is required to pull data from the Monetization Statistics API.
-
Developer ID is required for implementing the
app-ads.txtspec for Unified Auction Exchange’s Authorized Sellers for Ads certification.
Game Developers should implement app-ads.txt as directed in order to optimize potential for revenue from Brand advertising. By the first half of 2020, many DSPs will start to only buy inventory properly authorized in the app-ads.txt. For more information about how to implement app-ads.txt, please see this FAQ.
Blocking allows you to block ad content, ensuring a safe experience for your players. Any content that matches the fields will be blocked from appearing in your game. You can block by app store ID, creative pack ID, Unity Organization, or advertiser domain. You can click Download to download a CSV template to bulk-update blocking settings, then Upload to the revised template to update the dashboard. Changes to these settings apply to all projects in the Organization.
Select a project to view that project’s dashboard. Use the left navigation bar to select your desired option.

Note: You can use the header navigation to switch between projects at any time, or select Organization Level to return to your Organization's dashboard.
Select Overview from the left navigation bar to display your project’s at-a-glance revenue report. You can view statistics on Total Revenue, Average DAU (daily active users), or Day 1 Retention for the selected project. You can also filter the data by platform or date range.

Select Reporting > Ad Revenue from the left navigation bar to view a breakdown of ad revenue for the selected project.

Use the filters to isolate data by date range, platform, country, Ad Unit, or content type.
- Ads Revenue shows the total revenue from ads.
- Impressions shows the number of times a video ad played.
- eCPM (effective cost per mille) shows the average revenue you generate per 1000 impressions.
- Fill Rate shows the rate of available ads served divided by the number of ad requests.
- Impressions/DAU shows the average number of impressions per daily active user.
The chart (top) provides a visualization of each performance metric. Use the dropdown menu to plot results by date, platform, country, Ad Unit, or project. Click the chart icons to toggle between bar and line graphs.
The table (bottom) provides performance metric data as an exportable CSV file. Click the tabs to parse results by date, project, platform, country, Ad Unit, or content type. Click the download icon to export the data into a CSV file.
Select Reporting > IAP Purchases from the left navigation bar to view a breakdown of In-App Purchasing (IAP) revenue for your project.

You can filter data by date range, and display it as a spline chart, bar chart, or stacked chart.
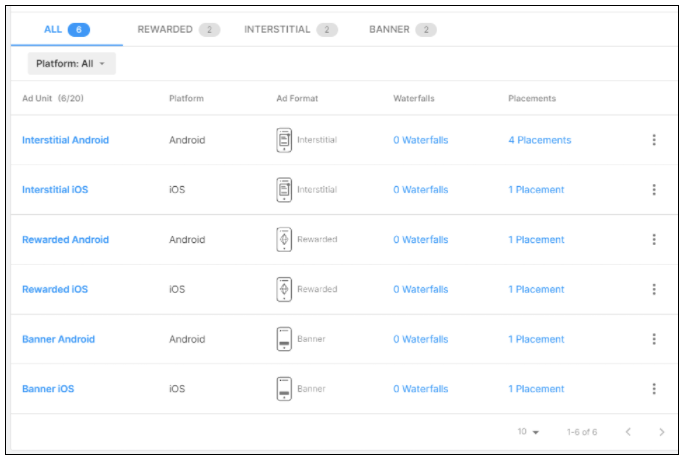
Select Monetization > Ad Units from the left navigation bar to create and manage Ad Units for your project.
For more information, see documentation on Ad Units.
You can also find your project’s Game IDs for iOS and Android here.
Note: This page only apply to projects using mediation.
Select Monetization > Placement Management from the left navigation bar to create and manage Placements for your project. Placements define eCPM thresholds for advertisers to bid on Ad Units. eCPM (effective cost per mille) is the average price your game earns from advertisers per thousand impressions. When setting eCPM targets, Unity will target that price and optimize to deliver the maximum demand at the desired eCPM.
For more information, see documentation on Placement management and eCPM targets.
Select Monetization > Geo Collections from the left navigation bar to create and manage Geo Collections for your project. Geo Collections are custom groups of countries to target in bulk. Geo Collections are particularly useful for setting up tiers of countries to use across multiple projects within your Organization, or for a collection of countries you use often for a given project.
For more information, see documentation on Geo Collections.
From the left navigation bar, select Project Settings to view and configure monetization settings for your project.
You need the Game ID for each platform to initialize the Unity Ads and Unity IAP SDKs in your code. You cannot edit these IDs.

Find the following properties for your project here:
- Project name is the name of your project. Though you cannot edit this setting here, Organization Owners can do so by navigating to the Develop dashboard tab, then selecting Settings > General, and following the prompts to rename your project.
- Project ID is a unique Unity identifier for your project.
-
Age designation indicates whether your project is directed at children under the age of 13 in the United States (required for COPPA compliance).
Important: Only the project's Organization Owner can edit the age designation setting.
Note: Opting in to the Apple Kids Category or Google Designed for Family program will automatically configure the Age designation setting to This app is directed to children under the age of 13. For more information, see section on app store compliance, below.
Both Google and Apple introduced requirements to ensure that apps that are directed at children and serve ads are safe to use. If you serve ads in your app and wish to participate in Google’s Designed for Families program or the Apple Kids Category, you must set your age limits filter to Do not show ads rated 13+ or stricter. Selecting one of these programs in your Project Settings will automatically configure the Age designation setting to This app is directed to children under the age of 13, and set your Age limits filter to Do not show ads rated 13+ or stricter. For more information on age rated content, see documentation on moderation.
Note: Apple requests documentation links demonstrating that the ad network (Unity) complies with the requirements outlined. You may provide a link to this section in the review notes of your submission.
Important: Unity does not provide legal advice. Therefore, the information on this page is not a substitute for reading the Apple App Store or Google Play guidelines, applicable publisher terms, or seeking your own legal counsel to determine the legal requirements of your business and processes, and how to address them.
Note: You do not have to change each placement. Formats are set for an ad-unit and then configured within them, placements are assigned to those ad-units and inherit the settings of that ad-unit. This means you can adjust the ad settings of 100 placements with one click vs having to set them individually within each placement.
For more information about Google Designed for Families, navigate to Ads and Monetization.
For more information about compliance settings, see this article about changing ad settings to meet compliance requirements.
By default, rewarded ads are not skippable. However, here is how you can make them skippable if you wish to.
- With your project active in the Monetization menu, choose Overview >Ad Units.
- Navigate to Ad Unit. Choose the type of ad you want to change.
- Select More (the three vertical blocks).

For more information, see this article about changing ad settings.
Optionally link your project to live Store IDs for the game’s Apple or Google Play app page.
Important: Skipping this step does not prevent you from showing ads, however, some of Unity's advertising partners require this information. In order to maximize revenue opportunities, please make sure you include it when your game is live.
Extract the Apple App Store ID from your game’s URL, as shown in the highlighted section of the following URL:

Extract the Google Play Store ID from your game’s URL, as shown in the highlighted section of the following URL:

Note: If you recently published your app, Unity may be unable to look up its ID. Should you encounter this error, please try again 5-7 days after the publish date.
Test mode allows you to test your integration without serving live ads. Use this setting to override programmatic settings on a device, by toggling Override client test mode, then checking Force test mode ON (i.e. use test ads) for all devices. It is important to enable test mode before testing integration to avoid getting flagged for fraud.

For publishers that also advertise with Unity, allowing Unity to collect revenue-optimizing data can increase Unified Auction campaign performance. Enabling this setting allows Unity to collect session data that enhances your Acquire campaigns, to better define the value of new users in your game and similar users from other games in Unity’s network.
To do so, ensure that your project has the Ads SDK installed, and an active Acquire campaign. Select Project Settings from the left navigation menu, then scroll to Acquire Optimization and enable the setting for each platform.
Note: Unity recommends including an app-specific shared secret key for games on the Apple app store, so that Unity can verify subscription purchases. To locate your secret key:
- Sign in to your Apple developer account and select App Store Connect from the left navigation menu.
- Click Go to App Store Connect.
- On the App Store Connect page, click My Apps. If you don't have an app, click the + button to create a new app.
- Select In-App Purchases > Manage from the left navigation menu.
- Click App-Specific Shared Secret to display the key.
- Copy the key and paste it into your Acquire Optimization setting in the Monetize dashboard, in the App-Specific Shared Secret field for the Apple App Store.

For more information, reach out to your Unity representative.
The Enable ad delivery toggle allows you to temporarily stop serving ads to your application.