content types - Unity-Technologies/unity-ads GitHub Wiki
/*
Title: Ad content types
Description: An overview of the various content types you can show through Ad Units or Placements.
Sort: 10
*/
Unity Ads allows you to serve a mix of engaging content to your players through Ad Units or Placements. Get to know the various content types, and learn how to deploy them in your monetization strategy.
AR ads offer players a fully immersive and interactive experience, by incorporating digital content directly into their physical world. Players can make new, memorable experiences, while feeling a sense of agency by creating their own narratives.
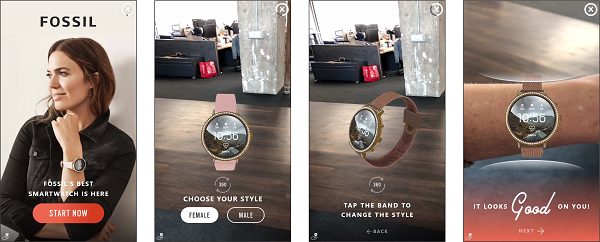
To implement AR ads in your game, see the integration guide below.
Banners remain a consistent source of ad revenue within mobile ad spend. You must implement banner ads through Banner Ad Units or Placements.
- Implement Banner ads (Unity developers)
- Implement Banner ads (native iOS developers)
- Implement Banner ads (native Android developers)

Display ads are the basic full-screen interstitials that persist until the player dismisses them. These are most effectively implemented strategically at natural pauses or breaks in gameplay, such as a load or level change. You can implement display ads through Rewarded and Interstitial Ad Units or Placements.
- Implement Unity Ads (Unity developers)
- Implement Unity Ads (native iOS developers)
- Implement Unity Ads (native Android developers)
- Read about best practices for ad implementation

Playable ads are ad units that enable the player to engage with the ad content through interaction. You can implement playable ads through Rewarded and Interstitial Ad Units or Placements.
- Implement Unity Ads (Unity developers)
- Implement Unity Ads (native iOS developers)
- Implement Unity Ads (native Android developers)

Video ads are the most common form of advertising, and recommended in our best practices guide. They create opportunities to implement rewarded ads, where players receive incentives for viewing the ad in its entirety. You can implement video ads through Rewarded and Interstitial Ad Units or Placements.
- Implement Unity Ads (Unity developers)
- Implement Unity Ads (native iOS developers)
- Implement Unity Ads (native Android developers)
- Learn how to optimize your rewarded video ads strategy

Cross-Promotion is an open beta feature that allows publishers to backfill their ad Placements with promotions for their own games. A Cross-Promotion works just like regular advertisements, but drives traffic to your own apps. There are several advantages to using them:
- Introduce users to your other apps.
- There is no opportunity cost, because Cross-Promotions only appear when there are no other ads available to fill.
- Boost your impressions and ad requests, which can lead to additional installs.
You can implement cross-promotional ads through Rewarded and Interstitial Ad Units or Placements. See the Cross-Promotion setup guide below for more information.
AR (Augmented Reality) ads offer players a fully immersive and interactive experience by incorporating digital content directly into their physical world. Players have the opportunity to make new and memorable experiences and can feel a sense of ownership by creating their own narrative. To integrate AR Ads into your Project, follow the steps detailed below:
- Download and install the latest SDK (Unity | iOS | Android).
- Configure your Project to access device camera permission settings.
- Create a Placement and associated script to receive and display AR content.
- Contact the Unity Ads team to enable AR ads for your Project.
Before implementing AR ads in your Unity Project, you must meet the following requirements:
- iOS versions 11+, and iPhone versions 6s+ and Android versions 7+ (ARCore supported devices)
- Unity Ads Monetization SDK version 3.0.1 or higher (Unity | iOS | Android)
Warning: Games directed at children under 13 are currently not eligible to enable AR ads.
This section details setting your Project up for Unity integration. If your game already uses AR functionality, skip to the Implementation section.
AR ads require access to the device’s camera. When configured, the Unity Ads SDK can handle this permission query.
iOS
- In the Unity Editor, select Edit > Project Settings > Player.
- Select the iOS icon in the platform tab menu and scroll to the Other Settings section.
- Find the Camera Usage Description field and enter a description of why the game needs to access the device’s camera. Unity recommends "For AR ads display". For more information on this setting, see the iOS Player Settings documentation.
Android
-
To download the Google AR core library:
- Access the Maven repository here.
- Click the most current version
- Select the .aar button listed under Files.
-
Place the .aar file in your Project’s Assets/Plugins/Android directory.
-
Contact Unity requesting a custom Android Manifest (AndroidManifest.xml) with the modifications required for AR ads to work in your Project, and a project.properties file that enables loading the Android Manifest.
-
Unzip the provided UnityAdsARConfigManifest.zip file, and place the resulting folder in your Project’s Assets/Plugins/Android directory.
Important: Google requires end-users to explicitly grant camera permissions. By default, Unity AR ads-enabled games on Android request that permission when the game starts. If you choose to postpone the permissions query, you may do so by changing the unityplayer.SkipPermissionsDialog value in the Android Manifest to true. However, this setting controls all of your game’s permission queries, not just the camera. While Unity Ads will handle the camera query, you must ensure that any other permission requests (for example, accessing the microphone) occur prior to accessing the relevant component. If one of your Project’s plugins does not support this, you may experience crashes. Unity recommends thoroughly testing your implementation if you enable this option.
This section details setting your game up for iOS or Android integration. If your game already uses AR functionality, skip to the Implementation section.
AR ads requires access to the device’s camera. Once configured, the Unity Ads SDK can handle this permission query.
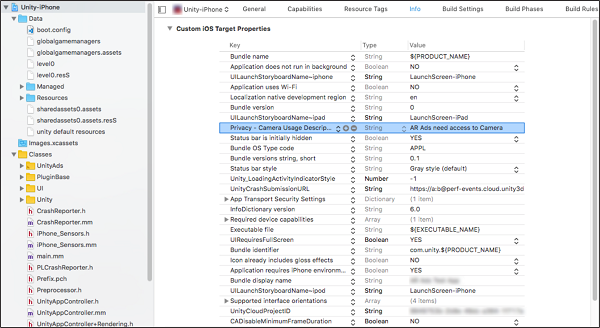
iOS Add the Privacy - Camera Usage Description key to your game's Property List (Info.plist). For example, you can set the string value to "AR ads would like to access the camera".
Android
- Add the following to your game’s Android Manifest (see the AndroidManifest.xml file included in UnityAdsARConfigManifest.zip for reference):
// Manifest level
<uses-permission android:name="android.permission.CAMERA" />
// Application level
<meta-data android:name="com.google.ar.core" android:value="optional" />
- Add the ARCore library as a dependency in your game’s build configuration file (build.gradle):
dependencies {
    ...
    implementation 'com.google.ar:core:1.4.0'
}
If you get an error when trying to build, ensure that your Project's build configuration file references Google's Maven repository:
allprojects {
    repositories {
        google ()
        …
    }
}
Implement a Placement that is dedicated for AR content. The Dashboard does not currently support enabling AR content. Instead, configure a Placement that you will not use for other content, using an easily identifiable Placement ID (Unity recommends ‘arPlacement’). In the final setup step, you will contact Unity to enable AR content for that Placement.
In the script for the dedicated AR Placement, configure your Placement logic as follows:
- Check for available AR content to fill your dedicated AR Placement.
- If yes, show content from the AR Placement.
- If no, show ad or Promo content from another Placement.
See the following code examples.
Unity developers (C#)
The following example uses the Monetization API (recommended) to retrieve a PlacementContent object and show an AR ad:
using UnityEngine;
using UnityEngine.Monetization;

public class ARTest : MonoBehaviour {
    private PlacementContent MyPlacementContent;

    void Start () {
        Monetization.Initialize ("1234567", false);
        Monetization.onPlacementContentReady += PlacementContentReady;
    }

    public void ShowAd () {
        if (MyPlacementContent != null) {
            ShowAdPlacementContent ad = MyPlacementContent as ShowAdPlacementContent;
            ad.Show (myAdCallbackHandler); // See note on callback handlers, below
        }
    }

    public void PlacementContentReady (object sender, PlacementContentReadyEventArgs e) {
        Debug.LogFormat ("PlacementID: {0}, Object: {1}", e.placementId, e.placementContent.GetType ());
        if (e.placementId == "arPlacement") {
            MyPlacementContent = e.placementContent;
        }
    }
}
Note: For more information on implementing a callback handler, see documentation on C# Ads integration.
Alternatively, the following example uses the Advertisement API to show an AR ad:
if (Advertisement.IsReady ("arPlacement")) {
   ShowOptions so = new ShowOptions ();
   so.resultCallback = MyARAdCallbackHandler;
   Advertisement.Show ("arPlacement", so);
} else if (Advertisement.IsReady ()) {
   ShowOptions so = new ShowOptions ();
   so.resultCallback = MyAdCallbackHandler;
   // Replace MyAdCallbackHandler with the one you are already using
   Advertisement.Show (so);
}
Note: If your script already decides between multiple Placements, ensure that the dedicated AR Placement handling executes first.
Rebuild your game. Your game should now be ready to receive AR content upon enabling it.
iOS developers (Objective-C)
The following example uses the UnityMonetization API (recommended) to retrieve a UMONPlacementContent object and show an AR ad. The code should be implemented as a delegate class for the UMONShowAdDelegate delegate.
-(void) showAdIfReady: {
    UMONShowAdPlacementContent * arPlacement = (UMONShowAdPlacementContent *) [UnityMonetization getPlacementContent: @"arPlacement"];
    if ([arPlacement isReady]) {
        [arPlacement show: self withDelegate: self];
    } else {
        UMONShowAdPlacementContent * interstitialPlacement = (UMONShowAdPlacementContent *) [UnityMonetization getPlacementContent: @"video"];
        if ([interstitialPlacement isReady]) {
            [interstitialPlacement show: self withDelegate: self];
        }
    }
}
Alternatively, the following example uses the UnityAds) API to show an AR ad:
if ([UnityAds isReady: @"arPlacement"]) {
    [UnityAds show: self placementId: @"arPlacement"];
} else if ([UnityAds isReady: @"video"]) {
    [UnityAds show: self placementId: @"video"];
}
Note: If your script already decides between multiple Placements, ensure that the dedicated AR Placement handling executes first.
Rebuild your game. Your game should now be ready to receive AR content upon enabling it.
Android developers (Java)
The following example uses the UnityMonetization API (recommended) to retrieve a PlacementContent object and show an AR ad:
protected void showAdIfReady() {
    PlacementContent arPlacement = UnityMonetization.getPlacementContent ("arPlacement");

    if (arPlacement instanceof ShowAdPlacementContent && arPlacement.isReady ()) {
        ((ShowAdPlacementContent) arPlacement).show (thisActivity, new ShowAdListenerAdapter () {
            @Override
            public void onAdStarted (String placementId) {
                Log.d ("UnityAds", "Starting AR ad!");
            }

            @Override
            public void onAdFinished (String placementId, UnityAds.FinishState withState) {
                Log.d ("UnityAds", "Finished an AR ad with state - " + withState);
            }
        });
    } else {
        PlacementContent interstitialPlacement = UnityMonetization.getPlacementContent ("video");


        if (interstitialPlacement instanceof ShowAdPlacementContent && interstitialPlacement.isReady ()) {
            ((ShowAdPlacementContent) interstitialPlacement).show (thisActivity, new ShowAdListenerAdapter () {
                @Override
                public void onAdStarted (String placementId) {
                    Log.d ("UnityAds", "Starting an interstitial ad!");
                }

                @Override
                public void onAdFinished (String placementId, UnityAds.FinishState withState) {
                    Log.d ("UnityAds", "Finished an interstitial ad with state - " + withState);
                }
            });
        }
    }
}
Alternatively, the following example uses the UnityAds API to show an AR ad:
String arPlacementId = "arPlacement";
String interstitialPlacementId = "video";

if (UnityAds.isReady (arPlacementId)) {
    UnityAds.show (self, arPlacementId);
} else if (UnityAds.isReady (interstitialPlacementId)) {
    UnityAds.show (self, interstitialPlacementId);
}
Note: If your script already decides between multiple Placements, ensure that the dedicated AR Placement handling executes first.
Rebuild your game. Your game should now be ready to receive AR content upon enabling it.
(Optional) Adjust surface tracking Depending on the user's behavior while engaged with AR ad content, your game's surface tracking may be off. This can result in objects floating in mid-air or inside surfaces. As such, we recommend adding a custom handler for AR ads. For example (C#):
void MyARAdCallbackHandler (ShowResult result) {
   Debug.Log ("AR ad successfully finished with result " + result.ToString ());
   // Implement any custom logic related to returning from an AR ad.
}
Contact Unity Ads to enable AR content, providing the following information:
- Your Project ID
- The ID for the dedicated Placement to display AR content
Please note that because AR content is loaded directly from our servers, AR ads only work in production mode, not test mode. The AR campaigns for integration testing may not reflect the final quality of the AR content.
For testing purposes, use the following Game ID and Placement ID combinations:
| Platform | Game ID | Placement ID |
|---|---|---|
| iOS | 1767349 | arPlacement |
| Android | 2085042 | arPlacement |
Remember to revert the test Game ID and Placement IDs to real production IDs before publishing your game.
Cross-Promotion is an open beta feature that allows publishers to backfill their ad Placements with promotions for their own games. A Cross-Promotion works just like regular advertisements, but drives traffic to your own apps. There are several advantages to using them:
- Introduce users to your other apps.
- There is no opportunity cost, because Cross-Promotions only appear when there are no other ads available to fill.
- Boost your impressions and ad requests, which can lead to additional installs.
To get started, log in to the Acquire section of the Developer Dashboard and select the Organization that owns the Projects you wish to promote your app in.
Note: If you wish to use Cross-Promotion but use more than one Organization for user acquisition and monetization, please contact Ads support for assistance.
Each Organization may create up to two Campaigns.
Select Cross promotion from the left navigation bar, then click CROSS-PROMOTE APP to choose a target Project.

Select a target app to promote using a store URL lookup. The target Project must be published in an app store, so that users can click the ad to install the app.
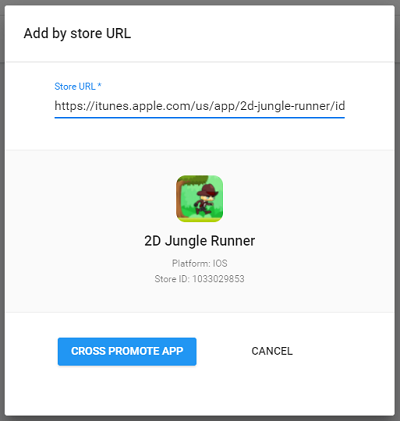
Click CROSS PROMOTE APP to verify the selection.
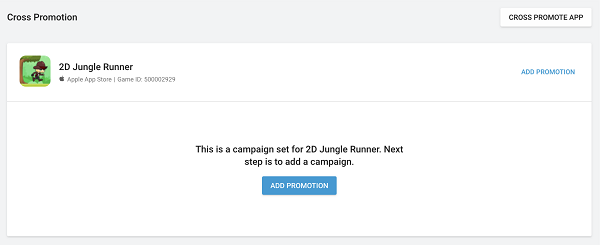
Your selected app should now appear on the Cross promotion page. Click ADD PROMOTION to configure a new cross-promotion campaign.
Name the campaign (for naming convention guidelines, see the Creating Campaigns section of the Configuring Campaigns documentation), then click CREATE to create the campaign.
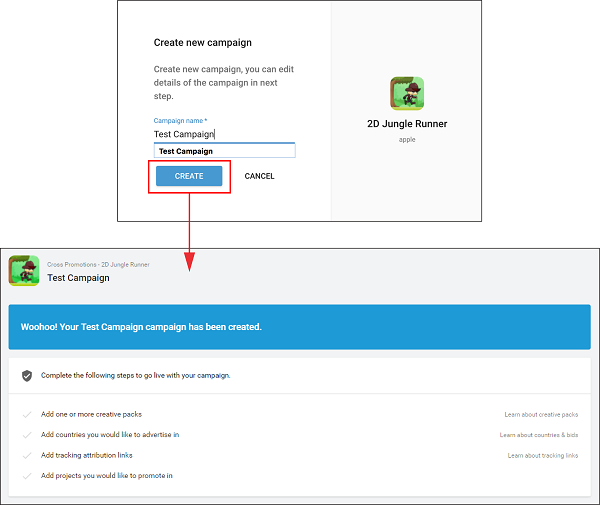
The process for setting up cross-promotion campaigns is similar to setting up normal ad campaigns. However, because cross-promotions use your own backfilled ad space, you do not enter bids or draw from an advertising budget.
The following four components are required for your cross-promotion to go live:
- One or more Projects to run the ad in
- One or more creative packs
- One or more countries to advertise in
- Install Tracking links
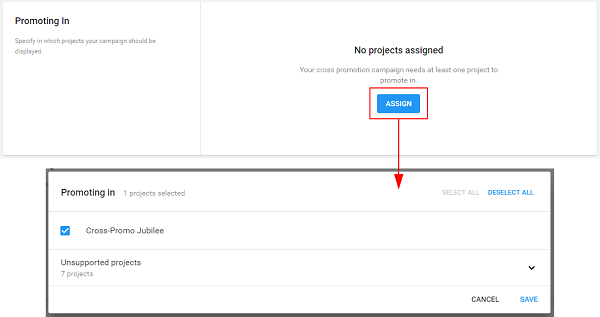
Adding Projects Add Projects in which you’d like to advertise your target app:
- Navigate to the Promoting in section of the campaign configuration page, then click ASSIGN.
- Select as many published, Unity Ads-enabled Projects that you’d like to promote the target app.
Note: Projects that do not meet this required are listed as unsupported. Remember that you must be logged in as a Project’s owner to select it as a cross-promotional option.
- Click SAVE to apply your selections.
Adding creative packs Creative packs are the content of your cross-promotional campaign. Creative packs are covered in depth, including specs and setup instructions, in the Configuring Campaigns documentation.
Note: While most advertising campaigns share creative assets from the same pool, cross-promotion campaigns draw from a separate resource. This means that even if you already created an ad campaign for the target app, you’ll still have to upload its creative assets to the cross-promotion configuration interface.
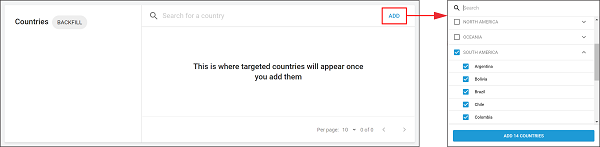
Adding countries Add countries in which you’d like to advertise your target app:
- Navigate to the Countries section of the campaign configuration page, then click ADD to bulk select countries, or use the search tool to find a specific country.
- Select as many countries as you’d like, then click ADD COUNTRIES to apply your selections.
For more information on countries, see the Bids section of the Configuring Campaigns documentation. Note however that Cross-Promotions do not currently use bids, as you do not need to bid on your own ad space when you deliver Cross-Promotion as backfill.
Schedule A valid Start date is required for your cross-promotional campaign. This field defaults to the current date. An End date is optional. Click here for more information on Scheduling settings.
Tracking links These URLs gauge campaign performance by tracking user interactions with your ad through this campaign:
- Start fires when the ad starts
- View fires when the ad ends
- Click fires when user clicks the download button
Click attribution is required, however Unity recommends using Start and Click attribution links in tandem to support higher conversion rates.
Note: If you use multiple Organizations to cross-promote, please be sure to contact Ads support so they may ensure there are no complications with install tracking for your Campaigns.
Click here for more information on Tracking links.
Miscellaneous settings Other settings are optional but recommended: