configuring campaigns - Unity-Technologies/unity-ads GitHub Wiki
/*
Title: Configuring and managing campaigns
Sort: 4
*/
This article provides a comprehensive look at each setting for your campaigns. Access campaigns through the Acquire dashboard.
- Creative packs
- Bids
- Budgets
- Scheduling
- App targeting
- Device targeting
- Attribution links
- Bulk Campaign Management with Spreadsheets (Beta)
- SKAdNetwork reporting
Creative packs are the content of your ad campaign. For a comprehensive guide about managing your creatives, including creating, assigning, and removing them, see creative packs.
Note: All new creative packs undergo a human moderation process when their associated campaigns go live for the first time. A campaign must have at least one assigned and approved creative pack to go live. For more information, see moderation.
If you have multiple campaigns and bids to manage, read about the bulk campaign management beta feature to streamline your work.
Unity Ads is a bidding platform. The exposure of your ad campaign depends on its eCPM (effective cost per thousand impressions), which is determined by the CVR (video conversion rate from impression to install) and CPI (cost per install) of your campaign. The higher your campaign’s eCPM, the more exposure it receives.
Acquire provides a variety of bidding strategies to match your campaign goals:
- Cost per install (CPI) and cost per impression (CPM) bidding optimizes for users who are likely to install your game.
- Retention bidding optimizes for users who are likely to stay in your game for seven or more days.
- ROAS bidding optimizes for users who are likely to spend money in your game.
Install campaigns optimize bids for players who install your app. Choose one of two bidding strategies for iOS install campaigns:
- Manual - manually set your CPI bid per country.
- Automated - set the maximum CPI bid per country, where the actual bid can be anywhere between zero and the maximum.
Note: Unity does not recommend that you run simultaneous campaigns with different bidding strategies in the same country.
For more information on install campaigns, see the documentation on CPI bids.
Select a manual bidding strategy to set the CPI bid that you want to pay per install. The system tries to optimize the bids to achieve an average CPI. This means that sometimes the CPI can be higher or lower than the bid amount.
Automated CPI bidding automatically manages and spends your campaign budget. This strategy maximizes installs for budget-constrained campaigns and optimizes budget usage throughout the day.
Instead of always using the maximum specified CPI bid, automated bidding controls spending and optimizes budget usage by focusing on opportunities with a high predicted value. Automated campaigns bid dynamically by discounting the maximum bid according to a machine learning algorithm. If the maximum CPI bid is restrictive enough that the campaign cannot spend its daily budget, thereby limiting campaign delivery, then Unity does not discount the bid and the automated campaign effectively behaves like a normal static CPI campaign.
For example, assume the following:
- Your campaign wins an impression if it bids $0.01 or more.
- Your campaign has a daily budget of $1.
- Your campaign has a CPI bid of $1.
- Your campaign observes 300 opportunities throughout the day.
- The first 100 opportunities have a predicted conversion rate of 1%.
- The next 200 opportunities have a predicted conversion rate of 2%.
With a CPI bid of $1, the example campaign would be expected to run out of money after the first 100 impressions, because a 1% conversion rate would yield one install. If you instead lower the bid by a fixed 50% and bid $0.50, the example campaign would lose the first 100 opportunities but win the latter 200 opportunities and yield 2 installs for the same cost.
To use the automated bidding strategy, add the maximum bids for each country you target with the campaign, and the system automatically optimizes delivery against your max bids. Use this strategy to control the maximum that you are willing to pay per install, and the campaign bids at most the maximum bid on an install or lower values whenever it is possible to spend the daily cap with a bid that is lower than the maximum bid. We recommend using relatively high maximum bids even with small budgets, because the actual discounted bid is only slightly more than the next highest competitive bid.
Note: We recommend creating a separate campaign for each tier of countries.
Automated bidding requires a daily cap. We recommend that you use the following minimum parameters:
| Parameter | Value |
| Daily cap | $50 |
| Campaign budget | $500 |
| Campaign duration | One week |
Please note the following feature compatibility notes:
- You can add source bids to campaigns that use automated bidding. The automated bidding algorithm treats each source bid as a maximum bid, which means that the actual discounted bid can fluctuate between zero and the source bid amount.
- Campaigns that use an automated bidding strategy do not use Reach Extension.
- You cannot use spreadsheets to create a new campaign that uses automated bidding, but you can export, import, and modify existing automated bidding campaigns by using bulk campaign management with spreadsheets. Automated bidding campaigns support the
BidsandSource BidsXLXS exports. Note that when you use this process, you cannot edit some fields for these campaigns, or they might behave differently:- You cannot remove Reach Extension from the Blocklisted exchanges column.
- You cannot change the campaign goal.
- Admin users cannot change the billing type.
- When duplicating a row for a campaign with automated bidding, the new campaign will have manual bidding instead.
A retention campaign goal targets users who are likely to remain in your app for at least seven days after installation. With this type of campaign strategy, the Audience Pinpointer feature uses dynamic pricing based on your base bid price and a user’s expected retention rate so you pay the best price across an entire user base.
For more information on retention campaigns, see the documentation on Audience Pinpointer.
A return on ad spend (ROAS) campaign goal targets users who are predicted to generate revenue through in-app purchases or by watching ads. This type of campaign strategy uses dynamic bids to acquire users at the best price. A ROAS campaign goal includes two optimization types: in-app purchases (IAP) and ad revenue.
Whether you specify an ad revenue or in-app purchase optimization type, revenue-based campaigns can help you to achieve your return on ad spend (ROAS) campaign goals.
Another way to describe this campaign strategy is the revenue a player generates in their first seven days playing your game, divided by the cost to acquire that player.
For more information on ROAS campaigns, see the documentation on Audience Pinpointer.
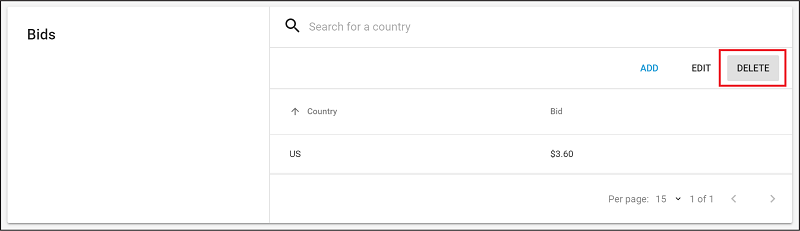
To add a bid, scroll to the Bids section and select ADD.
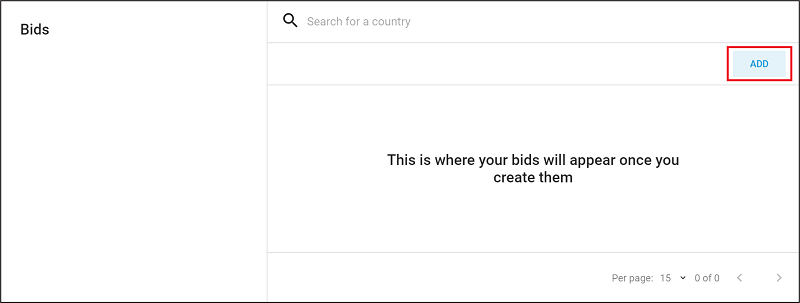
Use the Search tool to locate a country, or expand a region from the dropdown list to specify desired bids in each of that region’s countries. Selecting a region adds the default values for every country in that region (you can adjust or exclude these selections later if needed).
Note: Unity provides default values as a baseline, using average bid values for each region. You will likely want to modify them to fit your individual needs, app type, and marketing strategy.

To edit an existing bid, select EDIT, then select the bid(s) to edit.
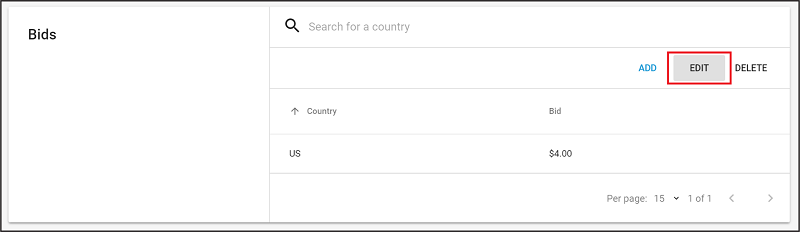
Hover over a bid value to display an edit icon (see image below). Select the edit icon to manually enter a new bid value.
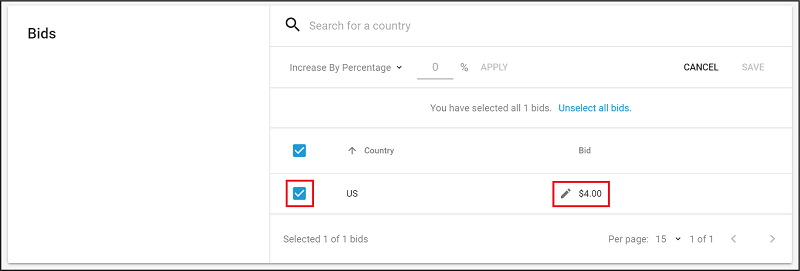
Make bulk edits by selecting the countries or regions to adjust, then selecting the Increase By Percentage dropdown to select from the following operations:
- Increase By Percentage: increases all selected bids by the specified % (for example, if the value is 25%, a $4.00 bid becomes a $5.00 bid).
- Decrease By Percentage: decreases all selected bids by the specified % (for example, if the value is 25%, a $4.00 bid becomes a $3.00 bid).
- Increase By Value: increases all selected bids by the specified dollar value (for example, if the value is 1, a $4.00 bid becomes a $5.00 bid).
- Decrease By Value: decreases all selected bids by the specified dollar value (for example, if the value is 1, a $4.00 bid becomes a $3.00 bid).
- Change To Value: sets all selected bids to the specified dollar value (for example, if the value is 1, a $4.00 bid becomes a $1.00 bid).
Enter the new value and select APPLY to process the operation to all selected bids.
Tip: To manage bids in bulk, explore the Bulk Campaign Management with Spreadsheets (Beta) beta feature to streamline your work.
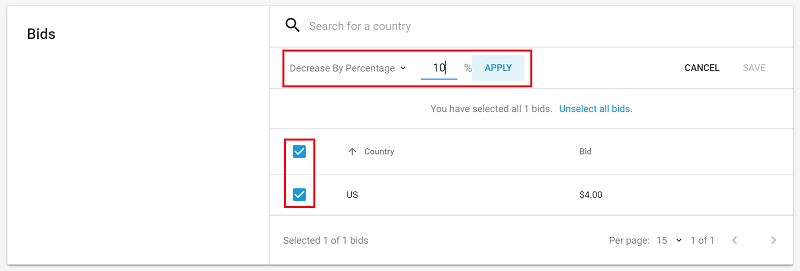
 Select SAVE to apply changes.
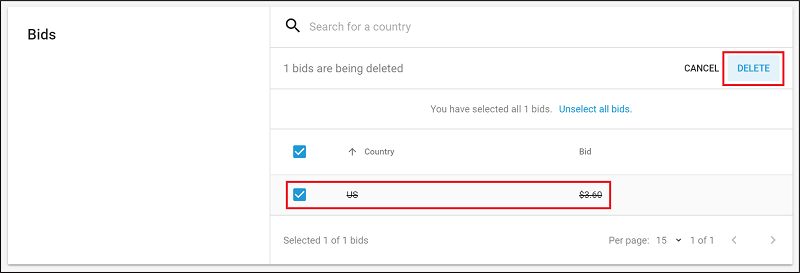
To delete an existing bid, select DELETE, then select the bid(s) to delete. Select bids using the Search tool, by country, or in bulk by region.
Affected bids display strikethrough font. Select DELETE to confirm their removal.
There are maximum bid limits based on the country in which the campaign will appear. This means that your maximum bid in the chosen country cannot be above a certain limit. The table below shows the maximum bids in each country for iOS and Android campaigns.
Here are the maximum bids according to country for iOS campaigns:
| Country | CPI Bid limit (iOS) |
|---|---|
| AT, AU, CA, CH, DE, FR, GB, HK, JP, KR, MO, NO, NZ, SE, SG, TW, US | $40 |
| AF, AR, AZ, BA, BE, BG, BJ, BR, BY, CD, CI, CL, CN, CY, CZ, DK, DO, DZ, EC, EE, EG, ES, FI, GH, GR, GT, GY, HR, HU, ID, IE, IL, IN, IS, IT, JE, KH, KW, LA, LK, LT, LU, LV, ML, MR, MX, MY, NG, NL, PA, PE, PH, PL, PR, PT, QA, RO, RS, RU, SA, SK, SL, SO, TH, TJ, TR, TT, UY, UZ, VE, ZA, ZM, ZW | $20 |
| AE, AL, AM, AW, BB, BD, BH, BZ, CM, CO, CR, FJ, GE, IQ, JO, KZ, LB, LC, LI, MA, MG, MM, MN, MU, NC, NE, NI, OM, PK, PS, RE, RW, SN, TZ, UA, UG, VC, VN, YE | $10 |
| Other | $10 |
Here are the maximum bids according to country for Android campaigns:
| Country | CPI bid limit (Android) |
|---|---|
| AU, CH, HK, JP, MO, NO, TW, US | $40 |
| AT, AW, BB, BE, BZ, CA, CD, CM, CN, CZ, DE, DK, FI, FJ, FR, GB, GH, GR, HR, IE, IL, IS, IT, KR, LC, LI, LT, LU, MG, MU, MY, NC, NE, NG, NI, NL, NZ, PL, QA, RE, RW, SE, SG, SK, TT, TZ, UG, VC, YE, ZA, ZM | $20 |
| AE, AF, AL, AM, AR, AZ, BA, BD, BG, BH, BJ, BR, BY, CI, CL, CO, CR, CY, DO, DZ, EC, EE, EG, ES, GE, GT, GY, HU, ID, IN, IQ, JE, JO, KH, KW, KZ, LA, LB, LK, LV, MA, ML, MM, MN, MR, MX, OM, PA, PE, PH, PK, PR, PS, PT, RO, RS, RU, SA, SL, SN, SO, TH, TJ, TR, UA, UY, UZ, VE, VN, ZW | $10 |
| Other | $10 |
Use Source bidding to granularly target and price apps (sources) within your ad campaign, so that you can bid higher or lower on individual sources per geo.
Source bidding gives you the self-service tools to granularly bid against source app IDs on a per-country basis. Each source app is valued differently based on its geos and quality of users. The ability to bid on sources accordingly, instead of placing a single bid across all sources within a given geo, creates greater efficiency within your ad spend.
- Granular optimization: Instead of applying the same price across all sources within a geo or larger app targeting list, make intelligent optimizations with granular bids for individual sources in each geo.
- Flexibility and targeting control: Increase control of how much you spend per source, and the flexibility to make changes.
- Self-service: It’s easy to set up and optimize campaigns on the dashboard without specialized support.
Each source app has an associated source app ID. Source bidding lets you place bids against the source app IDs you want to target, per country, by modifying and uploading a spreadsheet in the Acquire dashboard.
Note: You can add source bids to campaigns that use automated bidding. The automated bidding algorithm treats each source bid as a maximum bid, which means that the actual discounted bid can fluctuate between zero and the source bid amount.
To determine which sources to isolate and target, Unity suggests starting with static CPI campaigns. Use the data from these initial campaigns to analyze the various sources driving traffic, and determine more granular bids based on your own individual return on ad spend (ROAS) and lifetime value (LTV) goals.
Use source bidding as a standalone campaign strategy, or as an additional targeting tactic alongside standard bids. If the Source Bids and Countries & Bids sections target the same Source App ID(s), the source app bids receive priority. You may also target geos in Source Bids that are not targeted in Countries & Bids.
To start using source bids, follow these steps:
- Log in to the Acquire dashboard.
- Find the app that has the campaign that you want to modify, then select it.
- The campaigns page for this app will appear.
- Click the Campaign Name that you wish to modify, or create a new campaign.
- On the campaign page, navigate to the Source bids section, then click Export template.
- After exporting the template, populate the spreadsheet, as described in the next section.
- Return to the Source bids section of the campaign menu, then click Import to upload your modified spreadsheet.
Note: The source_app_ID is an alphanumeric, case-sensitive, 12-character string.
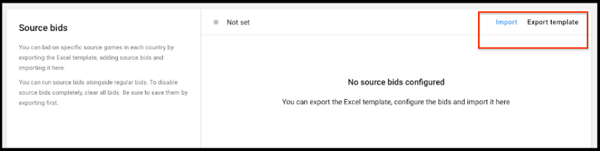
Once you have successfully imported your configuration, the Source bids section will display a list view of the countries you are targeting, and the bid amounts imported from your spreadsheet. A green icon indicates that source bidding is enabled and active.

Select Clear all to clear any imported bids and disable source bidding for the campaign. Alternatively, you can pause or stop the campaign.
Note: If this section remains disabled after uploading your spreadsheet, refer to the errors section below.
To specify your source bids, open the exported template and populate the fields according to the following guidelines:
| Column | Description | Example values |
|---|---|---|
Country code |
The two-letter (Alpha 2) ISO country code representing the source’s geo. Note: Using three-letter country codes will cause an error. |
|
Source ID |
The Unity Ads identifier for the source app, the source_app_id. Note: This is a 12-character alphanumeric, case-sensitive value. |
9g74cAw7WM1L |
Bid |
The amount you are willing to spend, in U.S. currency. This field supports up to two decimal places. Note: Values with three or more decimals will cause an error. |
|
Important: Make sure to save the template as an xlsx file.
Note: If you’ve already entered standard bids in the Countries & Bids section, those bids act as default bids for any sources that are not explicitly defined in your spreadsheet. You may also run a campaign that consists exclusively of source bids.
Any errors when importing your spreadsheet are detailed on the Source bids section of the campaign menu.
Some examples of potential errors include:
- Missing column headers
- Blank values
- Incorrect values (such as three-character country codes, or bids with the wrong number of decimal places)
- Unpopulated fields from a row
- Mismatch in format. For example,
source_app_IDis a 12-character alphanumeric case-sensitive string.
If there are multiple errors, you will see a detailed explanation of all of them:
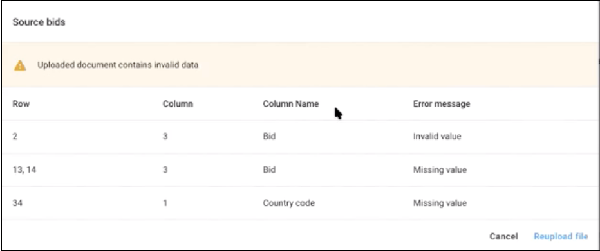
Fix the issues in your spreadsheet, and re-import the file.
To update source bids, revise your spreadsheet and re-import it. As a validation check, your previous bids will appear crossed out.
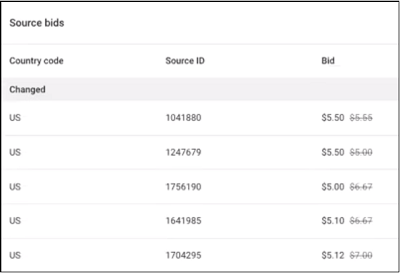
For additional validation, an alert will appear if a bid changed by a substantial amount.

Allowlisting and source bidding are separate campaign targeting tactics. You must clear any allowlisted apps from a campaign in order to use source bids in that campaign. You can still use app blocking (blocklisting) in tandem with source bidding.
Note: The source_app_ID is case-sensitive.
Edit the campaign Name and Bid type. Currently the only supported bid type is CPI (cost per install).
There are three types of budgets:
- Organization budget
- Campaign budget
- Daily budget
Read this section to learn how budget settings dictate how much marketing spend your user acquisition campaigns could consume.
Note: Campaign budget limits are estimates; Unity does not guarantee that you'll be invoiced according to the budget limit amount.
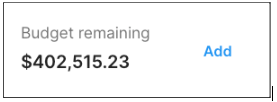
The overall marketing budget your organization has available to spend with Unity’s ad platform is called an Organization budget. If the organization budget reaches zero, all activity within the organization’s ad campaigns will pause until there is an available organization budget to spend from.
To add budget to your advertising account, select Add from the bottom left corner of the Growth dashboard.

Note: For invoicing options, please contact your account manager at Unity to arrange details.
Locate the remaining organization budget in the lower left corner of the Growth dashboard, next to Add.
Use Report Builder or Statistics API for historical spend reporting to understand how your organization has consumed its budget.
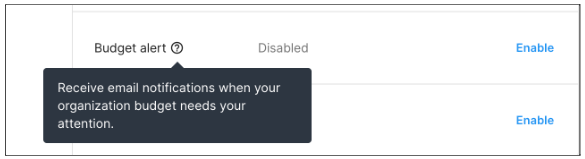
Use the settings page to enable a personal organization budget email alert if you want to be alerted when your organization budget is running low.
To change a setting:
- Select Settings from the left navigation menu of the Growth dashboard.
- Go to the Budget alert setting.
- Select Enable.
Your organization budget gets consumed by your active ad campaigns. You can specify budget limits to control campaign spend for each ad campaign.
The available budget limits are:
- Total campaign budget (the maximum amount a specific campaign can spend)
- Daily budget (the maximum daily amount a specific campaign can spend)
To specify budget limits for a campaign:
- Go to the configuration details of your campaign
- Find the Budget section and select edit.
- Input your desired daily budget and/or campaign budget.
Both of these values are optional. When left empty, the campaign will have unlimited budget to spend.
- Unlimited campaign spend: Leave daily budget and campaign budget both empty.
- Limit overall campaign budget but allow unlimited daily spend for the campaign: Specify the desired campaign budget and leave daily budget empty.
- Limit daily spend for the campaign but allow unlimited overall campaign budget: Specify the desired daily budget and add a very high value as the campaign budget to allow unlimited campaign budget. Campaign budget is a required field when daily budget is active for a campaign.
- Limit overall campaign budget and daily budget: Specify both daily budget as well as campaign budget
Note: When the daily budget is active for a campaign, a campaign budget is required.
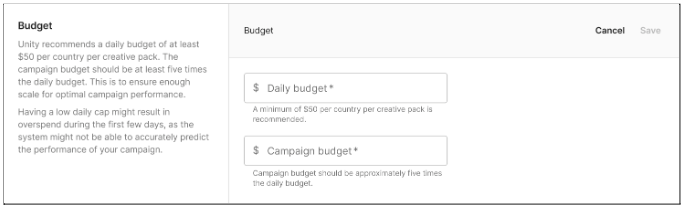
- Unity recommends a daily budget of
$50per country per creative pack. - The campaign budget should be at least five times the daily budget to ensure that there is enough scale for optimum campaign performance.
- If you have a low daily cap, this might result in overspend during the first few days, as the system might not be able to accurately predict the performance of your campaign.
Campaign budgets can be edited for both live and paused ad campaigns. To edit the campaign budgets, go to the configuration details of your campaign and select the edit icon in the Budget section. Enter the desired value for your daily budget and/or campaign budget. You can choose to increase or decrease your campaign budget amount. Select Save to apply your changes.
Budget changes to live campaigns will be taken into account immediately. However, there can be a delay of a couple of minutes before the impressions of your campaign will reflect the applied budgets changes.
- If the campaign budget is increased significantly, it may begin scaling.
- If you decrease the budget significantly the campaign may serve fewer ads or stop serving completely if the budget has run out.
**Important: **Unity’s support for shared campaign budgets will be removed during Fall 2022. If you are sharing budgets between any campaigns, consider moving to single budgets (per campaign) early, before support for share budgets is removed.
- Campaigns that are currently sharing budgets will continue to have the possibility to do so through Unity’s old campaign budget management interface until support is removed entirely.
- Note that some features may not be available for campaigns using shared budgets.
- New campaigns, and existing campaigns that haven't been sharing budgets, will automatically see the new campaign budget management interface, which doesn't have an option that allows different campaigns to share budgets.
To move from a shared campaign budget to a single budget per campaign, you'll need to create a new budget for the campaign that isn't shared with any other campaign.
Select the ** Choose budget ** dropdown, then select ADD BUDGET.
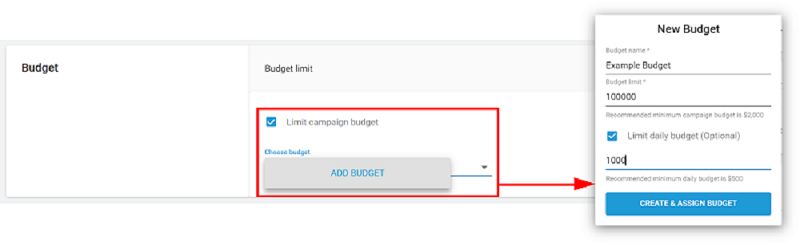
Next, enter a Budget name ** and total ** Budget Limit. If you want to limit the budget amount per day, check Limit daily budget and enter the desired amount.
Once your changes are saved and your campaign is no longer sharing a budget with other campaigns, you'll see the new campaign budget management dashboard, which doesn't allow budget sharing.
Note: Since multiple campaigns are sometimes set up to draw from the same shared budget, remember that your changes may impact the available budget of other campaigns (that originally shared a budget) until you have converted all of them to single budgets. Also keep in mind that the option to share budgets is being discontinued in Fall 2022.
Specify the start and end date parameters for your campaign to run. All dates begin at midnight UTC.
Defines the start date of the campaign. The default value is the current date. Select the edit icon to specify a different date.
Note: Regardless of this date, a campaign must be set to live and meet the necessary criteria in order to run.
Defines the end date of the campaign. The default value is Not set (the campaign will run indefinitely, or until out of budget or paused). Select the edit icon to specify a different date.

Use Source App IDs to allow or block apps to bid on. For more information on acquiring Source App IDs, see section on creating source bids.
Note: The source_app_ID is case-sensitive.
Adding Source App IDs to your allowlist restricts bidding to those specified apps. Note that limiting sources limits the scale of your campaign, so restricting your allowlist too much can negatively impact the campaign's performance.
Adding Source App IDs to your blocklist excludes those specified apps from receiving bids.
Use this section to refine your targeted devices. You only bid for users that fit specified criteria.
Select the edit icon, then check all desired options (wifi or cellular). We recommend selecting both to broaden the reach of your campaign. Select SAVE to apply your preferences.
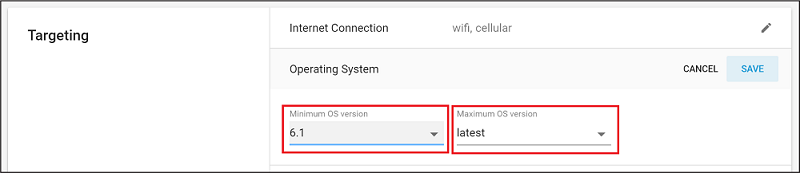
Select the edit icon, then select a Minimum OS version and a Maximum OS version from the dropdowns to define the OS range (note that the platform associated with your app’s store URL determines the list of operating systems). Select SAVE to apply your preferences.
Select the edit icon, then check all desired iOS devices. Select SAVE to apply your preferences.
To target and block Android devices and manufacturers:
- Select the edit icon.
- Select whether you wish to target or block ads for specific device models or manufacturers.
- To target ads for a model or manufacturer, choose Allowlist devices...
- To block ads for a model or manufacturer, choose Blocklist devices...
- In Device models, add Android device models, separating each entry by a comma.
- In Manufacturers, add Android device manufacturers, separating each entry by a comma.
For a list of available device model names and manufacturers, select click here.
Tips:
- Use Report Builder to observe high or low-performing device models or manufacturers, and alter targeting based on performance. The available dimensions in Report Builder are Device Model and Device Manufacturer.
- Use manufacturer and device model targeting together. For instance, by selecting Samsung as the allowlisted manufacturer and adding a few specific Huawei device models, you target all of Samsung and your desired Huawei devices.
As you type the Android device models you wish to target, basic input device validation and auto-suggestions will help prevent errors. If you see an error, review the model numbers to ensure your campaign is targeting the desired devices before going live with the campaign.
Note: You can allow or block any manufacturer, even if it is not auto-suggested.
Players with iOS or Android devices can enable the Limited Ad Tracking (LAT) setting on their devices to opt out of interest-based advertising. Use the LAT targeting setting in the dashboard to fine-tune your campaign bidding based on a device’s LAT setting. This allows you to create separate campaigns and bids targeting users with LAT on or off if you value those users differently.
For more information on the LAT setting, see Apple’s documentation or Google’s documentation.
Important: In order to use the Limited ad tracking setting, you must provide an attribution link from a provider that supports LAT. If no valid attribution link is detected, the setting will be disabled.
The following attribution providers support this feature:
For more about attribution partners and working with attribution links, see the documentation on server-to-server install tracking and attribution tracking links.
If you are using a preferred vendor but you still see an error message on the Limited ad tracking setting, please contact support
Both LAT-enabled and LAT-disabled segments are included in campaigns by default, meaning you’ll bid on both LAT segments equally. If you value each segment differently, create a targeted campaign by following these steps:
- From the Acquire Dashboard, choose the app, then click it. The campaign page appears. Choose the campaign name that you want to modify.
- Ensure that you’ve entered a valid attribution tracking link from a provider that supports LAT (see the list above.
- Scroll to Device Settings > Limited ad tracking and click the edit icon.
- Uncheck the segment you want this campaign to ignore. For example:
- To target devices with LAT enabled (cannot receive interest-based ads), only check Devices with LAT switched on.
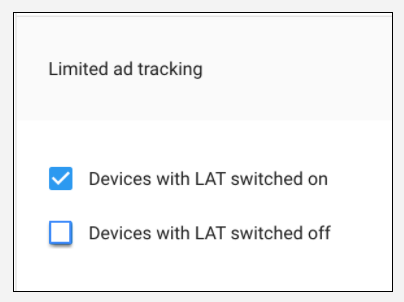
- To target devices with LAT disabled (can receive interest-based ads), only check Devices with LAT switched off.
- To target devices with LAT enabled (cannot receive interest-based ads), only check Devices with LAT switched on.
If you see a message when you scroll to the Limited ad tracking setting, refer to this chart:
| Message | Cause | Solution |
|---|---|---|
Use an attribution provider that supports LAT. |
The attribution tracking links for this campaign do not support LAT. | Switch to an attribution partner that supports LAT. |
Add a supported tracking link. |
There is no attribution tracking link listed. | Add tracking links to the campaign, using an attribution partner that supports LAT. |
Select the edit icon, then check all desired options:
- small (at least 426 x 320 pixels)
- normal (at least 470 x 320 pixels)
- large (at least 640 x 480 pixels)
- xlarge (at least 960 x 720 pixels)
Select SAVE to apply your preferences.
Select the edit icon, then check all desired options:
- Ldpi (120dpi)
- mdpi (160dpi)
- hdpi (240dpi)
- xhdpi (320dpi)
- xxhdpi (480dpi)
- xxxhdpi (640dpi)
Select SAVE to apply your preferences.
Three events can measure user interactions with your video ad campaign:
- Starts (Impressions)
- Completed views
- Clicks
To accurately report these events, you must obtain attribution tracking links from a 3rd-party or in-house attribution service. This section explains how to use the Aquire dashboard to tie these links to campaigns.
See Server to server install tracking to learn where to get the links you will need for this step.
Note: If you wish to differentiate campaigns according to an iOS device's Limited ad tracking (LAT) setting, be sure to choose an attribution partner that supports LAT.
Once you have obtained your links:
- Navigate to the Acquire dashboard
- Click the app you want, then select campaign name that you want to track.
- Scroll to Attribution links. Note: If you are using Adjust or Appsflyer, you will see a question about privacy mode settings. See the section below about these settings for guidance.
- Click the edit icon, then copy the appropriate URLs to the appropriate matching fields.
| Setting | Description | Requirement |
|---|---|---|
Start (Impression) |
Fired when players start viewing the video. The start link executes right before the ad begins to play, helping you measure reach. | Recommended |
Completed view |
Fired when players finish watching the video. Note: This field is hidden by default. To display it, click Show advanced. |
Optional |
Click |
Fired when the player clicks the download button. | Required |
Note: Campaigns require a Click attribution link. However, we recommend assigning Start (Impression) and Completed view attribution links as well. Collecting these settings will help you compare campaigns.
Note: If you wish to differentiate campaigns according to the Limited ad tracking (LAT) setting, be sure to choose an attribution partner that supports LAT.
If you use either of these modes:
- Adjust’s Extended Privacy Measurement (EPM)
- AppsFlyer’s Aggregated Advanced Privacy Mode (APM) (or their iOS campaigns)
use the optimized settings described below to improve campaign performance.
To ensure optimized settings:
- Navigate to the Acquire dashboard
- Click the app you want, then select campaign name that you want to track.
- Scroll to Attribution links.
The dialog will change if it detects that you are using Adjust or Appsflyer.
- Check Yes / No to indicate if you are using Adjust EPM or AppsFlyer APM.
- Repeat this step for all apps that have used Adjust EPM or Appsflyer APM.
Remember to update these settings if you change modes within Adjust or AppsFlyer.
Note: If you have never used either of these modes, then disregard this setting.
IMPORTANT: Ensure that ALL links comply with the following requirements. Otherwise the attribution will not work correctly.
- URLs and any redirection uses HTTPS.
- URL contains at least the
{ifa}dynamic custom token. - HTTP redirections should be done via HTTP 3XX codes and not via HTML/Javascript.
- URLs cannot redirect to the Apple App Store or Google Play store.
When you save the attribution link, the dashboard checks for errors to validate that the URL is syntactically correct.
You see a zero conversion rate, because Unity stops delivering a campaign, or the attribution partner reporting doesn’t show starts, views, or installs.
Even if a URL passes validation, it might still be incorrect due to a typographical error or other issue.
Try the following:
- Check the attributions links carefully and correct typographical errors.
- Ensure that the attribution links follow the URL formatting rules listed above.
- Be certain you have the appropriate attribution link in the appropriate field. (For example, do not put a Completed view link in the Click field.)
Before you go live with a new campaign, use the Attribution Links Tester to ensure that your links are properly configured. The Attribution Links Tester is a feature of Unity’s Ad Testing app, which you can download from the Apple App Store for your iOS device, or from the Google Play Store for your Android device.
The Attribution Links Tester:
- Simulates a user installing the advertised game, and checks that the install is attributed properly.
- Reduces your risk of failed attribution, incorrect reporting, misleading campaign performance data, and related issues.
To download and install the Ad Testing app, go to its Apple App Store or Google Play page. You can also search “Ad Testing” in the app store.
Important: Make sure to install version 2.4.1 or higher for iOS, and version 2.4.0 or higher for Android.
Before running your test:
-
Make sure you have at least one approved creative pack in the campaign you’re testing. If you don’t, the Attribution Link Tester will not work.
-
Make sure you have a budget assigned to the campaign you’re testing. If you don’t, the Attribution Link Tester will not work.
-
Make sure the campaign you’re testing has been set live. If it never has, the Attribution Link Tester will not work. If it is a new campaign, turn it on (that is, go live) briefly, then turn it back off to provide Acquire with the required campaign data.
-
Make sure the game you’re using to test the install isn’t already installed on your device. This would prevent installing the game as part of the test flow, and validating the attribution links.
-
Make sure your device allows apps to request permission to track your data across apps, and that you allow the Ad Testing app specifically to track your data across apps.
For iOS devices, go to Settings > Privacy > Allow Apps to Request to Track and enable the setting.Note: If this setting was already enabled, you must reset your device’s Identifier for Advertisers (IDFA). To do this:
- Toggle the Allow Apps to Request to Track setting off.
- When prompted, select Ask Apps to Stop Tracking.
- Toggle the Allow Apps to Request to Track setting on again.
For Android devices:
- Select Settings > Google services > Ads, and disable the Opt out of Ads Personalization setting to ensure that Google can track your device across apps.
- From the ads settings screen, select Reset advertising ID and confirm that you want to reset your Android Advertising ID.
When you open the Ad Testing app, it will prompt you to allow tracking.
To test your attribution tracking links:
- From the Growth dashboard, select the campaign you want to test and scroll to the Attribution links section.
- Click Test attribution link: Show QR code. Note that this only appears after you’ve entered and saved your attribution tracking links, and the campaign has at least one approved creative pack.
- In the Ad Testing app, click Scan QR, and allow the app to access your device’s camera.
- Scan the QR code from the dashboard.
- Following the on-screen prompts, initialize the ad.
- Play the ad and select CTA to install the app on your device.
- Open the advertised app to give it time to send postbacks to the MMP. The MMP will then forward install postbacks to Unity.
- Return to the test app and select Check Install Postback Status.
Note: It may take a few minutes before Unity receives install postbacks from MMPs. Unity supports a validation period of up to 12 minutes. Tapping Check Install Postback Status on the Attribution Link Tester initiates the first validation attempt. If the first attempt does not yield a positive result, wait a few minutes and try again. If additional attempts continue to fail, the attribution links are either not correct, or the MMP requires more than 12 minutes to return the install attribution data.
Important: Unity does not support testing for Android standalone campaign attribution links or cross-promotion campaign attribution links.
To learn more about attribution links, see Server to server install tracking.
To learn about MMP troubleshooting, see this guide.
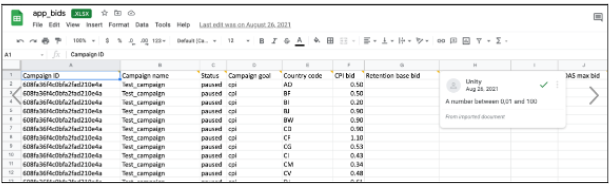
Bulk Campaign Management with Spreadsheets is a beta feature designed to save you time when working with large campaigns.
If you have multiple campaigns and bids (country bids or source bids), use this feature to manage each app campaign in its own set of spreadsheets. This is faster and more efficient than separately managing them with the user acquisition platform.
This feature is an alternative to Unity's Management API product. Unlike the Management API product, you don't need coding skills to use it.
Note: You cannot use spreadsheets to create a new campaign that uses automated bidding, but you can export, import, and modify existing automated bidding campaigns by using bulk campaign management with spreadsheets. Automated bidding campaigns support the Bids and Source Bids spreadsheet exports.
Bulk Campaign Management with Spreadsheets is a set of three custom spreadsheets that gives you the power to manage the following in bulk:
- Campaign setups
- Country bids
- Source bids
Use this management option on an app/campaign-set level.
Use app_campaign_setups.xlsx to do the following in bulk, from a simple spreadsheet interface:
- Add new campaigns
- Edit targeting settings
- Schedule
- Add attribution links of several different campaigns
- Assign or unassign new creative packs to campaigns in bulk
Use app_bids_spreadsheet.xlsx to:
- Add new countries in bulk as part of campaign targeting
- Manage country bids of several different campaigns
- Remove countries in bulk
Use app_source_bids_spreadsheet.xlsx to bulk manage source bids for several different campaigns.
- Navigate to the Campaigns page of your app and locate the Import and Export buttons.

-
Select Export to choose the spreadsheet you wish to download.
-
Open the spreadsheet in an application such as Microsoft Excel or Google Sheets that can read
.xlsxfiles.
Each column contains a tooltip that appears as you hover over the column title. Use the tooltip guidance to complete the spreadsheet.
Once you finish modifying the spreadsheet, save the changes and return to the Campaigns page. Select Import to upload your changes back to Acquire.
- Export the Campaign Setups spreadsheet.
- To add new campaigns, leave the Campaign ID column empty (it is auto-generated by Unity when you import the file).
- Configure other columns, such as campaign name, attribution links, and targeting, by directly entering values in the appropriate cells of the spreadsheet.
Download the Bids spreadsheet to modify the country bids of several different campaigns at once.
Download the Source Bids spreadsheet to add new source bids to several different campaigns at once.
- Unity supports bids with up to two decimal points.
- During the import validation process, Unity considers the formatted value. For instance, if you import a spreadsheet with a formatted bid value of
.01and a raw value of.009, Unity uses and applies the formatted bid value.
After you import the changes, you have the opportunity to preview, then confirm.
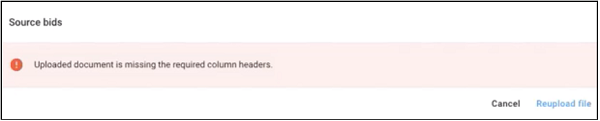
When you import the spreadsheet, the message Uploaded document contains invalid data appears if the spreadsheet doesn't pass validation.

As prompted, download the spreadsheet again. Find the column containing error messages to guide your corrections.
Once you have fixed the errors, select Reupload file to try again.
Campaign budgets and daily caps are not bulk-editable by using these spreadsheets, but this functionality may eventually be added.
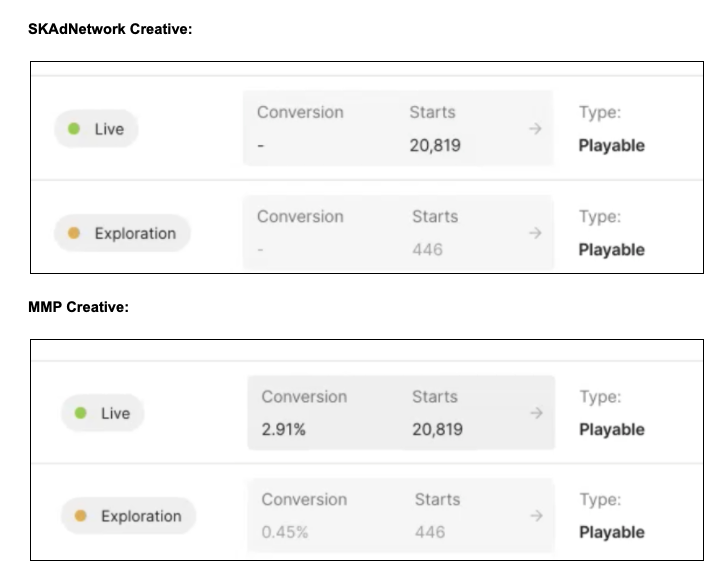
When looking at a campaign, you might notice a menu choice that allows you to switch between metrics for Mobile Measurement Partners (MMP) and the SKAdnetwork.
Note: This toggle is only available on iOS campaigns, and will only appear if Unity is receiving SKAdNetwork postbacks. If we are not receiving SKAdNetwork postbacks, then you will not see this feature on the dashboard.
Use this toggle to update measures such as installs, conversion rate, and average CPI according to your selection.

Here is a comparison of two snapshots from the last 24 hours of a test account. One is showing MMP metrics, and the other is showing SKadNetwork metrics.
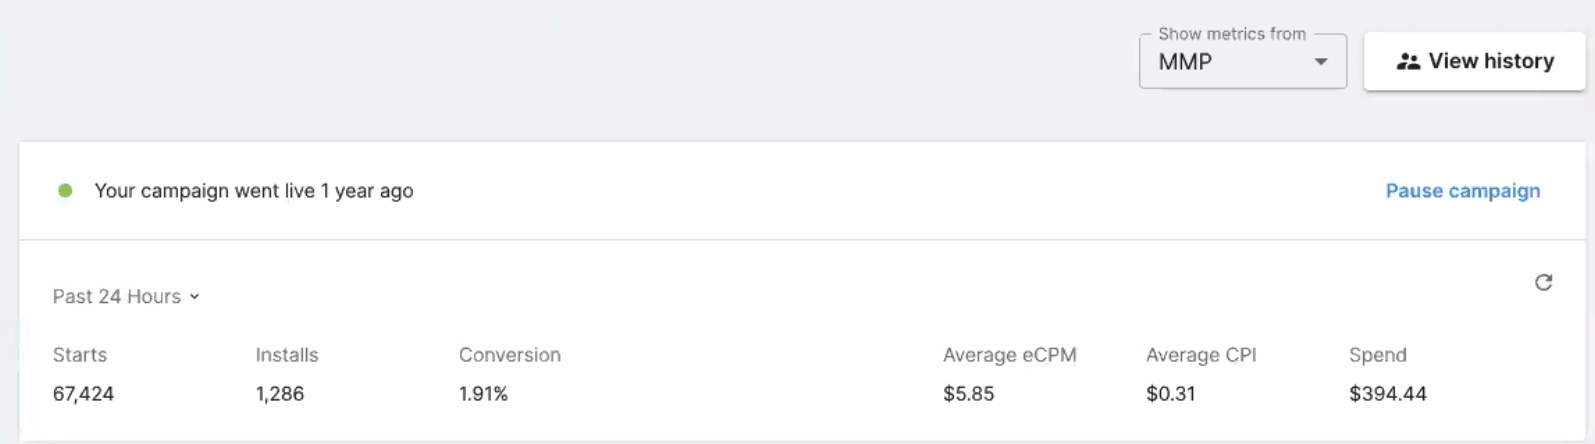
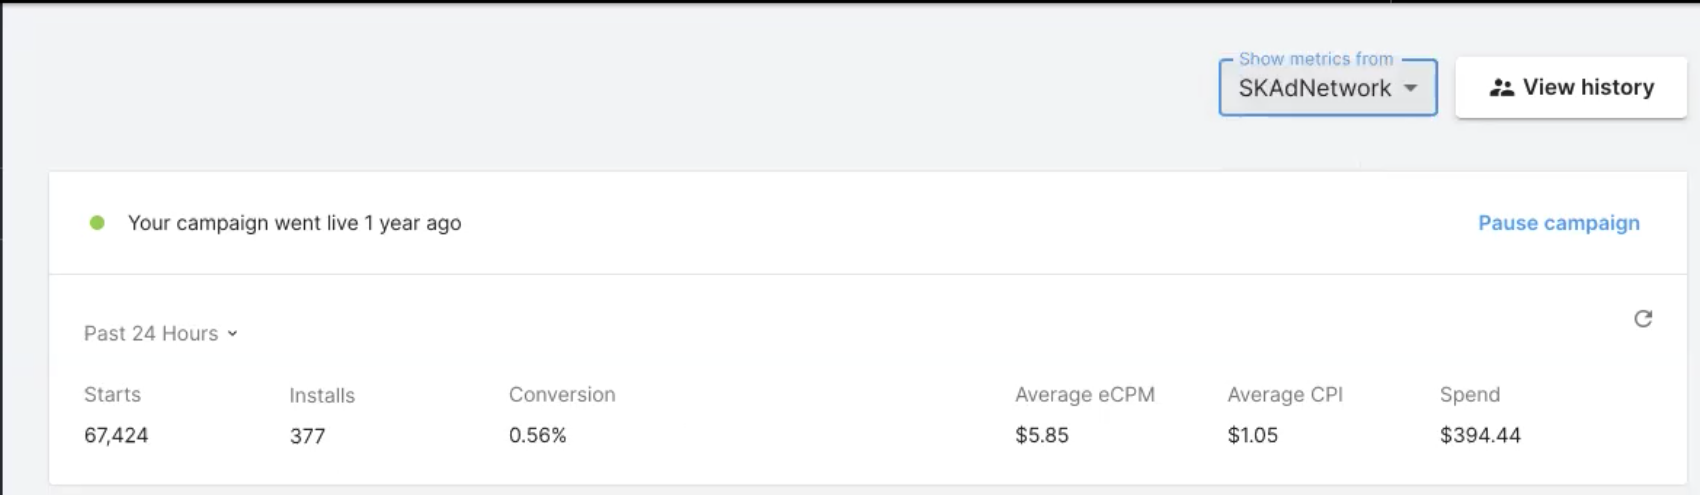
Note that the number of installs differs in the examples. This discrepancy will gradually change as SKAdNetworks are adopted. See this FAQ for details.
The available slots indicator provides you with the visibility to track how many combinations of campaigns and creative packs are available for iOS campaigns.
If you try to exceed the iOS campaign limitations, it will not succeed. You will see a dialogue that helps explain why.
Unity has observed that install postbacks received from Apple’s SKAdNetwork are most often received within a 72-hour window. In order to support the correct association of the delayed SKAdNetwork installs to iOS campaigns and creative packs, all paused iOS campaigns and/or unassigned creative packs enter a 72-hour cooldown before they get released as available slots.
From the Available Slots Indicator, advertisers can see how many slots are in cooldown, and when a next batch of their campaign slots will become available
As you will note, certain details, such as conversion statistics, don't appear for SKAdNetwork selections as we do not receive creative pack granularity on SKAdNetwork postbacks.