audience pinpointer - Unity-Technologies/unity-ads GitHub Wiki
/*
Title: Configuring Audience Pinpointer campaigns
Sort: 5
*/
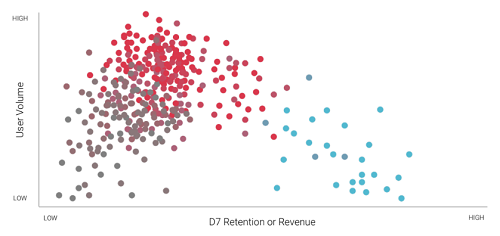
An Audience Pinpointer campaign is a powerful user acquisition service that uses machine learning to help you find players most likely to have value beyond an initial app install - users who are most likely to continue playing your game. Using dynamic pricing (the price paid for impressions or installs depending on the predicted value of the user in your app), Audience Pinpointer allows you to bid more for predicted high-value users, and bid less for users who are likely to not continue playing your game after installation.
In this article, we’ll discuss:
- Audience Pinpointer campaigns overview
- Getting started
- Creating Audience Pinpointer campaigns
- Configuring Audience Pinpointer campaigns
- Privacy compliance in China
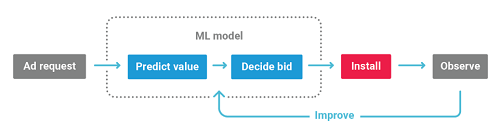
Unity’s machine-learning Audience Pinpointer model uses real-time user valuation at the time of an ad request. Our algorithm determines on a bid for each user based on individual valuation. The system updates constantly based on user behavior and the preferences of millions of users across Unity’s platform.
Audience Pinpointer offers two models (campaign goals) to choose from:
- Retention: A retention campaign goal acquires users who are more likely to use your app for seven or more days.
- Return on ad spend (ROAS): A return on ad spend campaign goal acquires users based on their predicted revenue in your app and return on ad spend during their first seven days in your app.
A retention campaign goal targets users likely to remain in your app at least seven days after installation. With this type of campaign strategy, the Audience Pinpointer feature uses dynamic pricing based on your base bid price and a user’s expected retention rate, allowing you to pay the best price across an entire user base.
To optimize for retention, set a base bid (otherwise known as a CPI, or cost-per-install bid) that the Audience Pinpointer can adjust based on the individual user's expected Day 7 retention in your app. You can think of Day 7 (D7) retention as the share of users playing your app on day seven after app installation. Unity determines this percentage after receiving at least one session event from the user within a 24-hour window starting 168 hours (or seven days) after the install event was recorded.
How retention optimization campaigns work:
- A baseline Day 7 retention in your app for the target audience you have selected might be 10%, which means 10% of users are playing your app on day seven after installing the app.
- Potential User 1 predicted Day 7 retention for your app might be 20%, or twice the average. Therefore, the bid for User 1 is your base bid x2.
- Potential User 2 predicted Day 7 retention for your app might be 5%, or half the average. Therefore, the bid for User 2 is base bid x0.5.
A retention campaign goal enables you to pay the best price for users based on the predicted retention behavior. Our Audience Pinpointer algorithm ensures you are not overbidding for users who are likely to not play your app after installation, and that you bid the best price for users who are likely to continue using your app at least seven days after installation.
A return on ad spend (ROAS) campaign goal targets users predicted to generate revenue through in-app purchases or watching ads. This type of campaign strategy uses dynamic bids to acquire users at the best price. A ROAS campaign goal includes two optimization types: either in-app purchases (IAP) or ad revenue.
Whether specifying an ad revenue or in-app purchase optimization type, revenue-based campaigns help you achieve your return on ad spend (ROAS) campaign goals. You can also understand this as:
The revenue a player generates in their first seven days playing your app ÷ The cost to acquire these users
How ROAS campaigns work:
- Your maximum bid may be $20 and your target Day 7 ROAS goal set as 10%, meaning that, during their first seven days in the app, users should spend 10% of the amount you bid to acquire them.
- Potential User 1 is predicted to generate $1 of revenue during their first seven days in the app. Therefore, the CPI bid for Potential User 1 is $10 ($1 / 0.1 = $10, which is within your maximum bid range).
- Potential User 2 is predicted to generate $5 of revenue during their first seven days in the app. Therefore, the CPI bid for Potential User 2 is $20 ($5 / 0.1 = $50. Since this value exceeds your $20 maximum bid cap, the campaign bids at your maximum bid instead of the calculated bid).
Note: Running install-optimizing campaigns (campaigns with a static CPI bid) simultaneously with Audience Pinpointer campaigns may improve Audience Pinpointer campaign performance, especially on Android and in smaller geographic areas where the total number of installs from Audience Pinpointer campaigns may be low.
Audience Pinpointer campaigns work very well alongside standard install-optimization campaigns, because they each optimize towards a different goal: installs, retention, or return on ad spend. You can decide your campaign structure based on your user acquisition goals.
Implement Audience Pinpointer campaigns in three basic steps:
- Enable passing post-install session events, purchase events or ad revenue events to Unity based on your desired campaign goals.
- Meet geo-specific eligibility. Because Audience Pinpointer campaigns work across determined geo locations, your game must meet certain minimum requirements in order to run revenue or retention campaigns in specific geographical areas.
- Create an Audience Pinpointer campaign with retention or return on ad spend campaign goals.
Audience Pinpointer campaigns require you to pass post-install events to Unity in order to power retention or ROAS campaign goals. Collecting these event types allows Unity to dynamically find the right users for your app.
Post-install events include:
- Session events for retention campaigns
- IAP (in-app purchase) events for return on ad spend (IAP ROAS) campaigns
- Ad revenue events for return on ad spend (ad revenue ROAS) campaigns
Send post-install events through on of the following:
- Your attribution partner (also known as an MMP, or mobile measurement partner)
- An integrated Unity SDK
- A custom server-to-server integration
Note: Using a Unity SDK to send post-install events is currently only valid for iOS and retention or in-app purchase revenue campaign goals. Ad revenue events are only supported with select attribution partners or a custom server-to-server integration.
Most MMPs support post-install event forwarding, and provide detailed instructions on how to pass this data to ad networks. For more information on configuring this integration with Unity-preferred attribution partners, see the documentation on passing post-install events using an MMP.
For iOS applications, you can also pass post-install session and in-app purchase events through a supported Unity SDK.
Note: Unity SDKs do not currently support passing post-install ad revenue events.
Unity recommends this method instead of using an attribution partner for iOS retention or IAP ROAS campaigns. This is because consumer privacy changes released in iOS 14 make it complex to scale User Acquisition (UA) campaigns on iOS with a third-party attribution partner. Integrating a Unity SDK can help you continue to optimize your campaigns, despite the privacy changes in iOS 14 onwards.
Note: When using this method, Unity still encourages passing post-install events for Unity-attributed users through your MMP to enable campaign-outcomes reporting, and to enable Audience Pinpointer campaigns for Android.
If you use Unity Ads to advertise or monetize, Unity recommends passing post-install events through the latest Unity Ads SDK.
If you do not use Unity Ads to monetize, Unity recommends passing post-install events through the latest deltaDNA SDK.
If you use a third-party mediation service, Unity supports post-install events passed from your mediation partner’s Unity Ads adaptor.
Important: The data events passed by a Unity SDK will also include the user’s device type and may include device-specific identifiers (such as an Identifier for Advertisers, known as an IDFA) if the appropriate consent is obtained from the user. Otherwise, an anonymous identifier stored on the device may be used to link events from the same user.
For more information on data collection, see Unity’s Advertiser Terms of Service. In addition, our SDKs pass metadata about in-app purchase events, such as the App Store receipt for the purpose of transaction validation.
If an MMP does not support forwarding a particular event type (such as ad revenue), it is possible to pass those events with a custom server-to-server post-install events integration. However, since this involves a custom integration, Unity may not be able to advise or troubleshoot potential issues encountered with this approach.
An MMP, or attribution partner, is an independent third-party platform that tracks, organizes, and visualizes mobile app data to give marketers a unified view of campaign performance across channels and partners. This section provides precise information about how to configure post-install events for the following attribution partners:
Unity also uses post-install events sent by MMPs for reporting on post-install campaign performance. Currently, campaign reporting on post-install outcomes only includes user-level and post-install events.
The following tables identify which event types are supported by popular MMPs for Android and iOS.
| MMP | Session (Retention) | Purchase (IAP ROAS) | Ad revenue (Ad ROAS) |
| AppsFlyer | Yes | Yes | Yes* |
| Adjust | Yes | Yes | Yes |
| Singular | Yes | Yes | No |
| branch | Yes | Yes | No |
| Kochava | Yes | Yes | No |
| Tenjin | Yes | Yes | No |
* Appsflyer only supports passing ad revenue data through Data Locker. For more information, see the Appsflyer documentation.
Important: Make sure to follow your attribution partner’s setup instructions carefully. Incorrect integrations will result in loss of event data, as events cannot be fired after the configuration is fixed.
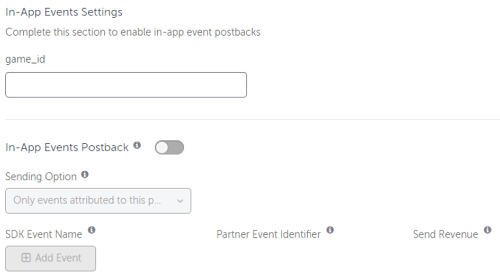
To set up Appsflyer to pass post-install data to Unity, follow their documentation using the following parameters for the Appsflyer dashboard Integration tab:
- In the General settings section, in the Unity Ads Game ID field, enter your Game ID from the Unity Dashboard.
- In the In-app event settings section: a. In the game_id field, enter your Game ID again. b. Toggle the In-App Events Postback field to on. c. For optimization purposes, Unity recommends setting the Sending Option field for all SDK-defined events to Events attributed to any partner or organic. This will send events from your entire user base, versus only sending events from users attributed to Unity. d. Click Add Event to add an SDK event to the list for each of the following Unity Ads events:
| SDK event name example* | Partner event identifier** | Send revenue |
af_app_opened
|
session | No values & no revenue |
af_purchase
|
purchase | Values & revenue |
* The SDK event name values in this table are examples. The real values for this field must match the event identifiers implemented in your game. For more information about these parameters, see the Appsflyer documentation on in-app event settings.
** There are more identifiers in the drop-down list. However, do not select any options besides the three listed above.
Important: Double-check and verify the following:
- You do not pass the same event to multiple partner event identifiers.
- You’ve assigned the correct partner event identifier to each specific event.
- You do not pass duplicate events.
- The actual correct value is passed.
- The Game ID you entered is correct.
Incorrect values will result in loss of event data, as events cannot be fired after the configuration is fixed.
Appsflyer only supports passing ad revenue data through Data Locker. Data Locker allows clients to send data collected in their app to cloud storage, where it can be forwarded to multiple destinations. You can use this feature to forward ad revenue data to Unity and enable ad revenue ROAS campaigns on both Android and iOS.
To do so, you must grant permission for Unity through Data Locker.
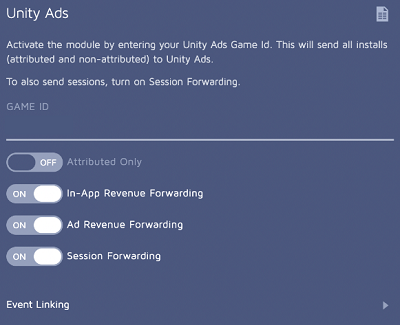
To set up Adjust to pass post-install data to Unity, follow their documentation for basic setup, using the following settings in their dashboard:
- In the Game ID field, enter your Game ID from the Unity Dashboard.
- For optimization purposes, Unity recommends toggling Attributed Only to OFF. This will send events from your entire user base, versus only sending events from users attributed to Unity. For more information, see Adjust’s documentation on forwarding data.
- To pass in-app purchase events, toggle In-App Revenue Forwarding to ON.
- To pass ad revenue events, toggle Ad Revenue Forwarding to ON.
- To pass session events, toggle Session Forwarding to ON.
For more information, see the complete list of parameters forwarded to Unity.
To set up Singular to pass post-install data to Unity, follow their documentation using the following settings in their dashboard:
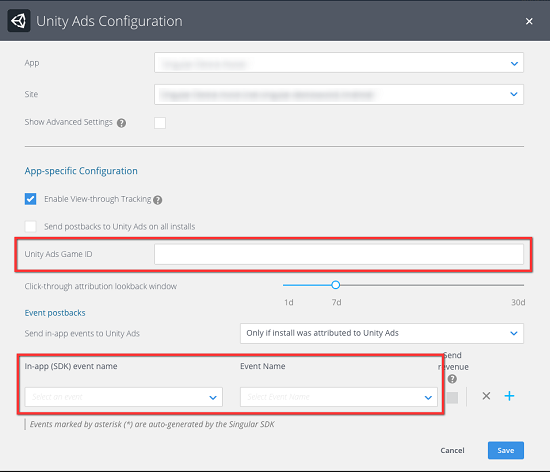
- In the App-specific configuration section: a. In the Unity Ads Game ID field, enter your Game ID from the Unity Dashboard. b. Set the Click-through attribution lookback window.
- In the Event postbacks section: a. For optimization purposes, Unity recommends setting the Send in-app events to Unity Ads field to Send this partner postbacks about all in-app events. This will send events from your entire user base, versus only sending events from users attributed to Unity. For more information, see Singular’s documentation on event postbacks. b. Click the plus (+) icon to add an SDK event to the list for each of the following Unity Ads events:
| In-app (SDK) event name example* | Event name** | Send revenue |
app_opened
|
session | Enabled |
purchase
|
purchase | Enabled |
* The SDK event name values in this table are examples. The real values for this field must match the event identifiers implemented in your game. For more information, see Singular’s documentation on event postbacks.
** There are more identifiers in the drop-down list. However, do not select any options besides the three listed above.
Important: Double-check and verify the following:
- You do not pass the same event to multiple partner event identifiers.
- You’ve assigned the correct partner event identifier to each specific event.
- You do not pass duplicate events.
- The actual correct value is passed.
- The Game ID you entered is correct.
Incorrect values will result in loss of event data, as events cannot be fired after the configuration is fixed.
Currently you can pass only session events for Retention campaigns and purchase data for IAP ROAS campaigns. It is not possible to run Ad Revenue ROAS campaigns using Singular.
You may also pass post-install events for iOS via a Unity SDK - specifically, you can pass session and in-app purchase events with a Unity SDK. Ad revenue events are not currently supported via a Unity SDK.
We recommend using a Unity SDK instead of an attribution partner for iOS and retention or in-app purchase ROAS campaigns. This is because consumer privacy changes released in iOS 14 make it complex to scale User Acquisition (UA) campaigns on iOS with a third-party attribution partner. Integrating a Unity SDK can help you continue to optimize your campaigns, despite the privacy changes in iOS 14 onwards.
The type of SDK you use depends on if you are advertising and/or monetizing with Unity. As a reminder, advertising means you are directly promoting your app through ads on other apps. Monetizing means you offer in-app advertising so other developers can promote their app in yours.
Note: Even if using a Unity SDK, we still encourage passing post-install events for Unity-attributed users through your MMP to enable campaign-outcomes reporting and to enable Audience Pinpointer campaigns for Android.
Supported Unity SDKs for passing post-install events:
- Ads SDK: When advertising and monetizing with Unity, install the latest version of Ads SDK in your app.
- deltaDNA SDK: When advertising but not monetizing with Unity, integrate the deltaDNA SDK for additional insights.
For more information about the latest Unity Ads SDK, read our documentation here. For information about updating the Ads SDK, read our iOS integration guide.
To enable an Audience Pinpointer campaign integration with a Unity SDK:
- For the Ads SDK, ensure your iOS game is integrated with Ads SDK 3.7.1 or above and that you have enabled Acquire optimization from the Unity Dashboard > Monetization > Project Overview > Settings page.
- For the deltaDNA SDK, ensure that
unitySignalSessionevent is integrated for retention campaigns andunitySignalPurchaseevent is integrated for in-app purchase revenue campaigns.
For more information on enabling an Audience Pinpointer campaign integration with the Ads SDK, scroll below to Setting up the Ads SDK for Audience Pinpointer campaigns.
For more information on enabling an integration with the deltaDNA SDK, scroll below to Setting up the deltaDNA SDK for Audience Pinpointer campaigns.
A note on data collection: The data events passed by a Unity SDK will also include the user’s device type and may include device-specific identifiers (such as an Identifier for Advertisers, known as an IDFA) if the appropriate consent is obtained from the user. Otherwise, an anonymous identifier stored on the device may be used to link events from the same user.
For more information on data collection, see Unity’s Advertiser Terms of Service. In addition, our SDKs pass metadata about in-app purchase events, such as the App Store receipt for the purpose of transaction validation.
If advertising and monetizing with Unity, set up the Ads SDK to power iOS Audience Pinpointer campaigns. Please note that only session and in-app purchase events data are supported with the Ads SDK. Ad revenue events data are not currently supported.
To allow Unity to collect iOS session data via the Unity Ads SDK, enable the Acquire Optimization setting from the Monetization dashboard. This setting allows Unity to better define the value of new users in your app, as well as to determine the value of similar users in other apps in your ad network.
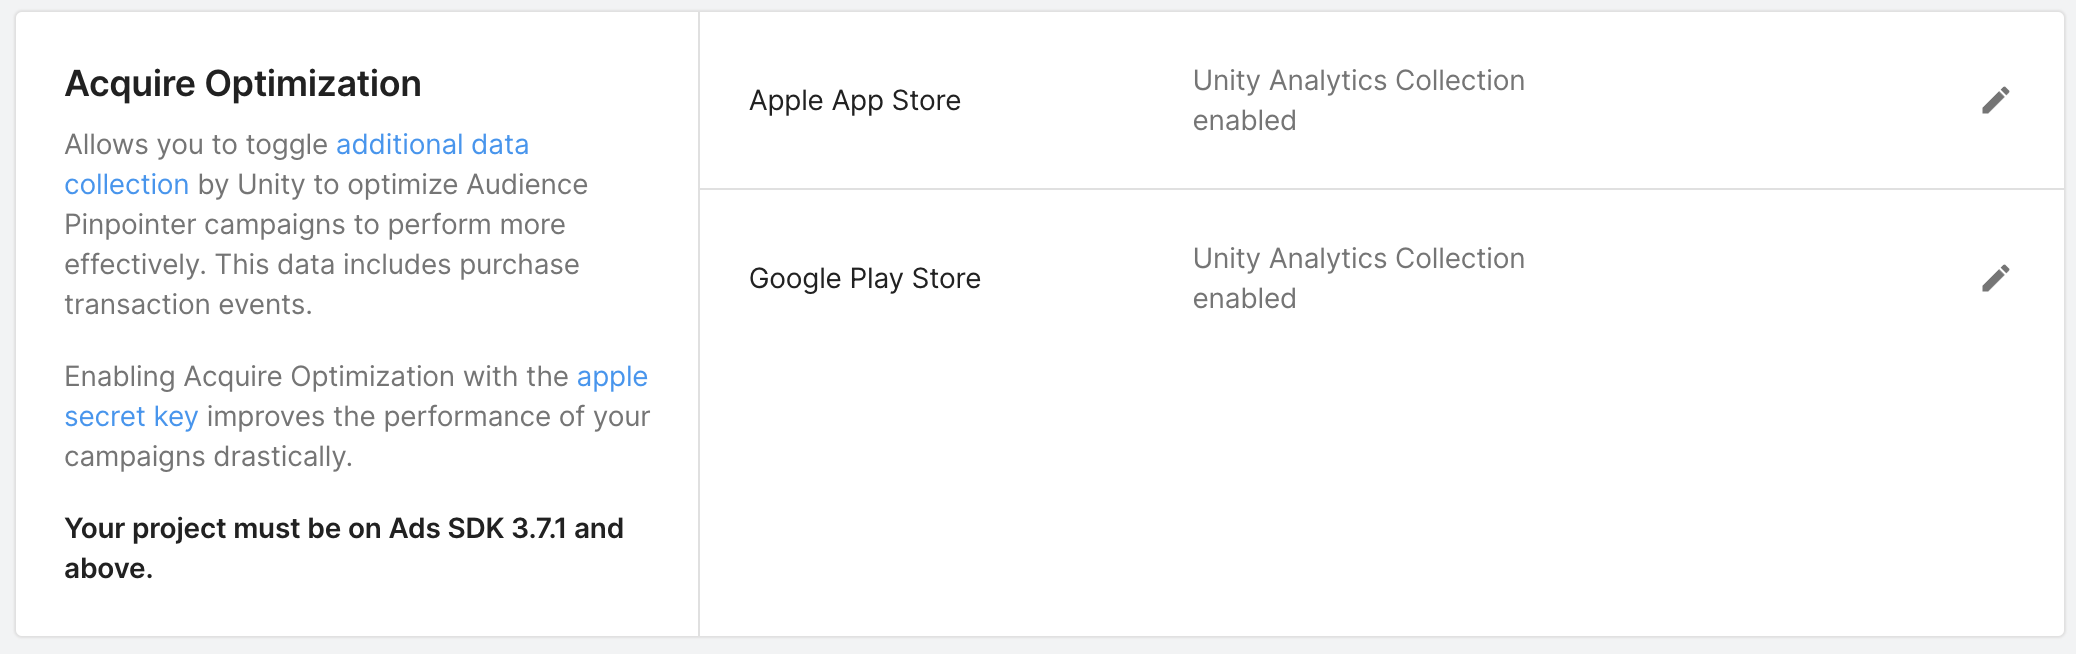
To enable this setting, ensure that your project has the Ads SDK installed, and an active Acquire campaign. Navigate to the Unity Monetization dashboard, select Project > Settings from the Project Overview menu, and then scroll to Acquire Optimization and enable the setting for each platform.
Unity recommends including an app-specific shared secret key for apps on the Apple App Store so Unity can verify subscription purchases. To locate your Apple App Store secret key:
- Sign in to your Apple developer account and select App Store Connect from the left navigation menu.
- Select Go to App Store Connect.
- On the App Store Connect page, select My Apps. If you don't have an app, select the + (addition symbol) button to create a new app.
- Select In-App Purchases > Manage from the left navigation menu.
- Select App-Specific Shared Secret to display the key.
- Copy the key and paste this key into your Acquire Optimization setting in the Monetization dashboard, in the App-Specific Shared Secret field for the Apple App Store.
Note: Acquire optimization is automatically disabled if your app-level age designation is set to This app targets users under 13 years of age, or if you enable one or more selections from the App Store Compliance section of the Monetization > Project Settings page.
This guide assumes you have already installed and set up the deltaDNA SDK for either Unity or iOS in your app. For more information on how to set up the deltaDNA SDK, see our iOS advanced integration documentation.
Note: Since deltaDNA Audience Pinpointer methods are designed for iOS 14, the deltaDNA SDK will only send post-install events for iOS version 12 or later. If this SDK is used for other iOS versions or device platforms, these methods will do nothing.
Once you have set up and configured the deltaDNA SDK following the above documentation, register the Apple Store ID and Apple Developer ID for your app right after you start the deltaDNA SDK using the appropriate code snippet below:
Unity SDK
DDNA.Instance.AppleDeveloperID = "[email protected]";
DDNA.Instance.AppStoreID = "1234567890";
iOS SDK (Objective-C)
[DDNASDK sharedInstance].appStoreId = @"1234567890";
[DDNASDK sharedInstance].appleDeveloperId = @"[email protected]";
iOS SDK (Swift)
DDNASDK.sharedInstance()?.appStoreId = @"1234567890"
DDNASDK.sharedInstance()?.appleDeveloperId = @"[email protected]"
Then, import the required events into your deltaDNA project on the deltaDNA web portal:
- Navigate to the Setup > Manage Events screen.
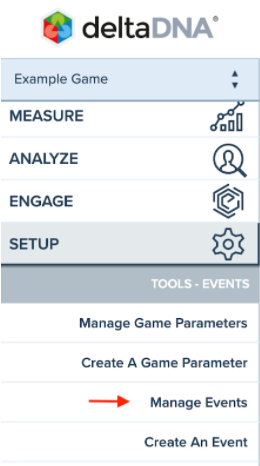
- Select Create Event.
-
Choose the
unitySignalInstallevent from the template event dropdown menu. -
Select Import.
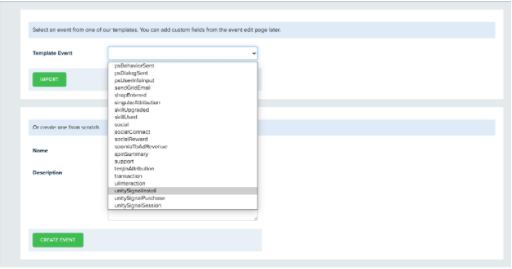
- Scroll down and select Save.

- Repeat for the
unitySignalPurchaseandunitySignalSession events.
There are 3 helper methods provided by the deltaDNA SDK to send session events (for retention campaigns) and in-app purchase events (for IAP ROAS or revenue campaigns): unitySignallInstall, unitySignalSession, and unitySignalPurchase.
Note: The ad revenue feature for enabling the sending of ad revenue events via deltaDNA SDK is not yet available with the deltaDNA SDK.
This event should only be sent on the first startup of the app. To send the unitySignalInstall event, add the following code snippets to the startup code of the app:
Unity SDK
DeltaDNA.AudiencePinpointer.RecordInstallEvent();
iOS SDK (Objective-C)
[[DDNASDK sharedInstance] recordSignalTrackingInstallEvent];
iOS SDK (Swift)
DDNASDK.sharedInstance()?.recordSignalTrackingInstallEvent()
The unitySignalInstall event contains the following data:
- deviceModel: The device model as reported by iOS
- connectionType: Whether the device is connected to WiFi, cellular, or otherwise
- sdkVersion: The version of the UA SDK that sent the event
- appStoreId: The iTunes Connect ID for the app
- appBundleId: The bundle ID for the application
- appDeveloperId: The Apple developer ID for the app developer
- idfv: The IDFV for the user’s device
- idfa: The IDFA for the user, if the user has granted permission to use it
This event should be sent every time the user starts a new app session. The following code samples show how to use this event:
Unity SDK
DeltaDNA.AudiencePinpointer.RecordSessionEvent();
iOS SDK (Objective-C)
[[DDNASDK sharedInstance] recordSignalTrackingSessionEvent];
iOS SDK (Swift)
DDNASDK.sharedInstance()?.recordSignalTrackingSessionEvent()
The unitySignalSession event contains the following data:
- deviceModel: The device model as reported by iOS
- connectionType: Whether the device is connected to WiFi, cellular, or otherwise
- sdkVersion: The version of the UA SDK that sent the event
- appStoreId: The iTunes Connect ID for the app
- appBundleId: The bundle ID for the application
- appDeveloperId: The Apple developer ID for the app developer
- idfv: The IDFV for the user’s device
- idfa: The IDFA for the user, if the user has granted permission to use it
This event should be sent every time a user makes a transaction or purchase within the application. It requires a currency amount (as an integer), a currency type (as a string, for example, GBP for British pounds, or USD for US dollars), as well as the developer ID and store ID required for the other two events.
The currency amount should be in the smallest denomination of the relevant currency. For example, if the currency is USD the amount should be in cents. There are helper methods available in the SDKs to make this conversion easier.
In order to verify that the transactions recorded in the purchase events are genuine, a second event (“transaction”) is sent alongside the unitySignalPurchase event, containing the transaction receipt data and transaction ID. If you wish to use deltaDNA’s other features, and you want to manually record transaction events in order to capture additional transaction data, you can set the setting AutomaticallyGenerateTransactionForAudiencePinpointer to false, which will disable the auto-send behavior. Please note that if you do this and do not send a transaction event with a matching transaction ID, your purchases will not be verified.
The following code samples show how to use this event:
Unity SDK
DeltaDNA.AudiencePinpointer.RecordPurchaseEvent(1000, “USD”);
iOS SDK (Objective-C)
[[DDNASDK sharedInstance]
recordSignalTrackingPurchaseEventWithRealCurrencyAmount :@100
realCurrencyType:@"GBP"];
iOS SDK (Swift)
DDNASDK.sharedInstance()?.recordSignalTrackingPurchaseEvent(realCurrencyAmount: 1000, realCurrencyType: “USD”)
The unitySignalPurchase event contains the following data:
- deviceModel: The device model as reported by iOS
- connectionType: Whether the device is connected to WiFi, cellular, or otherwise
- sdkVersion: The version of the UA SDK that sent the event
- appStoreId: The iTunes Connect ID for the app
- appBundleId: The bundle ID for the application
- appDeveloperId: The Apple developer ID for the app developer
- idfv: The IDFV for the user’s device
- idfa: The IDFA for the user, if the user has granted permission to use it
- realCurrencyAmount: The amount the user spent in the purchase
- realCurrencyType: The currency code which the user spent in the purchase (for example, GBP for British Pounds)
Before enabling Audience Pinpointer retention or ROAS (return-on-ad-spend or revenue) campaign goals in a specific geographical area, Unity needs to collect some data from end users in that geographic location. In most cases, you will be eligible to set up and run retention and revenue campaigns within 10-30 days from when you first start sending this data.
In general, eligibility is based on data from Day 7 (D7) mature install cohorts in a specific geo. An install is considered D7 mature when we have received the install event and subsequent post-install events for a period of 192 hours (8 x 24 hours) after the install event.
An example of Day 7 (D7) mature install cohorts within 10-30 days:
- If you enable sending data on January 01, the first install cohort will consist of installs made on January 01, and it will be D7 mature on January 10 (192 hours after January 01). Therefore, the earliest date when you can be eligible to run Audience Pinpointer campaigns will be January 10.
- On January 10, there is D7 mature data for the install cohort of January 01. On January 11, there is D7 data for two install cohorts (January 01 and 02). On February 08, there is D7 data for 30 install cohorts (January 01-30). Starting from February 09, we only look at the 30 newest install cohorts (January 02-31) for determining eligibility since in most cases you are eligible to run Audience Pinpointer campaigns within 10-30 days from when you first start sending this data.
To be eligible for running ROAS or retention campaign goals, you must comply with the following install, retention, or depositor rates listed below. In addition, Unity will request permission to activate the Unity analytics optimization collection.The requirements are slightly different depending on whether you are passing data via a Unity SDK or through the MMP integration for attributed users.
In both cases, the requirements refer to the 30 most recent Day 7 mature install cohorts. Installs older than 35 days (five weeks from the current date) are not considered. If these requirements are not met for a specific geo, you will not be able to set up retention or ROAS campaign goals in that geo.
To run retention campaigns in a specific geo, you need to have a minimum of 10 retained users in that geo over the 30-day cohorts. This is counted over all installs, not just Unity-attributed installs.
To run IAP ROAS (in-app purchase and return-on-ad-spend) revenue campaigns in a specific geo, you are required to have a minimum of 10 paying users in that geo over the 30-day cohorts. This is counted over all installs, not just Unity-attributed installs. Only users making IAP through the platform provider’s store are considered paying users.
To run retention campaigns in a specific geo, you need to have a minimum of 100 Unity-attributed installs in that geo over the 30-day cohort. The D7 retention rate over the 30-day cohort needs to be at least 1%.
To run IAP ROAS campaigns in a specific geo, you are required to have a minimum of 10 paying users in that geo over the 30-day cohort. This is counted over Unity-attributed installs.
To run ad revenue ROAS campaigns in a specific geo, you need to have a minimum of 200 Unity-attributed installs in that geo over the 30-day cohort. The cohort must also have generated some ad revenue passed to Unity via the MMP, but the cohort can include users who have not generated ad revenue.
Note that Unity recommends you clear any allowlisted or blocklisted apps for Audience Pinpointer campaigns, as Audience Pinpointer campaigns are purely optimized towards users. Please speak to your Unity account representative if you wish to retain these lists for your Audience Pinpointer campaign(s). For more information, see App Targeting.

After following our Getting Started guide, you can create an Audience Pinpointer campaign!
To create a new Audience Pinpointer campaign:
- From the Acquire dashboard, navigate to the app you want to advertise and select Create campaign.
- In the campaign creation window, give the campaign a name, then select Retention or Return on ad spend as your campaign goal. For each Audience Pinpointer campaign type, the number of eligible countries is indicated in the campaign creation window.
Note: If Unity has not validated post-install event data for your app, these options will be unavailable.

Once you have created a retention or return on ad spend campaign goal, configure its details. Because Audience Pinpointer campaigns target users based on geo locations, you can configure these campaigns from the Countries and Bids section of the Campaign Details page.
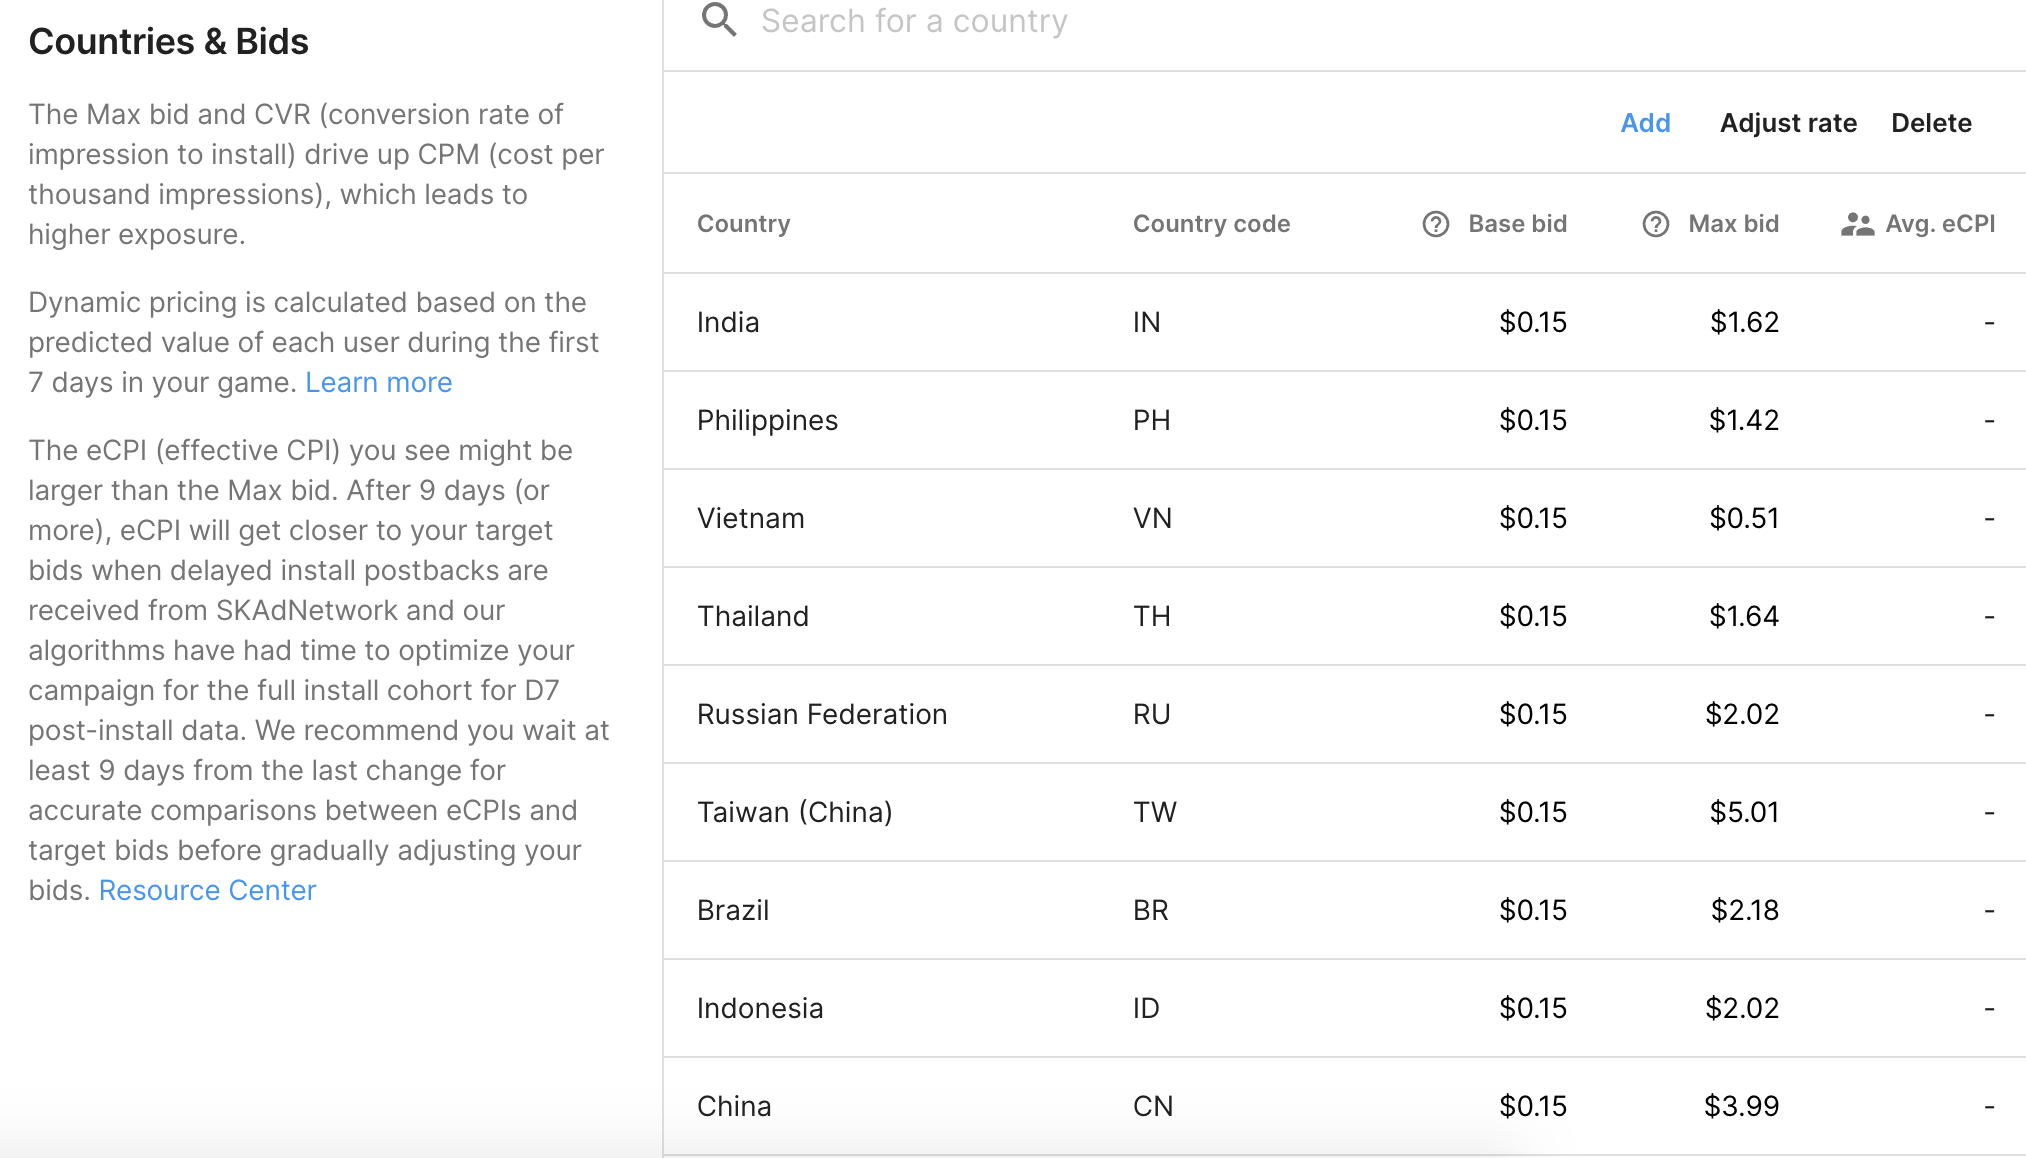
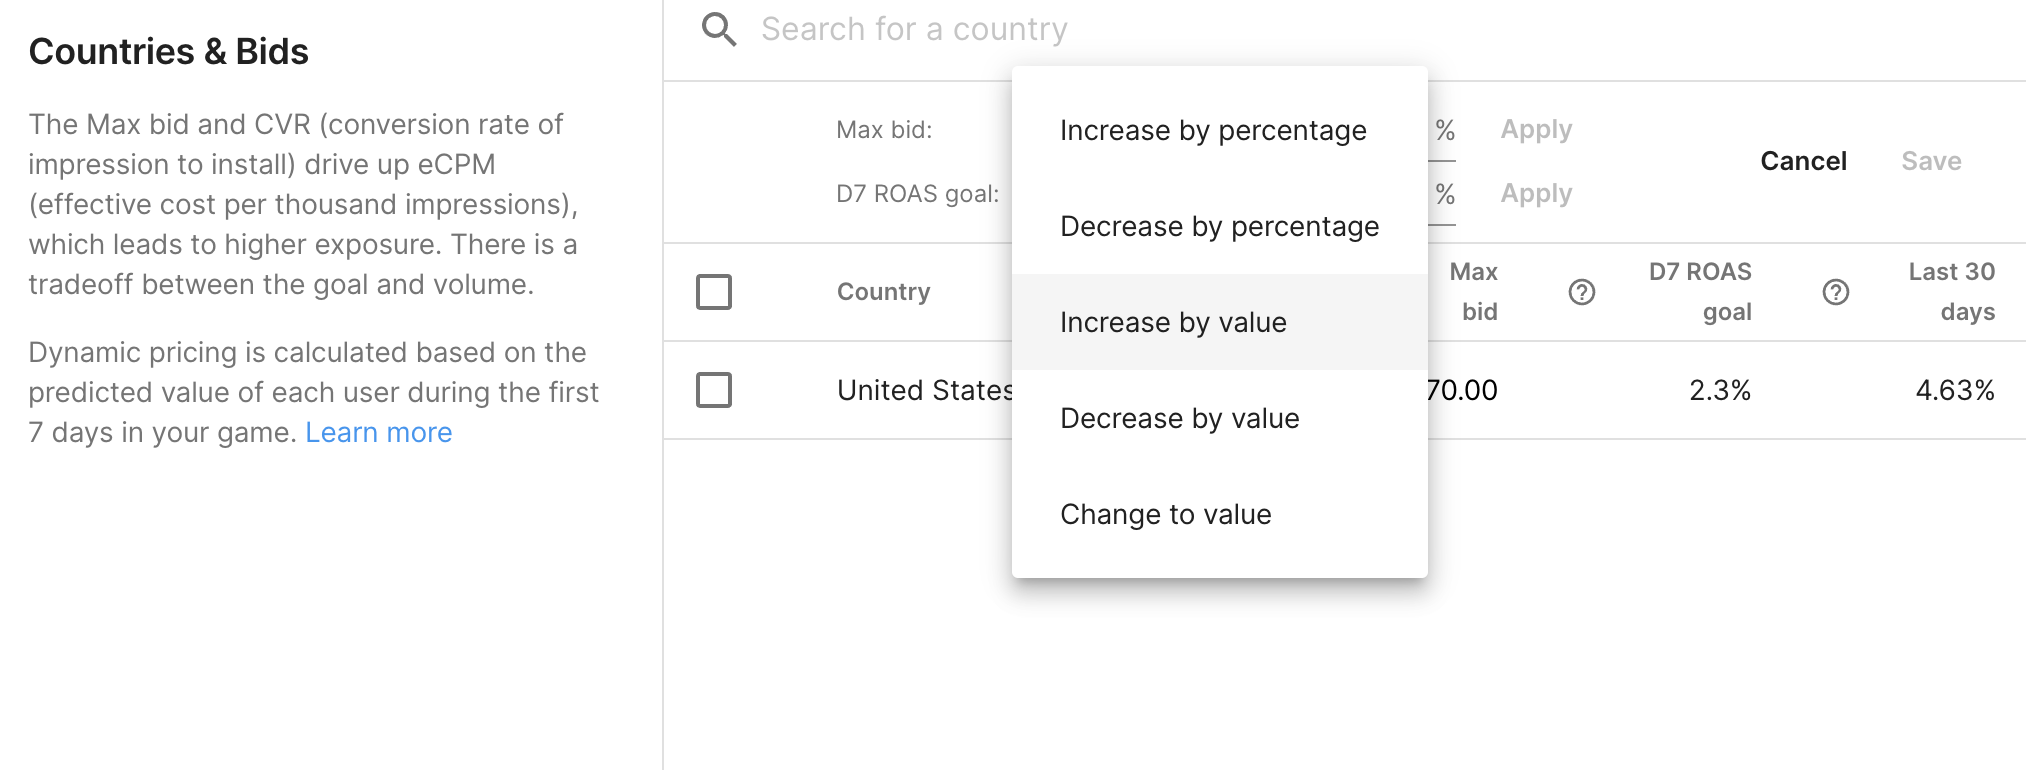
To configure your retention or ROAS campaign goals, scroll to the Countries and Bids section for the selected campaign on the Campaign Details page. From here, you can view eligible countries to target campaign optimization. Select Adjust to edit the parameters of each geographical area.
From the Countries and Bids section, specify Base and Max CPI (cost-per-install) bids for each geo you want to target. The base bid is the CPI you are willing to pay for the average user eligible for this campaign, and the maximum bid is the highest CPI you are willing to pay for a user who is likely to stay in your app.
- Our bidding algorithm uses a base and maximum bid amount to dynamically set your bid for each user based on their predicted retention. While the CPI bid for an individual user may be higher or lower than the base CPI bid, it will never exceed the maximum bid.
- Note that the maximum (max) CPI bid is the intended upper limit for what you wish to pay for users depending on their expected retention in your app. It is a good practice to set the max bid at 2-3 times beyond the base bid.
- Allow at least a full week or two using the provided guidelines to let the data mature before adjusting the target up or down based on campaign performance.
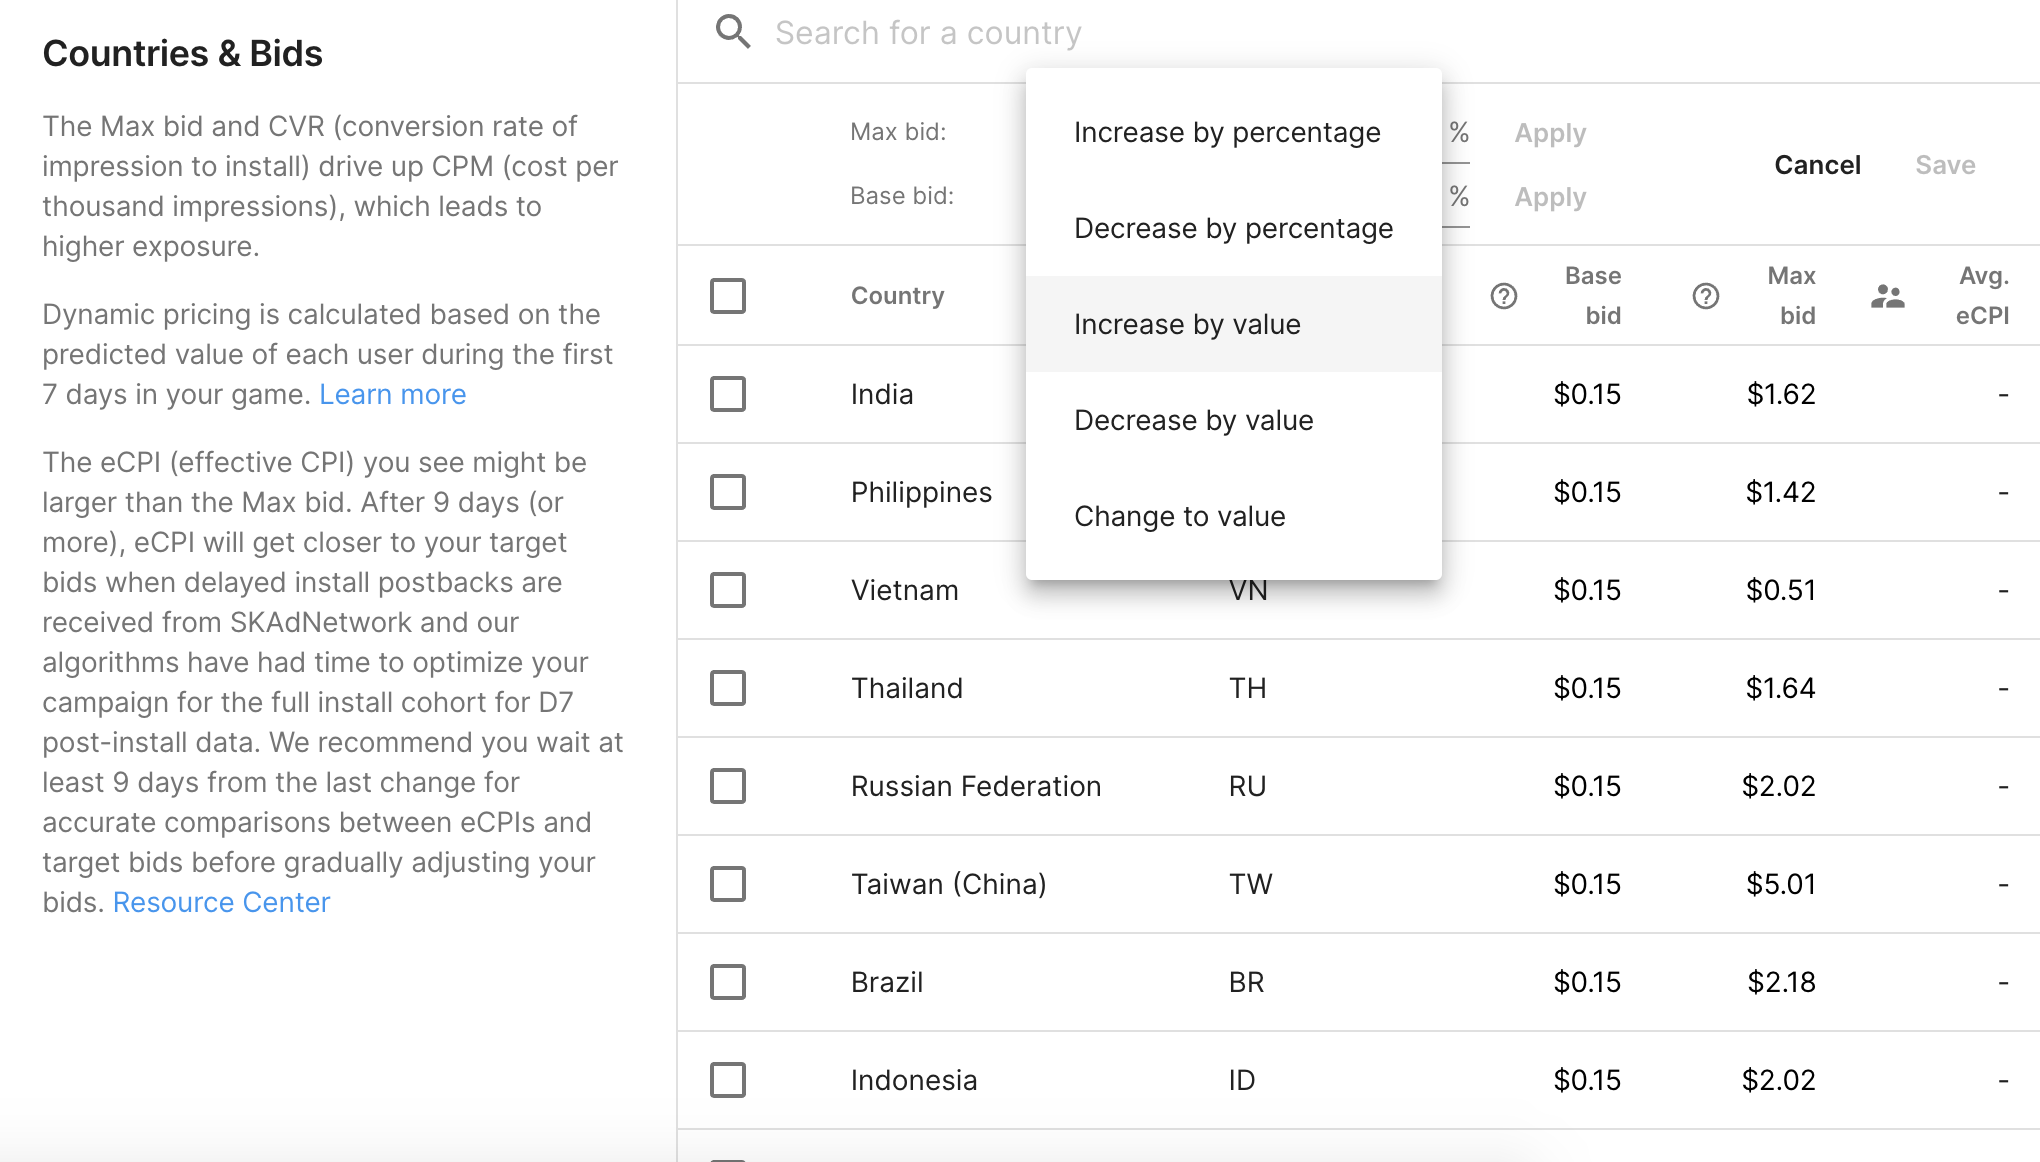
- You can edit these values individually, or check multiple geos to execute bulk changes (increase or decrease by value, increase or decrease by percent, or set to a value).


While the max CPI (cost per install) bid is always respected for individual users, in rare cases it is possible that the average price you pay per install is higher than the max CPI bid. This can happen when you pay for each ad impression (CPM billed campaigns on iOS) but receive less installs than expected by the bidding algorithm. The most likely scenario where this could happen is for campaigns with very little traffic, so it is typically not a practical concern.
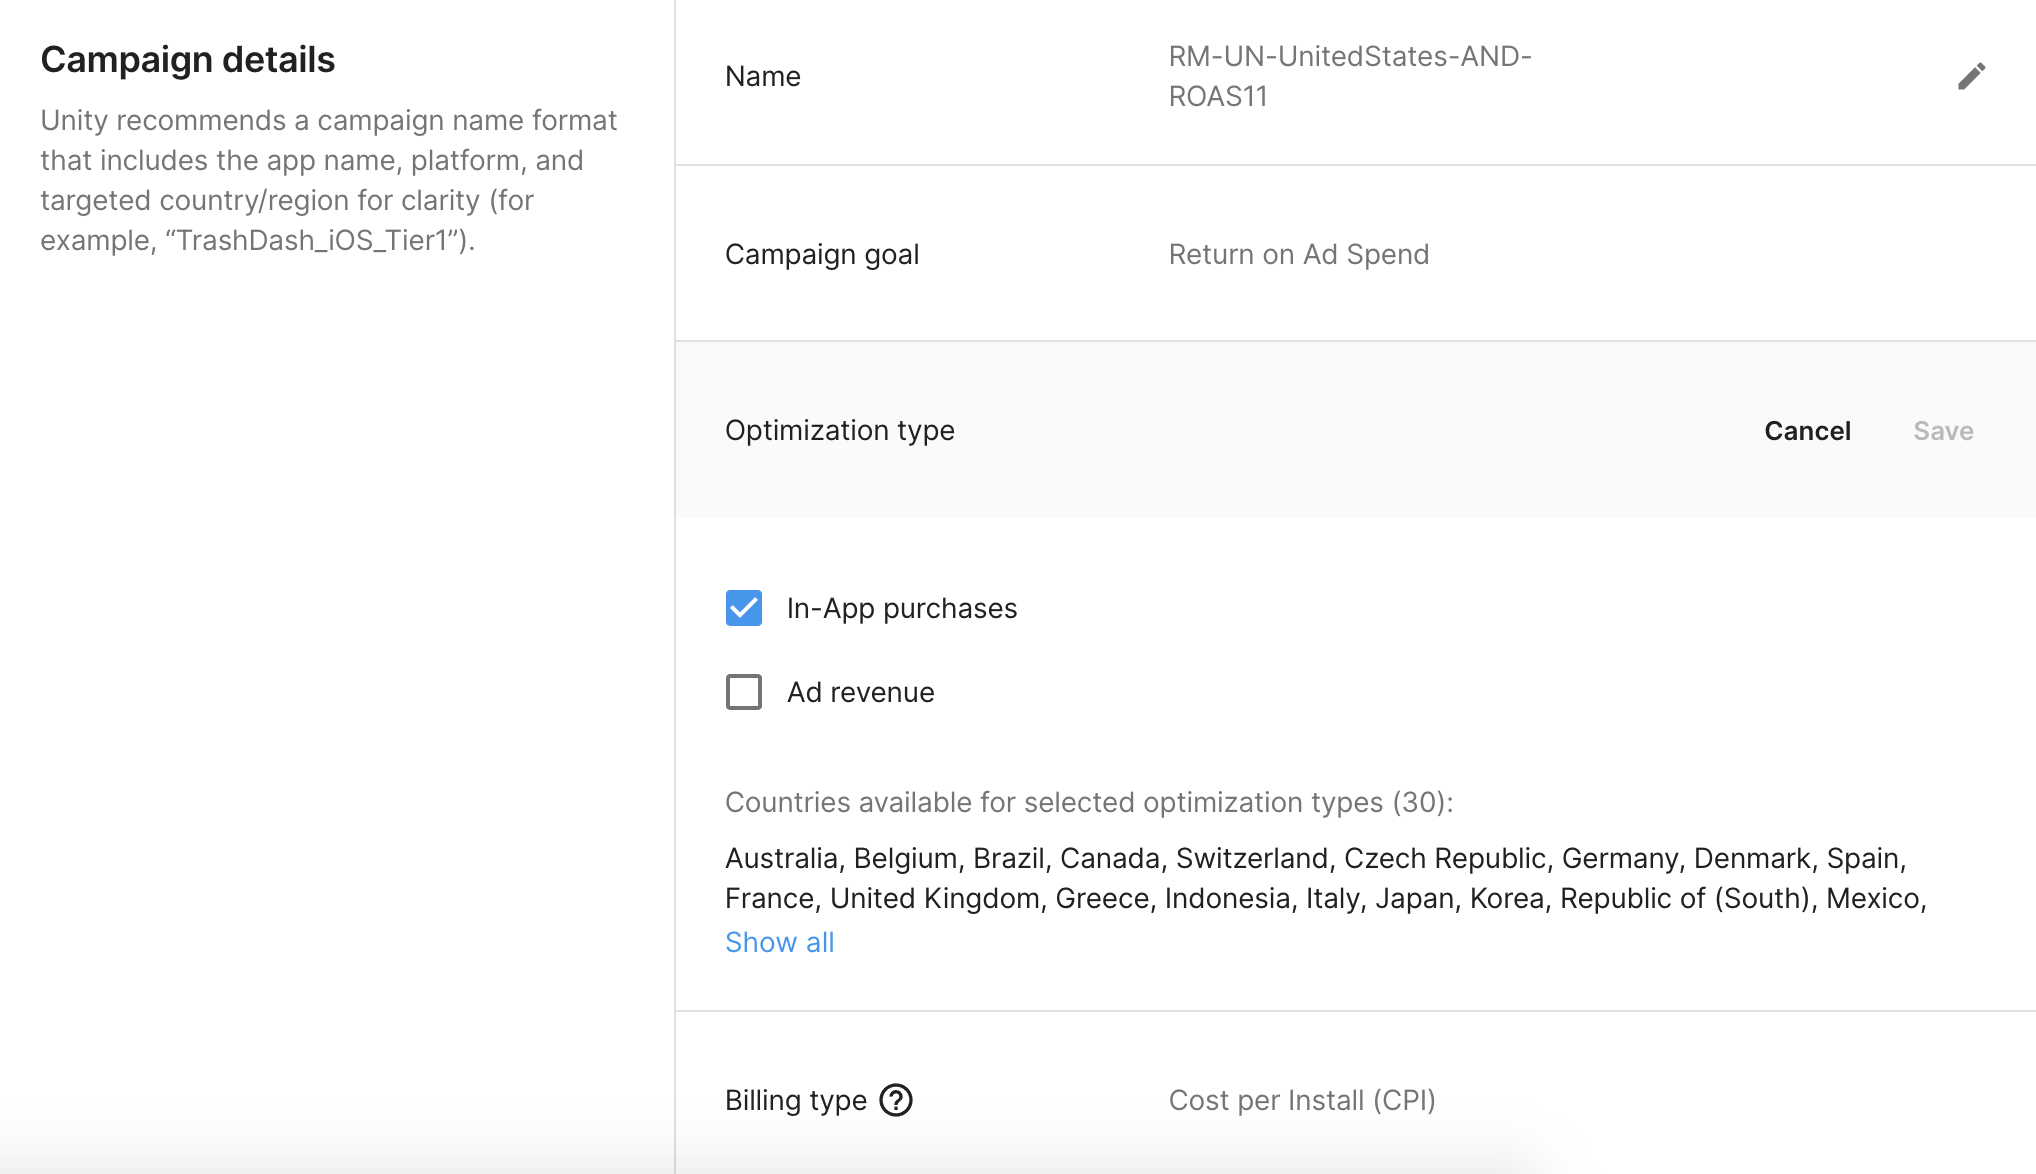
For return on ad spend campaigns you are able to choose whether you are optimizing for in-app purchase ROAS, ad revenue ROAS (for Android via Adjust and Appsflyer MMPs only), or both.
Your campaign target and maximum bid should reflect the optimization type you have chosen. You can view or adjust the optimization type by selecting the campaign from the Acquire Dashboard apps page to open the Campaign Details page. Then, scroll down to the Campaign Details section to view the campaign optimization type as either in-app purchase or ad revenue.
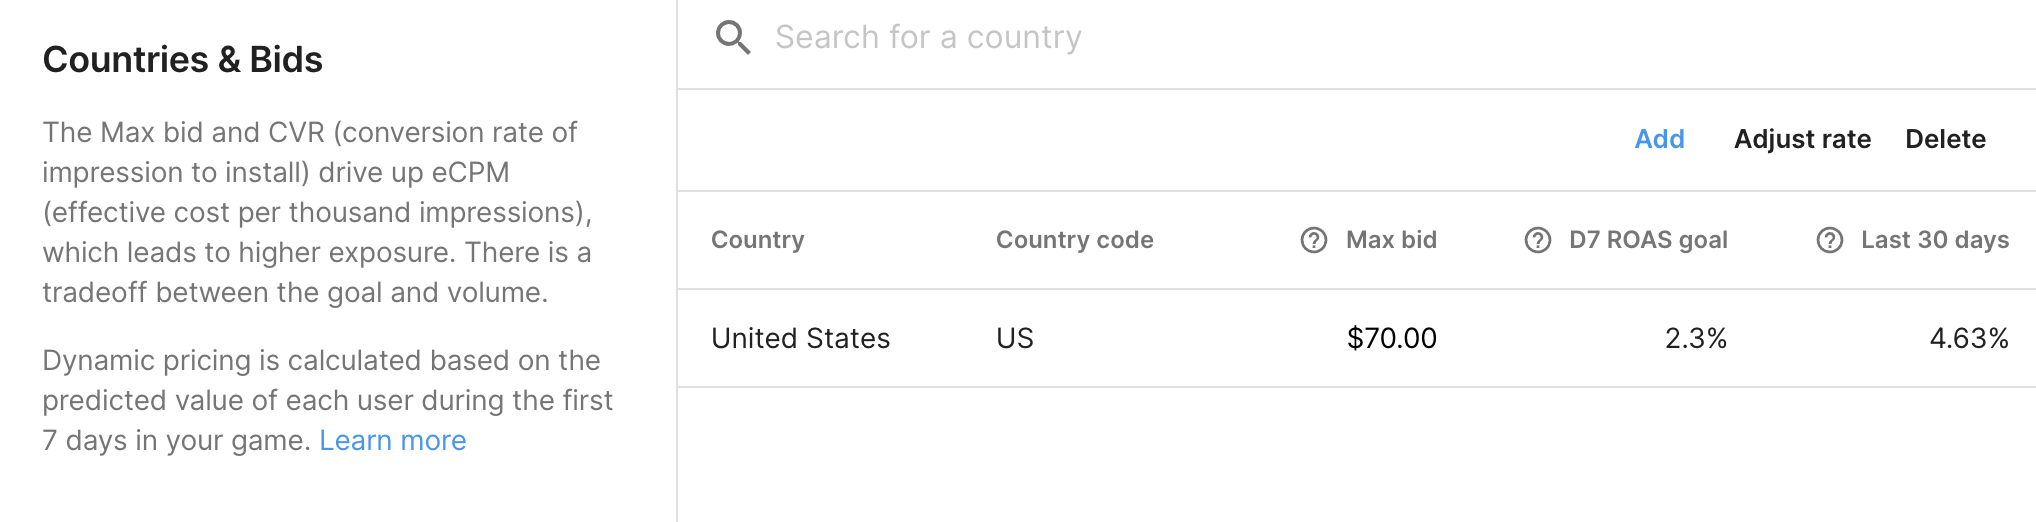
To configure your return on ad spend campaigns, scroll to the Countries and Bids section for the selected campaign on the Campaign Details page to view eligible countries to target for return on ad spend. Select Adjust to edit the parameters of each geographical area.
Specify the D7 ROAS goal and your Max bid for each geo you want to target. The D7 ROAS goal is a realistic return on ad spend (%) you would like to see for a new user after 7 days in your game, while the Max bid is the absolute most you are willing to spend to acquire a high-quality user.
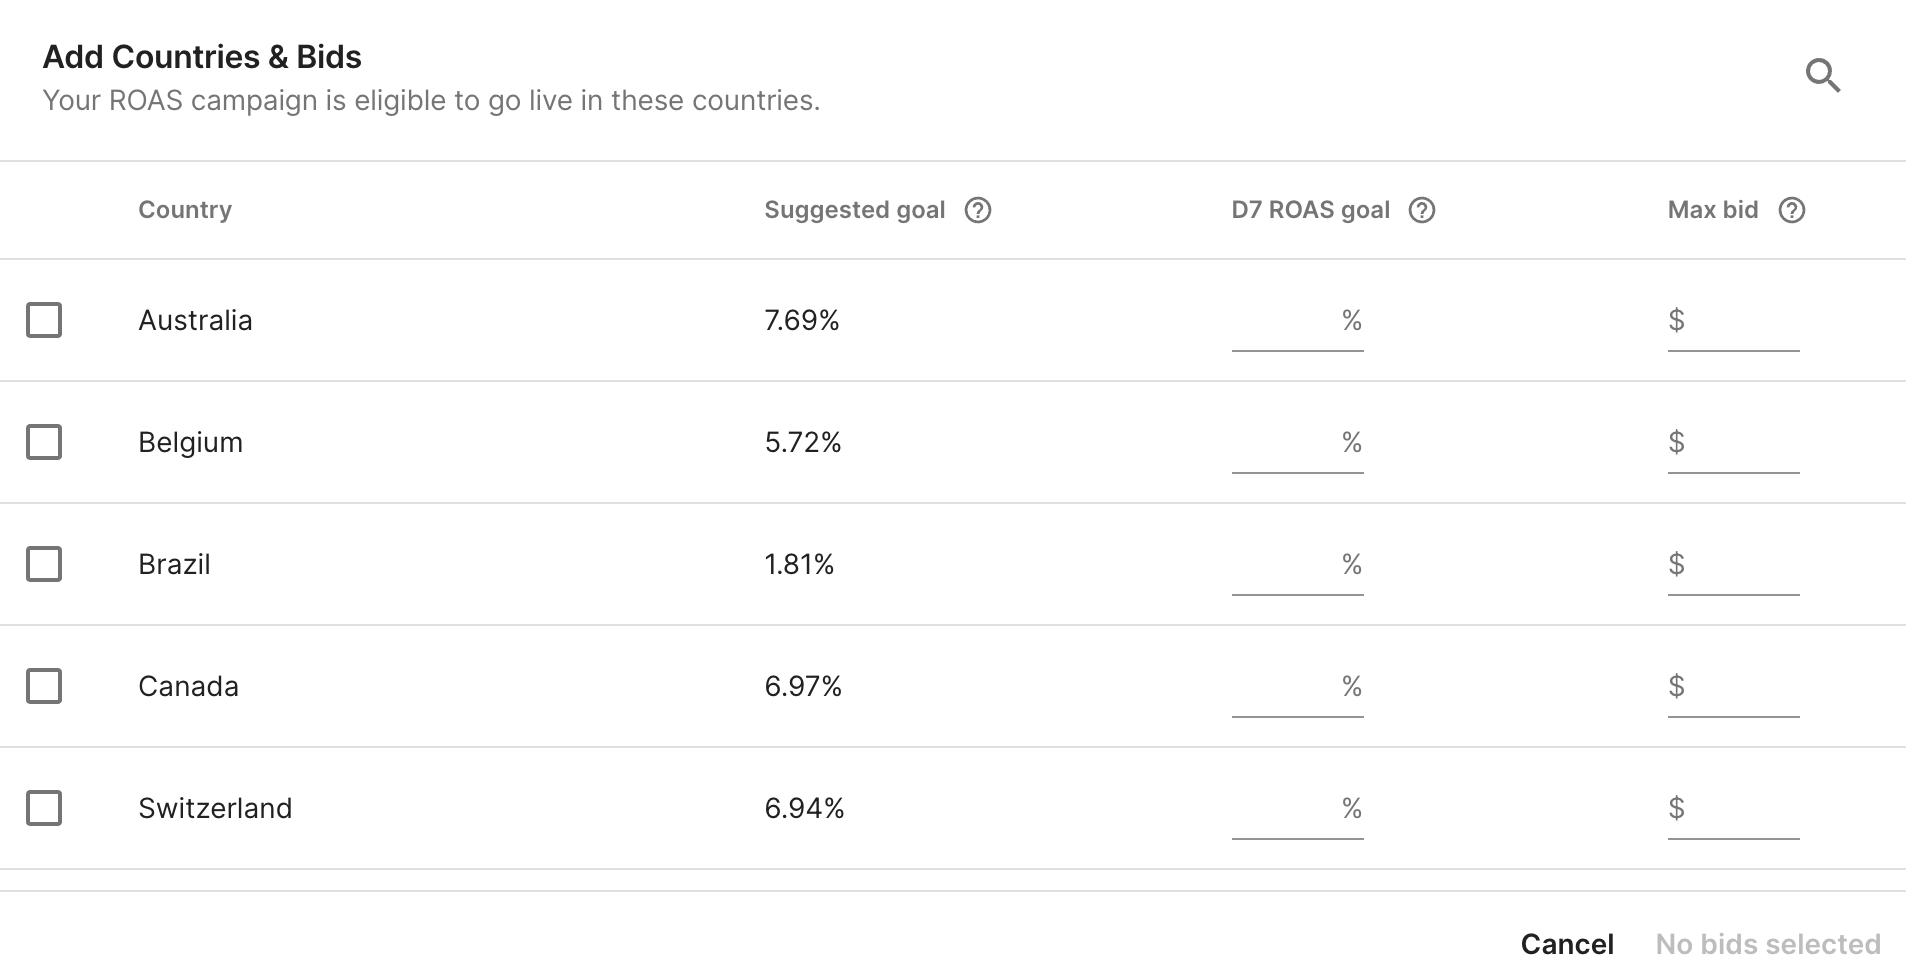
You can edit these values individually, or check multiple geos to execute bulk changes (increase or decrease by value, increase or decrease by percent, or set to a value).

Note: We recommend basing your D7 ROAS goal on a gross revenue figure to achieve realistic ROAS performance with Audience Pinpointer campaigns. Our algorithm calculates bids based on estimated user value and your day-7 ROAS goal.
For CPI-billed (cost per install) campaigns, you will only pay the CPI bid when an install occurs.
For CPM-billed (cost per thousand impressions) campaigns, your average spend per install should be close to the average CPI bid.
Either way, nothing changes on the reporting side, as you will still see the average spend per install reported as CPI.
To determine bid targets, look at the 7-day ROAS (return on ad spend) you have historically achieved with similar static CPI (cost per install) campaigns. The return on ad spend target should be similar to what you have observed so far.
If you set the target too high, unrealistic user criteria may limit scale and lead to reduced traffic. In general, the higher your ROAS target, the lower your bids, so setting extremely high ROAS targets yields very low bids that are unlikely to win many impressions.
Similarly, because Audience Pinpointer campaigns dynamically price bids based on predicted value, setting low maximum bids can cause you to miss out on high-value users. Low bid caps typically yield less installs and lower value installs.
Our algorithm predicts 7-day retention and return on ad spend, so allow at least a full week or two using the provided guidelines to let the data mature before adjusting the target up or down based on campaign performance.
Adjust your ROAS campaign target according to which revenue you are optimizing for (IAP, ad revenue, or both).
Note: Unity has lowered the data requirements threshold to create an Audience Pinpointer campaign. While lowering these data limits enables you to start and expand these campaigns faster, new campaigns and new geos still require time to mature and collect more data to improve their prediction accuracy. For new campaigns or eligible geos, Unity recommends starting with a lower max bid and observing performance before increasing it.
PIPL is an acronym for the Personal Information Protection Law (PIPL), a data privacy law passed by China’s National People’s Congress to protect the data privacy of natural persons based in the People's Republic of China (hereinafter “China”).
PIPL came into effect on November 1, 2021 and requires players in China to affirmatively consent (“Opt-In”) to have their personal information transferred and processed outside of China. Read more on China’s New Privacy Law here.
For advertisers using the deltaDNA or Ads SDK with your Audience Pinpointer campaigns in China, read below for more information on possible required actions for PIPL compliance.
If you have configured your game to pass in-game events to enable Audience Pinpointer user acquisition campaigns in China, you will need to update your game to the latest version of the deltaDNA SDK and implement a PIPL consent workflow to maintain compliance.
When the PIPL consent workflow is enabled, Audience Pinpointer campaigns in China will only collect data from players who have provided consent to both ads personalization and data transfers.
Please note that because traffic in China is subject to opt-in rates, low opt-in rates may impact the post-install quality of your Audience Pinpointer user acquisition campaigns.
What do I need to do?
To remain compliant with PIPL:
- Download and integrate the deltaDNA SDK containing PIPL functionality.
- Implement a PIPL consent workflow to request player Opt-In consent for collecting and storing player data.
- Deploy the deltaDNA SDK with the implemented data consent flags.
Where can I get the new SDK?
The new deltaDNA SDKs with PIPL functionality is available on the deltaDNA GitHub repository.
If you have activated the Acquire Optimization setting from the Monetization dashboard to enable Audience Pinpointer user acquisition campaigns on iOS, you will need to ensure your game is updated to at least version 3.7.1 of the Unity Ads SDK and using either the Unity consent solution or passing a custom consent form to comply with PIPL.
Only data from players who have consented to both ads personalization and to have their personal information transferred outside of China will be included in Audience Pinpointer campaigns.
Please note that because traffic in China is subject to opt-in rates, low opt-in rates may impact the post-install quality of your Audience Pinpointer user acquisition campaigns.
What do I need to do?
To maintain compliance with PIPL, you’ll need to be using Unity Ads SDK 3.7.1 or higher and activate the Acquire Optimization setting from the Monetization dashboard.
If you need to update your SDK to 3.7.1 or above, you can find the latest SDK version in the Unity Editor > Package Manager, or find Android/iOS versions in our Ads SDK Getting Started guide.