Installing ATtILA - USEPA/ATtILA2 GitHub Wiki
This section provides basic information on installing ATtILA using the downloadable zip file available at https://www.epa.gov/enviroatlas/attila-toolbox. For more detailed instructions on installing and using custom toolboxes in ArcGIS Pro, please see, 'Connect to a toolbox', in ArcGIS Pro's Online Help. New users should read through this wiki at least once to familiarize themselves with potential pitfalls associated with spatial data, ArcGIS limitations, and ATtILA processes.
Requirements
ATtILA requires ArcGIS Pro 3.0 or later and the Spatial Analyst extension. ATtILA has been tested on ArcGIS Pro through version 3.3.
In ArcGIS Pro 3.4, several ATtILA for ArcGIS Pro tools have failed when spaces are in the toolbox's file path. All tools operate as expected during testing when no spaces are found.
The Spatial Analyst or 3D Analyst extensions are required.
Installation
-
Download the ATtILA distribution zip file to a safe location, such as a Downloads directory.
-
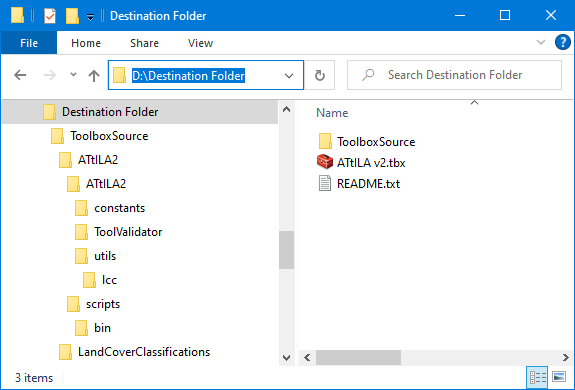
Extract the contents of the ATtILA zip file to a location on the file system where you commonly store personal Toolboxes. After extraction, ensure the ATtILA v2.tbx file and the ToolboxSource folder are at the same directory level. ATtILA's directory structure is illustrated below.

-
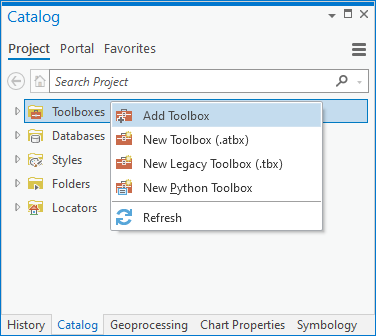
Start ArcGIS Pro. In the Catalog View or Catalog Pane, right click on Toolboxes, and click on Add Toolbox.

-
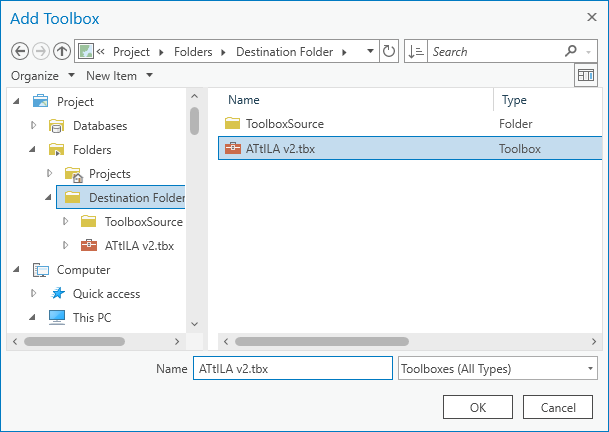
Navigate to ATtILA v{#}.tbx, select it and click OK.

-
Check to see if the toolbox installed correctly, i.e., open Toolbox to see tools contained within.

NOTE: To make the ATtILA toolbox available to all new projects, right-click on the toolbox and select 'Add to New Projects'. This will add a link to ATtILA toolbox in project favorites. For more details on accessing ATtILA this way, see 'Project favorites', in ArcGIS Pro's Online Help.
 Top of the page |
  Home |
  Metrics
