User Interface (UI) - UO-DFM/SimCityOttawa-Documentation GitHub Wiki
UI in Sim City Ottawa is built using Unity's new UI Toolkit, UI Builder, and UI Debugger. These tools are becoming the recommended standard for UI design within Unity. The tools come packaged with Unity as of version 2021.*.
Sim City Ottawa UI should not be generated using any other form of UI building such as GameObject based UI unless absolutely necessary.
The UI Toolkit uses an XML and CSS based approach to generating UI giving the creation of UI a web development feel and approach. These files can be scripted manually or built using the UI Builder (highly recommended).
All UI should be developed using the viewport size of an Iphone SE (375x667) so that we can support smaller viewports while still being able to scale up the UI to larger viewports.
When creating UI you should be following the file structure below.
Assets/UI
  -- <name of UI component>/
    -- Templates/
       -- other template files required by the main UI
    -- <name of UI component>.uxml
    -- <name of UI component>.uss (optional)
    -- <name of UI component>Controller.cs
    -- <name of UI component>.asset
We store all our UI within the Assets/UI folder under a folder named after the UI it represents. Within this folder we should find:
- .uxml file: the UI template generated in UI Builder
- .cs file: the controller script for the UI
- .uss file: optional file containing USS styling. (most UI use inline styling)
-
.asset file: represents the panel settings for the UI.
- generated in unity editor by right-clicking in the project and selecting:
create > UI Toolkit > Panel Settings Asset
- generated in unity editor by right-clicking in the project and selecting:
- Templates/: folder that stores any other templates that are used within the main UI. A "template" is similar to components in web development.
Assets/UI
  -- MainMenu/
     -- MainMenu.uxml
     -- MainMenuController.cs
     -- MainMeny.asset
This section describes how the UI is added to a scene. UI can either be an entire scene (ex. a main menu) or it can be an overlay (ex status bars).
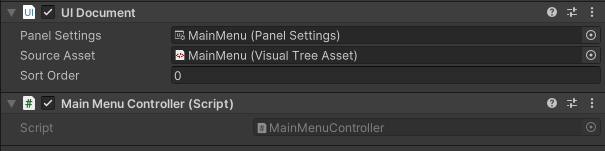
A scene must be created for the UI under the Assets/Scenes/UI folder with the name of the UI (ex: Assets/Scenes/UI/MainMenu.unity). The scene will contain a GameObject which must have the UI document component referencing the .uxml file and the .asset file. It should also have a script component referencing the UI controller script.
The panel settings file should be updated to scale with the screen size and we use the reference size of an Iphone SE (375x667) since we develop our UI based on this phone size. This allows the scalability of 'px' unit sizes when the viewport size changes. See the below note for more details on why we are using 'px' sizing.

IMPORTANT NOTE!
As of right now, the UI Toolkit has a bug with using '%' for sizing. This means setting a size using '%' will default to 'px' and cause problems with the responsiveness of the UI. This can be fixed by changing all '%' sizes to 'px' sizes and ensuring the panel settings file is correctly updated with proper values.
https://forum.unity.com/threads/button-text-size-in-doesnt-work.1037551/
This section is yet to be completed
Each controller script will store the UI Document and the root xml element as private instance variables along with all interactive elements (buttons, etc.) on the UI. We can populate these variables programmatically in the onEnable() method.
using UnityEngine;
using UnityEngine.UIElements;

public class MainMenuController : MonoBehaviour
{

    private UIDocument uiDocument; // Stores the ui document component on the main menu UI
    private VisualElement rootElement; // Stores the root visual element of the main menu UI
    private Button startButton;
    private Button settingsButton;

    // Runs when the component first shows on the screen
    void OnEnable() {
        // Get UI elements
        this.uiDocument = GetComponent<UIDocument>();
        this.rootElement = this.uiDocument.rootVisualElement;
        this.startButton = this.rootElement.Q<Button>("StartButton");
        this.settingsButton = this.rootElement.Q<Button>("SettingsButton");
    }
}
We define a function that will perform the desired action for each of the interactive elements. These functions can then be registered into the element's event emitter so they will be called whenever the emitter emits and event.
using UnityEngine;
using UnityEngine.UIElements;

public class MainMenuController : MonoBehaviour
{

    private Button startButton;

    // Runs when the component first shows on the screen
    void OnEnable() {
        // Get start button instance
        this.startButton = ...

        // Register start button clicked event
        this.startButton.clicked += OnStartButtonClick;
    }

    void OnStartButtonClick() {
        Debug.Log("Start the game!");
    }
}
using UnityEngine;
using UnityEngine.UIElements;

public class MainMenuController : MonoBehaviour
{

    private UIDocument uiDocument; // Stores the ui document component on the main menu UI
    private VisualElement rootElement; // Stores the root visual element of the main menu UI
    private Button startButton;
    private Button settingsButton;

    // Runs when the component first shows on the screen
    void OnEnable() {
        Debug.Log("Hello I am enabling the main menu component");

        // Get UI elements
        this.uiDocument = GetComponent<UIDocument>();
        this.rootElement = this.uiDocument.rootVisualElement;
        this.startButton = this.rootElement.Q<Button>("StartButton");
        this.settingsButton = this.rootElement.Q<Button>("SettingsButton");

        // Register clicked events
        this.startButton.clicked += OnStartButtonClick;
        this.settingsButton.clicked += OnSettingsButtonClick;
    }

    void OnStartButtonClick() {
        Debug.Log("Start the game!");
    }

    void OnSettingsButtonClick() {
        Debug.Log("Open the settings!");
    }
}
- UI Toolkit: https://docs.unity3d.com/Manual/UIElements.html
- UI Builder: https://docs.unity3d.com/Manual/UIBuilder.html
- UI tutorial: https://docs.unity3d.com/Manual/UIE-HowTo-CreateRuntimeUI.html