Install Kofax RPA 11.3 on Apache Tomcat on Windows - TungstenRPA/RPA-Best-Practices GitHub Wiki
Kofax RPA should be installed on Apache Tomcat for security, scalability, high availability and disaster recovery. You need* to install Kofax RPA on Tomcat to get access to
- Kapplets
- Robot Filesystem (RFS)
- Access to Microsoft SQL Server, Postgres, MySQL Oracle, etc databases for your production databases
- SAML for user management.
- Audit log. (see chapter 8 of Administrator's Guide)
*The use of Kofax RPA without Apache Tomcat is officially deprecated by Kofax and not intended for production usage.
This simple guide is for installing a stand-alone Kofax RPA on a single laptop. That is why it uses localhost for the machine names everywhere. Adjust accordingly if you install different components on different machines.
- Check the 11.3 Technical Specifications
- Download and install AdoptOpenJDK 11 or higher from https://adoptium.net/temurin/releases. please use a version earlier than 17 if you need LDAP.
- Download and install Apache Tomcat 9.0.50 or higher from https://tomcat.apache.org/download-90.cgi.
- Give it a username and password for Tomcat Administrator Login.
- Give it the path to the JDK you installed (don't included **bin**)
C:\Program Files\Eclipse Adoptium\jdk-17.0.3.7-hotspot - Tomcat will be visible on the Task Bar and it is running. Open it at (http://localhost:8080).

- Install your Database System (Microsoft SQL Server, Postgres, MySQL, etc)
- I downloaded Postgres 13.7 from (https://www.enterprisedb.com/downloads/postgres-postgresql-downloads).
- Install the JDBC drivers for your database into the folder c:\Program Files\Apache Software Foundation\Tomcat 9.0\lib
- Download and install Kofax RPA from https://delivery.kofax.com.
Make sure that Management Console WAR is selected in the installation.
This will put all 3 Tomcat applications ManagementConsole.war, kapplets.war and rfs.war into the C:\Program Files\Kofax RPA 11.3.0.1.299 x64\WebApps folder.
- Enable TCP/IP for Microsoft SQL Server in Sql Server Configuration Manager
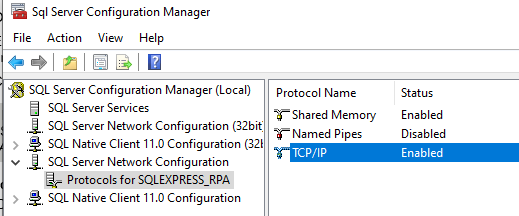
- Make sure your firewall is open for the required ports. Eg SQL Server https://docs.microsoft.com/en-us/sql/sql-server/install/configure-the-windows-firewall-to-allow-sql-server-access?view=sql-server-ver15
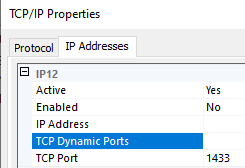
- Check that TCP port=1433 under IPAxx which is pointed at IP Address 128.0.0.1. Leave TCP Dynamic Ports empty.
 https://www.youtube.com/watch?v=OTyuCc-r3iM
- Restart your SQL Server instance.
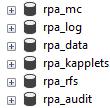
You will need to create 5 databases/Schemas for Kofax RPA
- Management Console database
- Log database
- Robot data database
- Kapplet database
- optional Robot File System Database
- optional Audit Log database
- Optional Statistics Database for Kofax Analytics
You could put all of these together in one database, but is better to keep them separate. Kofax Analytics only needs to see the Log database - it should not be able to see robots or credentials data.
The Robot data database should definitely be separate, because robot developers need to have write access to it and it could potentially contain personal or customer information which underlay strong data security policies, and you definitely do not want robot developers have read/write/drop access to Management Console data. The audit database contains far more information than Kofax Analytics can or should see and is definitely not a database that robot developers should be able to see or edit, because they are also being audited!
You will need to create the following file C:\Program Files\Apache Software Foundation\Tomcat 8.5\conf\Catalina\localhost\ManagementConsole.xml so that the Management Console can connect to the SQL Databases. See page 33 of Administrator's Guide 11.3.
Make sure that the change username, password, servername and DatabaseName for the Management Console database (eg rpa_mc) in the XML file.
you will need to add ;encrypt=false when using SQL Server 2019, as it defaults to encryption being on.
<?xml version="1.0" encoding="ISO-8859-1"?>
<Context useHttpOnly="true">
	<WatchedResource>WEB-INF/web.xml</WatchedResource>
	<Resource name="jdbc/kapow/platform" auth="Container" type="javax.sql.DataSource"
		username="*****" password="*****"
		driverClassName="com.microsoft.sqlserver.jdbc.SQLServerDriver"
		validationQuery="SELECT 1" testOnBorrow="true"
		url="jdbc:sqlserver://${ServerName}:1433;databaseName=${Schema}"/>
</Context><?xml version="1.0" encoding="ISO-8859-1"?>
<Context useHttpOnly="true">
<WatchedResource>WEB-INF/web.xml</WatchedResource>
<Resource name="jdbc/kapow/platform" auth="Container" type="javax.sql.DataSource" maxTotal="100" maxIdle="30"
maxWaitMillis="-1" validationQuery="/* ping */" testOnBorrow="true" username="*****" password="*****"
driverClassName="com.mysql.jdbc.Driver"
url="jdbc:mysql://localhost:3306/Database_Name?useUnicode=yes&characterEncoding=UTF-8&rewriteBatchedStatements=true"/>
</Context><?xml version="1.0" encoding="ISO-8859-1"?>
<Context useHttpOnly="true">
<WatchedResource>WEB-INF/web.xml</WatchedResource>
<Resource name="jdbc/kapow/platform" auth="Container" type="javax.sql.DataSource"
username="*****" password="*****"
driverClassName="org.postgresql.Driver"
validationQuery="SELECT 1" testOnBorrow="true"
url="jdbc:postgresql://localhost:5432/Database_Name"/>
</Context>- Copy "c:\Program Files\Kofax RPA 11.0.0.1 241 x64\WebApps\ManagementConsole.war" to the folder "c:\Program Files\Apache Software Foundation\Tomcat 8.5\webapps".
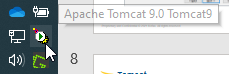
- Stop and Start Tomcat from the icon in the Notification Area on the Windows Taskbar.
- Open the Management Console at (http://localhost:8080/ManagementConsole/).
- Create a database called RPA_Logs in your Database Admin tool.
- In Management Console/Admin/General/Roboserver Log Database Configure your database settings.
- Test and close.
- Create a database called RPA_Data in your Database Admin tool.
- In Management Console/Repository/Database Mappings delete the objectdb database mapping.
- In Management Console/Admin/Roboservers Click ⋮ on Non Production cluster and select Cluster Settings.
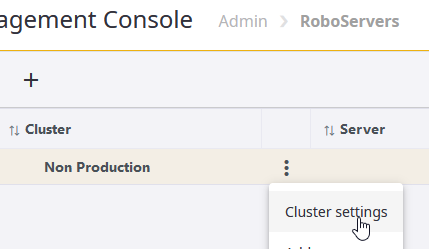 .
. - Click New Database and configure the database RPA_Data.
- Test and close.
- In Management Console/Repository/Database Mappings make a database mapping.

- In Management Console/Settings/Design Studio you can configure if this database is available to the Design Studio. Note that this guide uses localhost for machine names, so it will only work for a Design Studio on the same machine!.
- In Design Studio open Settings/DesignStudioSettings/ManagementConsoles and add a Tomcat entry.
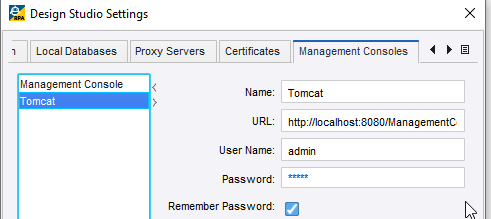
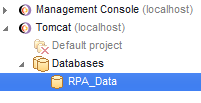
- You can now see your Tomcat Management Console and the RPA_Data database.
See page 88 of Admin Guide
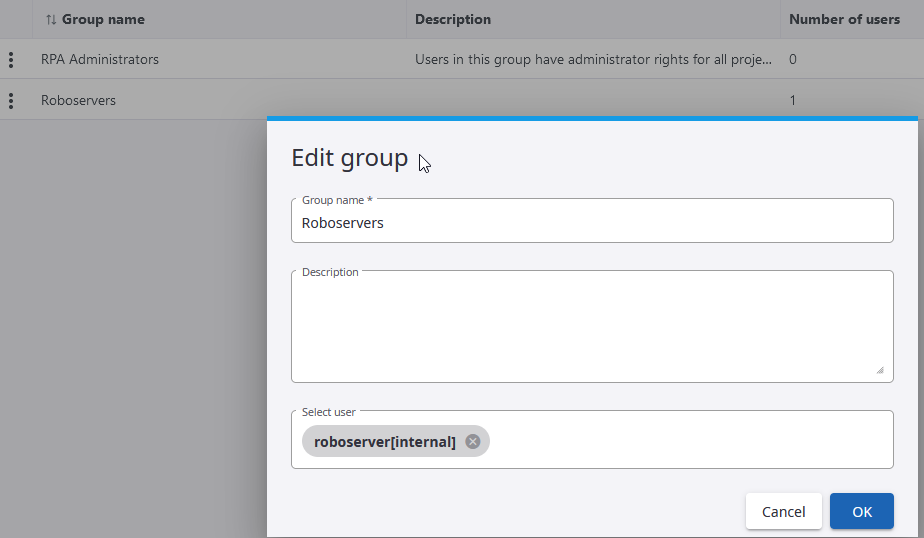
- In MC/Admin/Users&groups/Users create a user called Roboserver. Give it a password. You will need the password in step 6.
- In MC/Admin/Users&groups/Groups create a group Roboservers and add the user Roboserver.
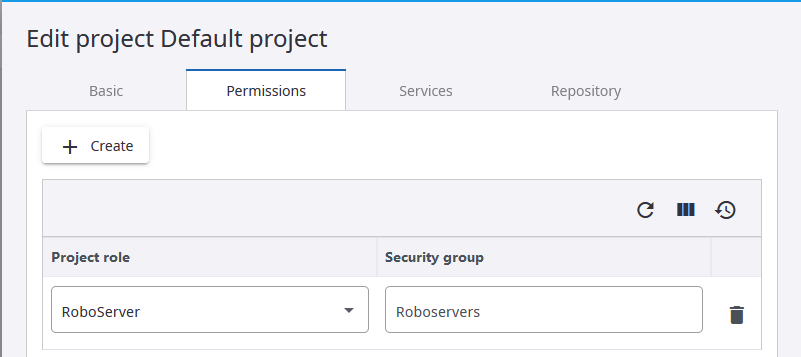
- In MC/Admin/Projects/DefaultProject/Edit/Permissions add the Project Role RoboServer with the Group Roboservers.
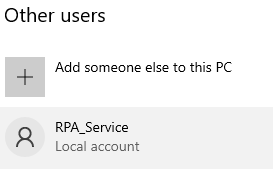
- In Windows/Add, edit or remove other users Create a local user account called RPA_Service .
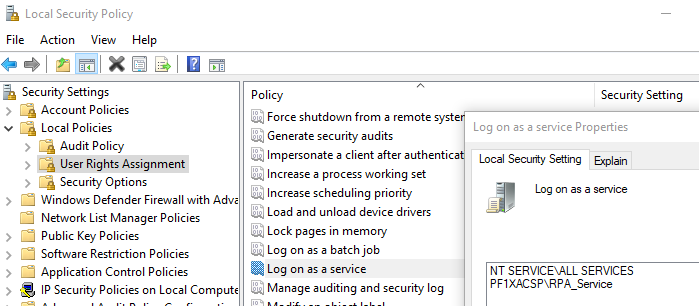
- Give this user permission to run Windows Services in Windows Local Security Policy/LocalPolicies/Log on as a service.
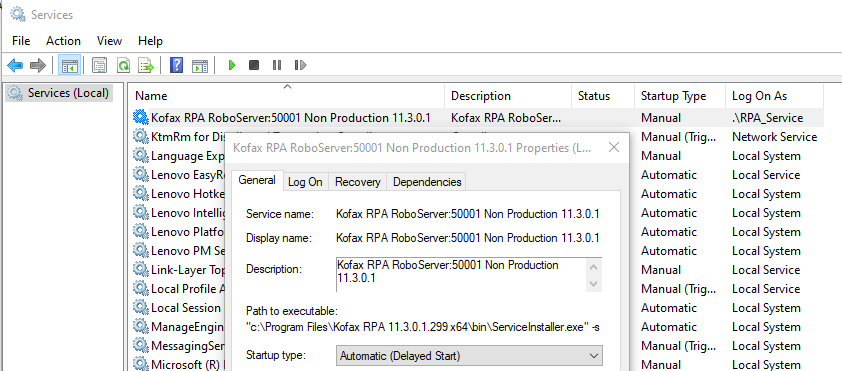
- Open a Windows Commmand Prompt with Admin Rights and type
cd "c:\Program Files\Kofax RPA 11.3.0.1.299 x64\bin"
set Version=11.3.0.1
set Port=50001
set Cluster=Non Production
set RoboserverPassword=*****
set MC=http://roboserver:%RoboserverPassword%@localhost:8080/ManagementConsole
set User=RPA_Service
set ServiceName=Kofax RPA RoboServer:%Port% %Cluster% %Version%
ServiceInstaller.exe -i RoboServer.conf wrapper.ntservice.account=.\%User% wrapper.ntservice.password.prompt=true wrapper.ntservice.name="%ServiceName%" wrapper.ntservice.starttype="Manual" wrapper.syslog.loglevel=INFO wrapper.app.parameter.1="-p" wrapper.app.parameter.2="%Port%" wrapper.app.parameter.3="-mcUrl" wrapper.app.parameter.4="%MC%" wrapper.app.parameter.5="-cl" wrapper.app.parameter.6="%Cluster%"- Enter the password for the local account to run the service.
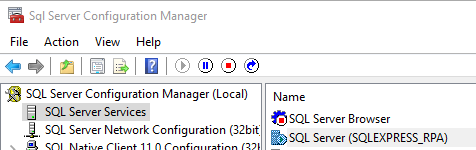
- Open Windows Services Panel. Start the Service. The Status will change to Running.
- You can change its startup type to Automatic (Delayed).
- Check that the Roboserver appears in Management Console/Admin/Roboservers.
- If it is not running look at the Roboserver log in C:\Users\RPA_Service\AppData\Local\Kofax RPA\11.3.0.1_299\Logs
- You can remove the service with
ServiceInstaller.exe -r RoboServer.conf wrapper.ntservice.name=%ServiceName%- You can repeat the Service Step above with a different Port Number, eg 50002 to add more Roboservers. Each Roboserver needs its own unique Port Number.
The Robot File System is easy to install and configure. See page 84 of the Admin Guide.
Note that the MC URL is http://admin:admin@localhost:8080/ManagementConsole
This is the configuration for PostgreSQL.
- Create a new Database called RPA_Kapplets.
- Copy C:\Program Files\Kofax RPA 11.3.0.1.299 x64\WebApps\kapplets.war to C:\Program Files\Apache Software Foundation\Tomcat 9.0\webapps
- Create file C:\Program Files\Apache Software Foundation\Tomcat 9.0\conf\Catalina\localhost\kapplets.xml with following content. Installation Guide page 40. see Installation Guide page 38 for Postgres environment variables.
<?xml version="1.0" encoding="UTF-8"?>
<Context useHttpOnly="true">
    <!-- Default set of monitored resources -->
    <WatchedResource>WEB-INF/web.xml</WatchedResource>
    <Resource name="jdbc/kapow/kapplets"
        auth="Container"
        type="javax.sql.DataSource"
        initialSize="5"
        maxTotal="100"
        maxIdle="10"
        maxWaitMillis="-1"
        validationQuery="SELECT 1"
        testOnBorrow="true"
        testWhileIdle="true"
        username="postgres"
        password="admin"
        driverClassName="org.postgresql.Driver"
        url="jdbc:postgresql://localhost:5432/RPA_Kapplets"
        factory="org.apache.tomcat.jdbc.pool.DataSourceFactory"/>
    <Environment name="spring.datasource.jndi-name" value="jdbc/kapow/kapplets" type="java.lang.String" override="false"/>
    <Environment name="spring.jpa.database-platform" value="org.hibernate.dialect.PostgreSQL10Dialect" type="java.lang.String" override="false"/>
    <!-- OAuth-->
    <Environment name="kapplets.services.mc.connection.url" value="http://localhost:8080/ManagementConsole/" type="java.lang.String" override="false"/>
        <!-- url user can access with browser -->
    <Environment name="kapplets.services.mc.connection.oauth.kapplets-base-url" value="http://localhost:8080/kapplets" type="java.lang.String" override="false"/>
        <!-- url user can access with browser -->
    <Environment name="kapplets.services.mc.connection.oauth.mc-base-url" value="http://localhost:8080/ManagementConsole" type="java.lang.String" override="false"/>
    <Environment name="kapplets.services.execution.request.priority" value="MEDIUM" type="java.lang.String" override="false"/>
    <!-- PostgreSQL Database-->
    <Environment name="spring.datasource.username" value="postgres" type="java.lang.String" override="false"/>
    <Environment name="spring.datasource.password" value="admin" type="java.lang.String" override="false"/>
    <Environment name="spring.datasource.url" value="jdbc:postgresql://localhost:5432/RPA_Kapplets" type="java.lang.String" override="false"/>
    <Environment name="spring.datasource.driverClassName" value="org.postgresql.Driver" type="java.lang.String" override="false"/>
    <Environment name="spring.jpa.database-platform" value="org.hibernate.dialect.PostgreSQL10Dialect" type="java.lang.String" override="false"/>
    <Environment name="spring.quartz.properties.org.quartz.jobStore.driverDelegateClass" value="org.quartz.impl.jdbcjobstore.PostgreSQLDelegate" type="java.lang.String" override="false"/>
    <!--Timeouts-->
    <Environment name="kapplets.services.execution.watcher.timeout" value="190" type="java.lang.String" orderride="false"/>
    <Environment name="kapplets.services.execution.purge.timeout" value="365" type="java.lang.String" orderride="false"/>
</Context>- Restart Tomcat.
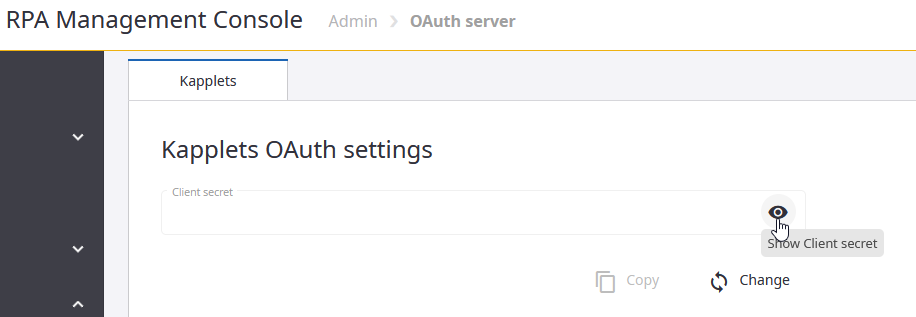
- Open Management Console/Admin/OAuthServer
- Show and Copy the Client Secret into the clipboard.
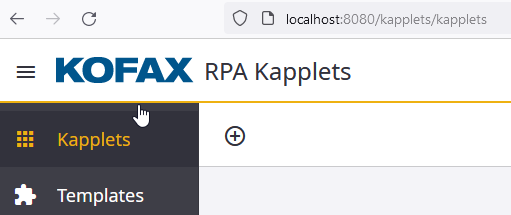
- Open Kapplets http://localhost:8080/kapplets. You will see Kapplets OAuth client secret is not set.
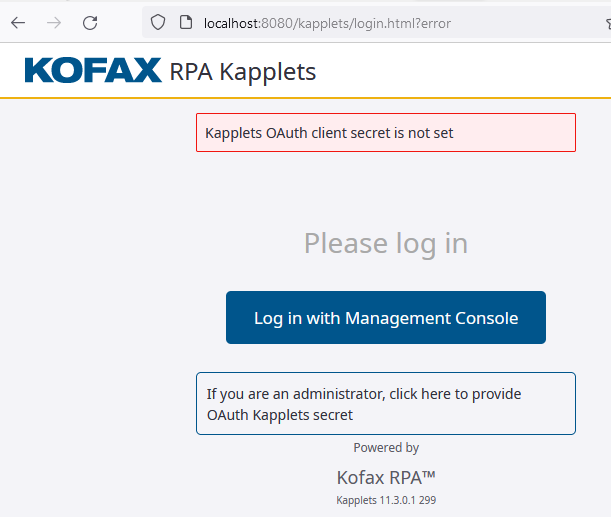
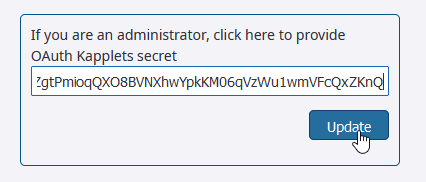
- Click If you are an administrator...

- Paste the Client Secret and click Update.
- Success! You are now logged into Kapplets.
- If Kapplets fails to run look at the log in C:\Program Files\Apache Software Foundation\Tomcat 9.0\logs\tomcat9-stdout.YYYY-MM-DD.log.