TownyAPI - TownyAdvanced/Towny GitHub Wiki
- Getting started with Towny and your IDE
-
Common API uses
- Checking if a player is in the wilderness
- Checking if a player is in their own town
- Getting a Resident from a Player
- Getting a Player from a Resident
- Getting a Town
- Getting a Nation
- Checking if a player can build/destroy somewhere
- Checking if Towny would prevent PVP damage
- Adding your own subcommands
- Adding your own TownBlock types
- Adding your own language strings
- Some useful events
- Towny Action Events
- Of use to Economy Plugin developers
- Of use to Shop Plugin developers
- Deprecation Policy
- Working with TownyObject MetaData
Using the Towny API in your plugins is quite simple. There are two versions of the API.
- The original API which ran from version 0 to 0.94.0.0 (see old Javadoc here)
- The new API which is present in Towny 0.94.0.1 and onwards (see new latest Javadoc's here)
The new API supports the old API calls although they will appear as deprecated. It is recommended that authors do switch to the new API.
The builds of Towny beyond version 0.94.0.12 are available on Maven.

Jitpack details
  <repositories>
	<repository>
	    <id>jitpack.io</id>
	    <url>https://jitpack.io</url>
	</repository>
  </repositories>
  <dependencies>
	<dependency>
	    <groupId>com.github.TownyAdvanced</groupId>
	    <artifactId>towny</artifactId>
	    <version>0.103.1.0</version>
	    <scope>provided</scope>
	</dependency>
  </dependencies>
Alternatively, if you are using Gradle, you may copy the text below into your gradle.build file:
repositories {
    maven { url = 'https://jitpack.io' }
}

dependencies {
    compileOnly 'com.github.TownyAdvanced:Towny:0.103.1.0'
}
As of Towny 0.97.5.7, Towny's has been available at Glare's repo.
Maven:
  <repositories>
    <repository>
      <id>glaremasters repo</id>
      <url>https://repo.glaremasters.me/repository/towny/</url>
    </repository>
  </repositories>

  <dependencies>
    <dependency>
      <groupId>com.palmergames.bukkit.towny</groupId>
      <artifactId>towny</artifactId>
      <version>0.103.1.0</version>
      <scope>provided</scope>
    </dependency>
  </dependencies>
Gradle:
repositories {
    maven {
        name = 'glaremasters repo'
        url = 'https://repo.glaremasters.me/repository/towny/'
    }
}

dependencies {
    compileOnly 'com.palmergames.bukkit.towny:towny:0.103.1.0'
}
GitHub packages is only updated on each major release of Towny, ie: 0.97.0.0, 0.97.1.0, 0.97.2.0 and will not see pre-release updates. Use Github Packages if you don't mind the hassle of having to authenticate with Github and you don't want to use the cutting edge builds.
GitHub Packages details
Developers may use the following after setting up their github token as shown here.
If you are only wanting to add Towny to your existing plugin's pom.xml you will need to give your token read:packages, write:packages access.
To elaborate on the above link in your settings.xml file you must have the following in your section:
  <servers>
    <server>
      <id>github-towny</id>
      <username>YourGithubUsernameHere</username>
      <password>YourAccessTokenHere</password>
    </server>
    <server>
      <id>github-tne</id>
      <username>YourGithubUsernameHere</username>
      <password>YourAccessTokenHere</password>
    </server>
  </servers>
The github-tne entry is only required if you're building Towny from the source using Maven, it is not required if you just want to use Towny in your own plugin.
It is critical that the above server matches the below repository value.
After you've configured your settings.xml file above you may enter the text below into your pom.xml file:
  <repositories>
    <repository>
      <id>github-towny</id>
      <url>https://maven.pkg.github.com/TownyAdvanced/Towny</url>
    </repository>
  </repositories>
  <dependencies>
    <dependency>
      <groupId>com.palmergames.bukkit.towny</groupId>
      <artifactId>Towny</artifactId>
      <version>0.102.0.0</version>
      <scope>provided</scope>
    </dependency>
</dependencies> Note again that the API changed after 0.94.0.2 and your version number should be set for that or newer. Once it is added you can put Towny into your plugin.yml's depend or softdepend list (depending on whether your plugin needs Towny present to function all of the time, or if you want to support Towny features when present.) Lastly you will need to add the following to your project's import section:
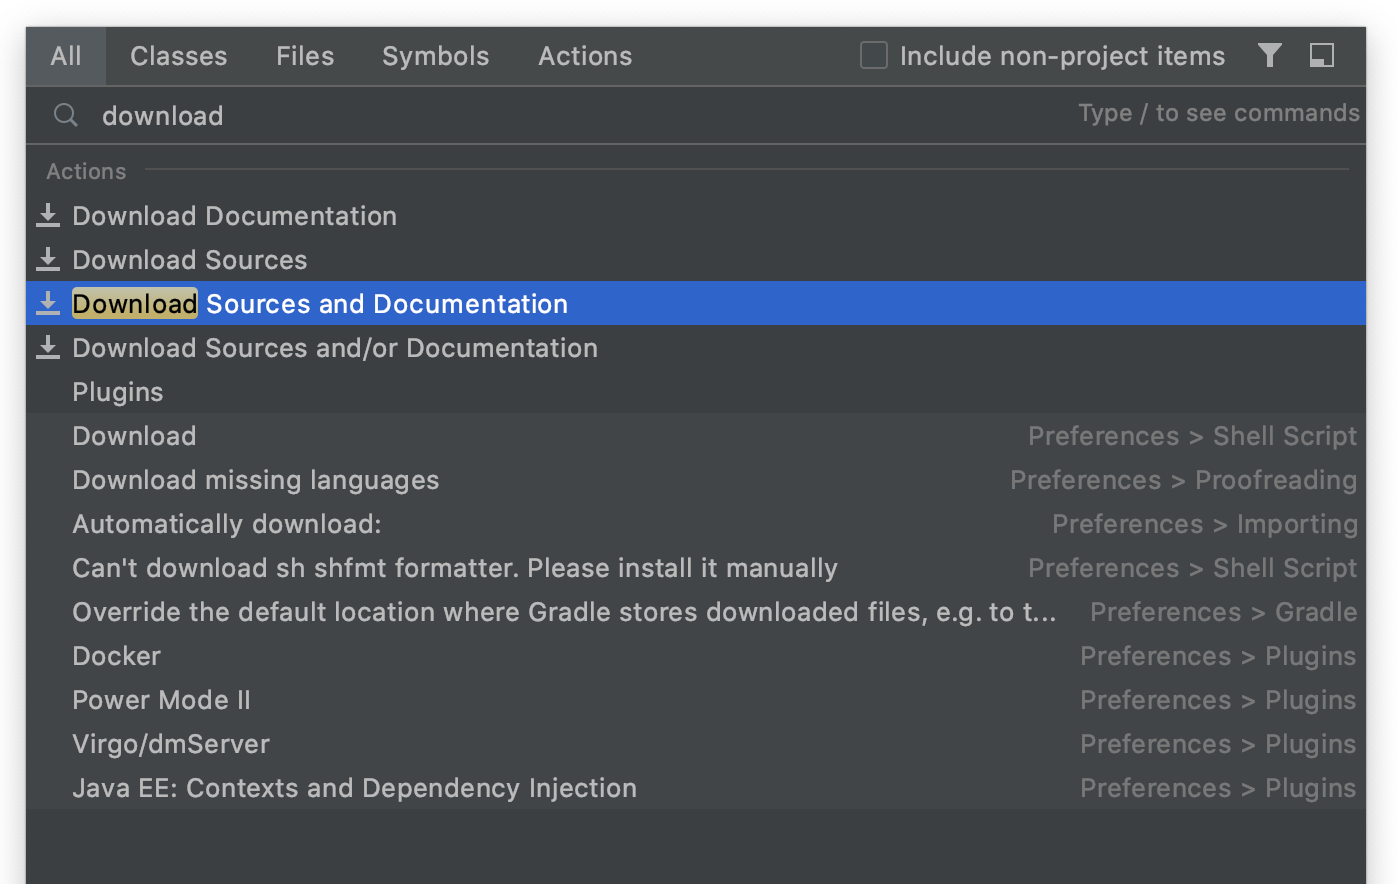
import com.palmergames.bukkit.towny.TownyAPI;Docs and sources are helpful as they provide context to the many objects in Towny's API. Here's how you can download them in your IDE:
Press shift twice to access the hot menu, and type "download", click the option that says "Download Sources and Documentation":
To check if the player is in the wilderness is easy:
if (TownyAPI.getInstance().isWilderness(player.getLocation()))
   return false;
Any Location is accepted.
To find the town a player is standing in, you have to look at the TownBlock, which is what towns are made up of. Looking up a TownBlock from a player's location can return null if the player is standing in the wilderness, so it is recommended that you perform an isWilderness(Location loc) test [seen directly above on this page] before you look up the TownBlock.
   Town town = TownyAPI.getInstance().getTown(player.getLocation());
   if (town != null && resident.hasTown() && resident.getTownOrNull().equals(town)) {
       //Execute your code here
   }
   //Or:
   if (town != null && town.hasResident(player.getName())) {
       //Execute your code here
   }
The above code will require the following imports:
import com.palmergames.bukkit.towny.object.Resident;
import com.palmergames.bukkit.towny.object.Town;
You've probably want to know how to get the resident so that you can use the above code, so here it is:
Most of the time getting the resident object of a player is something you'll need quite often. This can be done in several ways:
import com.palmergames.bukkit.towny.object.Resident;

//By a Player
Resident resident = TownyAPI.getInstance().getResident(player);

//By a Player's UUID
Resident resident = TownyAPI.getInstance().getResident(player.getUniqueId());

//or, by the Player's name.
resident = TownyAPI.getInstance().getResident(player.getName());If you have a Resident object and you want to get the Bukkit Player object it is done in one of the following ways;
Player player = Bukkit.getServer().getPlayer(resident.getName());
// Or, if the player is online:
Player player = resident.getPlayer();
Getting a town can be much like what you've seen already:
import com.palmergames.bukkit.towny.object.Town;

//When you've got a Player.
Town town = TownyAPI.getInstance().getTown(Player); // Remember to check if this is null!

//When you've already got a Resident.
if (resident.hasTown())
   Town town = resident.getTown();

// Or if you want to bypass the possible NotRegisteredException thrown by Resident#GetTown() use:
Town town = resident.getTownOrNull();
// Just remember to use resident.hasTown() or test that town isn't null.

//When you've already got a townblock.
if (townblock.hasTown())
   Town town = townblock.getTown();

// Or use:
Town town = townblock.getTownOrNull();
You can skip the .hasTown() checks if you want to surround your code with a Try/Catch block.
Getting a town can be much like what you've seen already:
import com.palmergames.bukkit.towny.object.Nation;

//When you've got a Player.
Nation nation = TownyAPI.getInstance().getNation(Player); // Remember to check if this is null!

//When you've already got a town.
if (town.hasNation())
    Nation nation = town.getNation();

//When you've already got a resident.
if (resident.hasNation())
    Nation nation = resident.getNation();

// Or:
Nation nation = town.getNationOrNull();

// Or
Nation nation = resident.getNationOrNull();
You can skip the .hasNation() checks if you want to surround your code with a Try/Catch block.
Using the PlayerCacheUtil you can easily test if a player can perform either of the four ActionTypes found in Towny (Build, Destroy, Switch, Item_use.)
boolean bBuild = PlayerCacheUtil.getCachePermission(player, block.getLocation(), block.getType(), TownyPermission.ActionType.BUILD);A common use of the API in magic/combat/rpg plugins is needing to know if Towny would prevent PVP combat. This is simple using our CombatUtil: While using Bukkit's EntityDamageByEntityEvent doing the following:
import com.palmergames.bukkit.towny.utils.CombatUtil;

private Towny towny = (Towny) Bukkit.getServer().getPluginManager().getPlugin("Towny");

@EventHandler(priority = EventPriority.LOWEST)
private void playerPVPEvent (EntityDamageByEntityEvent event) {
    Entity attacker = event.getDamager();
    Entity defender = event.getEntity();
    DamageCause cause = DamageCause.ENTITY_ATTACK;

    if (CombatUtil.preventDamageCall(towny, attacker, defender, cause))
            return;
}
The preventDamageCall will return True if Towny would stop the damage from happening.
Alternatively you can have Towny return the PVP status of a location (which also fires all of Towny's internal pvp-testing-events using this one line:
boolean pvpTrue = TownyAPI.getInstance().isPVP(Location);As of version 0.97.0.1, custom subcommands can now be added to Towny's commands using the command addon API.
To add your own subcommand, first you'll need to make your command class that implements CommandExecutor like normal commands.
public class CustomCommand implements CommandExecutor {

    @Override
    public boolean onCommand(CommandSender sender, Command command, String label, String[] args) {
        sender.sendMessage("My custom command!");
        return true;
    }
}
And then to add your custom command:
TownyCommandAddonAPI.addSubCommand(CommandType.TOWN, "mycommand", new CustomCommand());List of currently available CommandTypes:
RESIDENT, RESIDENT_SET, RESIDENT_TOGGLE, NATION, NATION_LIST_BY, NATION_SET, NATION_TOGGLE, TOWN, TOWN_BUY, TOWNY_LIST_BY, TOWN_SET, TOWN_TOGGLE, PLOT, PLOT_SET, PLOT_TOGGLE, TOWNY, TOWNYADMIN, TOWNYADMIN_RELOAD, TOWNYADMIN_SET, TOWNYADMIN_TOGGLE, TOWNYADMIN_TOWN, TOWNYADMIN_NATION, TOWNYWORLD, TOWNYWORLD_SET, TOWNYWORLD_TOGGLEAdding your own tab completions is possible too by implementing TabCompleter in your command class. Using AddonCommand#setTabCompletion is possible too, but only if your arguments are always the same.
setTabCompletion example
AddonCommand myCommand = new AddonCommand(CommandType.TOWN, "mycommand", new CustomCommand());
myCommand.setTabCompletion(0, Arrays.asList("suggestions", "for", "first", "argument"));
myCommand.setTabCompletion(1, Arrays.asList("suggestions", "for", "second", "argument"));
TownyCommandAddonAPI.addSubCommand(myCommand);As of version 0.99.0.0, injecting custom TownBlockTypes is possible withtout any intervention by an admin using your plugin!
TownBlockTypes are commonly known as Plot types in Towny, which mayors can set their plots to: ie, Farms, Inns, Jails, Embassies, Shops, etc.
To add your own TownBlockType you will need to register it with the Towny TownBlockTypeHandler, in your Plugin's onLoad() method:
public static void registerCustomPlot() {
	if (TownBlockTypeHandler.exists(YOUR_CUSTOM_PLOT_TYPE_NAME)) {
		return;
	}

	TownBlockType customPlot = new TownBlockType(YOUR_CUSTOM_PLOT_TYPE_NAME, new TownBlockData() {
		@Override
		public String getMapKey() {
			return "@" // A single character to be shown on the /towny map and /towny map hud
		}
		@Override
		public double getCost() {
			return 100.0 // A cost that will be paid to set the plot type.
		}
	});
	try {
		TownBlockTypeHandler.registerType(customPlot);
	} catch (TownyException e) {
		YourLogger.severe(e.getMessage());
	}
}
It is important to call the above method in your onLoad() and also have it ready to be called from a listener class:
// Re-register the TownBlockType when/if Towny reloads itself.
@EventHandler
public void onTownyLoadTownBlockTypes(TownBlockTypeRegisterEvent event) {
	YOUR_PLUGIN_INSTANCE.registerCustomPlot();
}
The above code will mean that a player can use /plot set YOUR_CUSTOM_PLOT_TYPE_NAME to set the plot type to your custom type.
TownBlockTypes offer much more than just MapKeys and Costs, you can see what is available to use by reading about TownBlockData which all TownBlockTypes have.
Events you'll want to consider listening to in order to add more logic to your Custom TownBlockType will include:
- PlayerChangePlotTypeEvent
- PlotPreChangeTypeEvent
- TownBlockStatusScreenEvent
- TownPreUnclaimCmdEvent
As of version 0.98.0.0, you can inject language strings into Towny, which you can then display to players (in their own locale,) using TownyMessaging.
This is accomplished using Towny's TranslationLoader:
An object which allows a plugin to load language files into Towny's translations hashmap. Enabling the given plugin to use Towny's built-in messaging and translating so that messages will display in the player's own Locale (determined by the client's locale setting.)
Language files should be saved in your plugin's resources\lang\ folder, using
valid Locale file names ie: en-US.yml, de-DE.yml. Locales which do not appear
in Minecraft will not be used.
You may opt to provide a global.yml file in your plugin's resources folder, which will allow an admin to globally override language strings for all locales.
Example:
    Plugin plugin = Towny.getPlugin();                                                     // replace Towny with your plugin's main Class.
    TranslationLoader loader = new TranslationLoader(plugin);
    loader.load();
    TownyAPI.addTranslations(plugin, loader.getTranslations());
Finally, add a EventHandler to a Listener class:
	/* Handle re-adding the lang string into Towny when Towny reloads the Translation Registry. */
	@EventHandler
	public void onTownyLoadLang(TranslationLoadEvent event) {
		Plugin plugin = SimplePlugin.getPlugin();
		TranslationLoader loader = new TranslationLoader(plugin);
		loader.load();
		Map<String, Map<String, String>>  translations = loader.getTranslations();
		for (String language : translations.keySet())
			for (Map.Entry<String, String> map : translations.get(language).entrySet())
				event.addTranslation(language, map.getKey(), map.getValue());
	}
And that's it, your language files will be injected into Towny! You can begin to use them like so:
   import com.palmergames.bukkit.towny.object.Translatable;

   player.sendMessage(Translatable.of("your_language_key_here").forLocale(player));
   //or
TownyMessaging.sendMsg(player, Translatable.of("your_language_key_here"));Events thrown by Towny can be imported here:
import com.palmergames.bukkit.towny.event.*EventNameHere*For a full list of Events check out the github.
Towny's action events are events that Towny throws when something is decided via the Towny plot permissions. When someone builds, destroy, switches, uses an item. Or when something blows up or burns.
Towny uses these events internally, to determine the outcome of plot permissions during war time, but it also fires these events so that plugins using the Towny API can override Towny outcomes.
	@EventHandler
	public void onDestroy(TownyDestroyEvent event) {
		if (event.isInWilderness())
			return;

		Player player = event.getPlayer();
		Material mat = event.getMaterial();
		TownBlockStatus status = plugin.getCache(player).getStatus();

		// Allow destroy for Event War if material is an EditableMaterial, FlagWar also handled here
		if ((status == TownBlockStatus.WARZONE && FlagWarConfig.isAllowingAttacks()) // Flag War
				|| (TownyAPI.getInstance().isWarTime() && status == TownBlockStatus.WARZONE && !WarUtil.isPlayerNeutral(player))) { // Event War
			if (!WarZoneConfig.isEditableMaterialInWarZone(mat)) {
				event.setCancelled(true);
				event.setMessage(Translation.of("msg_err_warzone_cannot_edit_material", "destroy", mat.toString().toLowerCase()));
				return;
			}
			event.setCancelled(false);
		}
	}
The above example uses event.isInWilderness(), event.getPlayer(), event.getMaterial(), event.setCancelled() and event.setMessage(). Other available methods include event.hasTownBlock(), event.getTownBlock(), event.getBlock(), event.isCancelled().
Of note: event.setMessage() will use Towny's internal messaging to send your cancellation message instead of Towny's default cancellation message.
Check out the javadoc for more information.
- As of Towny 0.100.1.0 we have made it easier to get the UUID associated with Towny's named economy-having objects:
-
TownyEconomyHandler#getTownyObjectUUID(String accountName)is a method which will return to you the internal UUID used for our EconomyAccounts (or null.) These are held by:- Towns,
- Nations,
- A server account used in our Closed Economy feature.
- You can pass account names through this method and if Towny has an associated object we will return the UUID we use, otherwise we'll return null and you can do what you want with the account.
-
- If you want your life to be easier all around, consider adding your comment on this PR which will bring full UUID support to VaultAPI.
- Our ShopPlotUtil provides easy-to-use tests to query if a player can make a shop at a location.
- Towny's code base is very old but we don't mind cleaning out old code. When something is deprecated in Towny's API or codebase, it will remain present for the rest of the current major version and the following major version's release cycles. This means anytime you're using Towny's code you likely won't have to worry about anything breaking for 1-1.5 years.
- For example: If a method is deprecated during the 0.99.*.* development cycle, it will remain in the code base through the rest of the 0.99.*.* and 0.100.*.* until just before the release of 0.101.0.0.
Visit this page for instructions on manipulating MetaData Towny can save for you.