Mini Season Modpack Installation with ATLauncher - TotallyNotSuspiciousMC/season-8 GitHub Wiki
This is a guide on how to manually install the TNS Mini Season mod pack with the ATLauncher. You may use other launchers, such as CurseForge or MultiMC if you wish. However, for simplicity, we will only be providing support for ATLauncher. If you have any trouble installing the ATLauncher or the modpack, feel free to open a tick in #help and staff will do their best to help you, or ask your fellow server mates in #chat.
Modrinth also has a guide on playing mod packs with a variety of launchers. You can find it here: https://docs.modrinth.com/docs/modpacks/playing_modpacks/
The recommended launcher for using the TNS Mini Season is ATLauncher. You can download it here: https://atlauncher.com/downloads
Installing ATLauncher should be the same as installing any other program on your computer. As it is hard to provide specific instructions for all operating systems, I will not be able to provide them here. The installer itself should be pretty self-explanatory though, you just need to get the right version for your OS. If you need any help installing feel free to reach out to me (TheDeathlyCow) or create a ticket in #help.
In order to use ATLauncher, you will need to sign in to your Microsoft account associated with your Minecraft: Java Edition account.
To do this, first go to the Accounts section of ATLauncher.

Select "Login with Microsoft". This will open a Microsoft login page in your web browser. Sign in to your Microsoft account associated with your copy of Minecraft: Java Edition. After logging in, you will be asked to allow ATLauncher to access some basic information about your Xbox Live profile. In order to use ATLauncher, you will have to agree to these terms.

After signing in, go back to ATLauncher where a dialog box will ask you to confirm your account. After pressing "yes", you can close your browser tab.
Make sure to select your account and you're good to go!

Now that you're all signed in, it's time to install the mod pack itself.
First, download the mod pack from the releases tab here. You have a choice between a CurseForge-compatible version, with the file type .zip, and a Modrinth-compatible version, with the file type .mrpack. Pick whichever one suits you best, they should both be the same. Of course, if you are using another launcher such as CurseForge/Overwolf, you will have to use the CurseForge-compatible .zip modpack.
Once you have that downloaded, go to the Instances tab in ATLauncher.

Next, click the Import button in the top-left.

Browse to where you downloaded the mod pack and select it, then press "open" to import it to ATLauncher.
Select Import. If you want, you can rename the instance at this point. Otherwise, press Install to finish installing the mod pack.
You may be asked to download a couple of mods manually from your browser. This is due to some weird policies of CurseForge that I cannot change. All you need to do is open these up and download the stated version to your standard downloads folder. ATLauncher will be able to automatically find and install them from there.

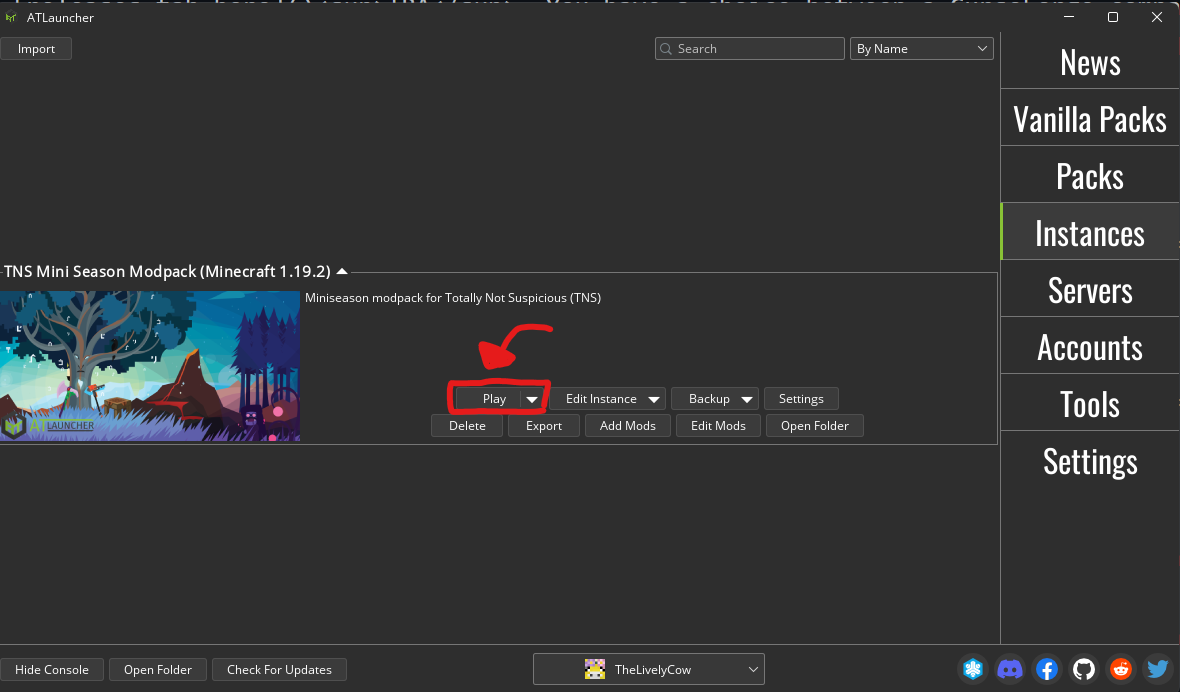
Congratulations! The mod pack should now be installed. It may take a few seconds as ATLauncher downloads all the mods and resources necessary. Just press Play on the instance to play the mod pack!
You may need to adjust some settings and configs to be as you like them. I've set some configs and keybindings already for you, to make sure that any obvious clashes are resolved. But if there's anything specific about how you like to play Minecraft, you will obviously need to set that yourself.
The server for the mini-season is different from the regular SMP. The IP is mini.totallynotsuspicious.com. However, this should already be listed in your Multiplayer tab.
For people with GPUs, you may need to configure your PC to use your actual GPU and not your internal graphics card. Setting this should improve performance drastically. Obviously, how you do this is dependent on your OS and hardware, but for 64-bit Windows users with NVIDIA graphics cards: you can do this in the NVIDIA Control Panel. Go to Manage 3D Settings -> Program Settings and set the app C:\Users\[Your User]\appdata\roaming\atlauncher\runtimes\minecraft\java-runtime-gamma\windows-x64\java-runtime-gamma\bin\javaw.exe (default location) to use your "High-Performance NVIDIA processor".