2.1 Started Services - TomeOkin/Learning-Notes GitHub Wiki
Service 一般用于执行后台任务,可以仅为普通的 Started Service 或者以客户端-服务器形式(Bound Services)运行。
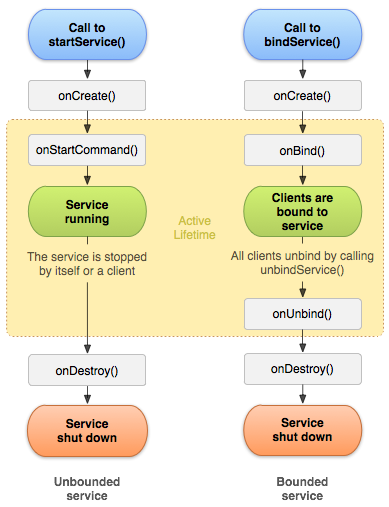
服务有两种启动方式:
- 使用
startService()方式启动:这种情况下,可以在启动时传递需要的 data 给 Service。 - 使用
bindService()方式启动:这种情况下,其他组件与 Service 之间可以进行交互。
以 startService() 方式启动 Service 后,用户需要自己结束服务,可以使用 stopSelf() 或者在其他组件中执行 stopService() 来结束服务。
如果以 bindService() 方式启动服务,当 bind 到该服务的其他组件不需要关联服务时,需要执行 unbindService() 方法。当没有组件绑定到 Service 时,系统会自动结束 Service。Service 可以同时存在这两种模式,一方面是 startService() 方式启动的,另一方面,有其他组件通过 bindService() 绑定到该服务,这种情况下,执行 stopService() 时,需要等到没有组件绑定到 Service 时 Service 才会被结束;如果没有手动结束服务,服务不会结束。

onCreate() 方法会在创建的时候执行,在销毁 Service 时,会执行 onDestroy(),需要在该方法中释放申请的资源或注册的广播等。需要注意的是 onDestroy() 并不总是会被执行。如果 Service 是由于 Low Memory 而被结束的,那么 onDestroy() 可能不会被执行。如果一个 Service 是 bind 方式的,正常不会被结束;如果前台服务的,一般也不会被结束。
如果 Service 是通过 startService 方式启动的,会执行 onStartCommand(),该方法需要返回一个值,表示当 Service 被异常结束(比如因为 Low Memory 被结束)后,在合适的时候,系统要怎么处理该服务:
-
START_NOT_STICKY:不需要重新启动该 Service。 -
START_STICKY:重新启动该 Service,不过是以 null Intent 方式启动。 -
START_REDELIVER_INTENT:将最后一次的 Intent 重新发送给 Service 的方式来启动。
另外,如果同时使用onStartCommand()发起了多个请求,可以通过stopSelf(int)服务。
stopSelf(int) 与 stopSelf() 的区别在于,后者会结束所有服务,而前者会判断传入的任务数是否与当前启动的总任务数相同,是则结束 Service(参见 ActivityManagerService 的 stopServiceToken())。对于 stopSelf(int),有个新版本的方法称为 stopSelfResult(),相比而已,多了返回值表示是否结束成功。
如果 Service 是通过 bindService 方式启动的,需要实现一个 IBinder 并返回给客户端用于交互。如果不允许绑定,则返回 null。当所有绑定的组件都解除绑定后,会先执行 onUnbind() 后才结束服务。
服务需要在 AndroidManifest.xml 中进行注册,只需要具备 name 属性即可。根据需要,也可以使用意图过滤器,不过建议操作服务时不要使用隐式意图或者意图过滤器。
<manifest ... >
  ...
  <application ... >
      <service android:name=".ExampleService" />
      ...
  </application>
</manifest>
如果为了更为准确,可以设置意图过滤器,排除相应的组件名称,不过随后要通过 setPackage() 方法设置意图所属的 Package。另外,可以设置 android:exported = false,这样其他应用即使通过显式意图也不能访问该服务。
<service android:exported="false" android:name="cooperation.wifi.WiFiAutoJumpService">
    <intent-filter>
        <action android:name="com.example.msf.wifi.autoconnect"/>
        <category android:name="android.intent.category.DEFAULT"/>
    </intent-filter>
</service>Service 默认是运行在主线程的,意味着如果执行耗时的操作,会影响用户体验。我们可以在服务里创建线程,在线程里执行需要的操作。
public class HelloService extends Service {
  private Looper mServiceLooper;
  private ServiceHandler mServiceHandler;

  // Handler that receives messages from the thread
  private final class ServiceHandler extends Handler {
      public ServiceHandler(Looper looper) {
          super(looper);
      }
      @Override
      public void handleMessage(Message msg) {
          // Normally we would do some work here, like download a file.
          // For our sample, we just sleep for 5 seconds.
          try {
              Thread.sleep(5000);
          } catch (InterruptedException e) {
              // Restore interrupt status.
              Thread.currentThread().interrupt();
          }
          // Stop the service using the startId, so that we don't stop
          // the service in the middle of handling another job
          stopSelf(msg.arg1);
      }
  }

  @Override
  public void onCreate() {
    // Start up the thread running the service.  Note that we create a
    // separate thread because the service normally runs in the process's
    // main thread, which we don't want to block.  We also make it
    // background priority so CPU-intensive work will not disrupt our UI.
    HandlerThread thread = new HandlerThread("ServiceStartArguments",
            Process.THREAD_PRIORITY_BACKGROUND);
    thread.start();

    // Get the HandlerThread's Looper and use it for our Handler
    mServiceLooper = thread.getLooper();
    mServiceHandler = new ServiceHandler(mServiceLooper);
  }

  @Override
  public int onStartCommand(Intent intent, int flags, int startId) {
      Toast.makeText(this, "service starting", Toast.LENGTH_SHORT).show();

      // For each start request, send a message to start a job and deliver the
      // start ID so we know which request we're stopping when we finish the job
      Message msg = mServiceHandler.obtainMessage();
      msg.arg1 = startId;
      mServiceHandler.sendMessage(msg);

      // If we get killed, after returning from here, restart
      return START_STICKY;
  }

  @Override
  public IBinder onBind(Intent intent) {
      // We don't provide binding, so return null
      return null;
  }

  @Override
  public void onDestroy() {
    Toast.makeText(this, "service done", Toast.LENGTH_SHORT).show();
  }
}
IntentService 基于 Service,内部集成了 HandlerThread 和 Handler:
- 提供了一个默认的工作者线程,在工作者线程中执行所有通过
onStartCommand()传递给服务的意图; - Intent 会被存放在工作队列中,依次执行;
- 处理完所有意图后,会自动停止服务;
-
onBind()方法会返回 null; - 提供
onStartCommand()的默认实现,将 Intent 依次发送到工作队列和onHandleIntent(),使用者只需实现onHandleIntent()方法即可。
如果需要重写 ,需要返回默认的执行结果:
@Override
public int onStartCommand(Intent intent, int flags, int startId) {
    Toast.makeText(this, "service starting", Toast.LENGTH_SHORT).show();
    return super.onStartCommand(intent,flags,startId);
}
如果需要同时执行多个任务,那么我们还是需要通过继承 Service 来实现。
当一个服务需要与用户交互时,比如播放音乐,会选择继承 Service 而不是 IntentService,并且通过 startForeground() 方式启动服务。该方法需要两个参数,唯一的 Id(不允许为 0)和状态栏的 Notification。如果该服务以前台服务的方式运行,那么该通知就不允许被清除。如果要去除该前台服务,可以使用 stopForeground() 方法,该方法接受一个 boolean 值,标识是否清除状态栏通知,但服务不会被结束,还是会继续执行,需要手动结束服务。
Notification notification = new Notification(R.drawable.icon, getText(R.string.ticker_text),
        System.currentTimeMillis());
Intent notificationIntent = new Intent(this, ExampleActivity.class);
PendingIntent pendingIntent = PendingIntent.getActivity(this, 0, notificationIntent, 0);
notification.setLatestEventInfo(this, getText(R.string.notification_title),
        getText(R.string.notification_message), pendingIntent);
startForeground(ONGOING_NOTIFICATION_ID, notification);Intent i = MyService.newIntent(context);
PendingIntent pi = PendingIntent
.getService(context, 0, i, PendingIntent.FLAG_NO_CREATE); // 如果系统中不存在相同的 PendingIntent,不创建一个新的
return pi != null;Started Service 也可以与其他组件进行交互,有几种方式:
-
Broadcast Intents:Service 在需要的时候发送广播(为了保证接收顺序,一般发送有序广播),可以注册个静态广播接收器来接收该广播。
-
Pending Results:在 Activity 中通过
createPendingResult()获得一个PendingIntent,由于PendingIntent实现了Parcelable接口,在启动服务时,可以将其当作 Intent extra 传递给 Service,在需要的时候,Service 通过该PendingIntent的send()方法将消息发送给 Activity。Activity 将从onActivityResult()中获得 Service 发送的消息。 -
Event Buses:通过 EventBus 或者
LocalBroadcastManager这类的来发送消息。 -
Messenger:
Messenger也实现了Parcelable接口。Activity 在启动服务是将 Messenger 通过 Intent extra 传递给 Service,在需要的时候,Service 通过Message.obtain()获得一个Message对象,并设置需要传送的消息,之后通过该Messenger的send()方法将Message发送给 Activity。Activity 则通过Handler的handleMessage()在主线程处理消息、更新界面等。 -
Notifications:在状态栏显示一个通知,当用户操作状态栏时,触发与 Activity 之间的交互。
提供两个小 demo 帮助理解:
(1)取自 《Android Programming:The Big Nerd Ranch Guide》
<uses-permission android:name="com.bignerdranch.android.photogallery.PRIVATE" />

<!-- 注册广播 -->
<receiver android:name=".NotificationReceiver"
    android:exported="false">
    <intent-filter android:priority="-999">
        <action android:name="com.bignerdranch.android.photogallery.SHOW_NOTIFICATION" />
    </intent-filter>
</receiver>
// Service 部分
public static final String ACTION_SHOW_NOTIFICATION = "com.bignerdranch.android.photogallery.SHOW_NOTIFICATION";
public static final String PERM_PRIVATE = "com.bignerdranch.android.photogallery.PRIVATE";
Resources r = getResources();
PendingIntent pi = PendingIntent.getActivity(this, 0, new Intent(this, PhotoGalleryActivity.class), 0);
Notification notification = new NotificationCompat.Builder(this)
.setTicker(r.getString(R.string.new_picture_title))
.setSmallIcon(android.R.drawable.ic_menu_report_image)
.setContentTitle(r.getString(R.string.new_picture_title))
.setContentText(r.getString(R.string.new_pictures_text))
.setContentIntent(pi)
.setAutoCancel(true)
.build();
Intent i = new Intent(ACTION_SHOW_NOTIFICATION);
i.putExtra("REQUEST_CODE", requestCode);
i.putExtra("NOTIFICATION", notification);
sendOrderedBroadcast(i, PERM_PRIVATE, null, null, Activity.RESULT_OK, null, null);// 广播接收器
public class NotificationReceiver extends BroadcastReceiver {
private static final String TAG = "NotificationReceiver";
@Override
public void onReceive(Context context, Intent intent) {
Log.i(TAG, "received result: " + getResultCode());
if (getResultCode() != Activity.RESULT_OK) {
return;
}
int requestCode = intent.getIntExtra("REQUEST_CODE", 0);
Notification notification = (Notification) intent.getParcelableExtra("NOTIFICATION");
NotificationManager notificationManager = (NotificationManager) context.getSystemService(Context.NOTIFICATION_SERVICE);
notificationManager.notify(requestCode, notification);
}
}这里,为了保证广播不被非法访问,还添加了权限。
(2)取自 《The Busy Coders Guide to Android Development》
public class Downloader extends IntentService {
  public static final String ACTION_COMPLETE=
      "com.commonsware.android.downloader.action.COMPLETE";

  public Downloader() {
    super("Downloader");
  }

  @Override
  public void onHandleIntent(Intent i) {
    // ...
    LocalBroadcastManager.getInstance(this)
                           .sendBroadcast(new Intent(ACTION_COMPLETE));
  }
public class DownloadFragment extends Fragment implements
View.OnClickListener {
// other is hide ...
@Override
public void onResume() {
super.onResume();
IntentFilter f = new IntentFilter(Downloader.ACTION_COMPLETE);
LocalBroadcastManager.getInstance(getActivity())
.registerReceiver(onEvent, f);
}
@Override
public void onPause() {
LocalBroadcastManager.getInstance(getActivity())
.unregisterReceiver(onEvent);
super.onPause();
}
@Override
public void onClick(View v) {
// ...
Intent i = new Intent(getActivity(), Downloader.class);
i.setData(Uri.parse("https://commonsware.com/Android/excerpt.pdf"));
getActivity().startService(i);
}
private BroadcastReceiver onEvent=new BroadcastReceiver() {
public void onReceive(Context ctxt, Intent i) {
// ...
}
};
}Services 官方文档
《The Busy Coders Guide to Android Development》
《Android Programming:The Big Nerd Ranch Guide》