Create a custom effect - TobKra96/music_led_strip_control GitHub Wiki
This guide will help you to create your own effect. We will create an effect called "effect_custom". Replace the name with your effect name.
You can find all modified files here: Custom Effect Demo Files
Do not copy and paste the whole file. These files may be outdated! Use the files from the master branch and add the required code lines.
Create a new file inside the directory music_led_strip_control/server/libs/effects/:
sudo touch /share/music_led_strip_control/server/libs/effects/effect_custom.pyAdd the following content:
from libs.effects.effect import Effect  # pylint: disable=E0611, E0401

import numpy as np
from scipy.ndimage.filters import gaussian_filter1d

class EffectCustom(Effect):

    def __init__(self, device):

        # Call the constructor of the base class.
        super(EffectCustom, self).__init__(device)

        # Init your custom variables here.


    def run(self):
        effect_config = self._device.device_config["effects"]["effect_custom"]
        led_count = self._device.device_config["LED_Count"]
        led_mid = self._device.device_config["LED_Mid"]

        audio_data = self.get_audio_data()
        y = self.get_mel(audio_data)

        if y is None:
            return

        # Build an empty array.
        output_array = np.zeros((3, self._device.device_config["LED_Count"]))

        # Use this output method for music responsive effects.
        # It will put the output array into a queue.
        # After this it continues directly with the next music signal.
        self.queue_output_array_noneblocking(output_array)

        # Use this output method for non-music responsive effects.
        # It will block the effect until the array was output.
        self.queue_output_array_blocking(output_array)
Above is the file where you will manipulate the output array.
Code description:
Create a new class EffectCustom that inherits from Effect.
class EffectCustom(Effect):This will be called during the start of the effect. It will be executed once. Add all variables that should be stored between the output cycle. E.g. the previous output array.
def __init__(self, device):This method will be called each time the program wants to update the LED strip. E.g. 60 times per second. Add the array manipulation here.
def run(self):Configs of your effect, that are stored inside the config.json.
effect_config = self._device.device_config["effects"]["effect_custom"]The count of the LEDs.
led_count = self._device.device_config["LED_Count"]The mid that you set for this LED strip.
led_mid = self._device.device_config["LED_Mid"]This variable is the audio signal that was captured between the last call of the run and now. It is an array of 24 elements and represents the level of a specific frequency range. It goes from lows to highs. See the other effects to understand it better.
yThis is the array you will output. It is three-dimensional with the length of the LED strip.
E.g. output[0][:] the [0] represents the red color channel.
[:] selects all LEDs. See the other effects for inspiration.
output_arrayThis will put the output_array into a queue which will output it. Use the blocking method for non-music effects and the non-blocking one for music reactive effects.
self.queue_output_array_noneblocking(output_array)

self.queue_output_array_blocking(output_array)Add the configuration of your effect inside the config
Remember the following line:
effect_config = self._device.device_config["effects"]["effect_custom"]Open music_led_strip_control/server/libs/config_template.json (this is the template config, which will be used if you reset your settings) and add your effect.
Find all_devices and default_device, then effects. Now you should see some other effect settings like effect_bars.
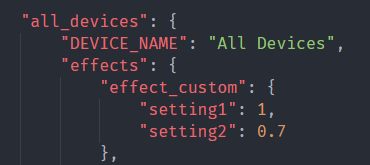
Add your own settings:
"effect_custom": {
    "setting1": 1,
    "setting2": 0.7
},
Do the same steps in /share/.mlsc/config.json.
You have to add it inside all of your existing devices and both the all_devices and default_device blocks.
Add a new entry in music_led_strip_control/server/libs/effects_enum.py:
effect_custom = 26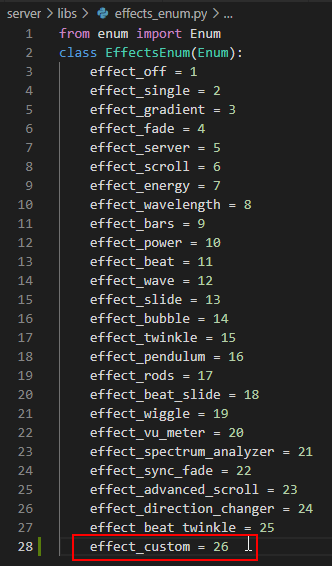
Add your effect to the imports in music_led_strip_control/server/libs/effect_service.py:
from libs.effects.effect_custom import EffectCustom # pylint: disable=E0611, E0401`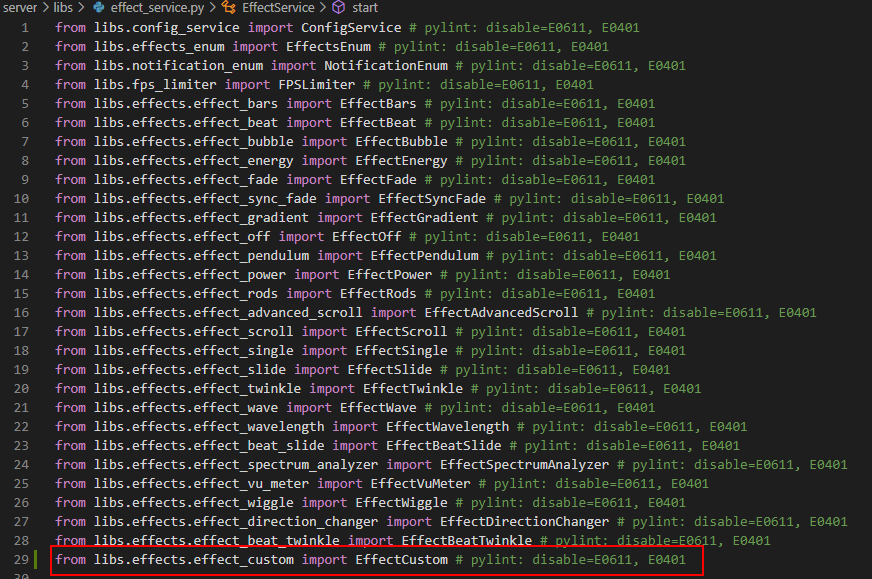
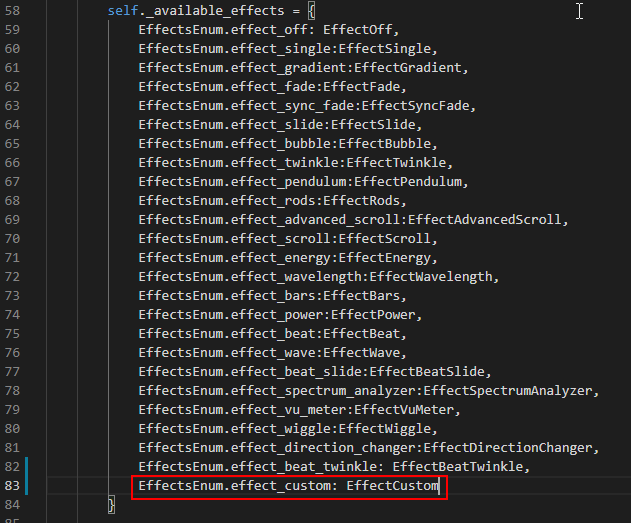
Add your effect to the available effects in self._available_effects:
EffectsEnum.effect_custom: EffectCustomThis will link your effect class with the enum.
Add a new tile to the Dashboard.
Open /share/music_led_strip_control/server/libs/app/home/templates/dashboard.html and create a new div element:
<div class="col-sm-6 col-md-4 col-lg-3 col-xl-2 mb-4">
    <div id="effect_custom" class="card m-auto h-100 dashboard_effect">
        <div class="card-block text-center">
            <i class="fa fa-lightbulb" aria-hidden="true"></i>
            <p class="mt-4 mb-0">Custom Effect</p>
        </div>
    </div>
</div>
Change the icon "fa-lightbulb" with any icon in this list: https://fontawesome.com/icons?d=gallery&m=free

Create effect_custom.html inside music_led_strip_control/server/libs/app/home/templates/effects/
sudo touch /share/music_led_strip_control/server/libs/app/home/templates/effects/effect_custom.htmlAdd the following content to effect_custom.html:
{% extends "layouts/base.html" %}

{% block title %} Edit Effect Custom {% endblock %}

<!-- Specific CSS goes HERE -->
{% block stylesheets %}{% endblock stylesheets %}

{% block content %}

    <div class="pcoded-content">
        <div class="pcoded-inner-content">
            <!-- [ breadcrumb ] start -->
            <div class="page-header">
                <div class="page-block">
                    <div class="row align-items-center">
                        <div class="col-md-12">
                            <div class="page-header-title">
                                <h5 class="m-b-10">Custom</h5>
                            </div>
                            <ul class="breadcrumb">
                                <li class="breadcrumb-item"><a href="/"><i class="feather icon-home"></i></a></li>
                                <li class="breadcrumb-item"><a href="javascript:">Edit Effects</a></li>
                                <li class="breadcrumb-item"><a href="javascript:">Custom</a></li>
                            </ul>
                        </div>
                    </div>
                </div>
            </div>
            <!-- [ breadcrumb ] end -->
            <div class="main-body">
                <div class="page-wrapper">
                    <!-- [ Main Content ] start -->

                    {% include 'includes/devices.html' %}

                    <div class="row">
                        <div class="col-sm-12">
                            <div class="card">
                                <div class="card-header">
                                    <h5>Custom Effect Settings</h5>
                                </div>
                                <div class="card-block">
                                    <p>Choose the color for the custom effect.</p>
                                    <input type="hidden" id="settingsIdentifier" value="effect">
                                    <input type="hidden" id="effectIdentifier" value="effect_custom">
                                    <form id="settingsForm">
                                        <div class="row">
                                            <div class="col-md-6">
                                                <div class="form-group">
                                                    <label>Setting1 <span for="Setting1" class="mb-0 badge badge-secondary"></span></label>
                                                    <input id="Setting1" type="range" class="custom-range setting_input" min="0" max="100" step="1" required>
                                                </div>
                                            </div>
                                            <div class="col-md-6">
                                                <div class="form-group">
                                                    <label>Setting2 <span for="Setting2" class="mb-0 badge badge-secondary"></span></label>
                                                    <input id="Setting2" type="range" class="custom-range setting_input" min="0" max="100" step="1" required>
                                                </div>
                                            </div>
                                        </div>
                                        <div class="mt-4 d-flex flex-md-row flex-column justify-content-md-end">
                                            <button type="button" id="save_btn" class="btn btn-success m-0">Save</button>
                                        </div>
                                    </form>
                                </div>
                            </div>
                        </div>
                    </div>
                    <!-- [ Main Content ] end -->
                </div>
            </div>
        </div>
    </div>

{% endblock content %}

<!-- Specific Page JS goes HERE  -->
{% block javascripts %}
<script src="/static/assets/js/settings.effect.js"></script>
{% endblock javascripts %}
This will add Setting1 and Setting2 range sliders. See the other effect settings pages for gradients, colors and checkboxes.

Open music_led_strip_control/server/libs/app/base/templates/includes/sidebar.html and add a new li element:
<li class="{{'active' if segment == 'effect_custom'}}"><a href="/effects/effect_custom">Custom Effect</a></li>Revision 2.2