Posing and Rigify - TheArtGun/GunquinDocs GitHub Wiki
Rig Layers
The Rig Layer panel tells you which bones are visible. At least one layer must be selected at any given time, you can click and hold to remove or add multiple layers. At times, the panel will jump up or down if you have bones selected while doing this. Certain bones have specific options that also appear in the options and therefore move the layers panel around. It's annoying but hard to avoid.

The Rightmost panel where all these UI options are can get a bit messy, you can collapse the options to make your life a little more organized

Pose Mode
You can only move bones to pose the character while you are in pose mode. To enter pose mode, click on the top left dropdown and select "pose" You can also press "Cntrl+Tab" in order to enter (or exit) pose mode.

Rig Main Properties
The rig main properties show options specific to the controller/bone you have selected.

There are several types of properties. The main ones are IK/FK sliders and switches, "X Follow" sliders, and IK parent switches.
IK/FK, Sliders and Snapping
There are two ways to control arms and legs, IK or FK.
IK(Inverse Kinematics) works by having two 'floating' points in space, and it'll rotate the limb so it automatically starts at point 1 and ends at point 2. This lets you move, for example, the hand, and the elbow will automatically position itself so the arm bends correctly. This lets us position the hand freely, or attach it to other parts of the body like the leg, and when we move the leg, the hand and arm will move correctly with it.

FK (Forward Kinematics) works by hierarchical rotation. Rotating the upper arm will rotate the forearm and the hand with it, rotating the forearm rotates the hand, but doesn't affect the upper arm etc. This mode may feel stiffer than IK but it allows for arcing motion very well, making it ideal for arms during walk cycles or jumping in animation where the arms are free floating and have no specific purpose (not grabbing or reaching for anything specific)

You can switch between these two modes with sliders. The slider will appear with (almost) any of the arm or leg bones selected. They won't appear if you have fingers or toes selected as those have their own controls.
The slider will directly blend from the IK position to the FK position

To avoid this, you can "snap" the FK to the IK position, or the IK to the FK Position.

IK to FK

FK to IK
NOTE : These can break slightly with the arm length and leg length, hand size and foot size sliders. It mostly works, but can be slightly off due to the way it copies scale while snapping.

While it's slight, there's a bit of a difference. Normally it's perfect, but to allow for character customization I had to break it a bit.
Follow
The "Follow" sliders essentially allow specific FK rotations to ignore their parent. This is primarily for the FK arms and the head.

The left arm and head aren't following the body.

The neck also has a follow control, by default it's at .5 so it blends between the head and the torso.
Parent Switching
For the arms, legs, and eyes, the IK "Targets" can be attached to different parts of the body. When switching, the location of the hand/foot/eye target should not change, but it will now move with the new parent.

IK Pole Target Toggle/Usage
The pole target is where the "elbow" or "Knee" will point to (if enabled). It's represented by a red sphere and can be moved and parented like the hand IK target. If not enabled, the big red arrows on the upper arms/thighs can be rotated to control the elbow direction.

Animating the Properties
The IK/FK slider, the Follows, and the parents can all be keyframed. The information is stored on specific bones, so if you want to modify the keyframes after making them you'll have to select these bones. The arm and leg settings are stored per limb on the red gears on the body

The head/neck/torso settings are stored on the yellow cube

The eye settings are stored in the green circle in the face

Mirroring the properties/poses
To mirror the properties or the pose, select all the bones you'd like to mirror. Hit control C, and then Control+Shift+V to paste to the opposite side. Remember, properties are stored on the bones mentioned above so if you want to mirror your IK/FK settings, make sure you select the right bones!
Rigify Posing Hacks
Fingers/Toes
Scaling the orange sticks with squares on the end will curl the finger/toe.

Moving and rotating the orange boxes on the hands/feet will give the toes/hand some bend and help it feel less stiff in some poses.

Walking the Feet
Rotating the funny little red arrows on the back of the foot back and forth will keep the toes planted Rotating these arrows to the side will rock/tilt the foot.

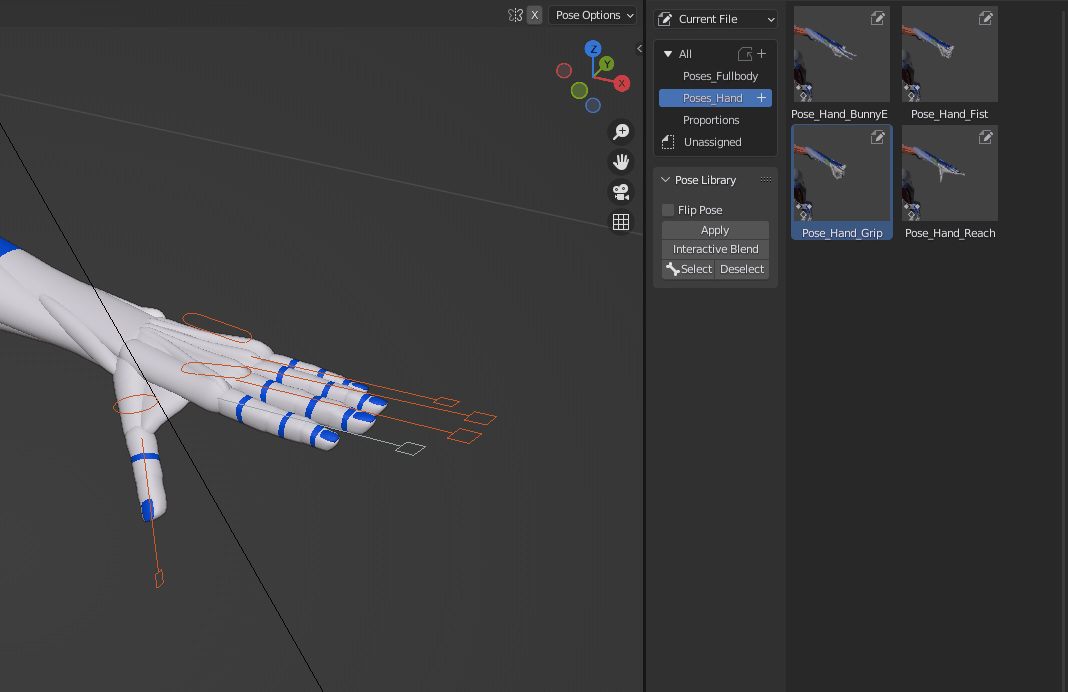
Pose Library
Make sure you set up the pose library correctly, you can find it on it's own page in this wiki via the index on the top right or by clicking here
Applying poses
Select a pose from the library, click "select" to select the related bones, and either "Apply" Or "Interactive Blend" Blend will blend between the current pose and the pose library pose, you can control how much by sliding your mouse left or right and clicking to confirm. Apply will just swap instantly to the pose. If the pose looks odd, make sure you have all the Rig Layers enabled so no bones are being left behind. Pose Library poses will only affect selected and visible bones.
Mirroring the Pose
Just click the little "Flip" checkbox in the Pose Library panel. This will select and apply poses to the opposite side, or for full-bodied poses it'll mirror everything.

Reset Pose
To reset the pose, use the "RESET_ALL" Pose. This will return the Gunquin to it's default pose. This won't affect the body sliders, only the pose bones. It will however reset the poses that change the character's proportions so keep that in mind