Installation - TheAppgineer/roon-extension-manager GitHub Wiki
The Roon Extension Manager can be installed on a variety of systems, this page contains detailed installation instructions for:
![]()
![]()
![]()
![]()
![]()
![]()
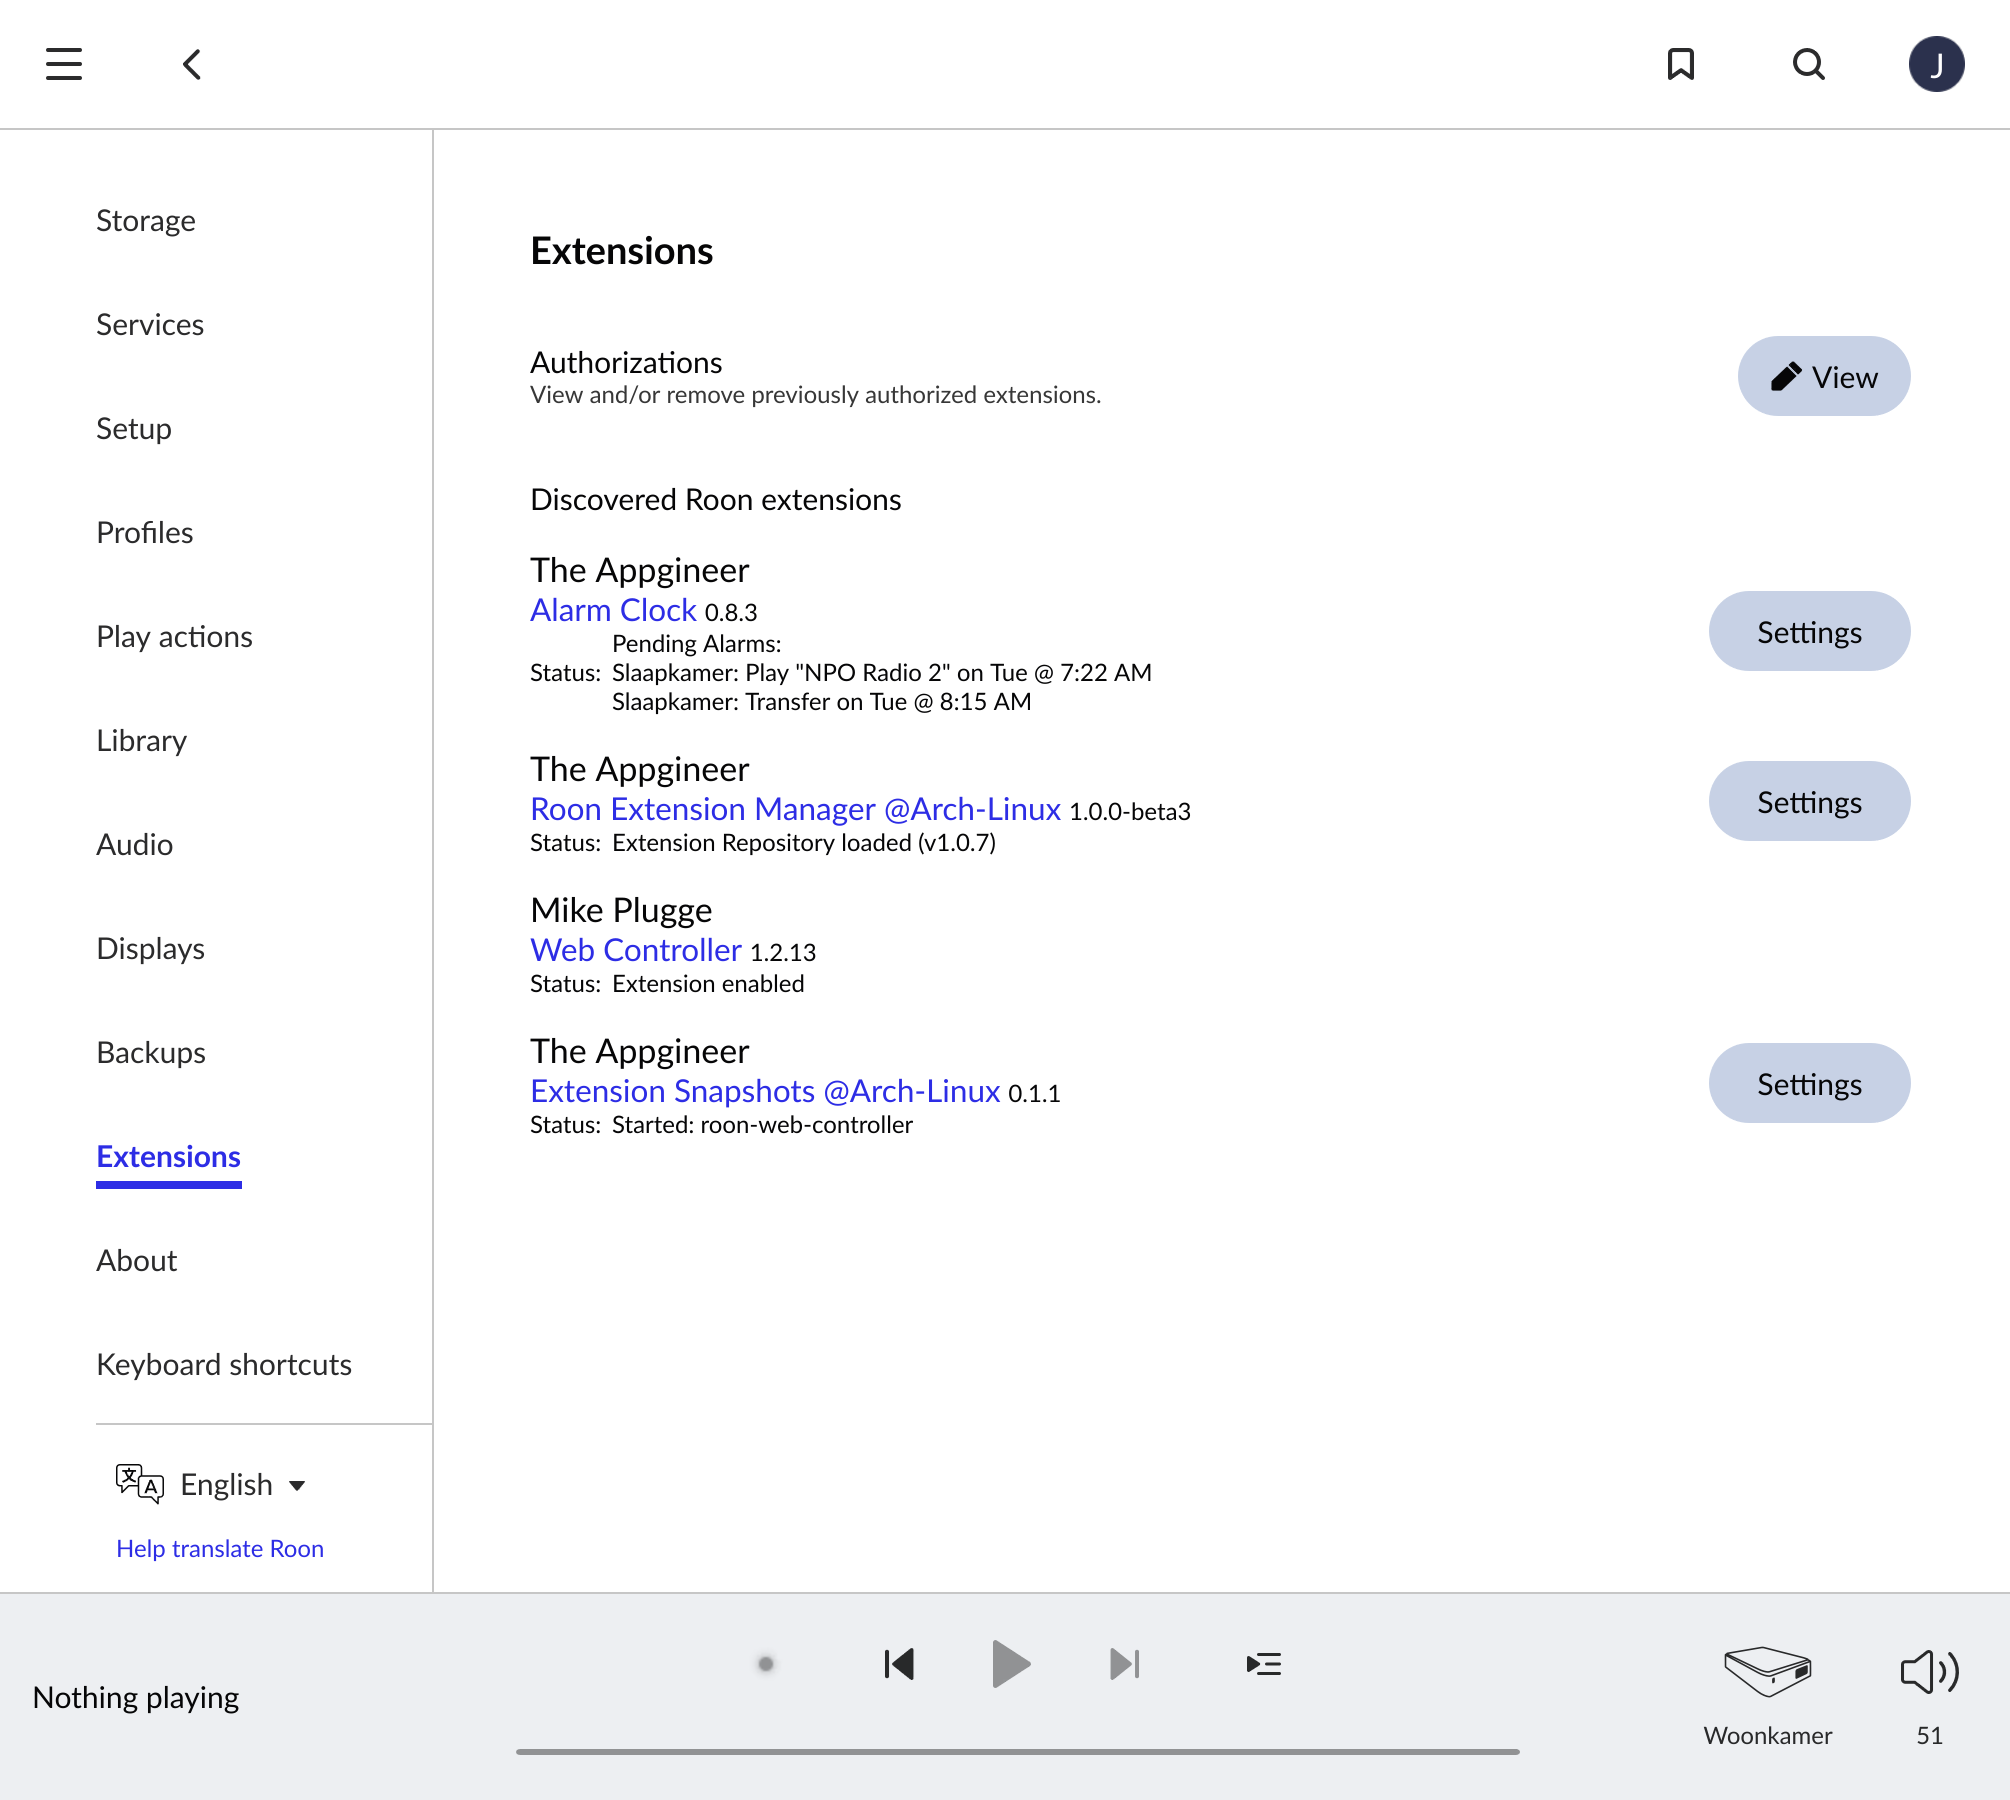
After installation the Extension Manager should show up in Roon, it can be accessed via ☰→Settings→Extensions.
Some devices and distributions come with the Roon Extension Manager already included, for these it is just a matter of enabling it and you are ready to go. The applicable products are:
DietPi (≥ v7.2)
ℹ️ Read the DietPi Setup Instructions if DietPi hasn't been setup yet.
ℹ️ Running the Extension Manager on DietPi requires a Raspberry Pi 2, 3, 4 or Zero 2 W. The original Pi 1 and Zero W are not supported!
Installation can be performed via the dietpi-software tool. The Roon Extension Manager can be found in the 'Media Systems' group within 'Browse Software'.
Alternatively, you can install from the command line:
dietpi-software install 86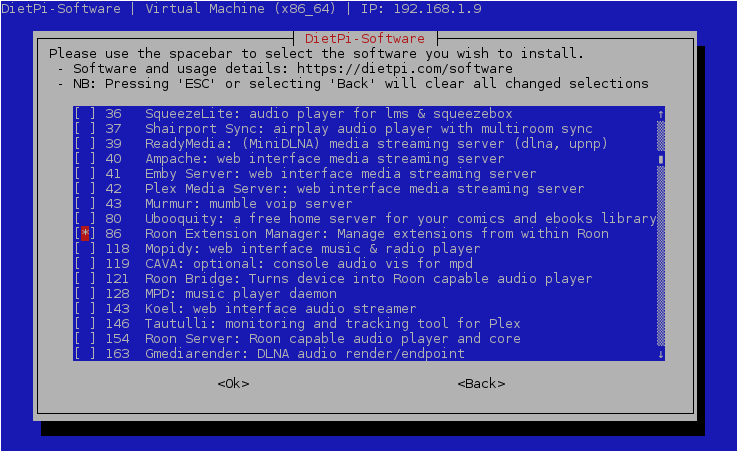
If the old 0.x version is already installed then an upgrade can be performed via the reinstall command:
dietpi-software reinstall 86The Extension Manager no longer depends on git and Node.js, so if these are no longer needed on the system they can be removed:
dietpi-software uninstall 9 17ℹ️ Check the running extensions in Roon after the upgrade, those extensions that were installed via npm have to be reinstalled!
An uninstall can be performed via the dietpi-software tool or via the command line:
dietpi-software uninstall 86rooExtend (≥ v3.0.2)
ℹ️ Read the rooExtend Quick Installation Guide V3.0.x if rooExtend hasn't been setup yet. It can be downloaded from here.
After installation you visit rooextend.local where you can enable the Roon Extension Manager at the top of the page.
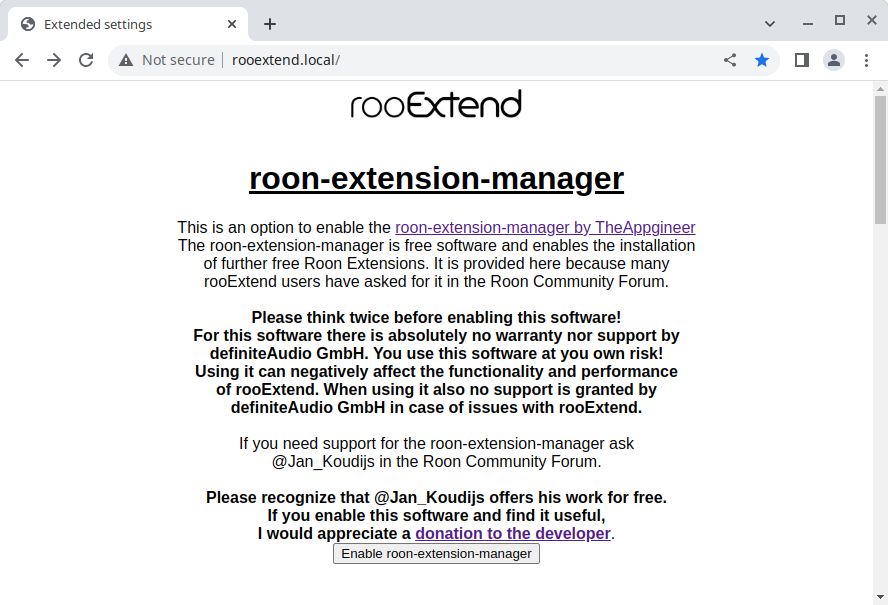
In the event that the Roon Extension Manager needs to be disabled then this can be done from the same page.
The Extension Manager depends on Docker, how this is installed depends on the Linux distribution that is used. Installation instructions can be found in the Docker Documentation, select the distro used from the list in the left sidebar. The recommended installation method is "Install using the repository".
The Setup Script performs a prerequisite check, installs the Extension Manager and sets up a systemd service. It has to be run with administrator privileges. If you run it as a normal user with sudo (recommended), the service will run as that user.
The script is used successfully on Ubuntu, Arch Linux and DietPi but should work an other distros as well.
-
Download the Setup Script
wget https://github.com/TheAppgineer/roon-extension-manager/raw/v1.x/rem-setup.sh -
Set the execute permission for the Setup Script:
chmod +x rem-setup.sh -
Run the Setup Script
sudo ./rem-setup.sh
ℹ️ The Setup Script performs an upgrade in case an old installation is found.

-
Download the Setup Script
wget https://github.com/TheAppgineer/roon-extension-manager/raw/v1.x/rem-setup.sh -
Set the execute permission for the Setup Script:
chmod +x rem-setup.sh -
Run the Setup Script with the
--uninstalloptionsudo ./rem-setup.sh --uninstall
If Docker is already used to run containers for other applications it might be preferable to create the Docker container manually.
In such a setup also the updates of the Extension Manager have to be done manually as the standalone image doesn’t support the update action for the manager itself.
Two environment variables have to be supplied during container creation. The first one is the Docker group ID <docker-gid>, it is determined with this command:
stat -c '%g' /var/run/docker.sock
The second one is the timezone <timezone>, valid values can be found in the TZ column of this list.
The docker run command can be used to create a container from the image. The full command to be used is shown below, in which the variable indicators have to be replaced with the values found in the previous step.
docker run -d --network host --restart unless-stopped --name roon-extension-manager --group-add <docker-gid> -v rem_data:/home/node/.rem/ -v /var/run/docker.sock:/var/run/docker.sock -e "TZ=<timezone>" theappgineer/roon-extension-manager:v1.x-standalone
The meaning of the options is listed in the table below:
| Option | Value | Description |
|---|---|---|
| -d | Run container in background and print container ID | |
| -e | "TZ=<timezone>" | Container timezone |
| -v | rem_data:/home/node/.rem/ | The name of the data volume and the mount point within the container |
| -v | /var/run/docker.sock:/var/run/docker.sock | The location of the Docker socket and the mount point within the container |
| --name | roon-extension-manager | The name of the container |
| --network | host | Use the Docker host network stack |
| --restart | unless-stopped | Restart the container unless explicitly stopped |
| --group-add | <docker-gid> | The Docker group ID |
| theappgineer/roon-extension-manager:v1.x-standalone | The Roon Extension Manager image |
ℹ️ Depending on system settings and privileges it might be necessary to run the docker command using sudo.
ℹ️ As most web interfaces of NASes do not provide all the required option types it might be necessary to create the container with the above command via an ssh connection.
The manual creation of the container implies that also an update has to be performed manually. The steps to take are:
- Stop the running container:
docker stop roon-extension-manager - Remove the container:
docker rm roon-extension-manager - Remove the old image:
docker rmi theappgineer/roon-extension-manager:v1.x-standalone - Create a new container by repeating the docker run command, as given above
ℹ️ These steps also have to be performed in case of an upgrade from the 0.x version.
It is also possible to use the Docker compose file, the environment variables can be set in an .env file or be directly inserted in the .yml file.
Running the Extension Manager on Windows requires the setup of a Linux Virtual Machine. This can be done in different ways but probably the most lightweight way of doing it is by running DietPi in the VM. Instructions for this can be found here.
If the old v0.x Extension Manager has been installed previously it can be removed by taking the following steps:
- Type
servicesin the Windows search bar and open the Services application - Select the Roon Extension Manager in the list and stop it
- Type
cmdin the Windows search bar, right click the Command Prompt application and select Run as administrator. - Answer the allow changes prompt with Yes
- Uninstall the service by entering:
sc delete roon-extension-manager - Type
uninstall a programin the Windows search bar and select Uninstall a program - Uninstall Node.js and Git
- Type
%appData%in the Windows search bar and press Enter - Delete the RoonExtensions folder
- Delete the npm-cache folder
- Type
envin the Windows search bar and select Edit the system environment variables - Select the Environment Variables... button
- Select NPM_CONFIG_PREFIX in the System variables section and press Delete
- Restart the system
Running the Extension Manager on macOS requires the setup of a Linux Virtual Machine. This can be done in different ways but probably the most lightweight way of doing it is by running DietPi in the VM. Instructions for this can be found here.