Installation Instructions - TeraLogics/TotalBriecall GitHub Wiki
Overview
Browsers
This application has been tested with the latest versions of Chrome, Firefox, IE11, Mobile Safari and Mobile Chrome. It uses modern technologies that may not be supported by older browsers.
Deployment Configurations
This application utilizes a number of external APIs to provide users with a robust and modern experience. Although none of the APIs are required, and the site will attempt to gracefully handle the lack of them, the application works best when they are configured correctly.
See Configurations
Heroku
We wanted to make deployment as easy as possible and we actually tried a few different things. Heroku provides a simple url that configures the application for you based on what the application requires. We chose to put this on the GitHub page for ease of access. Clicking the button provides a simple one step deployment. The following instruction will walk you through exactly what you need to do to deploy this application as well as link you to any additional walkthroughs on how to configure advanced options.
Step-By-Step Deployment Instructions for Total Briecall
- Navigate to GitHub.
- Scroll to the README section and click the 'Deploy to Heroku' button
NOTE: If you do not have a Heroku account you may need to create one at this point. See Login / Create Account for further instructions. - Fill in the App Name field (this is optional).
- Scroll down to the Config Variable section.
- If you have a Facebook App ID enter it in the
FACEBOOK_APPIDfield. If you do not have one, you can deploy the application and add your App ID later. Your application will not have direct Facebook sharing integration until this is configured. Follow the link for instructions on Creating a Facebook Application ID. - If you have an OpenFDA API key enter it into the
OPENFDA_APIKEYfield. If you do not have an OpenFDA API key, you can still deploy the application and add an API key later. This key is not required, but if it is supplied the OpenFDA API will allow more requests per minute and total requests per day. Follow the link for instructions on Getting an OpenFDA API Key. - If you have a StatusPage.io status page, go ahead and enter the url in the
STATUS_PAGE_IO_URLconfiguration variable. If you do not supply this, there will not be an externally available status page for your application. This integration is not required, but is a nicety for your users.
- If you have a Facebook App ID enter it in the
- Click the 'Deploy for Free' button.
To modify any additional configuration values see Configuration Settings
Login / Create Account
- Open a browser and navigate to Heroku
- Enter your 'Email address' and 'Password'
NOTE: If you do not have a Heroku account, then select the Sign up option at the bottom and fill in the required fields. - Click the 'Log In' button
NOTE: You will need an active credit card associated with your account to save add-ons to the application. To do this, click your user name from the top of the left menu and select "Manage Account." On the page that loads, select "Billing" and follow the steps to add a credit card. No charges to your card will result from this process. The card is required simply to proceed.
Enabling CI (Continuous Integration)
NOTE: You must be an administrator of the GitHub repository in order to configure this feature, and this application must also be hooked to a GitHub repository.
- Click on 'Personal Apps' in the left hand menu
- Click on your application (ex 'total-briecall-example')
- Click the 'Deploy' menu link at the top
- Scroll down to the 'Automatic deploys' section
- Select the 'master' branch
- Select the 'Wait for CI to pass before deploy' check box, then click the 'Enable Automatic Deploys' button

Creating an Open FDA API Key (Optional)
- Visit https://open.fda.gov
- Click on the API Basics link
- Scroll down to the 'Your API Key' section
- Enter you email address
- Click the 'Get API Key' button
- Copy the API key and put it in the application's configuration variable named
OPENFDA_KEY

Creating a Facebook Application ID (Optional)
Facebook integration was not completed for production due to the waiting period necessary by Facebook to approve sharing. Although the feature was usable by our team in the development environment, we choose not make it required for anyone else deploying our code, and did not enable it on https://www.totalbriecall.com
-
Log into or create an account on Facebook.
-
Go to Facebook's Developers page. It will ask you to accept their user agreement. If you agree, continue.
-
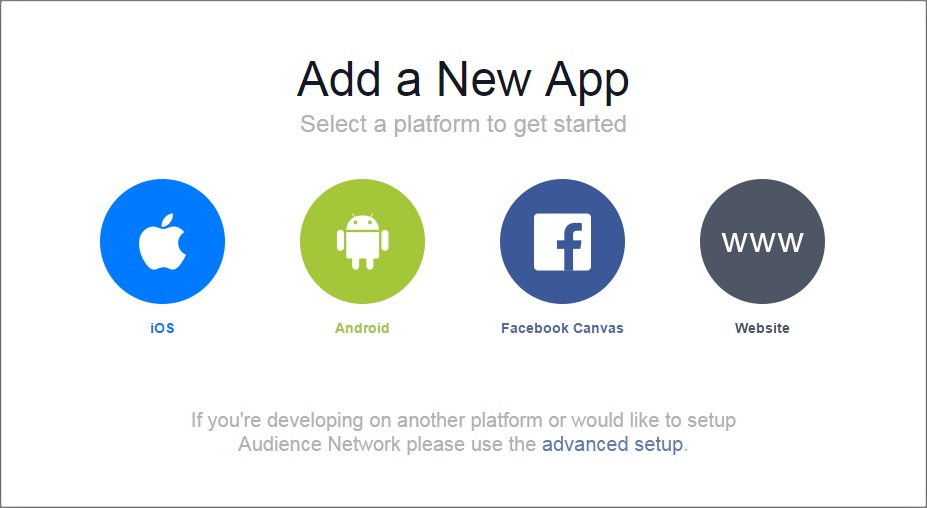
In the upper left hand corner, there should be a link for 'My Apps'. Click the button, then select 'Add a New App':

-
From the modal dialog that comes up, select 'Website':
-
Enter in a name for your app. We needed our main app as well as some development apps, so you can see how we named ours below. Enter a name, and then click 'Create New Facebook App ID'.

-
Wait for Facebook to generate your app. Once it's done, you will get a small options dialog. Unless you have made another app before that you want to attach this as a test app to, select no for the first option. For category, we went with 'Reference'. Afterwards, click 'Create App ID'.

-
It will show you more information about their SDK, which you don't need. At the bottom of the page should be a box for the URL you will be using with the app. Our main app uses 'totalbriecall.com'. Enter whatever URL your app will be using. It is important to match the URL correctly. Once entered, hit 'Next'.

-
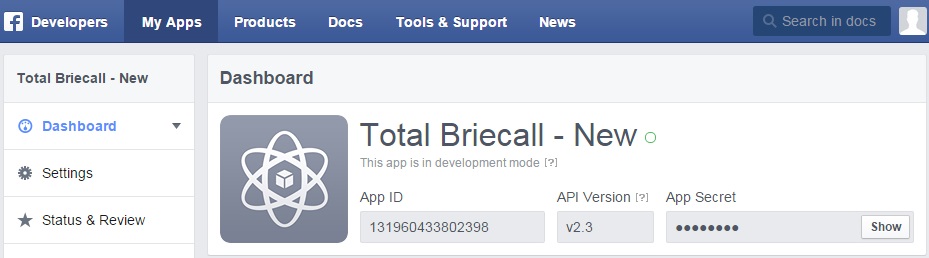
Facebook will then show you some more integration information, which you also don't need. At the bottom under 'Next Steps' is a link to the app's Developer Dashboard.
-
Go to your app's Developer Dashboard. At the top will be a window with 'App ID'. Use that ID in your Heroku configuration under the key 'FACEBOOK_APPID'.