Serial - TeensyUser/doc GitHub Wiki
Setup
USB Mode
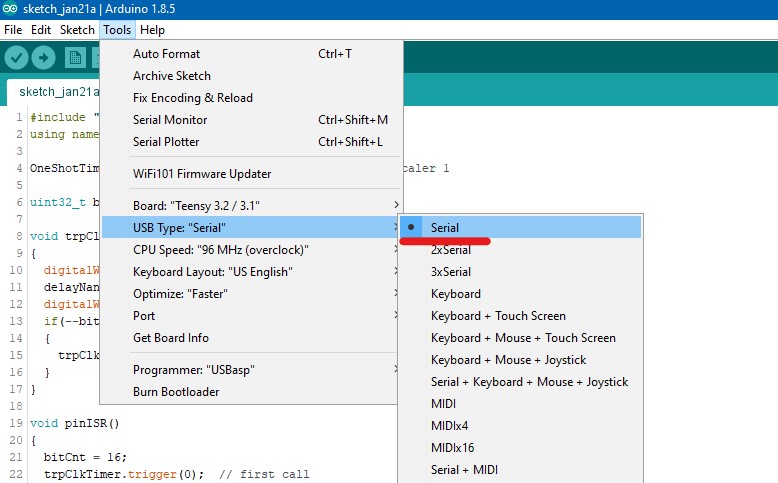
The easiest way to communicate with a PC is using the virtual serial port provided by the integrated USB controller. To enable it you first need to select Serial in the Tools|USB Type menue entry.
Note: The Teensies ship with the virtual serial port disabled.
After enabling the virtual serial port you can use the Serial object to read from and write to the port. The following example shows how to print the current value of millis() every 100ms.
void setup()
{
   // no baudrate setting requried for USB serial
}

void loop()
{
   Serial.println(millis());
   delay(100);
}
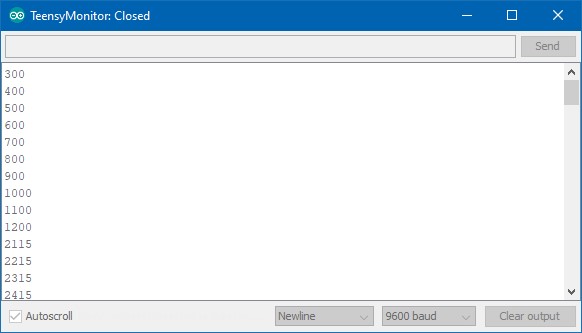
If you now open the Serial Monitor you should see something like this:
Baudrate
Please note that there is no need to set a baudrate. Communication over the virtual serial port is always done with full USB speed which is (net rates, actual tranmission rates will be smaller)
- 12 MBit/s for the T3.X boards, and
- 480 MBit/s for the T4.X boards.
Usage
Avoid Sending Data too Early
Since Teensies boot up very fast, they will be running your code before the PC has even detected the Teensy and loaded the corresponding USB drivers. Thus, if you don't wait until the PC is ready your code will send out data before the PC can receive it. In the code above this doesn't reall matter but if you need to avoid this you should check if the USB host already established a connection before you start sending data.
void setup()
{
   while(!Serial){}  //wait until the connection to the PC is established
   Serial.println("Start");
}

void loop()
{
}
This code works nicely but if you do not connect the Teensy to an USB Host the while(!Serial){} will wait forever and the rest of your code will never start, which can be very confusing. To avoid this you can add a timeout as shown below:
void setup()
{
   while(!Serial && millis() < 1000){}  //wait (at most 1000 ms) until the connection to the PC is established
   Serial.println("Start");
}

void loop()
{
}
Sending Text
Serial.println("some text");
Sending Binary Data
// write a byte to the port
Serial.write(42);

// write a buffer to the port
constexpr size_t bufSize = 1024;         // 1kB buffer
uint8_t buf[bufSize];
for (unsigned i = 0; i < bufSize; i++)   // fill with increasing number
{
    buf[i] = i;
}
Serial.write(buf,bufSize);               // write complete buffer to port
Receiving Data
Data transmission over USB is very fast. Do not read one byte per loop. It is better to read until the receive buffer is empty before continuing with other work. The following example switches the board LED on/off if it receives a '+' or '-' respectively.
void setup()
{
  pinMode(LED_BUILTIN, OUTPUT);
}

void loop()
{
  while (Serial.available())
  {
    uint8_t b = Serial.read(); // read one byte from the port
    switch (b)
    {
    case '+': // enter '+' to switch LED ON
      digitalWriteFast(LED_BUILTIN, HIGH);
      break;

    case '-': // enter '-' to switch LED OFF
      digitalWriteFast(LED_BUILTIN, LOW);
    default:
      break;
    }
  }

  // do something else
}
How to Communicate with a PC Application
To send data via the virtual serial port to a PC you can use one of the methods explained above. Here a very simple example sending increasing numbers as string. All source code can be downloaded from here
void setup()
{}

void loop()
{
  static unsigned cnt = 0;
  Serial.println(cnt++);
  delay(50);
}
Windows, C#
Using C# you can receive the sent strings as shown in the console program below. To find out the port number windows assigned to our teensy, we can use TeensySharp. Besides other stuff, it provides a list of all connected Teensies and their port numbers. Please note: In a real life application you'd certainly have the user select one of the found Teensies and add some checks for the availability of the port.
using System;
using System.IO.Ports;
using System.Linq;
using TeensySharp;

namespace SerialReceiver
{
    class Program
    {
        static void Main(string[] args)
        {
            var watcher = new TeensyWatcher();
            var teensy = watcher.ConnectedDevices.FirstOrDefault();  // Use the first teensy we find on the Bus

            SerialPort port = new SerialPort(teensy.Port);           // open a serial port for the teensy
            port.Open();
            while(!Console.KeyAvailable)
            {
                Console.WriteLine(port.ReadLine());
            }
            port.Close();
        }
    }
}
Here the output of the PC application:

LINUX
TBD
Multiple Serial Ports
Since version 1.52 Teensyduino supports one or two additional virtual USB serial ports. They use the same USB connection as the standard serial port. I.e., no additional cable or whatsoever is needed to open up to tree communication channels to the PC.
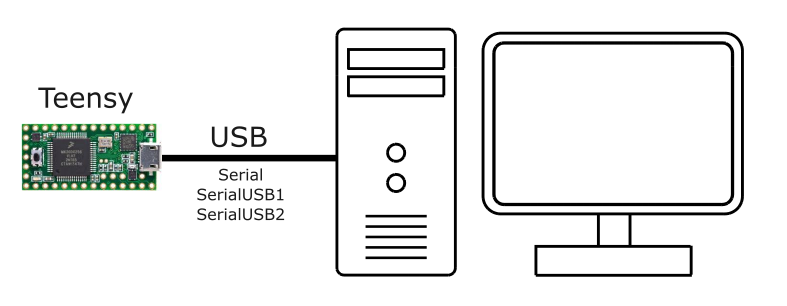
This is especially useful for debugging or logging if you have an application which already uses the normal serial port for communication with the Teensy.
To use it you need to compile your sketch with USB option Dual Serial or Triple Serial. This gives your sketch access to the new serial classes SerialUSB1 and SerialUSB2.
Here an example which waits for commands on the standard serial port. If it receives a '+' it switches the on board LED on, if it receives a '-' it switches it off. Other characters are ignored.
The sketch uses SerialUSB1 for debug messages and writes logging information to SerialUSB2.
void setup()
{
    while (!Serial) {} // wait until PC connected the port
    pinMode(LED_BUILTIN, OUTPUT);

    Serial.println("Enter '+' to switch the LED on, '-' to switch it off");
}

void loop()
{
    while (Serial.available() > 0)
    {
        uint8_t c = Serial.read();
        Serial.write(c);                              // echo
        SerialUSB1.printf("Received byte %u\n", c);   // debug messages on SerialUSB1

        switch (c)
        {
            case '+':
                digitalWriteFast(LED_BUILTIN, HIGH);
                SerialUSB2.println("LED switched on"); // log on SerialUSB2
                break;

            case '-':
                digitalWriteFast(LED_BUILTIN, LOW);
                SerialUSB2.println("LED switched off"); // log on SerialUSB2
                break;

            case '\r': // ignore carriage return and linefeed
            case '\n':
                break;

            default:
                SerialUSB1.printf("Unexpeced command %c received\n", c);  // debug messages on SerialUSB1
                break;
        }
    }
}
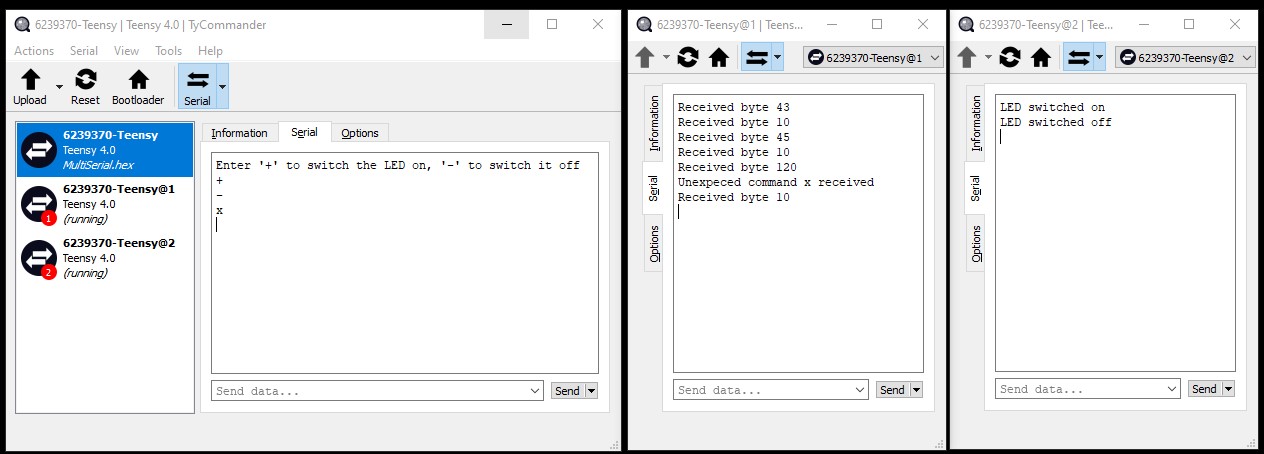
And here the generated output for the input+, - and x using three instances of TyCommander. TyCommander nicely identifies the additional ports by the red numbers in the Teensy logo. The left window shows Serial, the middle window shows SerialUSB1 and the right one SerialUSB2.
 .
.