How to start (Beginner's guide) - T-Troll/alienfx-tools GitHub Wiki
How to start using Alienfx-gui
This document is the beginner's guide, helping to start using AlienFX-GUI from scratch. Please read it to understand some basic concepts and methods of the light/fan/power controls.
Light control concept
Starting from release v6, AlienFX-GUI using "Grid&Zones" light control concept, instead of per-light control only into previous releases.
There are "Devices and Grids" tab, which tell the tools what light devices your system have, as well as how many and which lights defined for every of them. It not operate lights in itself, but define which lights can be operated by other settings.
The rest of the tabs operate this set of lights, and define default colors ("Colors" tab) and various effects (the rest of the tabs).
What is the Zone?
The group of the lights you want to control at once. For example, it can be keyboard row/column, WASD keys, cursor keys... And individual light (like power button) as well. Zones can be defined from light positions at the grid(s) and selected by light names from the global light list.
"WASD" keys zone selected at this screenshot:

Zone is not only group different lights, but also give a hint how to threat it's positions on the grid - use "Gauge" block to define it.
What is the Grid?
Grid define the position of the lights into one of your gear surface.
For example, keyboard surface looking like this (Alienware m15R1):
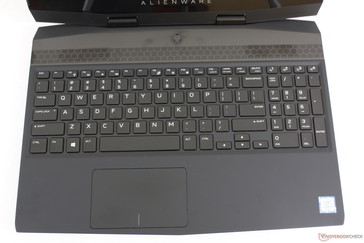
represented as a grid like this (it has 4-zone keyboard lights, not per-key):

Each keyboard key assigned to at least one grid cell (well... 2 cells in this case), and it's position the same as at a real keyboard.
Other lights (like power button and touchpad (if available)) share the grid (top 2 lights in screenshot is a power key).
Your gear can have more, then one grid. For example, for notebooks, the back of the screen can be represented by a different grid (Alienware 13R2):
represented as:

Good to know:
- Yes, you can mix lights from different devices at one grid
- Yes, you can set light to more, then one grid - but this is not reccomended for Grid effects - they can only use one grid in operation.
- Yes, you can have lights not assigned to any grid.
Do i need a light grid?
You can continue using per-light approach, if you don't have so much lights (f.e. for desktop or monitor) or don't plan to use spatial light connection (like gauge indicators and grid effects). In this case, you don't need to set up the lights on the grid (but still need one empty grid).
How to define grid size?
Count how much lights (buttons in case of RGB keyboard) you have at longer row or column. Add one row/column for power button if present, as well as one row for touchpad (in case it has light).
Keyboard structure can be irregular, so for some keyboards it's good to have 2 times more columns, then max. button count - it help you reflect button posisition better.
You can always increase or decrease grid size at "Devices and grids" tab using arrow buttons near the grid (it can add or remove row/column).
How to define lights and it's grid positions?
Switch to "Devices and Grids" tab.

In case you don't have lights defined, app switch into it automatically, and will prevent switching to other "Lights" tab. You can't oprate lights which is not defined.
Check you have some devices detected into "Device:" list at upper left corner.
Automatic lights detection
Press "Detect Devices" button. You will see the dialogue with a list of devices which fits hardware you have. Check devices fits you exact hardware model and press "Apply selected" - this fill lights and grids automatically.
Unfortunately, it's not possible to detect exact hardaware type, so application will guess for the same chip IDs. But real light mappings can be different from device to device. That's why is BAD idea to select "similar" hardware. Use manual setup in case you device not listed into detection list.
Manual lights setup
In case automatic detection doesn't have data about some of you hardware devices, you need to set it up manually. It's a one-time opreation, later used for all tools. Keep in mind setting lighs here does not control it, just tell tools you have this lights in action!
Manual setup is step-by-step, at the each step you define one light. To doing this, keep you eye at right part of the "Devices and grids" dialog.
First, select device you want to check from the left list. You can have mulpiply devices there, f.e. notebooks usually have 2 (one for tron lights and one for keyboard lights), all external (monitor, keyboard, mouse) will have separate device too.
Then, take a look at "Selected light" block. Number near "Selected light:" is lightID in action.
Check real device - did this ID change physical light color (light color will be changed to "Highlight" button color, press it to change to other one)?
In case some physical light changed, set it up:
- If you plan to use grids, just click on corresponging grid position (you can also click-and-grag to set light to more, then one cell). This will also fill light name to default value.
- If you don't plan to use grids, just enter any light name into "Lights:" edit box.
- For per-key RGB keyboards, it's a good idea also assign key code to light - "Keyboard" grid effect will not work if you don't do so. It can be done automatically for per-key RGB keyboard devices after you click on grid, or you can press "Key" button to change/set it.
- Setting key code open key set dialog. Just press corresponding keyboard key to record it code, as well as set its name to key name. Please keep in mind - some keys, like Fn, does not have a key code, so name sould be set manually.
- DO NOT use "ESC" button to close this dialog, you set current light to "ESC" key instead! Just press "x" button by mouse to cancel.
Some light IDs may not have physical light connected, it's normal situation, just skip it.
After you set light, or configure out it not connected, press ">" button (or use keyboard shortcut Shift+Right) to select next light and repeat operation above until all physical lights from device setted up. Already setted lights will fade black after set.
You can use other navigation buttons - "|<" (Shift+Home) to navigate to first defined light, ">|" (Shift+End) to the last defined, "<" (Shift+Left) to previous one (defined or not).
"Reset" button clear all current light data, in case you set it up by mistake.
Some other support functions for editing:
- You can select light from the list to edit it
- You can change light name any time just typing it into edit box
- You can set special light types (Hardware power button, Indicator - like NumLock light, Wifi, HDD) into "Current light:" block
- You can left-click on grid cell to select light it assigned for
- You can right-click/click-and-drag on grid cell to clean it from any light assignment
- You can press "X" button near grid to clean this grid from all lights (careful!)
After you finish setting lights from current device, select other device (if you have more, then one) from "Devices:" list and set it up as well.
You can also add/remove grid by pressing "+" and "-" buttons at grid block, as well as change grid name by double-click on it.
Additionally, you can change device name (double-click on it as well), or clear all device lights data (carelul!) by pressing "Clear device" button.
And don't forget to press "Save lights and grids" button then you finish to backup it and share to community - it helps other guys with the same hardware (it will be added to detection database)!
Let's set some colors and effects
After you setup some lights one way or another, it's time to define how to control it.
Create zone and assign colors
Switch to "Colors" tab:

First, create a Zone (press "+" button at zones block), you can double-click at zone name to change it.
Assign lights into zone selecting it from grid (left-click on grid cell or click-and-drag, left-click on selected one to unselect) or by pressing "Select from list" button, then select it from global lights list appears.
The number left of the zone name reveal how many physical lights assigned to this zone.
After you create a zone, assign color or effect into it.
For colors, most of the light devices (except per-key RGB keyboards and some desktops - but you still can emulate it using "Grid effect") have hardware effects for lights. Each phase of these effects named "Action".
Press "+" button at "Actions" block to add new action (you can also double-click on actions list). Select action type, color and other parameters at "Actions settings" block. Zone lights should change its color to selected parameters immediately.
For adding software effect to zone, switch to corresponding tab, process is different for different effects.
Create as many zones as you wish. You can use "Gauge" setting (but it will not work if lights not assigned to grid) to point how to process zone lights position for some software effects or make gradient color set for it.
Well done!
Fan/Power control setup
Check you have "Fans and Power" tab - it will not visible in case fan control not supported at you device. Switch to it:

Good to know:
- Fans can only be user-controlled in "Manual" power mode. All other modes block manual control, and fans will be controlled by BIOS settings.
- Fan control is INDIRECT, not direct. So you can't define exact fan RPMs, but give BIOS a hint to increase it based on sensor temperature.
- Different Power modes (it's similar to "Thermal profiles" into AWCC) have different fan profiles and CPU/GPU power limits - you can check it using something like HWINFO.
Manual fan control is sensor-driven, so you need to define how fan will react on sensor temperature:
- Select fan you need from fan list.
- Select and check the sensors you want to use to control this fan from Sensors list.
- Define boost curve (reaction) for each of checked sensors:
- Select fan.
- Click anywhere inside the fan curve window to add a new point (or click on an existing point to drag it to the other position).
- Keep pressing the left mouse button and drag it to the desired temperature/boost position.
- You can click the right mouse button at any point to remove it.
- Repeat for different sensor/fan combination.
What also good to know about fan control:
- Cooling system are joined at modern notebooks. It's a good idea to set, for example, both CPU and GPU fans for CPU cooling, but with different rate.
- Setting boost over zero prevent fan stop, even if BIOS can do it. Set it to 0 if you want to tell BIOS stop the fan (but BIOS can decide to keep it running for some hardware/temperature).
- It's a good idea to check max. boost for fans - it will detect possibility and values to run fans over 100% of nominal. For doing this, Press "Check Max. boost" button. This operation took some minutes, and require no other fan control apps running.
- There are system keyboard shortcuts to change Power Mode - CTRL+ALT+0 for manual, CTRL+ALT+1..N for pre-defined by system.
What's next?
You can play with hardware effects, mixing different actions types and settings.
The other big thing is software effects (but keep in mind it will stop hardware effects due to hardware limitation!) - switch to corresponding tab ("Events monitoring", "Ambient", "Haptics", "Grid effects"), select zone or create new one and set it up. Effects in action shown at tray icon tooltip.
You can use "Profiles" tab for automatization - you can create as many profiles with different light and effect settings as you wish, then switch it manually or according to running/active application(s), power state and even function key pressed. You can also assign "Global" (device-wide) hardware effect for devices supporting it there.
Experiment, use your creativeness! Good luck!