6. Communications Gateway Setup - sunny-day-flooding-project/tutorials_v1 GitHub Wiki
Table of Contents
- Tutorial Overview
- Equipment
- Setting up the Pi Operating System
- Entering Site and Sensor Information
- Enable Site
Tutorial Overview
Once the Communications Gateway is constructed, we need to setup the operating system on the Raspberry Pi 4, download the Sunny Day Flooding Project GitHub, and setup and enable data and image collection.
Equipment List
- USB-A to USB-C cable
- Micro HDMI to HDMI cable
- Keyboard and mouse (preferably wireless)
- Screen compatible with HDMI inputs
Setting up the Pi Operating System
An image file of the SunnyD team's recent Raspberry Pi custom operating system is available here - see sunnyd_bullseye.img.gz.
This image incorporates all the OS (operating system) components needed. The image was created following these instructions and can be written to an SD Card using the Raspberry Pi OS imager. Follow these steps:
- Plug the microSD 64 GB card into your computer.
- Download the most recent .img image file from GitHub.
- From Tom’s hardware Tutorial, scroll to the Writing Your Raspberry Pi Disk Image to a Card to burn the custom OS image file to the SD card.
- After writing .img file to SD card, insert it into the PI. The metal should face the board, and the piece should click into place. NOTE: need to lookup computer requirements for writing image to SD Card.

Now that the Pi has an operating system... we can logon:
- Connect a mouse and keyboard to the Pi using the USB ports.
- Connect the Pi to a monitor using the microHDMI port on the Pi.
- Now we need to reboot the Pi. To do this, find the very small black power button on the UPS next to the USB-C connection to battery, it should be just inside of the USB-C connection (Note: this does not refer to the big black power button located on the fan). Hold for 3-5 seconds to turn on. The fan on the Pi stack turns on and you should see blue lights. Wait 10-20 seconds for the desktop to pop up on the monitor connected to the Pi.
Now that we are logged into the Pi... we can start to enter site information and details with the site_setup script pinned on the desktop. This script walks the user through the steps of setting up (1) internet information, (2) VNC connection, (3) Bluetooth connection, and (4) site specific details.
Entering Site and Sensor Information
Site-setup script
Double click the desktop icon named “Site-Setup” OR open a terminal and execute the following: Type: cd bin; Type: sudo ./site-setup.sh. It will ask the user to input the information listed below... so have it handy. This script can be run multiple times and values NOT set will remain as they were:
- WiFi SSID (network name), password, and priority. Priority values are small integers, higher numbers are higher priority. Use 9 for top priority like cell-phone hotspots. Use 5 for normal connections. Use other numbers to raise or lower this connections priority.
- New hostname (gateway number) for this system (ex. GW99).
- BLE address of the sensor to be associated with this gateway. You can get this address using the Bluefruit app OR you can discover it by powering on the OLA/BLE boards and look for the Adafruit Bluefruit LE entry on the Pi Bluetooth manager under devices. If the first click on the bluetooth manager icon pops up the question "Shall bluetooth be enabled automatically?", answer yes.
- Setup the UPS hardware.
- Pull repo from Github if new changes need to be incorporated.
- Update/add the following information which will populate the config.ini file:
- Place Name (ex. Carolina Beach, North Carolina)
- Site ID (ex. CB_02)
- Camera ID (ex. CAM_CB_02)
- Sensor calibration offset (see calibration spreadsheet)
- Sensor calibration temperature factor (see calibration spreadsheet)
Reboot the Pi. You can do this by selecting "Logout" and "Reboot" from the main menu or from the terminal using the command sudo reboot.
add note about entering wrong address or duplicates.
Setting up VNC Connection
After the hostname has first been set or changed, the VNC program must be restarted to reflect the new hostname in the VNC account. To set up VNC, follow the steps below.
- Reboot the computer (if you haven’t already)
- Open VNC, click on the three bars in the upper right corner, and select Licensing from the drop down menu
- Enter the user name and password associated with your account
- Select the VNC cluster you want to join and confirm that the gateway name (ex. GW06) is the same as the hostname on the Pi.
Connect to the gateway using VNC from your computer. At this point you can switch to a VNC connection to logon to the Pi if preferable. If applicable, test wifi and/or hotspot and/or modem connection to ensure that the gateway will automatically search and connect to the wifi information added during the site_setup.sh process.
Using a Mobile Hotspot
If using the Netgear AirCard 797S hotspot to provide internet to the communications gateway, make sure the following three options are set:
- Time to sleep mode if no WiFi client connects: Never. We do not want the hotspot powering off.
- WiFi signal range: Extended
- WiFi band setting: 5 GHz only. The 2.4 GHz signal can interfere with Bluetooth connection.
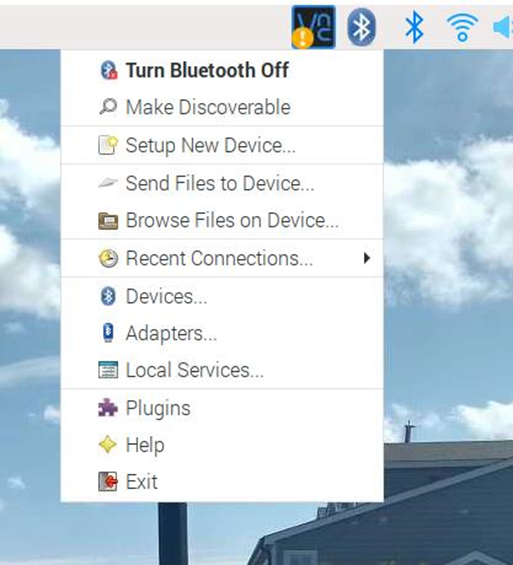
Check Bluetooth Connection
- Watch the Bluetooth connection indicator on the Bluetooth manager icon (First image). It should turn green when it is connected to the BLE.
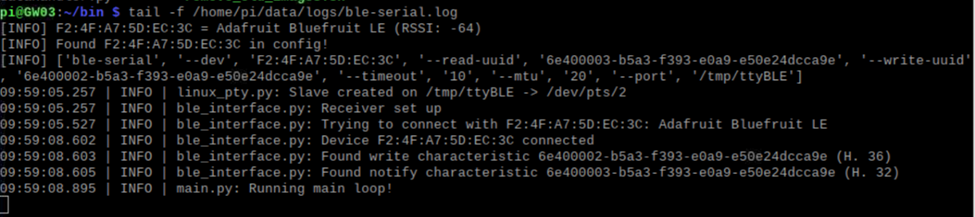
- You can also check the log file using the alias ‘sble’. In the terminal, type:
sble. This will print information to the screen. If it is working and the Pi has connected to the BLE... the final line printed will say “Running main loop!”. The output should pause on that line for the expected amount of time (about 15s with the current OLA setup)(Second image).
Check Data Logging
- The OLA and BLE should be powering on/off while collecting data which is sent to the Pi. When the BLE is on (the light will be blue on the board) and it is successfully sending data to the Pi, you will see that the bluetooth manager on the Pi turns green.
- When the OLA is logging data and sending it to the Pi, we can access the Log Artemis setup menu (e.g., what was used to setup the OLA in Sensor Setup Wiki -- put link). To do this, open up a terminal and type
slog. You will see the data logged by the OLA printed to the screen. You can also change the OLA device settings from this menu. - The OLA should already have been set up to collect data - it will be easier to test if the sampling rate is fairly quick. 20s is about the minimum for the OLA to do all the sleeping and waking up like normal. If the OLA is only sampling data every 6 minutes you need to press the reset button on the OLA to turn on the Bluetooth to see if it is connected.
Enable Site
Now that you are connected to the Pi and the Operating System is setup. We will test the scripts that are setup to collect data and images and write them to the API. We can enable/disable these processes using the site_enable.sh script which can be accessed by double-clicking the icon on the desktop or from the terminal. The script will allow you to enable/disable the following processes:
- Data collection from the pressure logger
- Sending data to the cloud database
- Image collection from the communications gateway and camera
- Sending images to the cloud
Enable the data collection
- Pull SD card from OLA and delete logged files.
- Double click Site-Enable.sh on the desktop OR in terminal, run the commands:
cd bin, thensudo ./site-enable.sh - Enable the data collection ONLY.
- Reboot pi.
- Make sure all changes worked. Test that data is printed to the screen. In the terminal type
slog. - You can check to see that the sensor data is being uploaded and stored to the Pi (before being sent to the cloud) by checking the folder
/home/pi/datawhich includes the follow:- downloaded_data folder: These are files directly downloaded from the OLA when there is an error or when there is a reboot
- logged_data folder: This is data received from OLA over BLE. The data is written to a text file each time.
- logs folder
Enable sending data to the cloud
Use the cloud setup wiki (link here) to prepare the cloud database to make this connection.
Enable Image Collection:
- In the terminal, type
camerato leave the photo on the screen to adjust the settings on the lens manually. To take a single photo, run script/home/pi/bin/webcame.sh - Adjust Camera Settings using the following these steps. Note, the lens is physically rotated at 3 different locations and the knobs are screwed in to ensure that the settings do not change once the camera is focused.
- First, toggle "TELE-WIDE" to completely wide
- Second, toggle "OPEN-CLOSE" to completely open
- Adjust the "NEAR-FAR" setting until the image is clear (It is recommended to start at "FAR" and work towards "NEAR"). We want the image to focus on objects in the distance.

- Now enable the image collection process by double clicking Site-Enable, or in terminal, run the command:
./site-enable.sh. - Check that images are being saved every 6 minutes by looking in the
/home/webcamfolder on the Pi
Enable sending images to the cloud
Use the cloud setup wiki (link here) to prepare the cloud database to make this connection. From the terminal, type scam to show the camera upload log