Buliding A Pi for Learning Serial Stuff - SteveCossy/IOT GitHub Wiki
Objective
Instructions for Building a Raspberry Pi OS environment that allows for:
- People exploring the whole concept of things in educational context
- 'Lift the Lid' and see things + code working along together
Intended Audience
- Absolute beginners
- Learners of all ages and stages and ability
- Yourselves...
- A memory prompt 'recipe' for those who have done it many times before
Contributors
- Andrew Hornblow [email protected] for doing most the hard mahi, many times over many years.
- Steve Cosgrove [email protected] for wordsmithing and academic input.
- Kit, Chyenne, Rachelle for motivation and feedback if they choose (to be updated)
Cicadacom Run Sheet
These instructions are in a number of sections. For use as needed. Note that any headings can be bookmarked by clicking the link symbol to the left when you mouse over a heading.
Stage One
Follow this guide then connect the breadboard onto the Pi and run Minicon. Then you should see the CVS data rolling in...
Setting up guide for student projects establishing a basic IoT connection between a Pi Gateway and Cayenne MyDevices IoT MQTT cloud. Suitable for simple microcontroller projects with low level radio data links. A Raspberry Pi GPIO Serial Port UART acts as a gateway forwarding sensor data to Cayenne MQTT using a Python script.
Quick Start
The quick start prompt main steps or commands are in Bold Italic. Background information and links are provided for reference.
Overview
The Raspberry Pi is set up to act like a post office validating, sorting and PUBlishing data coming in from sensors and devices directly connected to the Pi GPIO Serial Port. Serial data arriving at the Pi GPIO Serial pins may come directly from sensors or over radio links from remotely connected projects. The Pi with remote VNC and wifi access makes this a flexible and seriously powerful IoT concept. The Pi running a minimal desktop ‘Raspbian’ image means the Pi can be easily accessed remotely. Ssh tools or VNC remote that runs standard on the Pi desktop image makes class, lab and development easy for students or absolute beginners. VNC Reader is available and runs on a range of devices. At a deeper level ssh can be used with tools such at PuTTy, Filezilla etc at a command line level.
- Setting Up a Raspberry Pi:
- Flash a freshly formatted µSD card class 10/X or better with the latest version of the Raspbian.
- It is recommended to follow the setup instructions and choose the minimum desktop image from here.
- On first boot you will be guided through setting basics up as well as joining local WiFi and updating the system.
- Follow all the prompts then reboot the pi and check all is working normally.
Optional - Manually update the Pi Raspbian Operating system to the Latest Version:
From a command prompt:
sudo apt-get update or or sudo apt update, Y, Y
sudo apt-get upgrade -y
sudo reboot To finish and tidy up.
Setting up the Pi:
From the desktop screen Start Menu:
- Start > Preferences > Raspberry Pi Configuration > Display to screen resolution if needed (DMT Mode 16)
- Start > Preferences > Raspberry Pi Configuration > Interfaces Tab set the following
-
- Enable SSH
-
- Enable VNC
-
- Enable the Serial Port
-
- Disable Serial Console
Okay > Reboot YES
These settings are also accessible using command line:
sudo raspi-config
Configure:
- Option 5 – Interface Options P2 – to Enable SSH
- Option 5 – Interface Options P3 – VNC to Enable VNC
- Option 5 – Interface Options P6 – No to enable login shell over serial port
- Then select YES to Enable the Serial Port
- Option 7 – Optional display Option 2 > D1 – Video resolution. Recommend 16
- Exit the Raspi-Config utility and choose Yes to reboot or Manually reboot the Pi using
sudo reboot
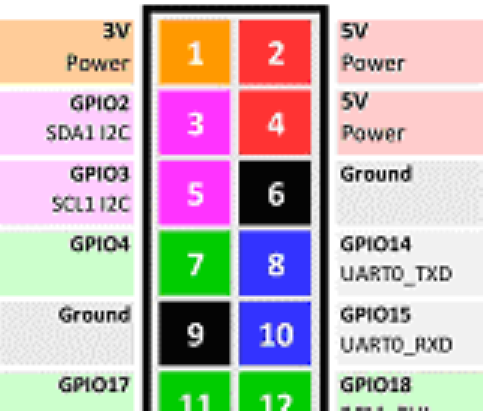
- Serial Port Taming and Configuration. The serial port on the Pi GPIO pins is key to the ‘Cicadacom Method’ The GPIO TTL Serial port and adjacent power pins are a great asset for tinkering, breadboard work and demonstrating low level concepts. Four pins on the Pi GPIO header provide power and a bi directional serial and power interface. The GPIO port on the Pi is available by default. It can be used to give direct low level command line access to the Pi using a suitable hardware serial terminal.
By default it is set to 115200 Baud and has 3.3 volt ‘TTL’ normally high signal lines. For Cicadacom the serial port needs setting up to ‘talk it down to the humble 2400 baud. The command console and system chatter needs to be turned off as well. To set the port up follow the steps in Part 1. above.
- Minicom Pi Terminal Program Minicom is a useful simple serial console tool. Minicom does not have to be installed but I highly recommend it as handy debug and educational tool. It is a great teaching aid for demonstrating the passing of data to and from the Raspberry Pi. A great way to test out the serial port is to use the Minicom program. Give it a spin. Try the loop back ideas below or even try swapping the Rx and Tx pins with another Pi to make a two way teletype.
To install minicom
sudo apt-get install minicom -y
Start a serial terminal session on the GPIO pins serial port at 2400 baud for a Raspberry Pi 3, Pi 0, Pi 0w:
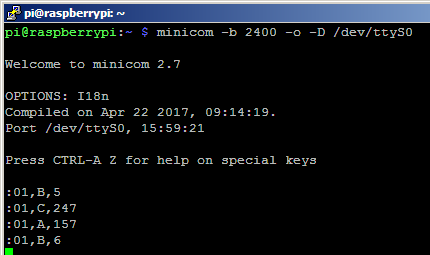
minicom -b 2400 -o -D /dev/ttyS0
or for earlier Raspberry - Pi B, B+, 2:
minicom -b 2400 -o -D /dev/ttyAMA0
CTRL + A, Z- gives you the detail help menuCTRL + A, X- Exits back to the Pi command prompt
Remember to exit Minicom or reboot the Pi when not needed. Only one application, device or program can access a com port at a time. If minicom does not start then check serial port is set up correctly. Note there are TWO steps: - Enable the Serial Port AND Disable Serial Console. Another serial port called ttyUSB0 is available on all Pi and sets up automatically when using a USB <> Serial lead. A quality FTDI A four pin version (Txd, Rxd –Ve 0v, +ve5V) of this with TRUE data polarity (RS232) has been developed. This keeps things away gtom the GPIO and provides a safe and convenient interface for tinkering and experimentation.
Loop Back Demo and Test:
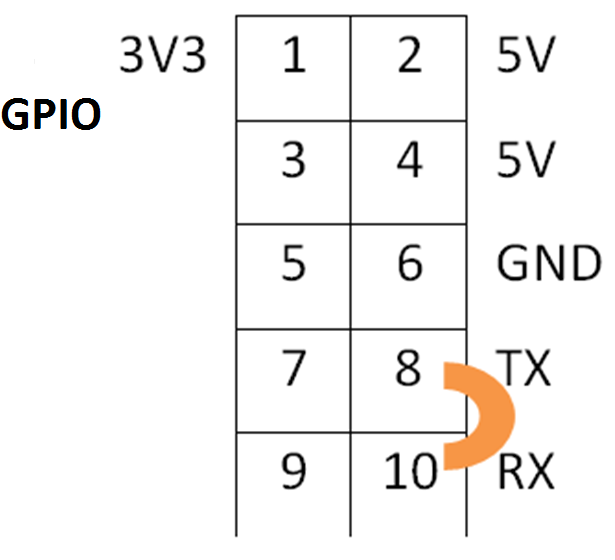
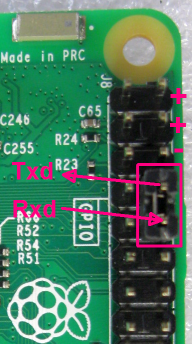
The traditional Loop Back is a good starting out system test and educational confidence step. The Loop Back Test for classic Hello World checks out and confirms that your Pi Com port is all okay. Try looping pins 8 (Tx Out From Pi Data) to pin 10 (Rx InTo Pi Data). Use a standard header pin jumper. Double check what you are shorting together! Type something and you should see what you type on the screen as you type.
Double check when jumpering and hard wiring to the Pi GPIO
| Pi Minicom Terminal example | Top pins in the Pi GPIO header | Diagram showing GPIO pins 8 and 10 looped | Photo of Pi GPIO header with pins looped |
|---|---|---|---|
 |
 |
 |
 |
Teletype Demo:
With two Pi it is possible to set up a teletype link by connecting the –ve of the two Pi together and the TX of one Pi to the Rx of the other Pi and vica versa.