Old ROS1 Documentation - StanfordMSL/TrajBridge GitHub Wiki
Welcome to the TrajBridge wiki! The wiki is structured as follows:
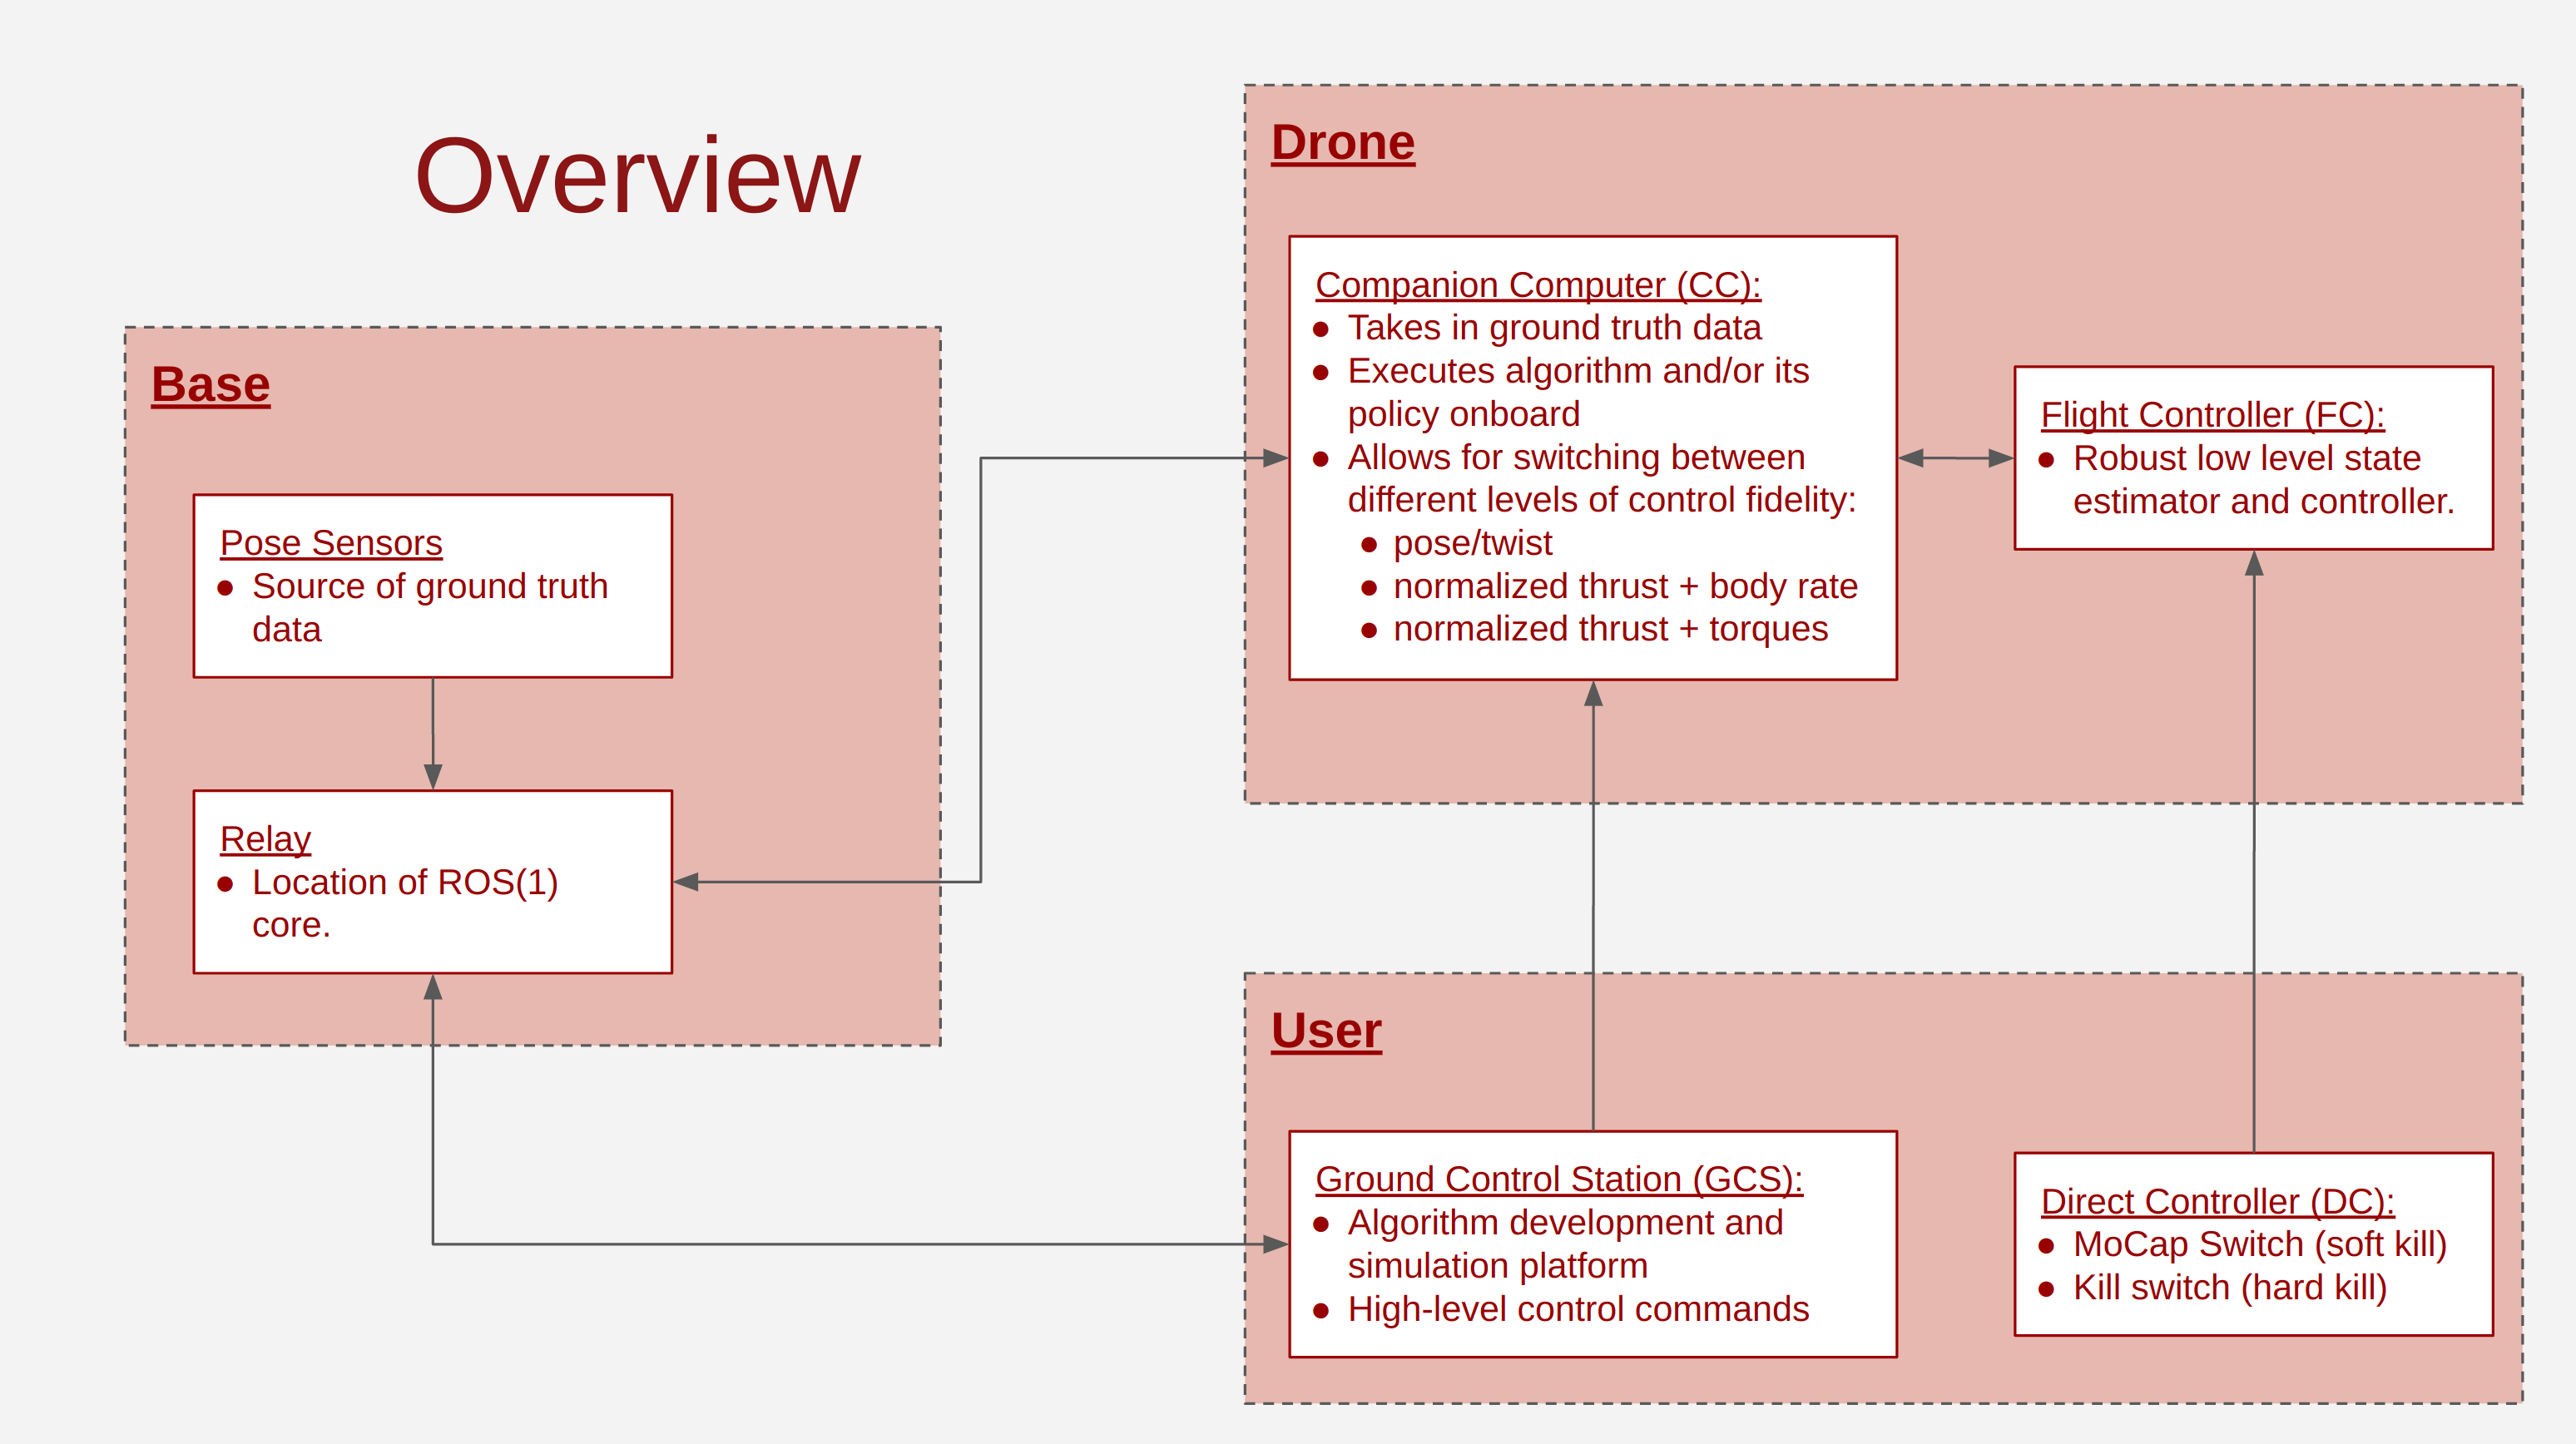
Setup Overview: Description of the hardware and software we use and how they are connected to each other.
Drone Hardware Setup: The drone build we use.
Companion Computer Setup: The software installation steps on the high-level onboard computer
Flight Controller Setup: The software installation steps on the low-level onboard computer
Basic Tutorial Part I: Flying the pipeline in simulation.
Basic Tutorial Part II: Flying the pipeline in hardware.
Advanced Tutorial: Using the NAC and SAC controllers.
The documentation is written from a 'how we did it' perspective. There may be better ways for the same objectives, there may be better ways for different/more general objectives. We're happy to take any feedback and ideas via the Issues tab.
1. Setup Overview
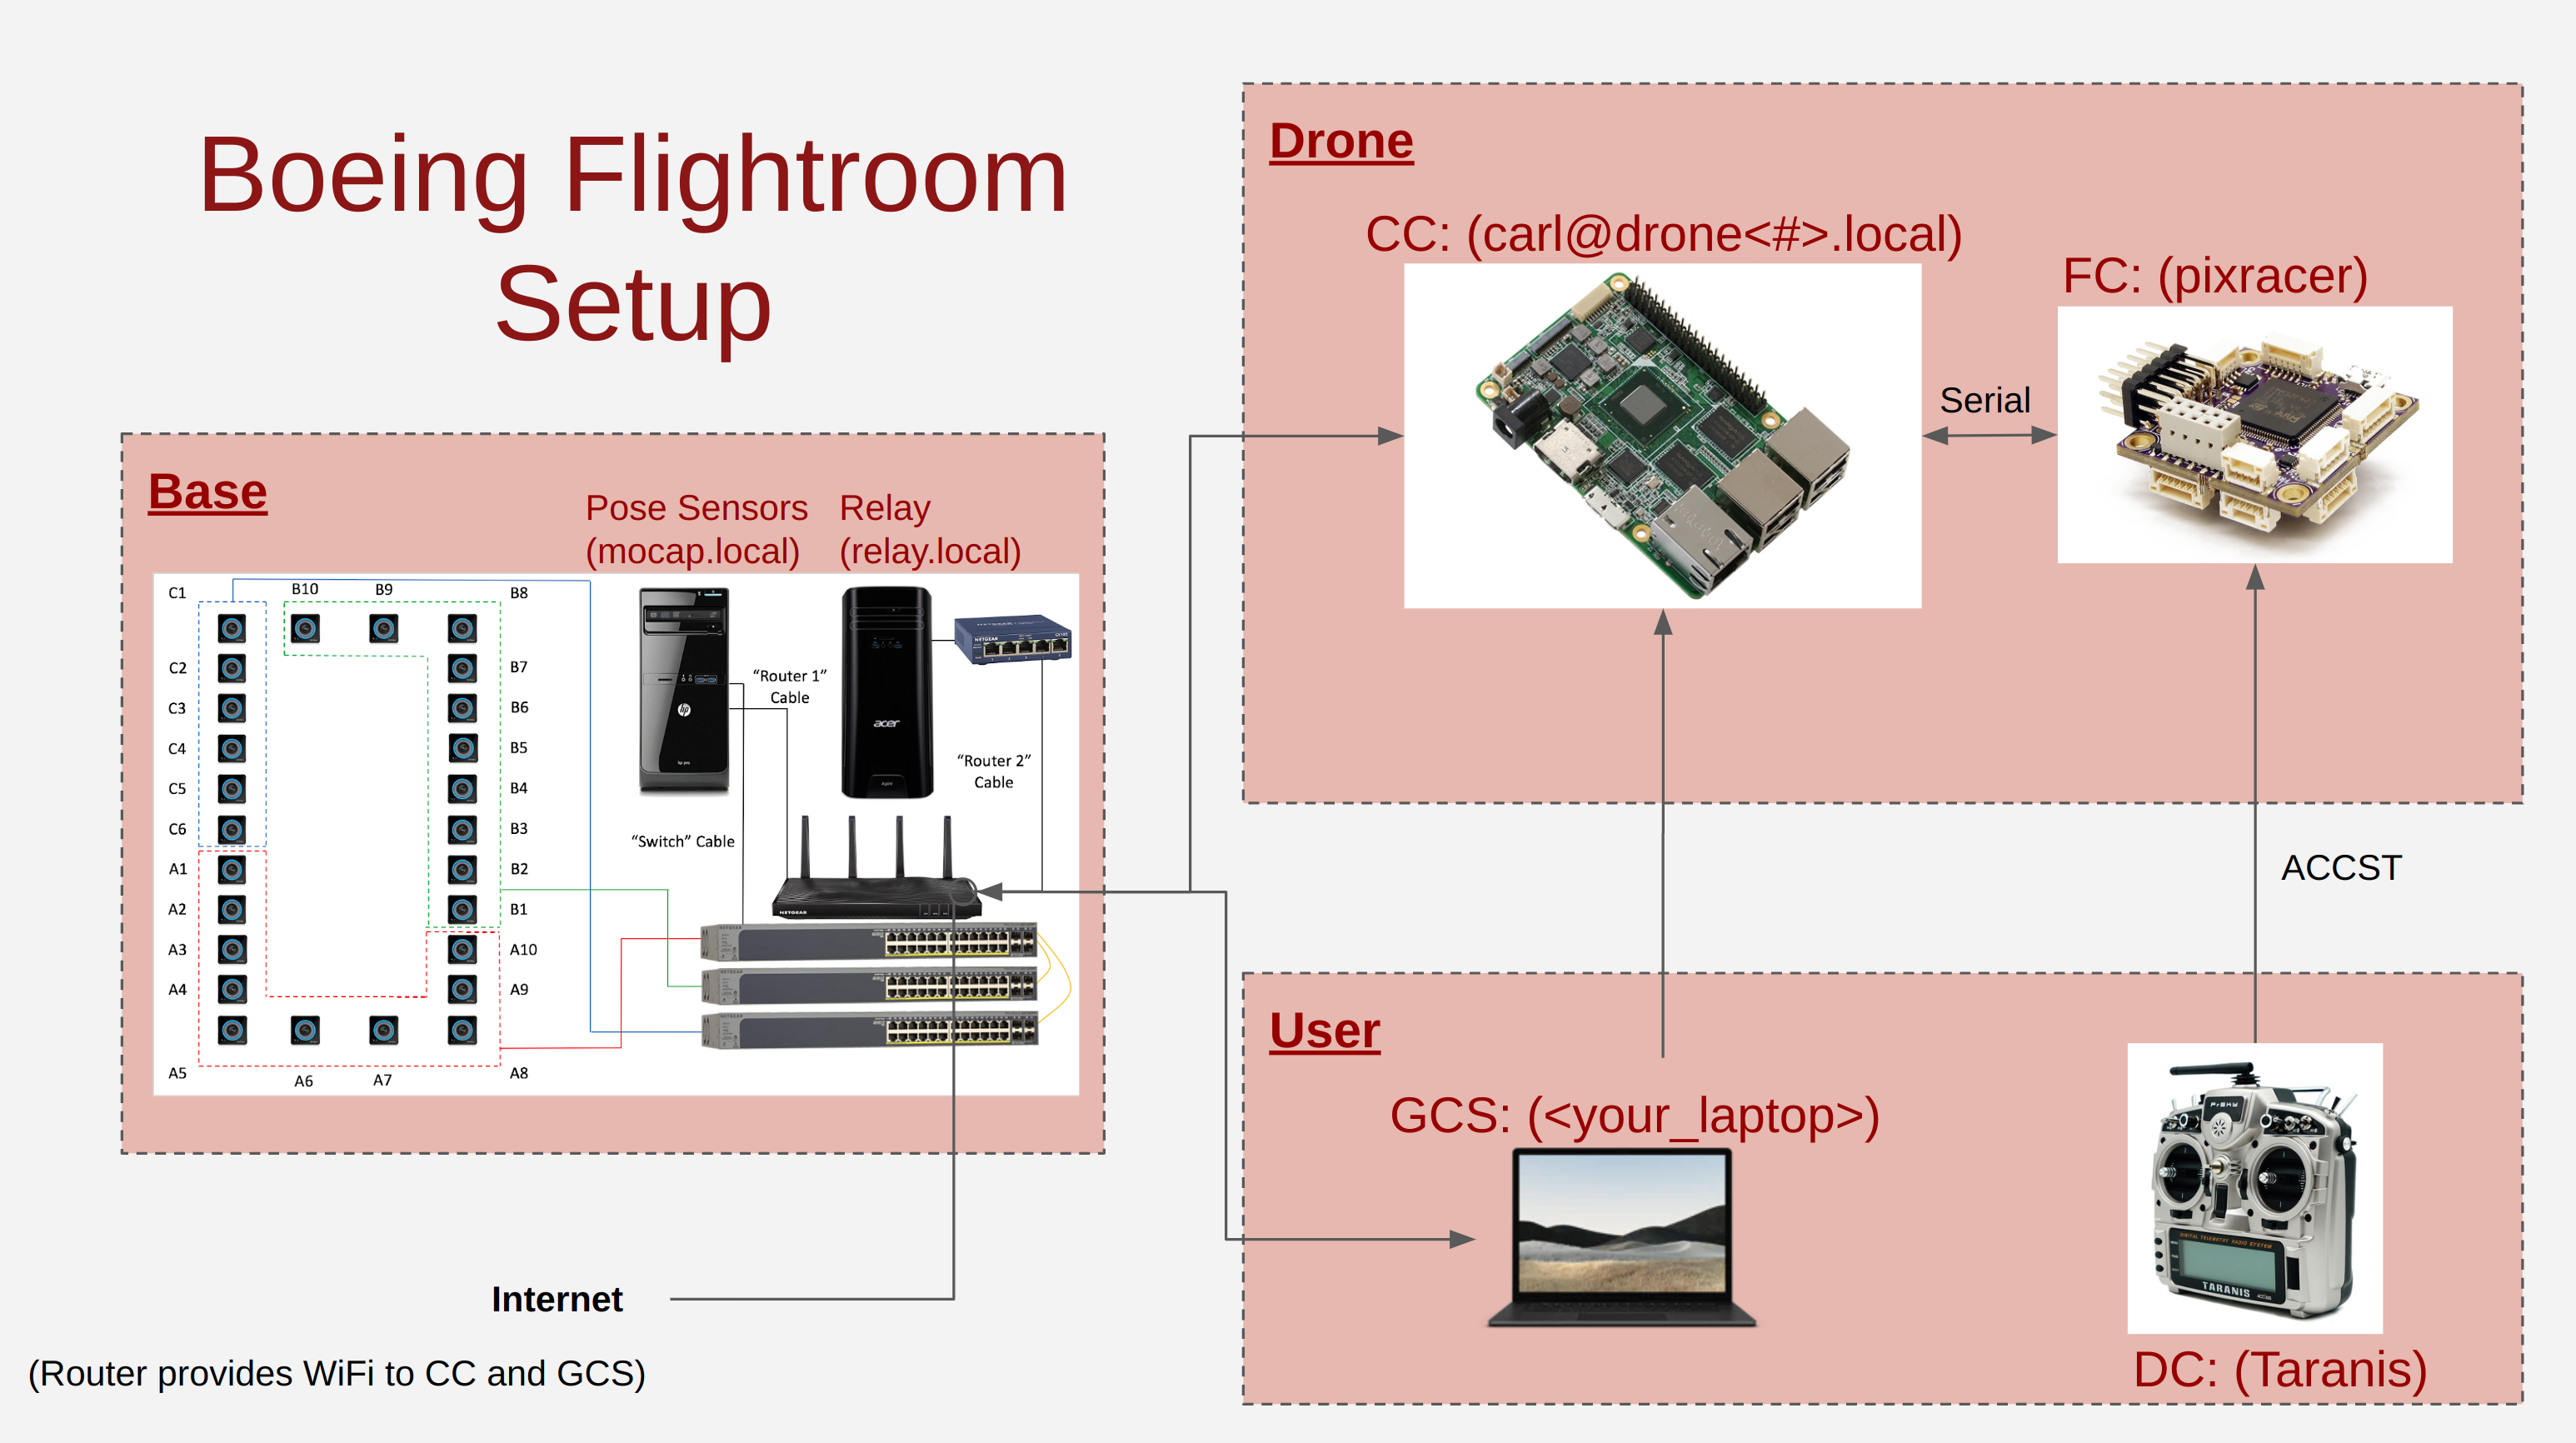
Hardware
Flightroom Hardware
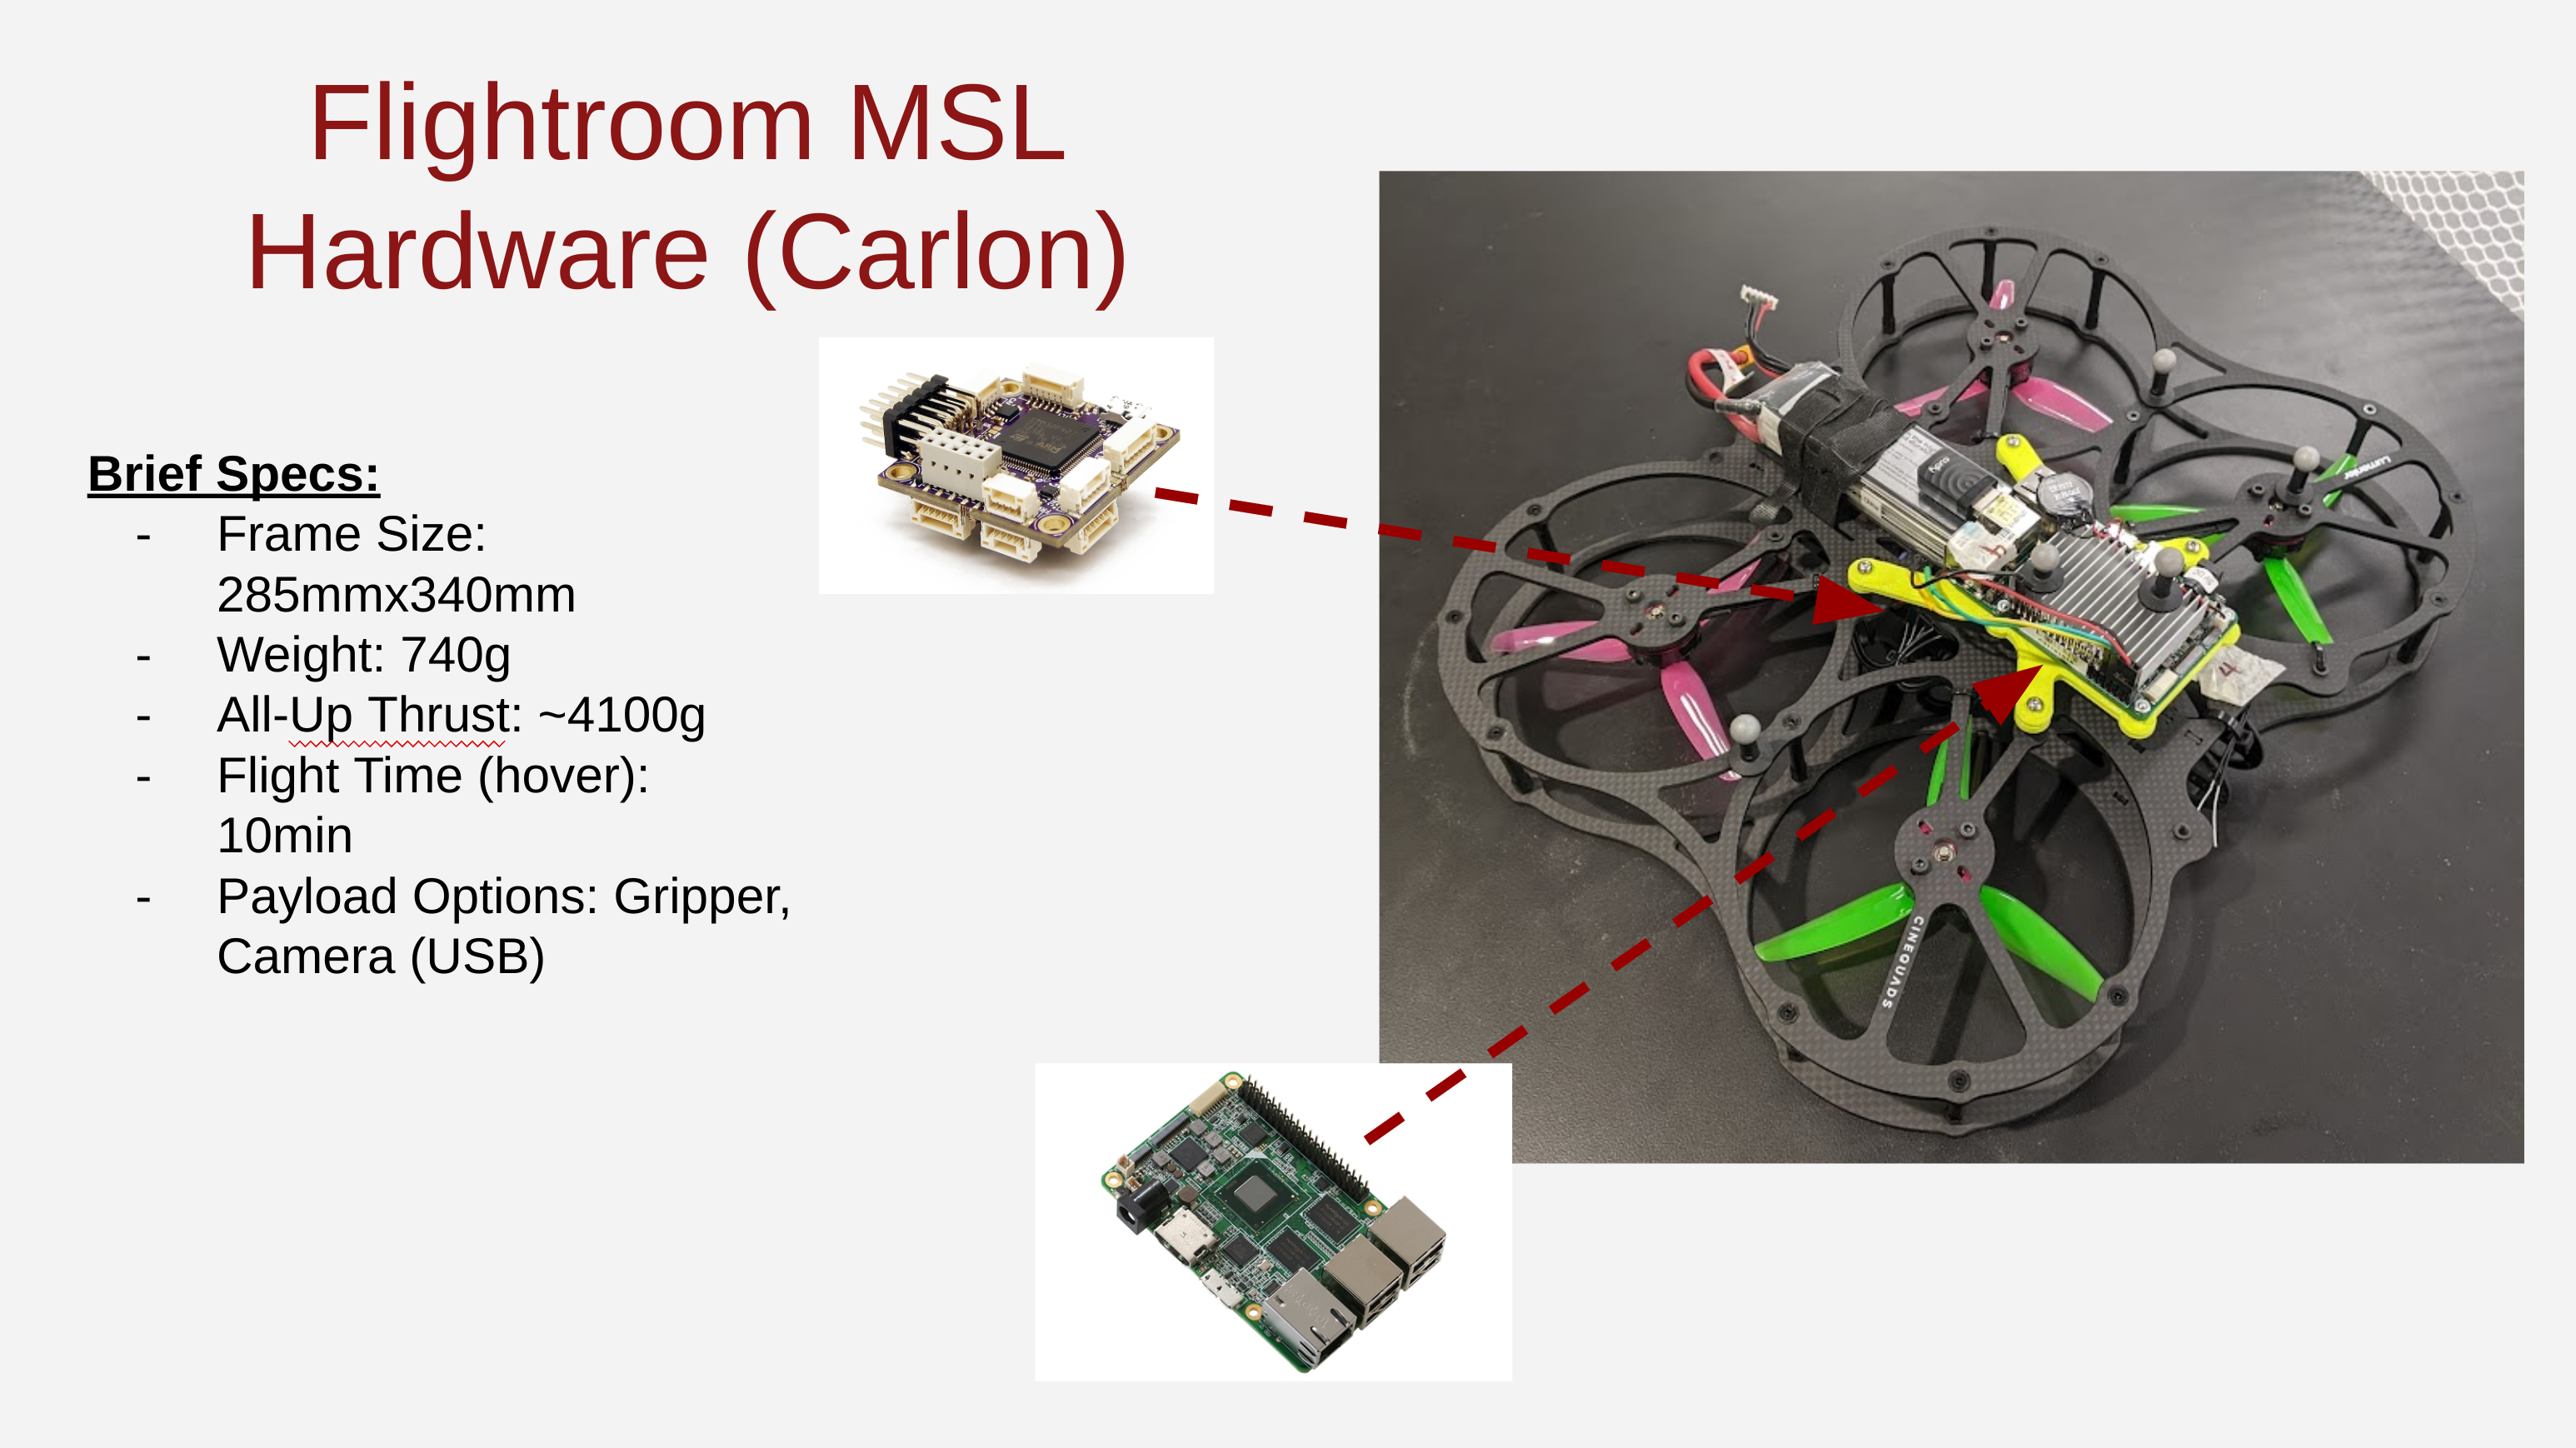
Drone Hardware
 TODO: transfer over full build details
Software
Flightroom ROS Nodes
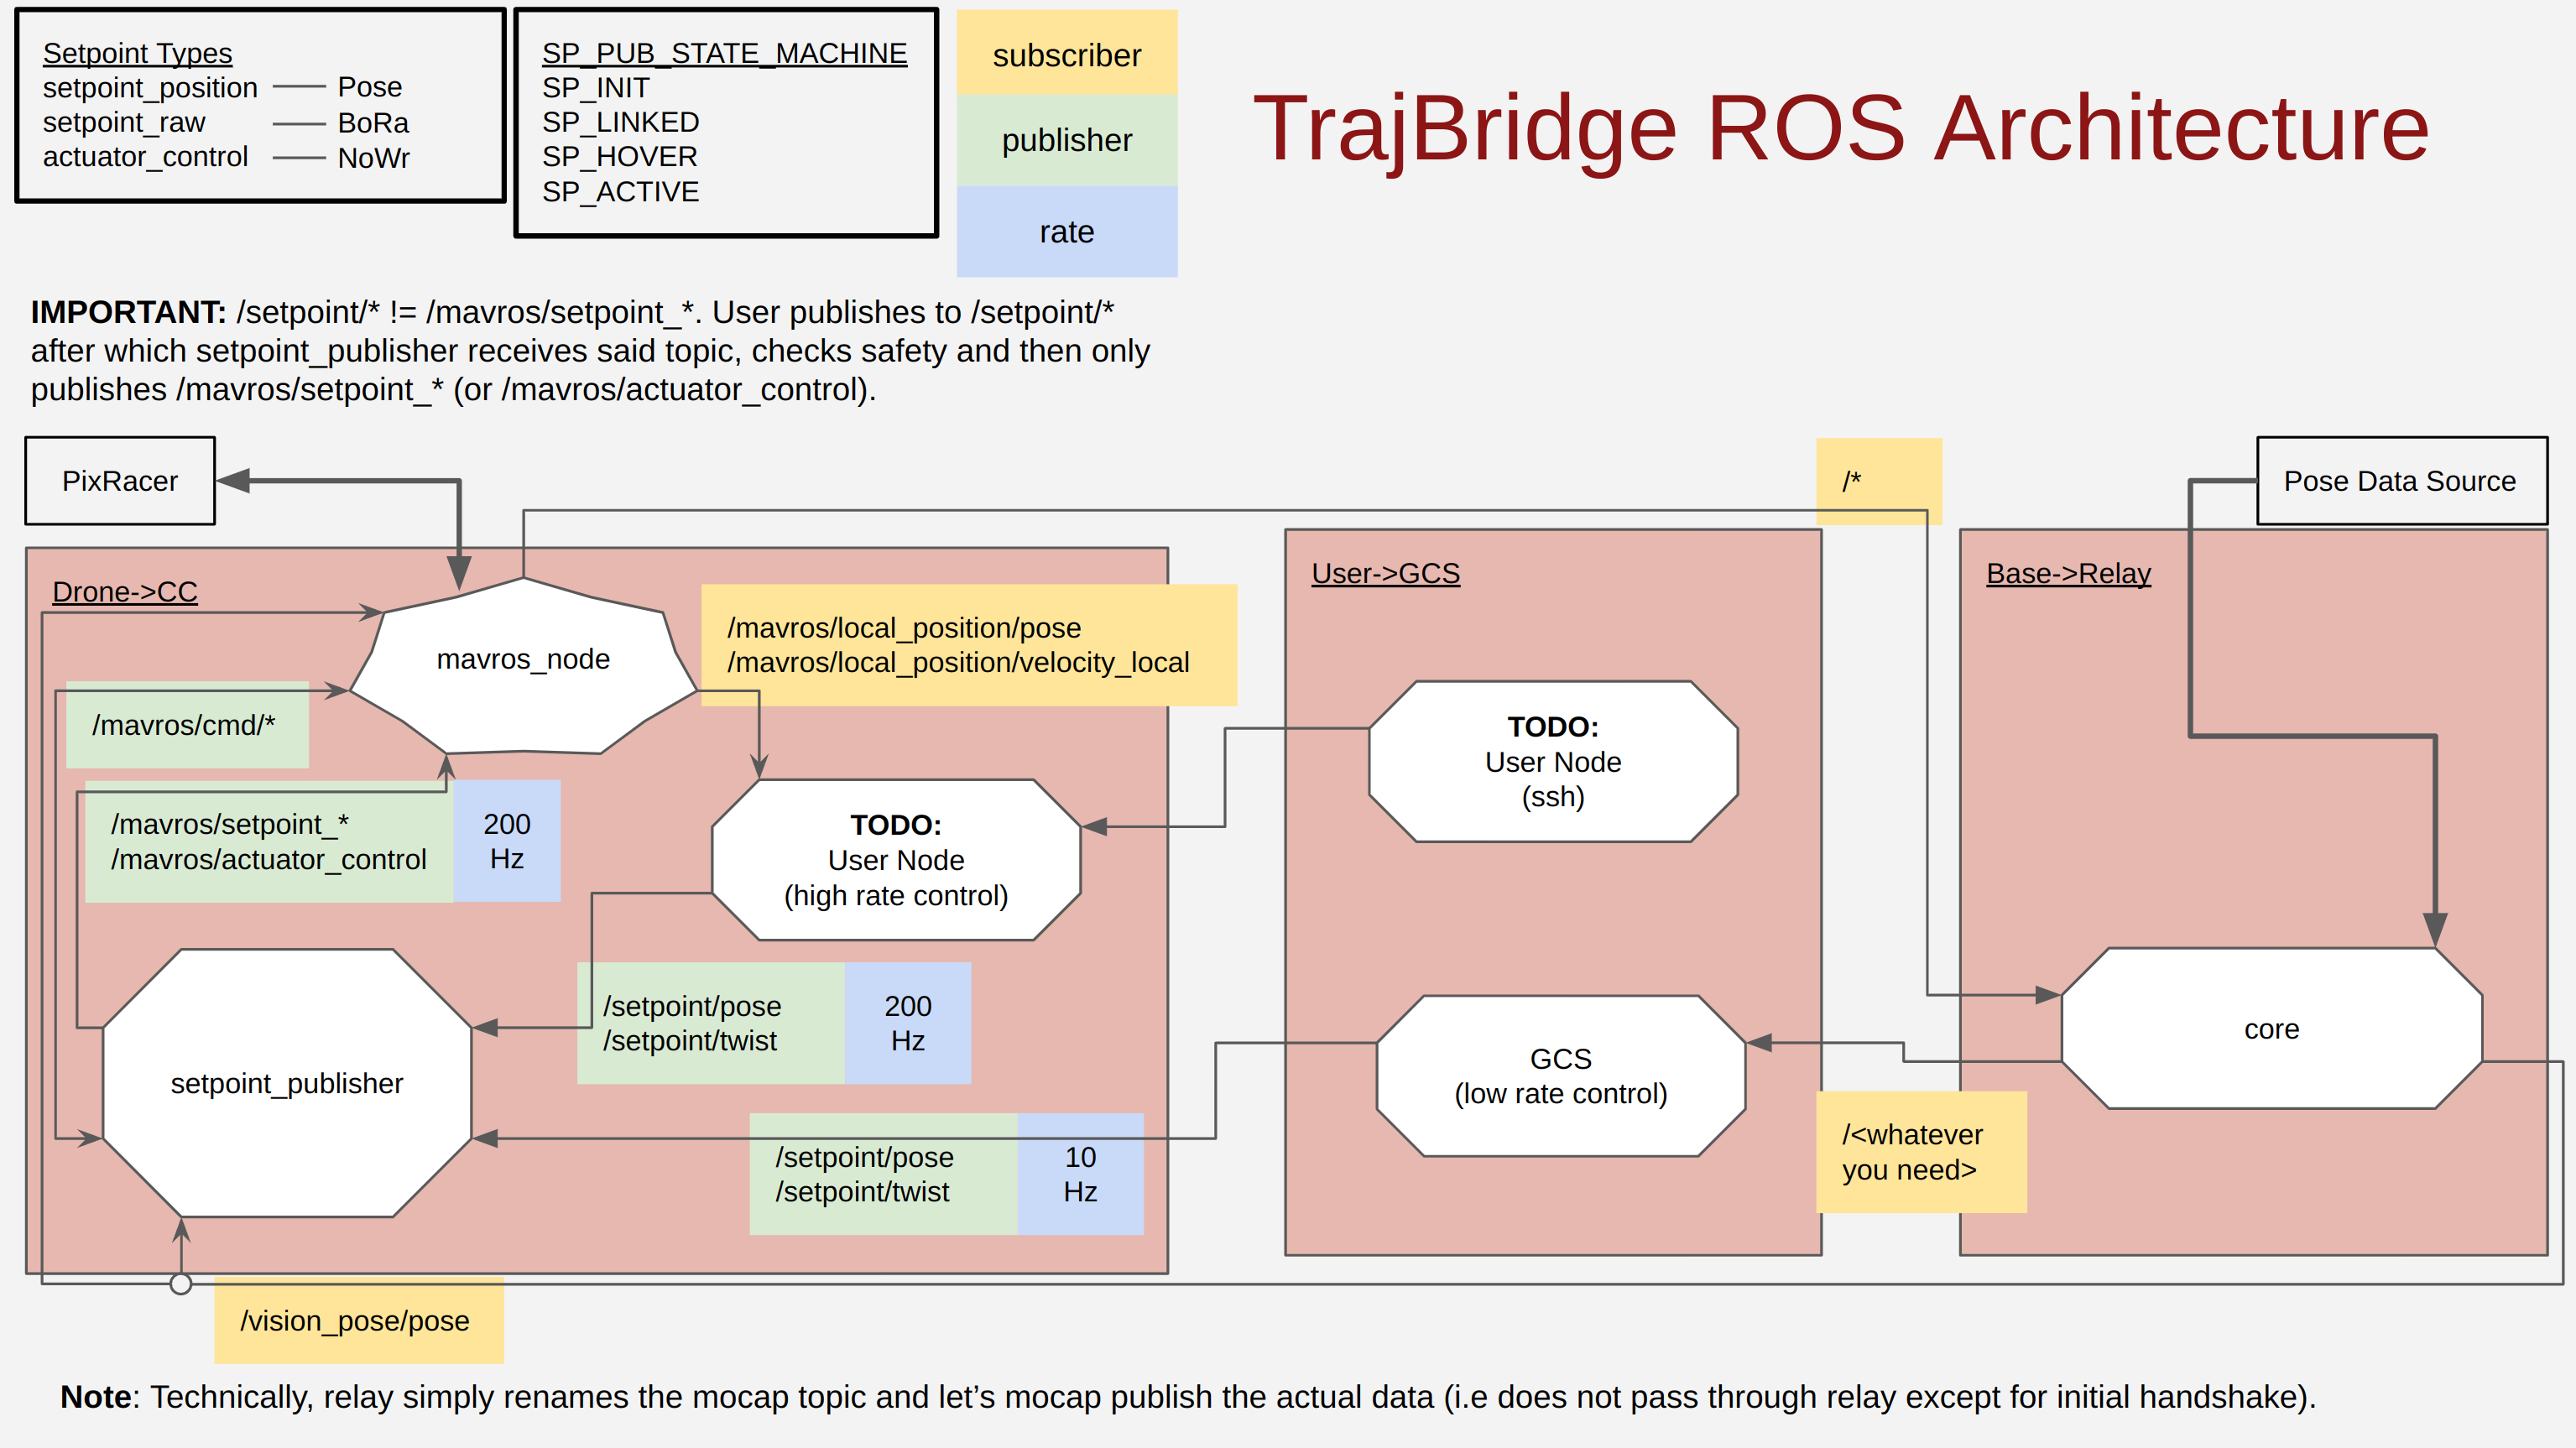
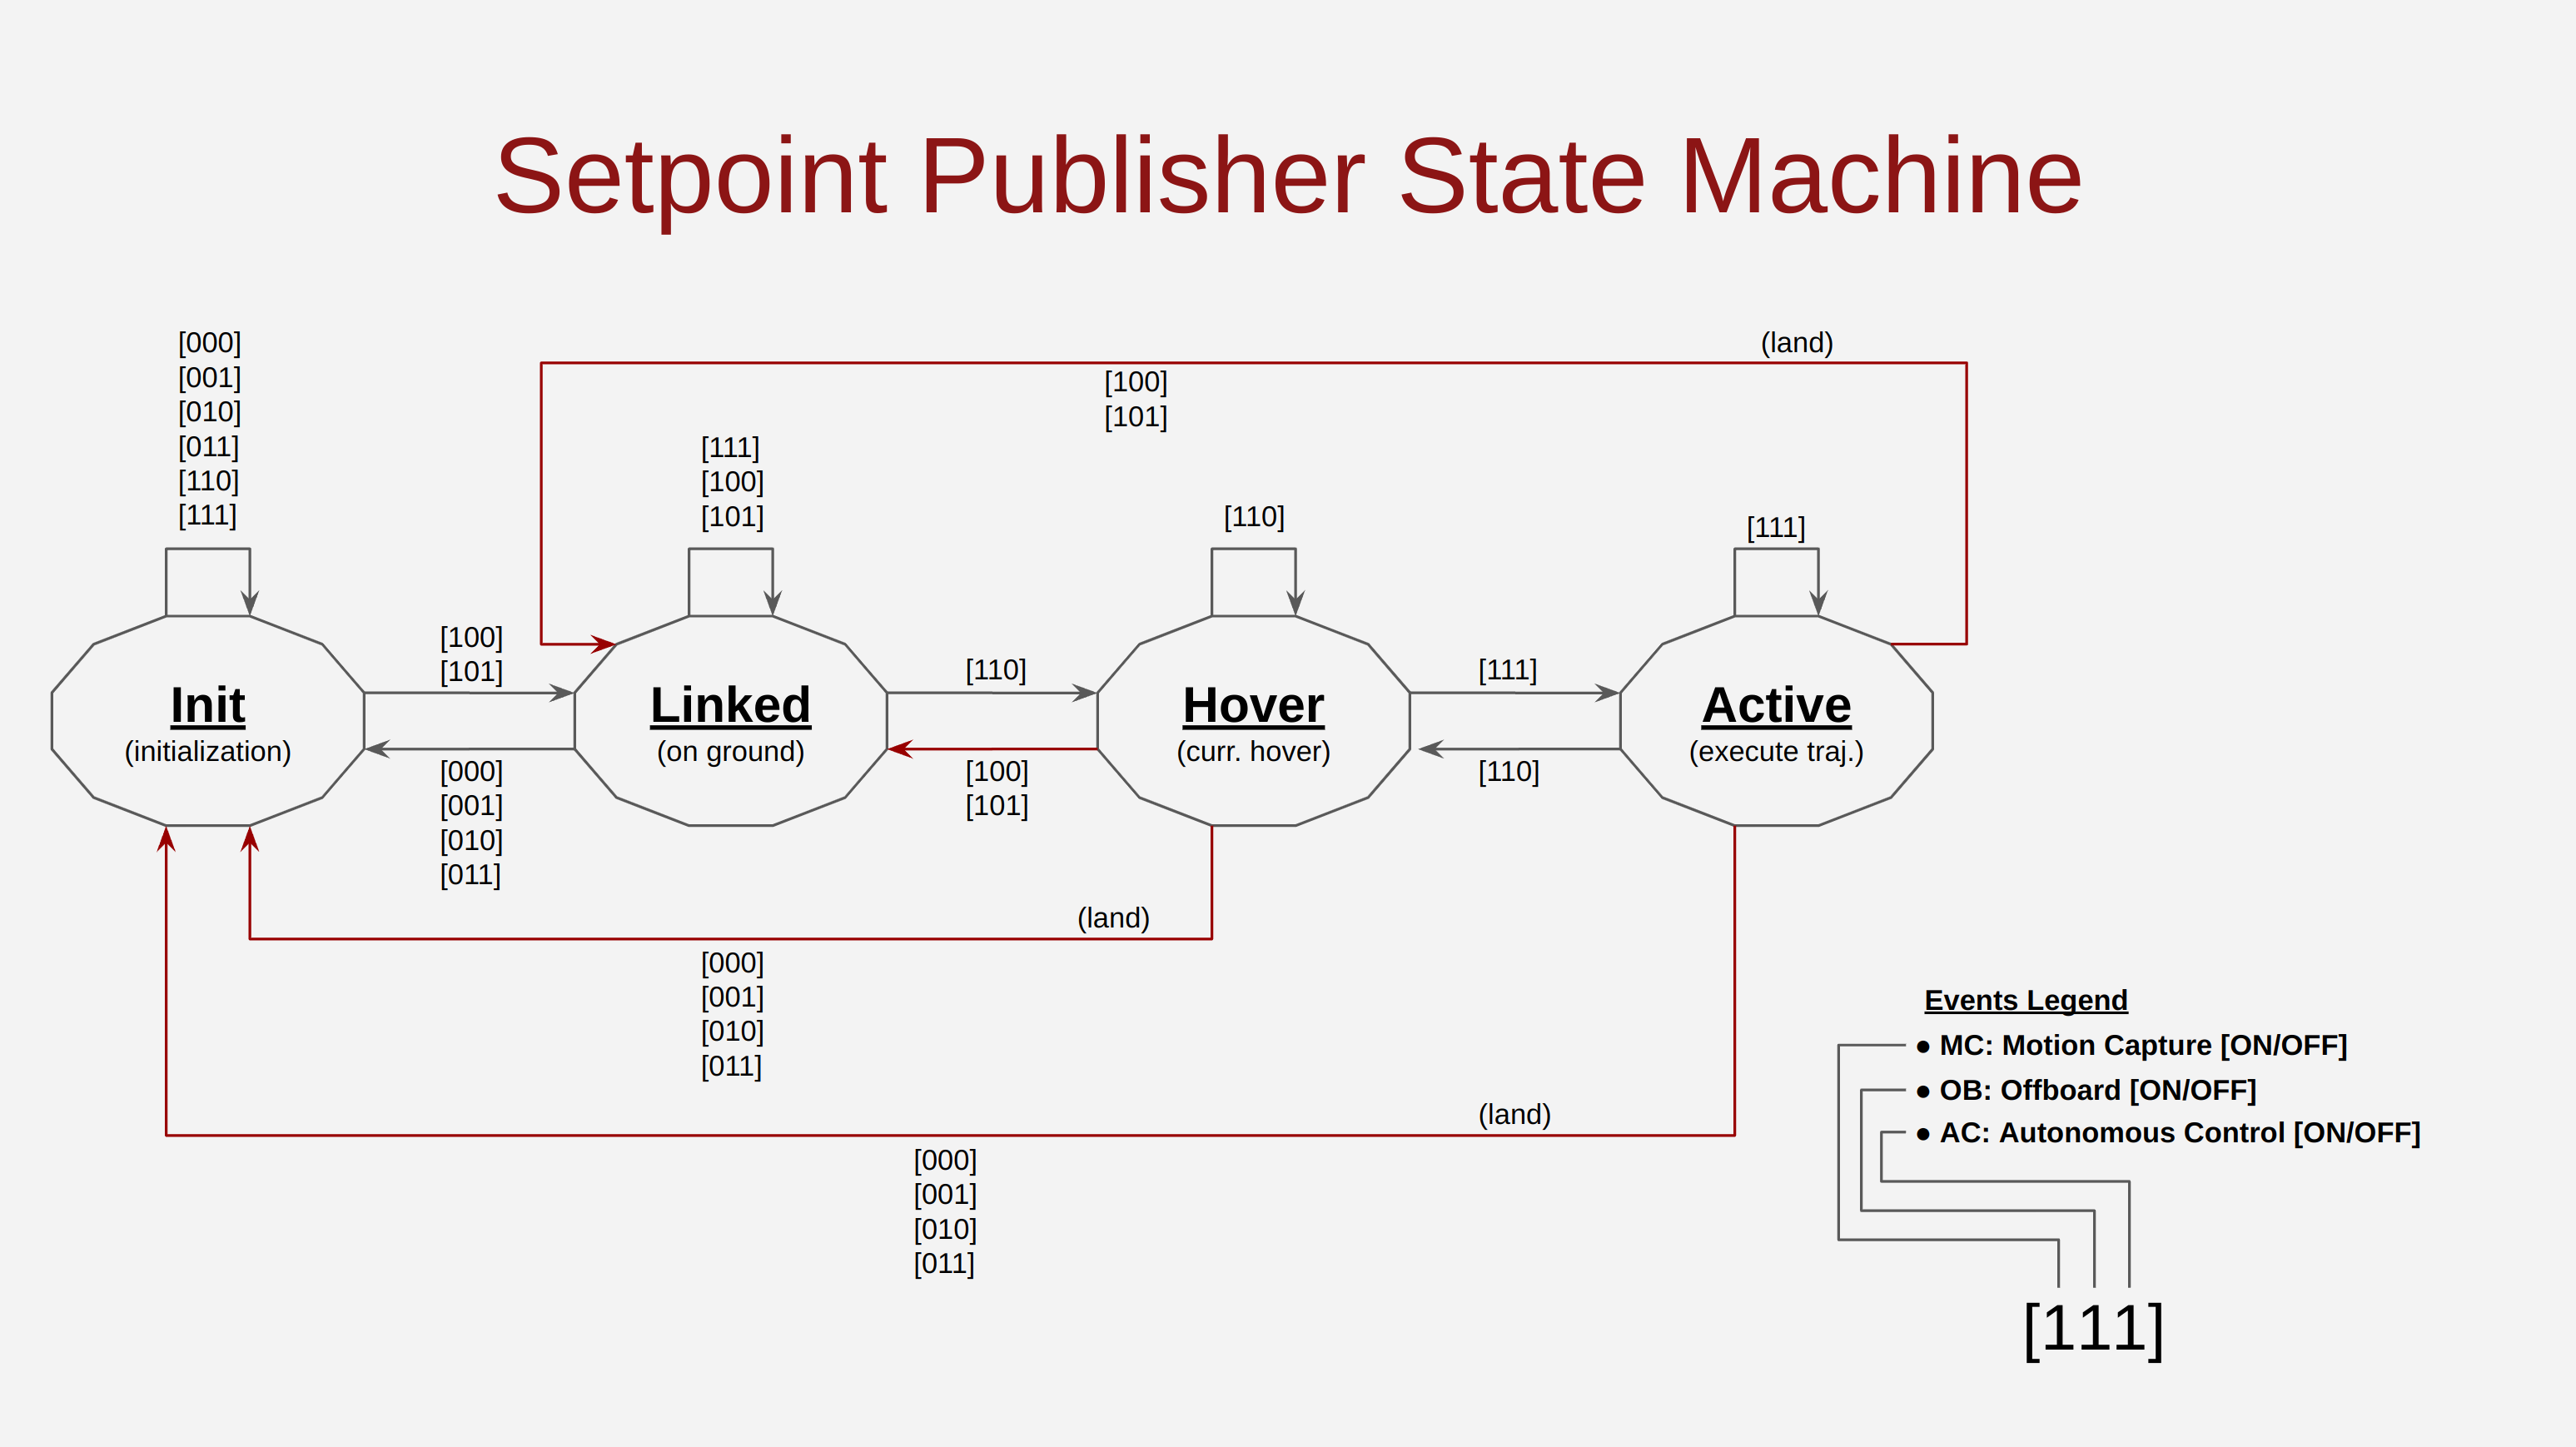
Setpoint Publisher State Machine
Software Versions
TODO
2. Drone Hardware Setup
TODO
3. Companion Computer Setup
We use an Upboard running Ubuntu 20.04 with ROS Noetic. We follow the set up described here along with additional steps. These are documented below in detail. But before that, here's some Q&As to summarize the above choice.
- Why the Upboard?: It has an identical form factor to a Raspberry Pi but the hardware is similar to what we have on our laptops. So that means 1) we get to use Raspberry Pi hats without the need to design our own adapters. So things like ROS controlled grippers, servos, cameras, sensors, interfaces are easier to mount (a touchscreen on a drone anyone?). 2) We can port code that we tested on our laptops directly onto the drone without having to worry about compatibility issues. This is beyond my own expertise but in a nutshell, most of our laptops are x86 based I wanted something as close as possible to that. Also, the Upboard has more compute power at the cost of higher energy consumption (at time of writing this). I don't care about energy consumption at this point as the drone motors drain waaay more energy at this point. As an aside, something like a Jetson would be really cool for online learning and stuff but I don't think we're there yet. Importantly, at time of writing, there aren't any cleanly designed adapters available.
- Why Ubuntu 20.04?: ROS Noetic targets Python3 and one of our main controllers is built on Pytorch which needs Python3.x. Sure you can get Python3 on Ubuntu 18.04 (ROS Melodic) with some fiddling here and there. You also don't need it if you're just running the pose/nac controller. Whatever it is, if it works with minimal changes, great, but with respect to maintaining this repo, I can't be bothered to feed that can of worms. There's at least 7 drones, 2 desktops and a GCS in the lab running this setup and the last thing I want to do is to update packages on EACH of them or debug version control stuff.
- Why ROS Noetic?: As in (2).
Setting Up the Upboard
These steps follow the Upboard wiki link above followed by my own steps.
- Download the desktop image from here
- Burn the downloaded image on a USB stick. I used etcher.
- Insert the USB installer disk in an empty USB port on the Upboard and proceed with a normal Ubuntu installation. During the Ubuntu installation the following were defined:
3a. Normal installation with third-party software.
3b. For punny reasons, the drones all have usernames set to
carl, passwordellie. Brownie points for figuring out the pun. 3c. Drones have computer names set todrone#, for exampledrone1. Automatic login is turned on as default. These setting make a swarm of drones easier to manage as they make identification of the drones easier and avoid needing us to login to each of them at start-up respectively. - Then we add the upboard specific repository:
sudo add-apt-repository ppa:up-division/5.4-upboard - Update:
sudo apt update - Remove all the generic installed kernel (select No on the question "Abort Kernel Removal")
sudo apt-get autoremove --purge 'linux-.*generic' - Install the upboard kernel (18.04 and 20.04 share the same 5.4 kernel):
sudo apt-get install linux-generic-hwe-18.04-5.4-upboard - Install any updates:
sudo apt dist-upgrade -ysudo update-grub - Reboot
- Check if the kernel was successfully added:
uname -a
You should get something like:
Linux upxtreme-UP-WHL01 5.4.0-1-generic #2~upboard2-Ubuntu SMP Thu Jul 25 13:35:27 UTC 2019 x86_64 x86_64 x86_64 GNU/Linux - Setup a WiFi dongle. The major weakness of the Upboard is that it doesn't come with built in WiFi. But this is easy to fix. Pick a WiFi dongle of your choice (we use a Cudy WU1300S). Install the drivers over ethernet.
- Install some useful stuff. Firstly your choice of IDE (we use VS Code) and then these:
sudo apt install build-essential
sudo apt install python3-pip
sudo apt install terminator
sudo apt install git
- Install ROS-Noetic. You can follow the steps described here. Use the Desktop-Full Install.
- Install mavros specific stuff:
sudo apt install ros-noetic-mavros ros-noetic-mavros-extras - Install catkin_tools:
sudo sh \
    -c 'echo "deb http://packages.ros.org/ros/ubuntu `lsb_release -sc` main" \
        > /etc/apt/sources.list.d/ros-latest.list'
wget http://packages.ros.org/ros.key -O - | sudo apt-key add -
sudo apt-get update
sudo apt-get install python3-catkin-tools
- Install Pytorch (pip,CPU version):
pip3 install torch torchvision torchaudio --extra-index-url https://download.pytorch.org/whl/cpu - Add this to your ~/.bashrc:
source /opt/ros/noetic/setup.bash
export ROS_HOSTNAME=$HOSTNAME.local
export ROS_MASTER_URI=http://relay.local:11311/
- Download TrajBridge into your workspace directory and try out the tutorial
- (optional) Configure the drone to auto-launch the rosnode on startup by doing. There are two files in the Tools folder in the repo, trajbridge.sh and trajbridge.service. With these:\
- Place trajbridge.service in
/etc/systemd/system/ - Place trajbridge.sh in
/usr/local/bin/ - Give execute authority to trajbridge.sh. I.e in
/usr/local/bin/, dochmod +x trajbridge.sh - Use systemctl to launch the files on startup:
sudo systemctl start trajbridge.service
sudo systemctl enable trajbridge.service
- Place trajbridge.service in
4. Flight Controller Setup
We use a PixRacer running PX4 Pro Stable Release v1.13.1. Here's some Q&As to summarize the above choice.
- Why PixRacer?: Has an SD logger, a WiFi hat and it's small form factor is pretty close in size to the flight controllers used on race quads. Which means you can use race quad frames without having to print out any adapters. The hardware on it is also pretty beefy for an FMU. There are more powerful boards on the market nowadays but I feel those are overkill given that algo development and execution should really be on the companion computer.
- Why PX4 Pro Stable Release v1.13.1?: Easy to acquire, feature rich, low-level accessible controller with an active community. One can test algorithms in ROS+Gazebo and then easily port the code over to ROS+(real life). Sometimes the documentation can be vague/require some deep digging but that's where the active community is really powerful. Lots of nice people willing to help. Why v1.13.1? That's the latest stable release at time of writing.
Setting Up the PX4
We use firmware v1.13.1. This was the latest stable release at time of writing.
- Install the firmware using QGroundcontrol
- Run through the setup steps in QGroundcontrol (calibration, failsafe etc.). These fill up the PX4 parameters according to your specific hardware setup. Some of these will need a reboot to appear. The important ones are:
- [Parameters] MAV_1_CONFIG = TELEM 2
- [Parameters] MAV_1_MODE = onboard
- [Parameters] SER_TEL2_BAUD = 921600 8N1
- [Parameters] EKF2_HGT_MODE = 3 (Vision Position + Vision Yaw Fusion)
- [Parameters] EKF2_AID_MASK = 24 (Vision
- [Parameters] BAT_N_CELLS = 4S Battery (our quad runs on 4S)
- [Safety] Low Battery Failsafe Trigger: Land mode
- [Safety] RC Loss Failsafe Trigger: Land mode
- [Safety] Return To Launch Settings: Climb to Altitude of: 2\
The first three enable control via the Upboard. The next two allow MoCap data fusion. The sixth is because our quadcopter uses 4S batteries and the last 3 ensure that should a px4 level failsafe event occurs, the drone won't launch itself into the ceiling.
- For flight modes, I do the following:
- Mode Channel = Channel 6 (three way [because there weren't anymore two ways left]): Stabilized -> Stabilized -> Position
- Emergency Kill Switch Channel = Channel 5 (two way)
- Offboard switch Channel = Channel 7 (two way)
With 'down' defined to be switch position that is away from the pilot and 'up' to be the switch position towards the pilot. So at startup all switches should be down (stabilized mode, kill switch on and offboard off) These provides a pretty straightforward setup that even inexperienced pilots can use. With the Trajbridge code running (see the tutorials):
- You disengage the kill switch (up) and arm (throttle/yaw to 0): The motors spin up
- You set the mode channel to Position mode (up): Nothing happens. But don't wait too long here (you can actually do this and step 3 almost simultaneously).
- You set the offboard channel switch to on (up): The drone will takeoff and hover at 1.0m.
- If something bad happens, hit the offboard switch (down). The drone should stop what its doing and land gracefully. This is a soft kill because this assumes the stuff you are running in ROS is not stuck. Usually fine in most cases.
- If bad stuff is still happening, hit the kill switch (down). This is an absolute kill because it goes directly from the transmitter to the PX4. So EVEN IF bad things are happening in your ROS stuff, this will still work. Thing of it as an e-stop button. The downside of this switch is.. well... the drone will drop like a brick. So save it only for the worst case scenarios.
A general tip for new users: Put the offboard switch and kill switch at opposite ends of the transmitter. Then, once you're in offboard mode, have HAND1 hold the offboard switch and HAND2 hold the kill switch. If you see something bad, HAND1 down (soft kill). If bad things continue to happen, HAND2 down (hard kill). This is because, when you're flying, especially if it's your first time flying a drone, you will be nervous; these things are essentially flying shurikens. You will be stressed. So keep the failsafe procedure simple.
6. Basic Tutorial Part I: Testing the Repo in Simulation
Compiling the Repo
TrajBridge uses catkin-tools for compiling. After cloning the repo, trying doing catkin build. The service messages might not to be pre-compiled (TODO: fix the CMakeLists.txt so this doesn't happen) so for a quick workaround, simply compile with the cpp files commented out (add_executable, target_link_libraries).
Testing the Repo in Simulation
We start by testing the code base in simulation. Essentially, we want to be able to simulate the entire flightroom setup on the user's computer (which in reality is just the GCS in the flightroom). To do this we need to setup PX4 to run as SITL in a Gazebo simulation. Together these will produce a virtual instance of the flight controller and simulated pose and vehicle state data for TrajBridge to interface with.
 We then run the companion computer node(s) on the GCS.
First Time Install
If this is the first time, we'll need to get PX4 (flight controller software) and Gazebo (simulation software) installed. The steps should be a mirror of the ones found here and here:
- Download the StanfordMSL forked PX4 repo and its submodules:
git clone https://github.com/StanfordMSL/PX4-Autopilot.git --recursive
We use the StanfordMSL fork because this protects this tutorial from the ever-changing main branch of PX4. I initially tried using the v1.13.1 release branch for stability reasons but submodule updates give problems. I'll fix this in the future. - Install everything:
bash ./PX4-Autopilot/Tools/setup/ubuntu.sh - Restart your computer
- cd into the PX4 repo and configure+build a px4 copy for Gazebo:
DONT_RUN=1 make px4_sitl_default gazebo boardconfig
a. In the configurator, under Toolchain -> Force disable lockstep -> Save b. If (4) doesn't successfully execute due to missing packages, install them accordingly. For the most recent instance, I had to do:
c. Inpip3 install kconfiglib pip3 install --user jsonschema pip3 install --user packaging pip3 install --user jinjaTools/simulation/gazebo/sitl_gazebo/models/iris/iris.sdf, setenable_lockstepto 0 (default is 1). We need to disable lockstep to allow access to the actuator_controls topic. - We're now ready to test out the setup. Prep the terminal to call the simulation:
source Tools/simulation/gazebo/setup_gazebo.bash $(pwd) $(pwd)/build/px4_sitl_default
export ROS_PACKAGE_PATH=$ROS_PACKAGE_PATH:$(pwd)
export ROS_PACKAGE_PATH=$ROS_PACKAGE_PATH:$(pwd)/Tools/simulation/gazebo/sitl_gazebo
- Call the simulation:
roslaunch px4 posix_sitl.launch
The Gazebo should pop up with a drone as in the image below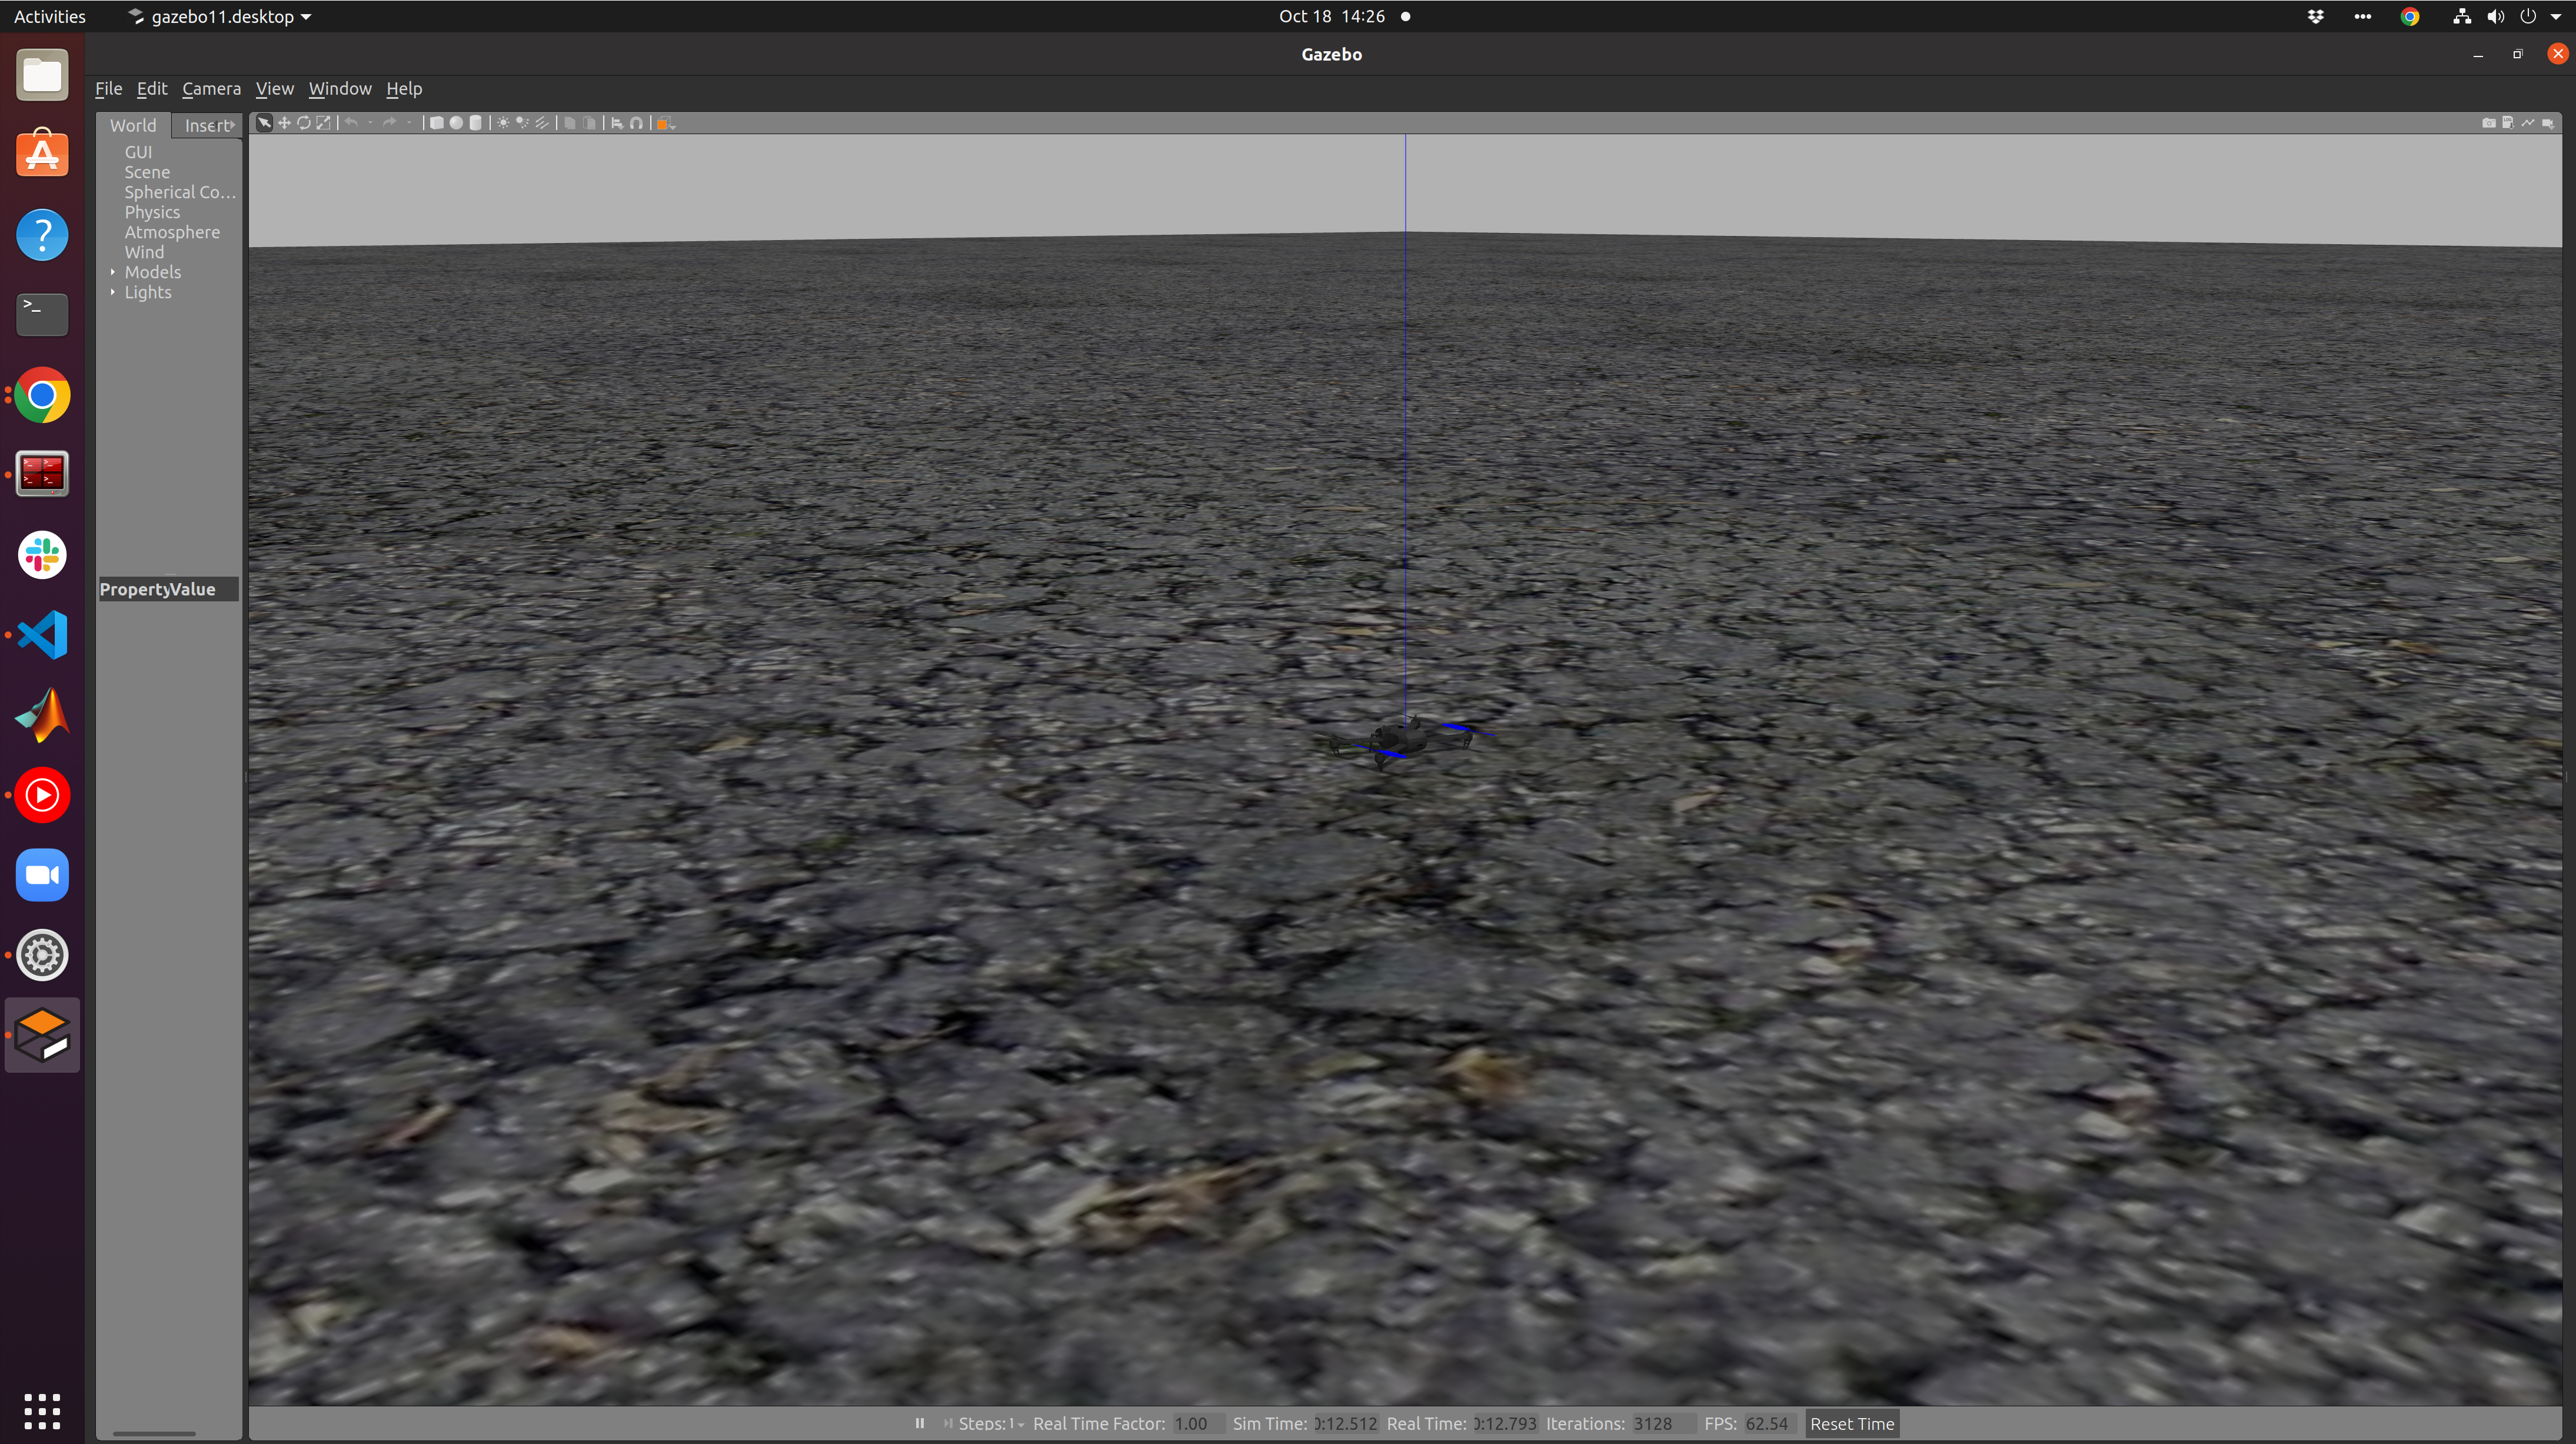 In a separate terminal do
 rostopic list. You should see something like:
/clock
/gazebo/link_states
/gazebo/model_states
/gazebo/parameter_descriptions
/gazebo/parameter_updates
/gazebo/performance_metrics
/gazebo/set_link_state
/gazebo/set_model_state
/rosout
/rosout_agg
Running TrajBridge with the simulation
We can now run code to mimic the flightroom setup on the GCS:
- In the first terminal, cd to the PX4 repo and do:
source Tools/simulation/gazebo/setup_gazebo.bash $(pwd) $(pwd)/build/px4_sitl_default
export ROS_PACKAGE_PATH=$ROS_PACKAGE_PATH:$(pwd)
export ROS_PACKAGE_PATH=$ROS_PACKAGE_PATH:$(pwd)/Tools/simulation/gazebo/sitl_gazebo
roslaunch px4 posix_sitl.launch
- In the second terminal (in the TrajBridge repo) launch the companion computer node(s):
roslaunch bridge_px4 sitl.launch
a. Don't forget tosource devel/setup.bash. a. If (2) still doesn't successfully execute due to missing geographiclib datasets, install them accordingly:
sudo /opt/ros/noetic/lib/mavros/install_geographiclib_datasets.shThe drone should take-off into a hover.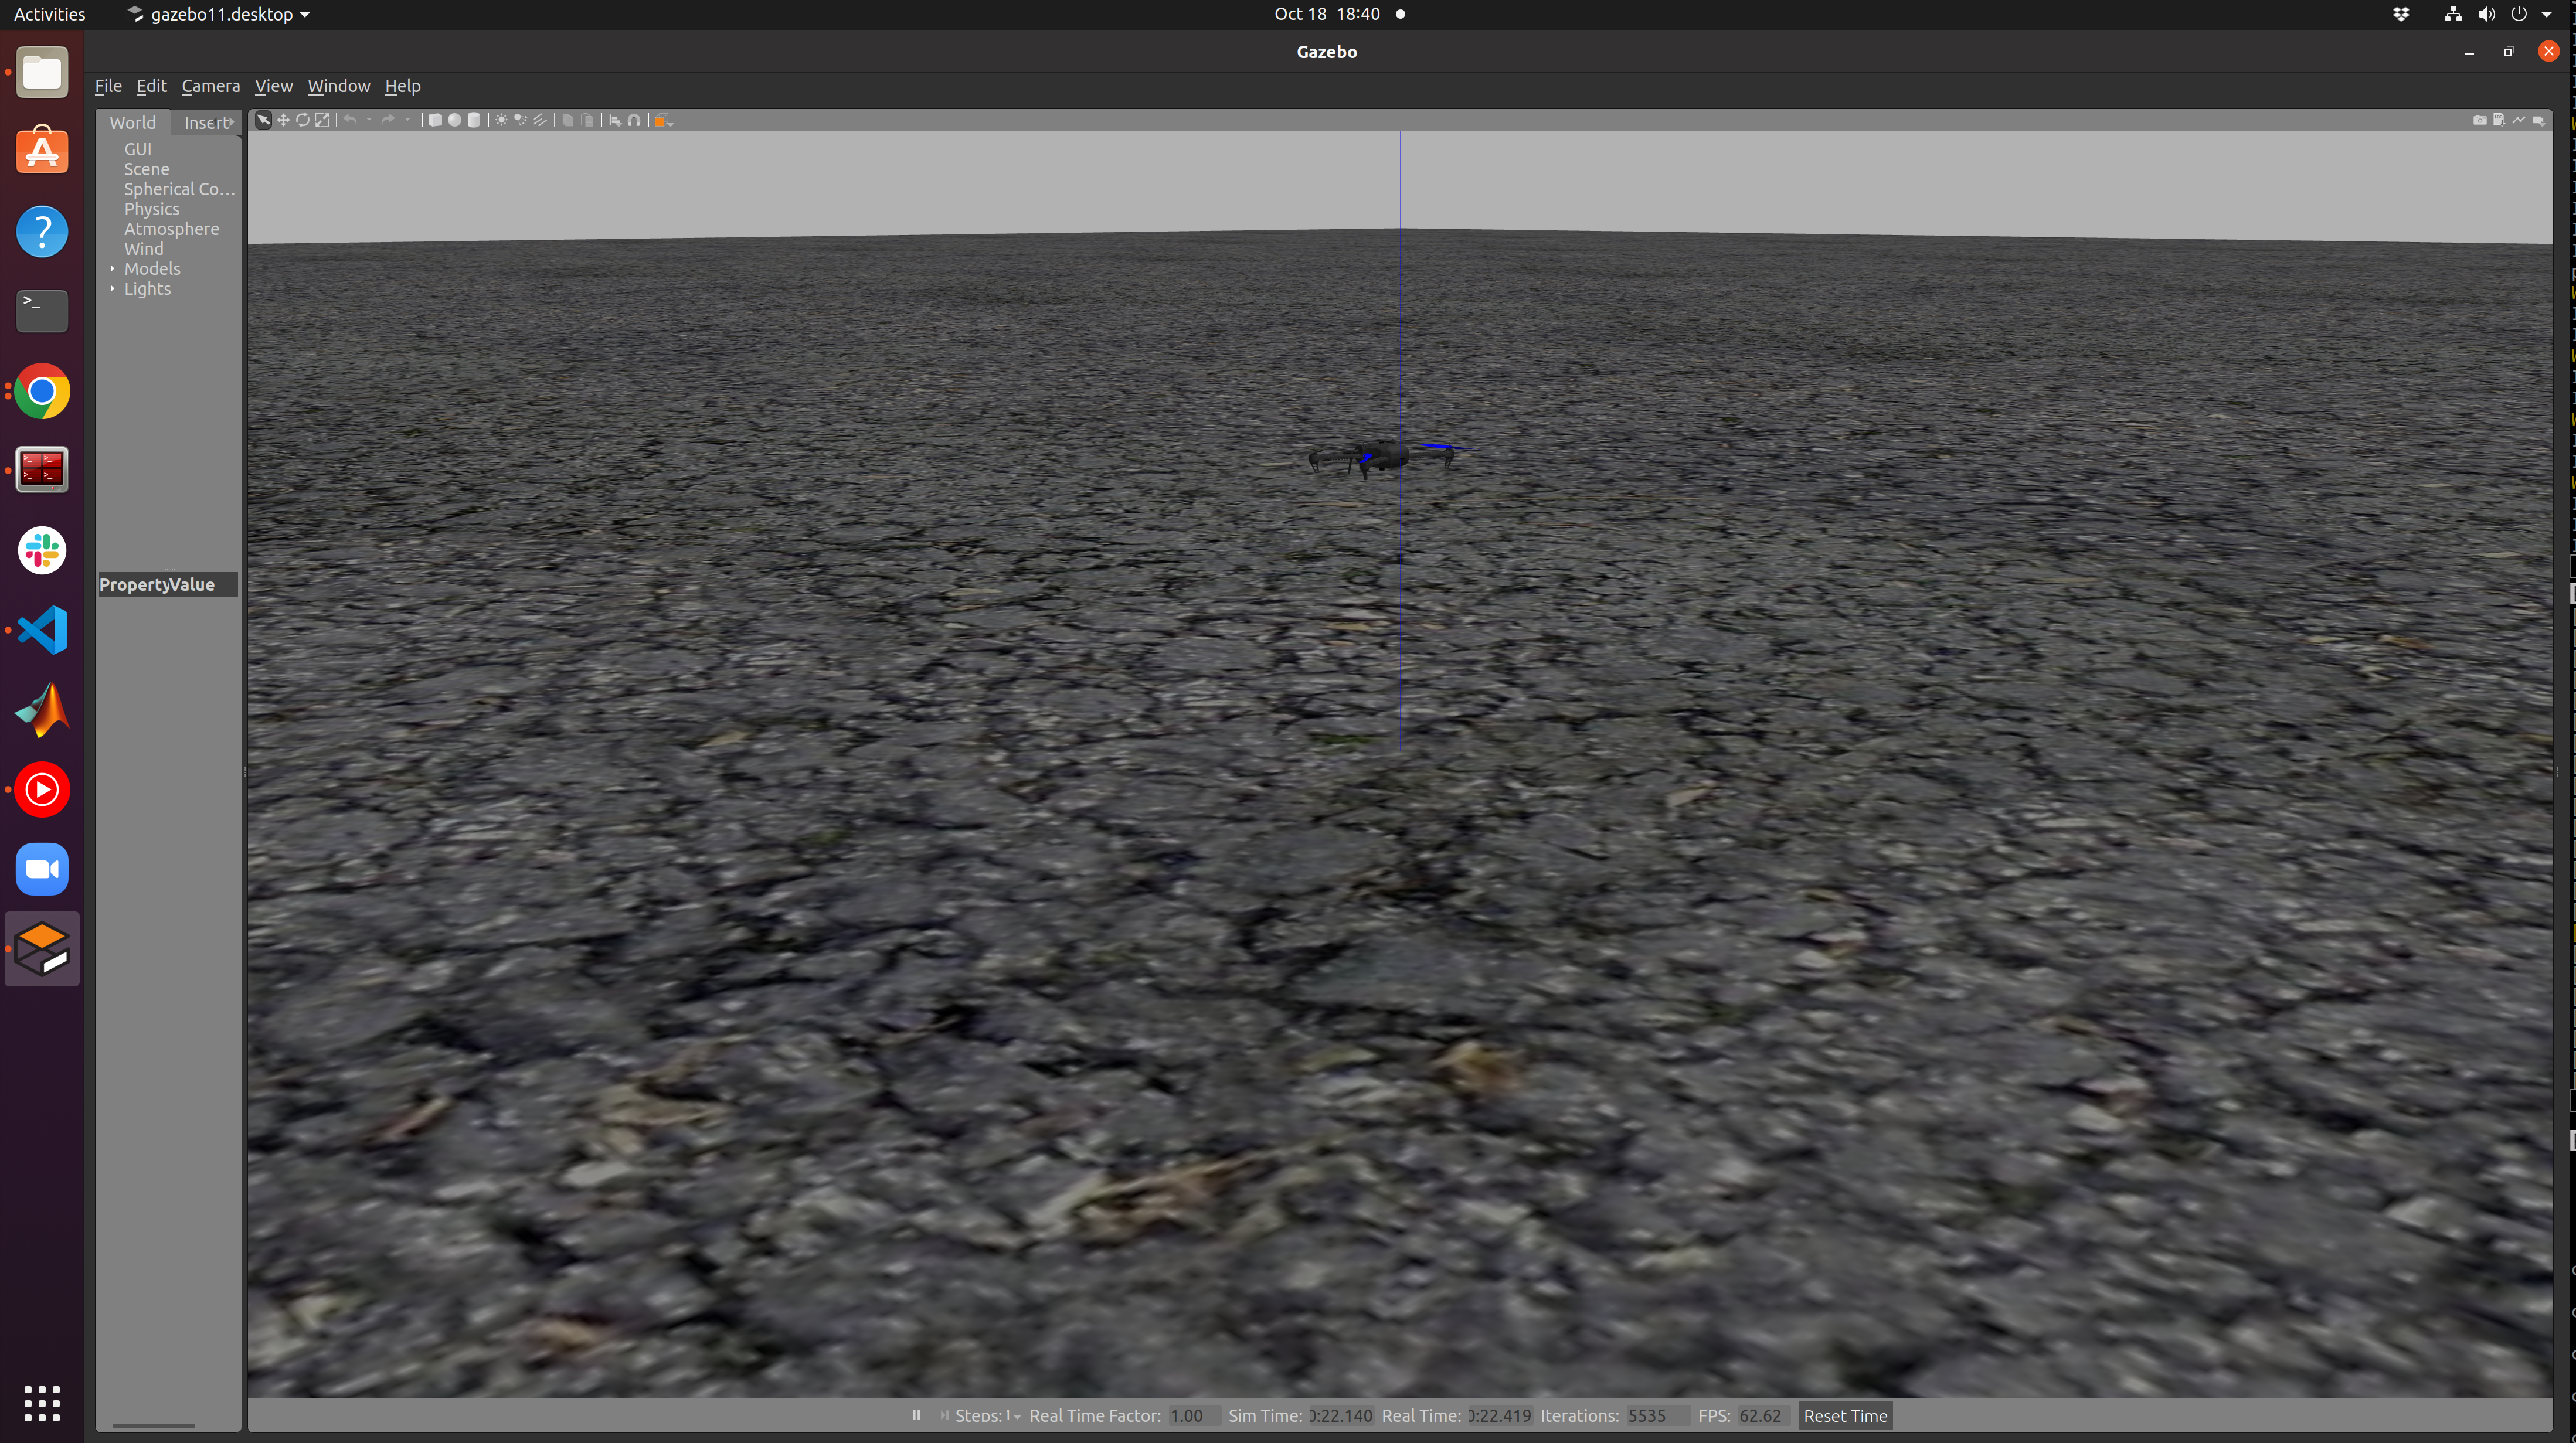
- Finally we run through a basic pose trajectory by running:
roslaunch bridge_px4 gcs.launchThe drone should execute a simple straight-line trajectory.
7. Basic Tutorial Part II: Testing the Repo in Real Life
TODO
8. Advanced Tutorial: Running SFTI Program
To run SFTI we have to utilize a novel setup:
- PixRacer Pro (normal PixRacer is fine. we used the Pro due to availability issues): PX4 v1.14.0beta
- Upboard: Ubuntu 20.04 with ROS2
- relay2.local: Ubuntu 20.04 with ROS2
We follow the setup detailed here:
https://docs.px4.io/main/en/ros/ros2_comm.html
up until "setup the agent" part 2. For Part 3, since we're plugging into an actual drone we do:
sudo MicroXRCEAgent serial --dev /dev/ttyS4 -b 921600
Since we are using the PixRacer Pro the make command is now:
make mro_pixracerpro_default
and upload is
make mro_pixracerpro_default upload
Use the msl-dev branch of the PX$ firmware that is forked into the StanfordMSL repo
Configure the PX4 to enable the companion computer with XRCE: [Parameters] UXRCE_DDS_CFG = TELEM 2 [Parameters] MAV_1_CONFIG = Disabled [Parameters] SER_TEL2_BAUD = 921600 8N1
In one terminal run in the XRCE directory: MicroXRCEAgent udp4 -p 8888 In another terminal make and launch the px4 firmware in SITL: make px4_sitl jmavsim
Note
I gave up on playing the whole submodule game because it slows and complicates progress. I acknowledge that px4_msgs, px4_ros_com and vrpn_mocap were initially copied from the forked repos seen in the MSL organization. My own work is built open these.
Offboard Control
The setup involves three computers (relay2.local to do mocap, drone5.local to do drone stuff, ASGARD.local to do ground control stuff). All running Ubuntu 20.04 with the TrajBridge repo. The following is the list of additional stuff I installed into the computers to the best of my memory:
sudo apt install build-essentialsudo apt install python3-pipsudo apt install terminatorsudo apt install gitsudo apt install ros-foxy-vrpnsudo apt install openssh-serverpython3 -m pip install -U torch torchvision torchaudiopython3 -m pip install -U numpypython3 -m pip install -U scipy
Additionally I have a PixRacer Pro with and custom firmware branched from v1.14 that exposes direct motor commands. The params I changed are influenced by https://github.com/PX4/PX4-Autopilot/issues/21232 and https://docs.px4.io/main/en/ros/external_position_estimation.html:
- UXRCE_DDS_CFG = TELEM 2
- EKF2_BARO_CTRL = Disabled
- EKF2_EV_CTRL = 11
- EKF2_EV_DELAY = 0.1 ms
- EKF2_EV_NOISE_MD = EV noise parameters
- EKF2_GPS_CTRL = 0
- EKF2_HGT_REF = Vision
- EKF2_IMU_CTRL = 1
- EKF2_MULTI_IMU = 3
- EKF2_MULTI_MAG = 3
- EKF2_RNG_CTRL = Disable range fusion
The steps are as follows:
- In the Trajbridge folder on relay2.local run:
ros2 launch vrpn_mocap client.launch.yaml server:=mocap.local port:=3883. - In the Micro-XRCE-DDS-Agent folder on drone5.local run:
MicroXRCEAgent serial --dev /dev/ttyS4 -b 921600. - Test flight in Position Control.