Walkthrough of How Nutmeg Compiles and Runs "Hello World" - Spicery/Nutmeg GitHub Wiki
Overview
In this developer-oriented article, we show how the nutmegc and nutmeg commands work together to compile and then run the very simple program hello.nutmeg. Here's the code for the program. Even though it is a simple program, the compiler has a lot of work to do :)
@command
def hello():
    println( 'Hello, world!' )
enddef
The Console-Commands
The nutmegc command
The command for compiling this program is shown below, where % represents the command-line prompt for bash.
% nutmegc -b hello.bundle hello.nutmeg
The annotation @command tells the compiler that the variable hello will be the entry point. The option -b instructs it to put the output in the file hello.bundle, which is Nutmeg's compiled format (and a SQLITE file under the hood.) The final argument is a list of files to compile into the bundle; in this case it is a single file called nutmeg.
This command is implemented via a bash-script that is installed on a folder on the default ${PATH}. At the time of writing the default path for the script is /usr/local/bin/nutmeg. This script uses 'exec' to chain into the nutmeg "launcher", which is a native executable (produced using pyinstaller). Aside: These kind of executables produced by compiling Python code often have trouble with symlinks, which is why we indirect via a bash script rather than simply symlinking to the script.
The launcher is installed in Nutmeg's main installation folder. For the purposes of this article, this is referred to as ${NUTMEG_HOME} and by default this is '/opt/nutmeg'. The actual location is buried in /opt/nutmeg/libexec/nutmeg/compiler- and this somewhat complicated looking path has been selected for compatibility with both Ubuntu Snap installs and RPM-style installs.
Here's what the script looks like. Note that the subcommand compile is passed through to the Python launcher; these subcommands tell the launcher what to do. In this case it is running the compiler.
#!/bin/bash
exec /opt/nutmeg/libexec/nutmeg/compiler/nutmeg compile $*
The nutmeg command
The command for running the compiled program is:
% nutmeg hello.bundle
This command is also implemented by a bash-script. This script checks if the next argument is a subcommand for the compiler or not. If it is for the compiler, it uses exec to chain into the nutmeg launcher. In this case, there is not a compiler-subcommand and the script uses exec to chain into Nutmeg's runner. This is also a native executable under ${NUTMEG_HOME}.
Here's what the script looks like:
#!/bin/bash
case $1 in
    compile|parse|resolve|optimize|codegen|bundle|trace)
        exec /opt/nutmeg/libexec/nutmeg/compiler/nutmeg $*
        ;;
    test)
        shift
        exec /opt/nutmeg/libexec/nutmeg/runner/NutmegRunner --test $*
        ;;
    run)
        shift
        exec /opt/nutmeg/libexec/nutmeg/runner/NutmegRunner $*
        ;;
    *)
        exec /opt/nutmeg/libexec/nutmeg/runner/NutmegRunner $*
        ;;
esac
Compilation
The nutmeg compiler invoked by nutmegc processes each supplied source-file in turn. For each file, it coordinates a pipeline of transformations, whose effect is to digest the source code and populate the bundle with the results. The transformations are:
- Parser
- Resolver
- Optimizer
- Code Generator
- Bundler
- Tracer
Each of these stages can be individually invoked and tested, so you can troubleshoot an individual stage without too much trouble.
In addition to these stages the compiler (currently) inserts a copy of the compiled source into the bundle in the table SourceFiles, which is mainly intended to provide context for runtime errors. Here's a screenshot of that table in the final bundle, taken using 'DB Browser for SQLITE'.

Parsing
For each source file, the compiler selects an appropriate parser based on the file extension. At the present time there are just two parsers:
| File Extension | Defined In | Meaning |
|---|---|---|
| *.nutmeg | dot_nutmeg_parser.py | The main custom syntax for writing Nutmeg programs |
| *.txt | dot_txt_parser.py | An example for defining a static text variable |
In this case, there's only one source file, hello.nutmeg and that is transformed. The output of all parsers has to be a codetree. Subsequent stages to parsing add extra information into the tree and can even transform it radically. Codetrees have a canonical JSON export format. In this case the hello.nutmeg code is transformed into the following codetree - as we can see, even a small program generates quite a verbose result!
{
    "kind": "binding",
    "lhs": {
        "kind": "id",
        "name": "hello",
        "reftype": "val"
    },
    "rhs": {
        "body": {
            "arguments": {
                "kind": "string",
                "value": "Hello, world!"
            },
            "function": {
                "kind": "id",
                "name": "println",
                "reftype": "get"
            },
            "kind": "call"
        },
        "kind": "lambda",
        "parameters": {
            "body": [],
            "kind": "seq"
        }
    }
}
Resolution
The primary purpose of the Resolver is to annotate the variables (kind "id") of the code-tree, so that stages know whether they are global or local and whether they have special properties, such as non-assignability.
In this case the Resolver makes two changes to the code-tree - it marks the variable hello as having "scope": "global" and similarly it marks the variable println. The latter change is important as it allows the Optimizer to identify println as a built-in function (and we haven't got a better mechanism in place yet.)
{
    "kind": "binding",
    "lhs": {
        "kind": "id",
        "name": "hello",
        "reftype": "val",
        "scope": "global"
    },
    "rhs": {
        "body": {
            "arguments": {
                "kind": "string",
                "value": "Hello, world!"
            },
            "function": {
                "kind": "id",
                "name": "println",
                "reftype": "get",
                "scope": "global"
            },
            "kind": "call"
        },
        "kind": "lambda",
        "parameters": {
            "body": [],
            "kind": "seq"
        }
    }
}
Optimization
At this time, the optimizer has only a single job, which is identifying built-in functions; obviously this will be expanded in the future! In our example, this spots that the call of println can be transformed into a call to a built-in.
{
    "kind": "binding",
    "lhs": {
        "kind": "id",
        "name": "hello",
        "reftype": "val",
        "scope": "global"
    },
    "rhs": {
        "body": {
            "arguments": {
                "kind": "string",
                "value": "Hello, world!"
            },
            "kind": "syscall",
            "name": "println"
        },
        "kind": "lambda",
        "parameters": {
            "body": [],
            "kind": "seq"
        }
    }
}
Code Generation
Nutmeg doesn't generate native code! So code-generation means annotating the code-tree with any analysis needed for the runtime engine to execute the code using it's simple execution model. At the time of writing this means determining how many arguments are consumed by a function and how big the call-stack frame needs to be for a function. It also associates local variables with call-stack slots but that isn't actually used in this walkthrough.
In this case, Optimization simply adds "nargs": 0 and "nlocals": 0 to the lambda-object.
{
    "kind": "binding",
    "lhs": {
        "kind": "id",
        "name": "hello",
        "reftype": "val",
        "scope": "global"
    },
    "rhs": {
        "body": {
            "arguments": {
                "kind": "string",
                "value": "Hello, world!"
            },
            "kind": "syscall",
            "name": "println"
        },
        "kind": "lambda",
        "nargs": 0,
        "nlocals": 0,
        "parameters": {
            "body": [],
            "kind": "seq"
        }
    }
}
Bundling
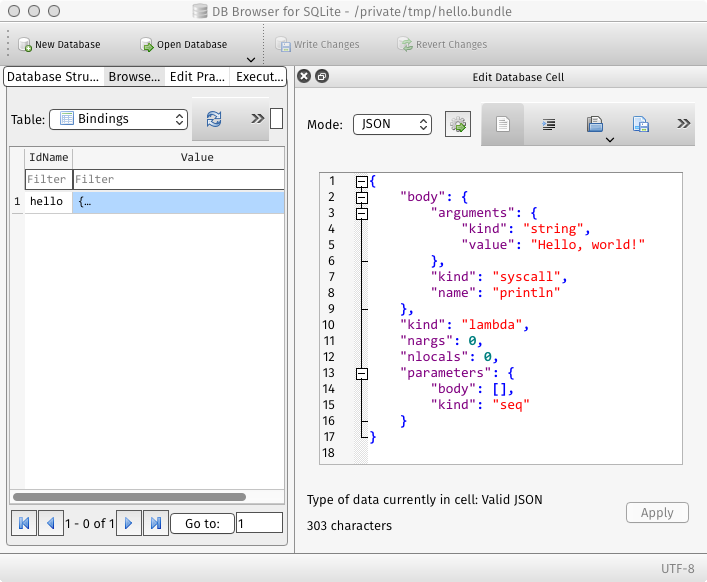
The bundler's job is to insert the output of the code-generator into the Bindings table of the bundle file. To do this, it finds top-level "bind" objects, splits them into variable name and body, and adds them as a row in the table. Here's a picture of the Bindings table for this program.
Tracing
It is desirable to limit the code loaded by the runtime engine at startup to code that's actually required. The Tracer's job is to pre-compute the complete set of dependencies for any declared entry-point. This speeds up loading and reduces the size of the runtime and it is needed for a couple of use cases e.g. (1) a bundle that support multiple programs (entry-points) that share a big library or (2) when you only need a few functions from a large library.
An entry-point is created by @command annotation (or the -e option). You can use this annotation as many times as you like and each one adds an entry into the Annotations table.

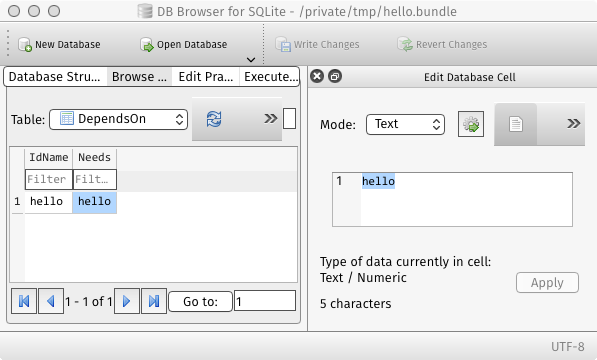
For each entry-point, the Tracer records all the variables it directly or indirectly depends on in the DependsOn table. Obviously in the case of Hello-World, the hello function does not depend on anything else, other than itself. So this is a particularly short table!
Runner
Having completed the compilation of the hello-world program, we are now in a position to run it. Because there is only a single entry-point, the runner is able to start the program without an explicit entry-point being specified. The runner starts by loading all the bindings that are named by the DependsOn table for the given entry-point. In our example, this is simply the hello bindings itself!
Each binding is loaded into a runtime global-dictionary. This global-dictionary maps from the name of a global variable into an Ident object, which is essentially just a trivial reference that points to the runnable-code or Runlet, which is the runtime-form of a code-tree. Loading the global-dictionary is actually a fairly complicated process.
The first phase is that blank Ident objects are inserted into the global-dictionary for each variable. This pre-population helps to avoids problems with recursive functions. The second phase is to compile each code-tree into a Runlet. Runlets are instruction-like objects that are threaded together into a graph that mimics the control flow of a program - each Runlet linking to the next. This threading makes the innermost execution loop simple:
// Taken from RuntimeEngine.cs, method RuntimeEngine#StartFromCodelet
while (true) {
    currentInstruction = currentInstruction.ExecuteRunlet( this );
}
Because the Runlets form complicated graphs, they can't easily be rendered as a JSON object. Instead we are able to render them using graphviz. The option --graphviz=_VARIABLE_ is used to do this:
% nutmeg --graphviz=hello hello.bundle
digraph hello {
"0. Function" -> { "1. Lock" }
"1. Lock" -> { "2. PushQ Hello, world!" }
"2. PushQ Hello, world!" -> { "3. SysPrintln" }
"3. SysPrintln" -> { "4. Unlock" }
"4. Unlock" -> { "5. Return" }
"5. Return" -> { }
}
This can be turned into a PNG image like this:
% nutmeg --graphviz=hello hello.bundle | dot -Tpng > hello.png
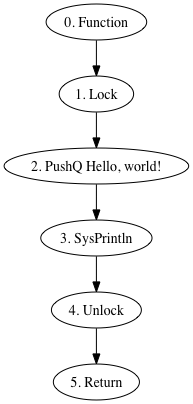
The above image shows that the hello function turns into 5 runlets aka instructions. [Aside: this is not very good but hey, early days! In particular the lock/unlock instructions are there to protect 'bad' access to the stack and a bit of analysis would eliminate them.]
Executing this graph simply runs through until the return instruction is encountered, which will then cause the RuntimeEngine to return to a previously invisible system function. This secret function throws a special exception which is neatly trapped, bringing the whole engine to a timely halt. Here's the code that does that, slightly edited for clarity here.
try {
    //  Add secret function to bring machine to halt!
    Runlet currentInstruction = new LockRunlet( new CallQRunlet( fwc, new HaltRunlet( usePrint ) ) );
    //  Main loop
    while (true) {
        currentInstruction = currentInstruction.ExecuteRunlet( this );
    }
} catch (NormalExitNutmegException) {
    //  Normal exit.
} finally {
    if (Debug) stdErr.WriteLine( $"Bye, bye ..." );
}
The net effect is for the running program to do exactly what is expected ....
% nutmeg hello.bundle
Hello, world!
%