Site structure - SoftFx/Hierarchical-Sensor-Monitoring GitHub Wiki
The HSM site is the main product for visualizing data coming to the server. It has the following structure:
Let's take a look at each of the blocks below.
Tree
Work with Tree
A tree structure is used to present information about products connected by customers to the HSM site. A tree structure is one way of representing a hierarchical structure in a graphical way. It is so called due to the fact that it visually looks like an upside down tree. Tree example below:
The tree structure displays all products, nodes and sensors. Each of the above has 4 possible statuses (the order of the statuses, displays their priority, from lowest to highest, from top to bottom):
- OffTime (
 ) - no data available due to schedule settings on the client or server application;
 - Ok (
 ) - the data received by the sensor corresponds to the expected result;
 - Error (
 ) - the data received by the sensor contains an error.
The user has the ability to set up alerts, ignore the sensor, edit product metadata by right-clicking on the product.
The list of parameters available to the user depends on the rights granted to him on the site. Rights and accesses will be described in more detail in the Roles section on the site.
Data filtering
For the convenience of working with the tree, filters are used that the user configures personally for himself. To call the filtering settings, click on the “Filters” button. The filter settings form appears as a pop-up window to the left of the tree:
Possible filtering settings:
- Update tree interval - time for updating statuses in the tree. Default = 5 seconds. Example: Update tree interval = 5 seconds. After updating the sensor status on the server, within 5 seconds the new status will be displayed on the tree.
- Status - display sensors with the selected status on the tree. In this case, if the selected status is “lower” in priority than the one on the tree, then the status “higher” in priority will be indicated in the products and nodes. Example:
The tree is filtered to show all products, nodes and sensors with the status “Ok”, however there are sensors in the Bitmakerts Live product and node Feed Connections with the status “Error”. In this case, the user sees the nodes with the “Ok” status, and those products and nodes where there is an error is shown with the “Error” status, and the sensors that caused the error are not displayed directly. This is done so that in the case when the user monitors the system on the “Ok” status, there will be no error skipping situation.
-
History - this filter is used to add to the list the display of products for which there is no information. Either it did not come, or all data was cleared / deleted. !Not supported!
-
Notification - !Not supported! - allows you to leave in the tree display sensors that have enabled
-
Blocked -!Not supported!- includes all products that have been blocked in the display. (This functionality is being removed at the moment).
-
Sort By - used to define the sort order:
- By Name (
 ) - alphabetically, from A to Z. Used by default;
 - By Last Update (
 ) - by the time of the last update. That product will be higher, whose update time is closer to the current one. Example, at the given time 17:00, there are 3 products in the list of products: Product 1 (16:50), Product 2 (16:13), Product 3 (16:57). When using sorting by last update time, the order in which products will be displayed in the tree will be as follows (from top to bottom): Product 3, Product 1, Product 2.
- By Name (
-
Apply - This button is used to confirm and apply the filter option that the user has selected.
After the filter is applied, tooltips will appear that indicate how the tree is currently filtered and the number of filters applied. Example below:
In this example, we see that the tree is filtered by 2 filters, by status and by visibility, with the value Icons. The order of the products on the tree is by the name.
Graph and data table
To the right of the tree, the data obtained by the product is displayed using a graph or table. The display depends on whether the node or product has its own sub-products/sensors. If the node contains sub-products, then to the right of the tree information about:
- Product name;
- The current setting of the Expected Update interval parameter (can be edited);
- Nodes / sub-products and their states in the form of Grid or List.
The state of the nodes in the form of a grid:
The state of the nodes in the form of a list:
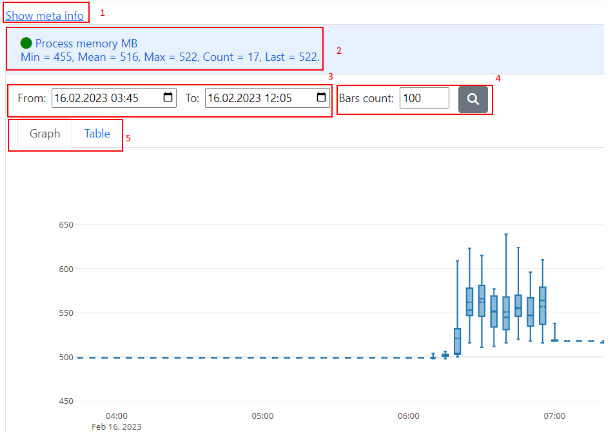
- If the selected element on the tree is a sensor (node without subproducts), then to the right of the tree information about:
- Meta information of the sensor, which includes (to view, you need to click on the text “Show meta info”):
- Parent product (Product);
- The path (Path) along which this sensor lies;
- Sensor type;
- Expected update Time - set by default from the parent, i.e. node one level up. In this case, next to the parameter there is a mark (from parent).
- Description
- Unit of measurement (Unit).
- Brief information about the sensor:
- Status;
- The latest data;
- The time of the last update.
- Time period for which the data is displayed;
- Number of bars (only for sensors that collect information in bars);
- Data collected by the sensor in the form of a Graph or a Table. By default, the number of entries to display = 100.
Products tab
The products tab is required to create/edit/delete and view folders/products added by customers on HSM. After opening the tab, the user will see a list of folders/products available to him on the project.
Folders
If the user has enough rights, then he can add folder by link "+Add folder" on Products tab. To create a folder you need to specify its name (description) and click the "Save" button. After that, the user will be redirected to the "Edit folder" page, where he can configure it. To delete a folder click "Remove" link. In case containing products by folder, all products from this folder will be moved to "Other products" section (products without folder). Let's look at the folder settings that user could configure. On General tab we see name, description, color, author, creation date information and connected to this folder products list. New products could be added via "+Add product(s)" link. To exclude product select "Exclude from folder" option in "Action" column.
On Settings tab user could set "Keep sensors history". The period during which the sensor history will be stored. After this period has expired, the history will be clean up. "Remove sensors after inactivity" defines the period after which the sensor will be deleted by the system. This settings applied only for sensors. Empty nodes user have to delete manually. Default values for "Keep sensors history" and "Remove sensors after inactivity" settings is 1 month. Parameter "Time to sensors live" used for TTL alert. These settings will be used as parent when setting up TTL alert. Default value is Never.
'Telegram' tab provides information about telegram chats connected to the folder. User could add chat connected to HSM via "Choose chats to add" list or add new chat via link "+Add new chat". Guide for inviting all types of telegram chat (group and direct) described in "Add new telegram chat help" modal window. Next actions available for user: "View/Edit" (redirect user to "Edit telegram group" page), "Remove from folder" (group will be deleted for this folder and alerts of products that are nested in this folder), "Send test message" (test message will be sent in selected group for user request it), "Go to chat" (user will be redirect to telegram group).
Also user could edit telegram chat settings on "Edit telegram group" page that opens by click on the chat name.
Alert notifications enabled/disabled via "Enable messages" toggle. Parameter "Messages delay" define alert notifications aggregation period.
List of folders this chat is connected to is presented in Connected folders section.
'Users' tab show list of users and their roles. To add new user click "+Add user", select user and set role. It is possible to update a role or remove user from a folder using the operations Edit/Remove in Action column.
Products
If the user has enough rights, then he can add new products by link "+Add product". A new product will be created and added to the list of products.
The list of products consists of 4 elements:
- Name - Product name, set when creating a product;
- Managers - Product manager, set when editing a product;
- Last Update - displays the time when the product data was last updated;
- Actions - allow you to edit or delete a product.
To simplify navigation in the list of products, there is a search by (filtering is possible simultaneously by all the following parameters “Name”, “Managers”).
Product editing
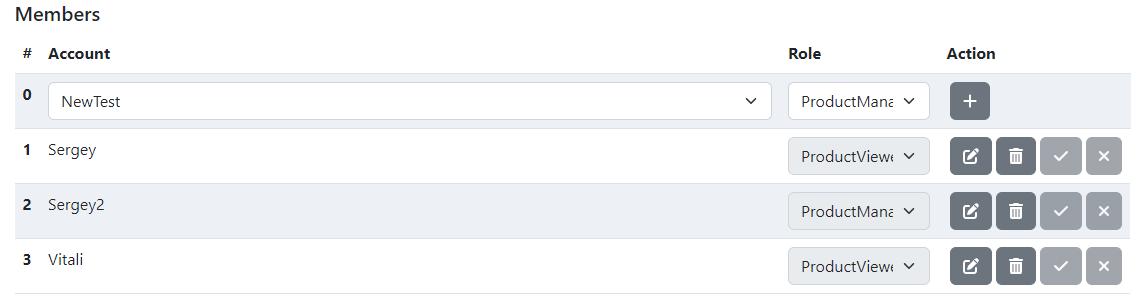
To open the product edit form user should click on the product name or select "Edit" from the "Actions" context menu. On this page user could edit product "Name", "Description"; add/edit/remove members and access keys.
To add a new user to this project, the Admin/Product Manager must select the user's login from the drop-down list, their role (ProductManager and ProductViewer are currently available), and click the "Add" (+) button. After that, the user will appear in the Members list, where his name and role are displayed. Admin/Product Manager can edit the role of this user or remove his access to the project.
Examples of connecting external services
User could connect external products and HSM using product access key and server address.
Connection TTS performed via TTA:
Connection aggregator and adminEye performed via adminEye:
Access keys - a list of keys that allow the user to send / read data, create nodes / sensors.
The list contains information about:
- Name - the name of the key given by the user. When a product is created, a DefaultKey is created;
- Key - the key;
- Copy - a button that allows you to copy the key to the clipboard;
- Permissions - list, permission for the given key. What they can be:
- CanSendSensorData - the user will be able to send sensor data using this key;
- CanReadSensorData - the user will be able to read sensor data using this key;
- CanAddNodes - the user will be able to create nodes for this product;
- CanAddSensors - the user will be able to create sensors for this product.
- Full - includes all permissions described above.
- State - displays the status of the key. There are 3 statuses possible:
- Active (
 ) - this key is available for work, in accordance with its permissions;
 - Expired(
 ) - this key has expired;
 - Blocked(
 ) - the key was manually blocked.
- Active (
- Actions - a list of actions that can be performed with a key from the list:
- Edit - opens the key editing form;
- Block/Unblock - manually blocks the key, the operations of the corresponding permissions are blocked until the Manager/Admin unblocks the key;
- Delete - deletes the key.
To add a new key, the user must click "Add key". Then a form for adding a new key appears, which is similar to the edit form, except that it is not possible to change the Expiration parameter in the edit form. Below is an example of a form for adding and editing a key.
In this form, the user specifies:
- Display name - display name for the key;
- Permissions - all permissions that the key has, the description of each was above;
- Expiration - expiration date of this key (set when creating a key, cannot be edited).