03 Installation - Smart-Edge-Lab/SeQaM GitHub Wiki
The platform comprises three main components: Central, Network, and Distributed. However, a Builder component is used to build them. The components can be installed on a single computer or every component on a dedicated computer.
The components have the following requirements:
-
Builder
- Ubuntu 20.04 LTS or Alpine Linux 3.20
- Git: 2.43.0 or newer
- GNU bash: 5.2.21 or newer
- Your favorite text editor
- Docker: v20.10.22 or newer
- envsubst: 0.22.5 or newer
- Memory: 768 MB RAM or more
- Disk: 10 GB or more
- CPU: at least one core
-
Central
- Ubuntu 20.04 LTS or Alpine Linux 3.20
- Git: 2.43.0 or newer
- Signoz: v0.49.0 from https://github.com/SigNoz/signoz/archive/refs/tags/v0.49.0.tar.gz . If you are going to deploy SigNoz somewhere else or use its cloud version, then you can skip this dependency
- Your favorite text editor to edit configuration files
- Docker: v20.10.22 or newer
- Docker Compose: v2.29.7 or newer
- Memory: 768 MB RAM or more
- Disk: 10 GB or more
- CPU: at least one core
📝 Note: Refer to the SigNoz documentation for further requirements
-
Network event manager
- Ubuntu 20.04 LTS or Alpine Linux 3.20
- Docker: v20.10.22 or newer
- Docker Compose: v2.29.7 or newer
- Memory: 4 GB RAM or more
- Disk: 4 GB or more
- CPU: at least 4 cores
-
Distributed event manager
- Ubuntu 20.04 LTS or Alpine Linux 3.20
- Docker: v20.10.22 or newer
- Docker Compose: v2.29.7 or newer
- Memory: 768 MB RAM or more
- Disk: 4 GB or more
- CPU: at least 4 cores
Follow the sections below to deploy each component.
The Builder is used to build docker images of all other components and to configure them.
The deployment of the Builder requires following these steps
Navigate to some directory where you have writing access and would like to store the platform source files.
Clone the Repository and navigate to the project directory
git clone https://github.com/Smart-Edge-Lab/SeQaM.git

cd SeQaM🪲 Common Issues:
1. Permission to run Docker: If you encounter issues running Docker (e.g., "permission denied"), it could be because the user doesn’t have permission to run Docker. To fix this, add your user to the Docker group:
sudo groupadd docker
sudo gpasswd -a $USER docker
newgrp docker
2. Do not run any installation or deployment scripts with
sudoor as therootuser. Running scripts likedeploy.shorinstall.shwith elevated privileges can cause permission-related issues with configuration files not being read (unless stated differently in this guide).
Run
./api/bin/install.shThis script creates a hidden folder named .seqam_fh_dortmund_project_emulate in your home directory /home/<your_username>:

This folder contains an ssh key pair and important configuration files that need to be modified to suit your specific setup.
Please carefully read the explanation of Configuration files here before continuing. Also, you should read the page of the demo setup to familiarize yourself with the configuration of these files given an example of a network before proceeding with the instalation.
Modify Configuration Files
After running the
install.shscript, navigate to the hidden folder in your home directory:cd ~/.seqam_fh_dortmund_project_emulate
- env: Modify the environment variables to match your specific network configuration.
- ScenarioConfig.json: Adjust this file to suit your deployment scenario and network topology.
Open the ~/.seqam_fh_dortmund_project_emulate/env file in your favorite text editor and set the SEQAM_CENTRAL_HOST variable to the IP address of the computer where you are going to install the Central components:
📝 *Note: The IP address should be the IP of the machine. Do not use
localhostas this will be unreachable by the containers.
Open the ~/.seqam_fh_dortmund_project_emulate/ScenarioConfig.json and replace the sample IPs with the IP address of the computers where you are going to install a Distributed component. If you plan to have more distributed components in your setup (eg. three servers), add each one of them individually to the file following the same format. Make sure you configure each IP address and assign different names.
Add a load-client entry under the UE section of the same file, setting the IP address of the computer where you are going to install a Network component in the host field:
Again, you can refer to the configuration files here, which are provided as an example of the network setup used in the demo.
Execute
# from the platform folder
./api/bin/fast-build.sh
This may take a while as it will build docker images for all the components:

Run
./bare-composes/generate-docker-composes.sh yThis step can also take some time. In the command, the last "y" option means that we would like to generate tar-balls ready to be deployed on computers without an internet connection.
The above scripts generate three folders:
- bare-composes/seqam-central/
- bare-composes/seqam-network-event-manager/
- bare-composes/seqam-distributed-event-manager/
the content of these directories should be copied to the computers that should run the Central, Network, and Distributed components, respectively.
Go to the computer where you would like to deploy the central components and set up the Central Collector. It is recommended to follow the Signoz installation guide. Signoz can be installed in various ways, including Signoz Cloud; however, SeQaM uses the standalone version with Docker. You can run the central collector on a separate machine to improve performance.
In a directory of your choosing, clone the SigNoz repository and cd into the signoz/deploy directory by entering the following commands:
git clone -b main https://github.com/SigNoz/signoz.git && cd signoz/deploy/🛠️ Configuration Recommendations:
- Update OpenTelemetry Collector Configuration: The OpenTelemetry collector operates in batches, meaning that information is collected but not exported until certain conditions are met. There are two parameters to configure:
datasizeandtimeout. When either condition is fulfilled, the data is forwarded to the exporter. For faster data insertion into the database, it is crucial to configure these parameters in both the central and distributed collectors. For the central collector, locate theotel-collector-config.yamlfile insignoz/deploy/docker/clickhouse-setupand adjust it as follows:processors: batch: send_batch_size: 100 send_batch_max_size: 110 timeout: 1ms
- Avoid Unwanted Signoz Components: It is advisable not to install unnecessary Signoz components for this platform, such as hotrod, and load-hotrod, which are just an example service. These can be removed by deploying the minimal version of Signz or by editing the
docker-compose.yamlfile located insignoz/deploy/docker/clickhouse-setupand removing the corresponding entries.include: #- test-app-docker-compose.yaml - docker-compose-minimal.yaml
To run SigNoz, enter the docker compose up command, specifying the following:
-
-fand the path to your configuration file -
-dto run containers in the background
docker compose -f docker/clickhouse-setup/docker-compose.yaml up -dThe central collector can be still separated as it is a completely isolated unit. This means it can run on a different machine than the core components. However, to simplify the setup it is better to put them together.
Copy the content of the bare-composes/seqam-central/ folder from the Builder computer (the machine where you have built the docker images) to the computer where you are going to deploy the Central components:
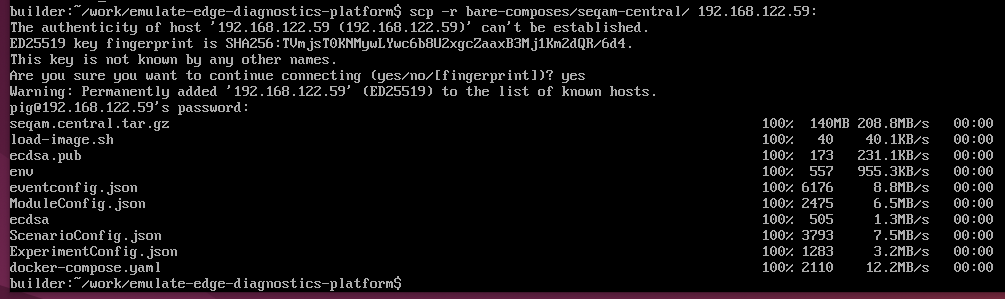
Go to the Central computer, navigate to the seqam-central folder and run
./load-image.sh seqam.central.tar.gzit should load docker images of the Central components:
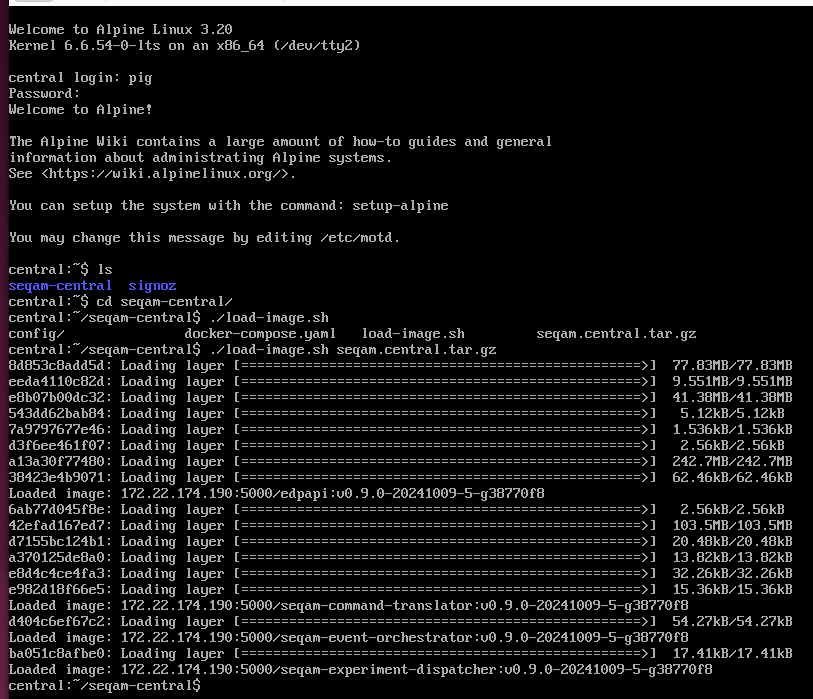
You can see the loaded docker images:

Once this step is completed, proceed to deploy the platform components:
docker compose up -dIt should start all the Central components:

⚠️ Warning:
The API component requires Signoz (clickhouse) to be running as it implements database migrations when starting. In case you have Signoz + Clickhouse in a different machine, make sure you change the environmental variables of the docker-compose.yaml file to match the IP address. as default the system is built supposing all central components are in the same machine.
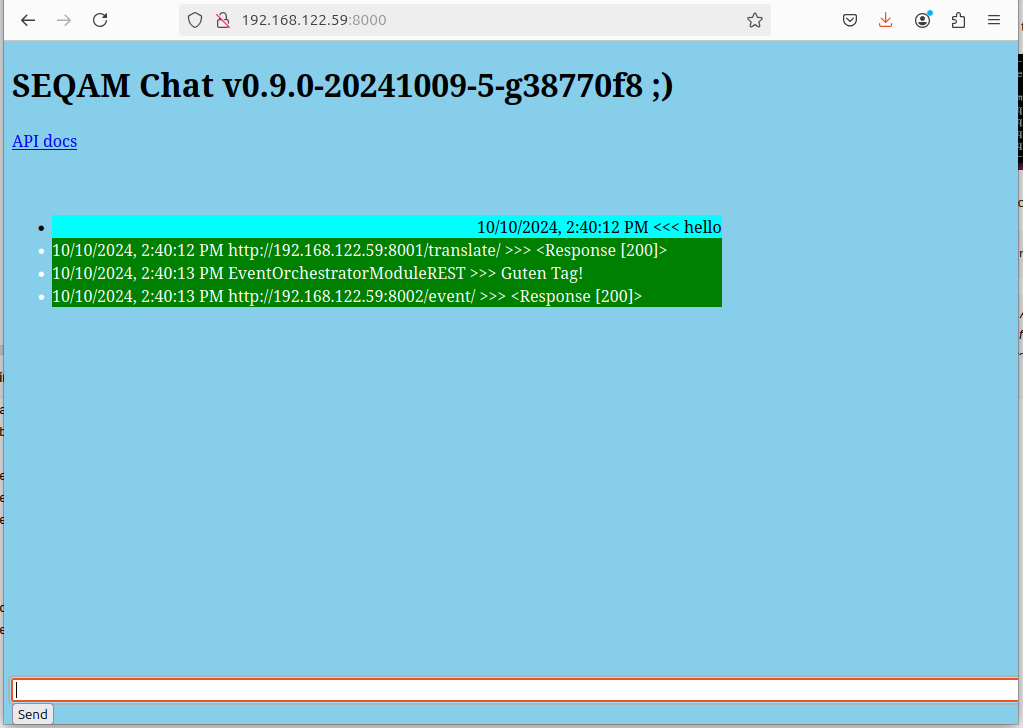
Now navigate your web-browser to the IP-of-the-Central-computer:8000. A "chat" window should open. Type "hello" in the input field and press <ENTER>. You should see a response like below:
To stop the platform
docker componse down
⚠️ Warning:After deploying the platform, any changes or updates to the configuration must be made in the
seqam-central/configconfiguration folder on the computer running the Central components. Also, if you change, for example, the port of a distributed component, then you will have to manually adjust the docker compose in that distributed component to expose the same port. Please refer to the Managing Configuration Files section for detailed instructions on how to modify the settings.
Deploy your instrumented application client/server together with the distributed components. To get started, you can also test out the demo application. Check out the demo installation guide here.
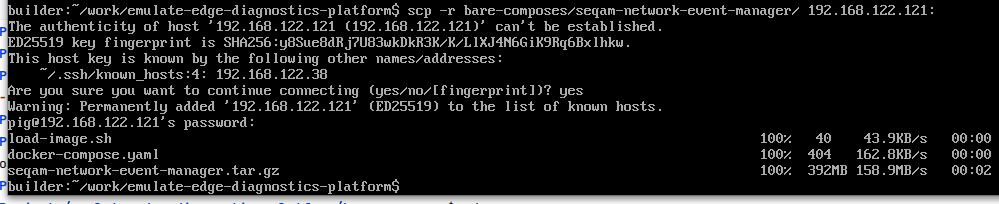
Copy the content of the bare-composes/seqam-distributed-event-manager/ folder from the Builder computer to each device (UE/server) where you are going to deploy the Distributed component.
Use scp to securely transfer these files:
scp -r bare-composes/seqam-distributed-event-manager/ user_name@distributed_device_IP:optional_directoryMake sure to replace user_name and distributed_device_IP with the appropriate username and IP address of a distributed machine:

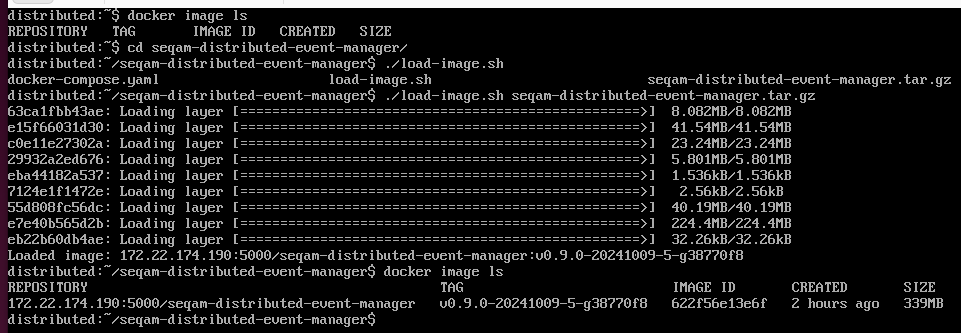
Once the files are in place, go to the Distributed device, navigate to the seqam-distributed-event-manager directory and run
./load-image.sh seqam-distributed-event-manager.tar.gzit should load the docker image:
Deploy the distributed components by running the following commands:
# From the seqam-distributed-event-manager directory
docker compose up
To stop the distributed components just press <CTRL>+<C>.
⚠️ Warning: Applicable For NVIDIA GPUs Only.
Install NVIDIA Container Toolkit following the official guide.
Modify
docker-compose.ymlby uncommenting the following lines:deploy: resources: reservations: devices: - driver: nvidia count: all capabilities: [gpu]
Copy the content of the bare-composes/seqam-network-event-manager/ directory from the Builder computer to the machine/VM that will represent the Load Client:
Go to the computer where you are going to run the Network component, navigate to the seqam-network-event-manager directory, and load the docker image with
./load-image.sh seqam-network-event-manager.tar.gzDeploy the Network components on by running the following command
# From the seqam-network-event-manager directory
docker compose up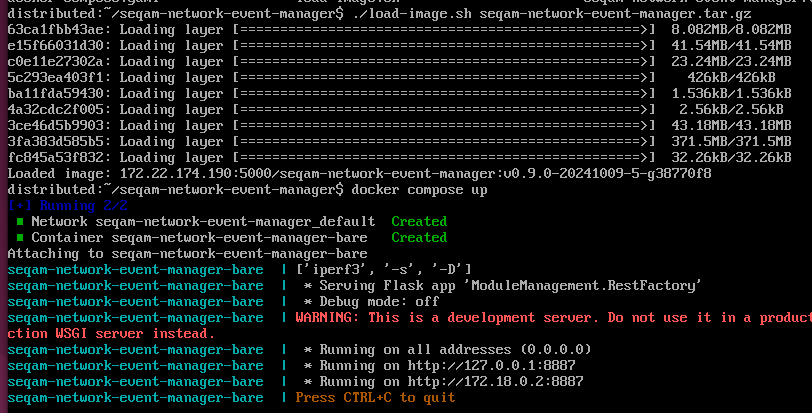
To stop the component just press <CTRL>+<C>.
To simulate traffic and handle performance measurements, start one more instance of the Network component on some computer and add its IP address to the seqam-central/config/ScenarioConfig.json file under the server section on the Central computer like the following:
{
  "name": "load-server",
  "host": "load_server_IP"
}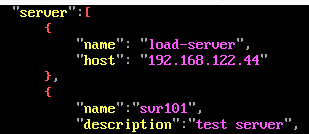
This load-server will run iperf3 in the background, listening for incoming client connections for bandwidth testing.
The seqam-central/config/ExperimentConfig.json file on the Central computer contains a sample experiment. Please open it and update the experiment_name:
Run the experiment by typing in the SeQaM "chat" window in your browser:
start_module module:experiment_dispatcher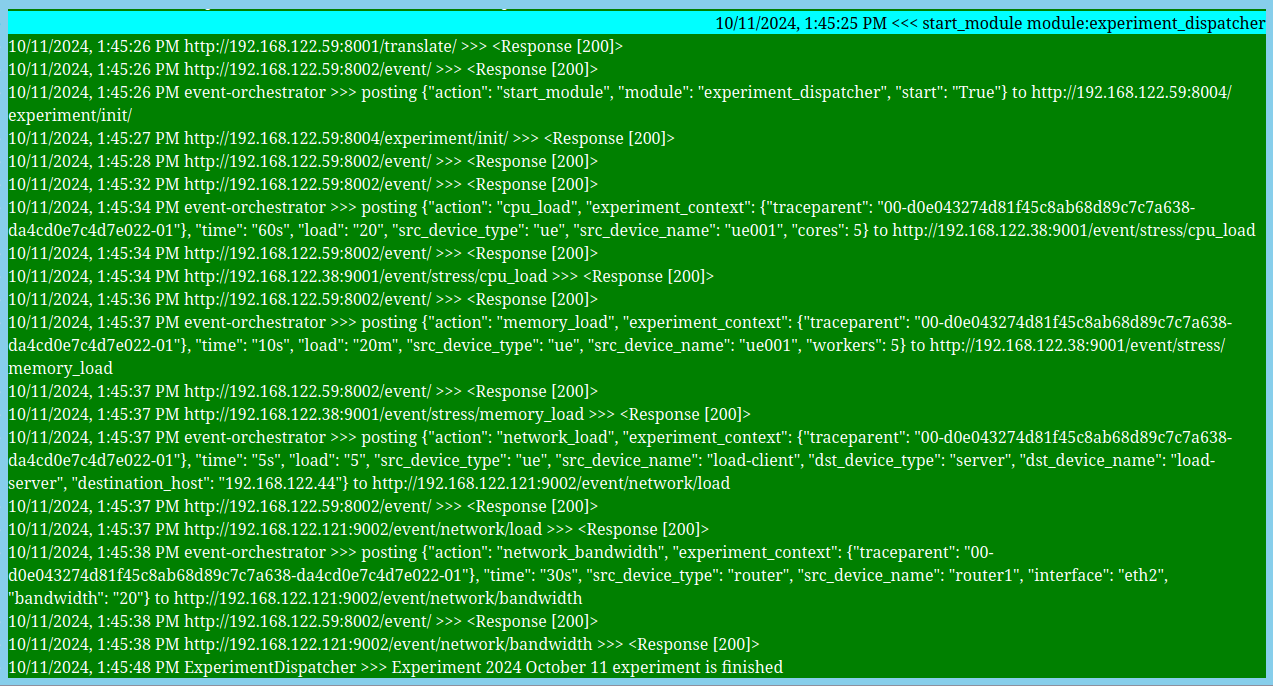
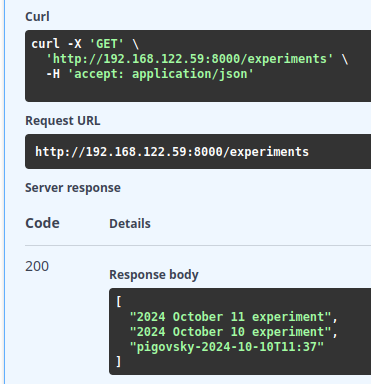
Now, using /experiments API on the Central component, you can see the experiment in the list of conducted experiments:
Using /experiments/{exp_name}/apps/{app_name} API we can get detailed information about spans that happened during every step of the experiment:
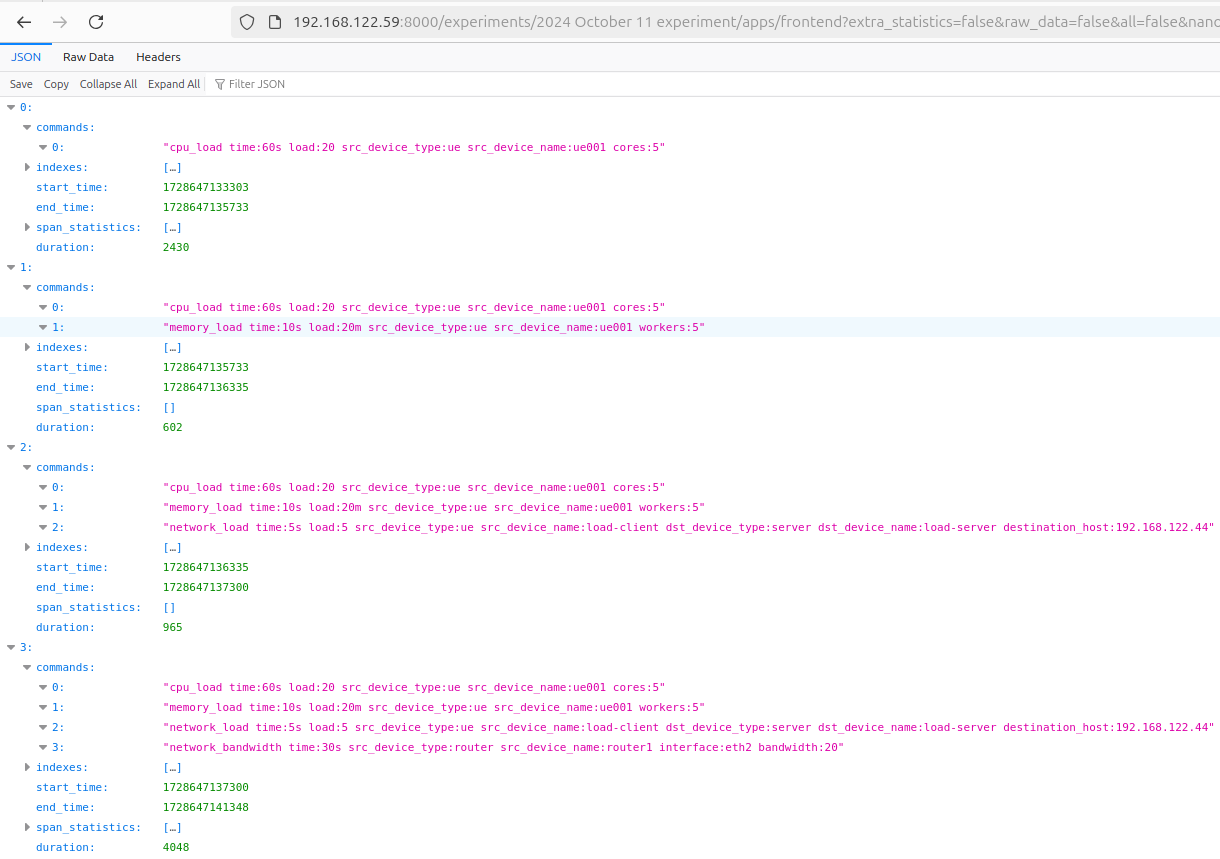
📝 *Note:
{exp_name}is the name you have just changed in theseqam-central/config/ExperimentConfig.jsonfile{app_name}is the service name of your instrumented application with OpenTelemety.
