Tutorial Render your first scene - SethKitchen/ThreeMojo GitHub Wiki
Tutorial: render your first scene
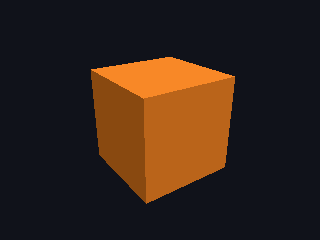
In this tutorial you write a program that renders one lit cube to a PNG file. It takes about ten minutes. At the end you know how a scene, a camera and a renderer fit together.
You need a working install. See How to install if make check-cpu does not pass yet.
The finished program is examples/first_scene.mojo in the repository.
1. Create the file
Create examples/first_scene.mojo with these imports:
from cameras.perspective_camera import PerspectiveCamera
from core.assets import Assets
from core.object3d import Object3D
from core.scene import Scene
from geometries.box import cube
from lights.light import ambient_light, directional_light
from materials.material import Material
from math.vector3 import Vector3
from objects.mesh import Mesh
from render.framebuffer import Color
from render.png import encode
from renderers.renderer import Renderer
from std.pathlib import Path
from units.si import Angle, DEGREE, Length, METER
Every import is a module of this repository. -I . on the command line makes them visible.
2. Make the assets
Add a main function. Put a cube geometry and an orange material into an Assets store:
def main() raises:
    var assets = Assets()
    var box = assets.geometries.add(cube(Length(1.0, METER)))
    var orange = assets.materials.add(Material(Color(255, 140, 40)))
The store returns an id for each item. A mesh names its geometry and material by id. Two meshes can share one geometry without a copy.
Lengths carry a unit. Length(1.0, METER) is one meter. cube(1.0) does not compile, because the compiler cannot tell meters from feet.
3. Build the scene
Add a node, turn it, and draw the cube at it:
    var scene = Scene()
    var block = Object3D()
    block.set_euler(Angle(25.0, DEGREE), Angle(35.0, DEGREE), Angle(0.0, DEGREE))
    var node = scene.add(block^)
    scene.add_mesh(Mesh(box, orange, node))
A node is a transform. A mesh is three ids: a geometry, a material and a node. The ^ moves the node into the scene.
4. Add lights
Without lights the cube renders black. Add a soft fill and one lamp:
    var lamp = Object3D()
    lamp.set_position(0.4, 0.8, 0.5)
    var lamp_node = scene.add(lamp^)
    scene.add_light(ambient_light(Color(255, 255, 255), 0.79))
    scene.add_light(directional_light(Color(255, 255, 255), lamp_node, 2.36))
    scene.update()
A directional light shines from its node towards the origin. scene.update() computes every world matrix. Call it after every change to a node.
5. Place the camera
    var camera = PerspectiveCamera(
        Angle(45.0, DEGREE), 4.0 / 3.0, Length(0.1, METER), Length(100.0, METER)
    )
    camera.place(Vector3(0, 0, 3), Vector3(0, 0, 0))
The arguments are the vertical field of view, the aspect ratio, and the near and far distances. place puts the camera three meters from the origin, looking at it.
6. Render and save
    var renderer = Renderer(320, 240)
    renderer.set_background(Color(16, 18, 26))
    var image = renderer.render(scene, assets, camera)
    Path("out/first_scene.png").write_bytes(encode(image))
    print("Wrote out/first_scene.png")
render returns a Framebuffer. encode turns it into PNG bytes.
7. Run it
mkdir -p out
.venv/bin/mojo run -I . examples/first_scene.mojo
Open out/first_scene.png. You see an orange cube, lit from the upper right, on a dark background.
What you learned
- Assets own geometry and materials. Meshes name them by id.
- A scene is a list of nodes. Meshes and lights name a node.
scene.update()must run before a render.- The renderer returns an image. An encoder writes the file.