Hull Light control - SergeGit/rc-tank-platform GitHub Wiki
Threading
- Arduino Threading
- Blinking in back
- Switch rear lights pin A7 with A2. Arduino Nano A0-A5 can be used as Digital I/O, A6-A7 only as AnalogInput reference
- Front lights (white leds)
- Back lights (red leds)
- Turret light (not controlled by hull controller)
Voltage drop of LEDs
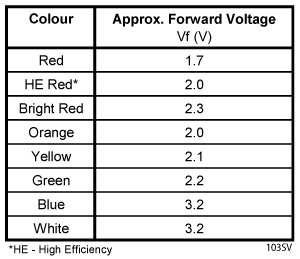
The red lights on the tank are 4 in total. These are connected via a red and yellow wire.
the red wire is connected to the LED anode (+) the yellow wire is connected to the LED cathode (-)
The voltage drop over the LEDS is 1.84 volts The driving voltage tested is 5V and a 330 Ohm resistor with good result. The current draw is (4.77V - 1.84V)/330Ohm = 8.9 mA.
TODO It should be checked if these LEDs operate in parallel or in series. The current draw is relatively low for 4 LED, suggesting these are in parallel. These would then operate on a fraction of the current draw.
- check if LEDs operate in parallel
The white lights on the tank are 2 in total. These are connected via a red and black wire.
the red wire is connected to the LED anode (+) the black wire is connected to the LED cathode (-)
The voltage drop over the white LEDS is 2.725 volts The driving voltage tested is 5V and a 330 Ohm resistor with mediocre result. The current draw is (4.77V - 2.72V)/330Ohm = 6.2 mA.
TODO
- check if LEDs operate in parallel
- decrease resistor for white LEDs to 220Ohm (--> 10mA)
- Front lights to use pin A2 (analog pin 2) on the Arduino Nano
- Rear lights to use pin A7 (analog pin 7) on the Arduino Nano
- Tank light to use ...
- Kept as digital outputs despite being on analog pins (the Arduino allows this)
// Light control pins - specific to Arduino Nano
#define FRONT_LIGHTS A2  // Analog pin A2 for front lights
#define REAR_LIGHTS A7   // Analog pin A7 for rear lights
#define TURRET_LIGHT 26  // Digital pin for turret light
Initialize the light pins
 // Initialize light control pins
  pinMode(FRONT_LIGHTS, OUTPUT);
  pinMode(REAR_LIGHTS, OUTPUT);
pinMode(TURRET_LIGHT, OUTPUT);Added three states for lights:
- LIGHT_OFF (0): Lights are turned off
- LIGHT_ON (1): Lights are turned on continuously
- LIGHT_BLINKING (2): Lights blink at a 2Hz rate (on for 0.5s, off for 0.5s)
// Light states
#define LIGHT_OFF 0
#define LIGHT_ON 1
#define LIGHT_BLINKING 2
Light control variables:
// Light control variables
byte frontLightState = LIGHT_OFF;
byte rearLightState = LIGHT_OFF;
unsigned long frontLightTimer = 0;
unsigned long rearLightTimer = 0;
bool frontLightBlinkState = false;
bool rearLightBlinkState = false;
const unsigned long BLINK_INTERVAL = 500; // 500ms blink rate (2Hz)- Implemented a non-blocking approach for blinking lights using timers
- Added an
updateLights()function called in the main loop to handle the blinking state changes - Each light has its own timer and state variable to operate independently
// Update the state of blinking lights
void updateLights() {
  unsigned long currentTime = millis();

  // Handle front lights blinking
  if (frontLightState == LIGHT_BLINKING && currentTime - frontLightTimer >= BLINK_INTERVAL) {
    frontLightTimer = currentTime;
    frontLightBlinkState = !frontLightBlinkState;
    digitalWrite(FRONT_LIGHTS, frontLightBlinkState ? HIGH : LOW);
  }

  // Handle rear lights blinking
  if (rearLightState == LIGHT_BLINKING && currentTime - rearLightTimer >= BLINK_INTERVAL) {
    rearLightTimer = currentTime;
    rearLightBlinkState = !rearLightBlinkState;
    digitalWrite(REAR_LIGHTS, rearLightBlinkState ? HIGH : LOW);
  }
}- Updated the light command handlers to support the three states
- When receiving a light command, it sets the appropriate state and initializes blinking if needed
Front lights:
void handleFrontLights(byte data) {
  // data: 0=off, 1=on, 2=blinking
  frontLightState = data;

  Serial.print("Front Lights: ");
  switch (frontLightState) {
    case LIGHT_OFF:
      digitalWrite(FRONT_LIGHTS, LOW);
      Serial.println("OFF");
      break;
    case LIGHT_ON:
      digitalWrite(FRONT_LIGHTS, HIGH);
      Serial.println("ON");
      break;
    case LIGHT_BLINKING:
      // Initial state for blinking
      frontLightTimer = millis();
      frontLightBlinkState = true;
      digitalWrite(FRONT_LIGHTS, HIGH);
      Serial.println("BLINKING");
      break;
    default:
      // Unknown state, default to OFF
      frontLightState = LIGHT_OFF;
      digitalWrite(FRONT_LIGHTS, LOW);
      Serial.println("OFF (default)");
      break;
  }
}
Rear lights:
void handleRearLights(byte data) {
  // data: 0=off, 1=on, 2=blinking
  rearLightState = data;

  Serial.print("Rear Lights: ");
  switch (rearLightState) {
    case LIGHT_OFF:
      digitalWrite(REAR_LIGHTS, LOW);
      Serial.println("OFF");
      break;
    case LIGHT_ON:
      digitalWrite(REAR_LIGHTS, HIGH);
      Serial.println("ON");
      break;
    case LIGHT_BLINKING:
      // Initial state for blinking
      rearLightTimer = millis();
      rearLightBlinkState = true;
      digitalWrite(REAR_LIGHTS, HIGH);
      Serial.println("BLINKING");
      break;
    default:
      // Unknown state, default to OFF
      rearLightState = LIGHT_OFF;
      digitalWrite(REAR_LIGHTS, LOW);
      Serial.println("OFF (default)");
      break;
  }
}
Turret Light:
void handleTurretLight(byte data) {
  // data: 0=off, 1=on
  digitalWrite(TURRET_LIGHT, data ? HIGH : LOW);
  Serial.print("Turret Light: ");
  Serial.println(data ? "ON" : "OFF");
}- Added light states to the response data for
GET_ALL_SENSORScommand - Updated the status byte to include bits for front and rear light status
From the Raspberry Pi side, you can now send these commands to control the lights:
# For front lights
i2c.send_command(Command.FRONT_LIGHTS, 0)  # Turn off
i2c.send_command(Command.FRONT_LIGHTS, 1)  # Turn on
i2c.send_command(Command.FRONT_LIGHTS, 2)  # Start blinking

# For rear lights
i2c.send_command(Command.REAR_LIGHTS, 0)  # Turn off
i2c.send_command(Command.REAR_LIGHTS, 1)  # Turn on
i2c.send_command(Command.REAR_LIGHTS, 2)  # Start blinking
#SORT The following states are defined for light control:
- OFF
- ON
- BLINKING
- (SOS)
These can correspond with the following scenarios:
- Blink during initialization no faults
- Blink SOS if fault (Main battery low / other fault)
Light_control.ino
/*******************************************************************************
   THIS SOFTWARE IS PROVIDED IN AN "AS IS" CONDITION. NO WARRANTY AND SUPPORT
   IS APPLICABLE TO THIS SOFTWARE IN ANY FORM. CYTRON TECHNOLOGIES SHALL NOT,
   IN ANY CIRCUMSTANCES, BE LIABLE FOR SPECIAL, INCIDENTAL OR CONSEQUENTIAL
   DAMAGES, FOR ANY REASON WHATSOEVER.
 ********************************************************************************
   DESCRIPTION:
   The code controls the front and the rear lights in the hull of the tank. The front lights are
   white LEDs, and the rear lights are red LEDs. The LEDs are separately controlled by
   two Arduino digital outputs (A2, A7) switching on the CTRL supply (+5V) via the ULN2001AN to the
   LEDs. The different states for the lights are: OFF, ON, BLINK. The OFF and ON can be done separately
   for the front- and rear lights. The blinking function has the front and rear lights operating simultaneously.
   The blinking should not interrupt the rest of the loop and is taken into a threading function.

   CONNECTIONS (Arduino nano v3 - Atmega328P, old bootloader):

   Arduino A2   - Front lights (white)
   Arduino A7   - Rear lights (red)
 *******************************************************************************/

#include <Arduino.h>
#include <Thread.h>

// Define pins
const int frontLightPin = A2;     // Front LEDs connected on A2
const int rearLightPin = A7;      // Rear LEDs connected on A7

// Parameters
Thread blinkThread;               // Create a thread for blinking
//bool blinkCmd = false;            // Variable to control blinking

// Define states for the Light FSM
enum LightState {
  ON,
  OFF,
  BLINKING
};

void setup_Light_ctrl() {
  // Initialization of Light_ctrl

  // pinout light control
  pinMode(frontLightPin, OUTPUT);   // Set the LED pin as an output
  pinMode(rearLightPin, OUTPUT);    // Set the LED pin as an output

  // Set initial state for the lights
  LightState currentState = OFF; // Initial state is OFF

  // Start blink/light thread
  blinkThread.start(light_ctrl); // Start the thread for light control
}


// Function to control the lights based on states
void light_ctrl() {
  while (true) {
    switch (currentState) {
      case ON:
        digitalWrite(frontLightPin, HIGH);   // Turn on Front lights
        digitalWrite(rearLightPin, HIGH);    // Turn on Rear lights
        break;

      case OFF:
        digitalWrite(frontLightPin, LOW);   // Turn on Front lights
        digitalWrite(rearLightPin, LOW);    // Turn on Rear lights
        break;

      case BLINKING:
        digitalWrite(frontLightPin, HIGH);   // Turn on Front lights
        digitalWrite(rearLightPin, HIGH);    // Turn on Rear lights
        delay(500); // Wait for 0.5 seconds
        digitalWrite(frontLightPin, LOW);   // Turn on Front lights
        digitalWrite(rearLightPin, LOW);    // Turn on Rear lights
        delay(500); // Wait for 0.5 seconds
        break;
    }
  }
}Test_main.ino
/*******************************************************************************
   THIS SOFTWARE IS PROVIDED IN AN "AS IS" CONDITION. NO WARRANTY AND SUPPORT
   IS APPLICABLE TO THIS SOFTWARE IN ANY FORM. CYTRON TECHNOLOGIES SHALL NOT,
   IN ANY CIRCUMSTANCES, BE LIABLE FOR SPECIAL, INCIDENTAL OR CONSEQUENTIAL
   DAMAGES, FOR ANY REASON WHATSOEVER.
 ********************************************************************************
   DESCRIPTION:
   This is the test code for testing the light control function.
   The function shows how to set up light control and use the functions for
   turning separately the front and rear lights On/OFF. And the blinking function.


   CONNECTIONS (Arduino nano v3 - Atmega328P, old bootloader):
 *******************************************************************************/

// Keyboard WASD movement for track control
#define LIGHTS_ON '1'
#define LIGHTS_BLINK '2'
#define LIGHTS_OFF '0'

// Initialisation
void setup() {
  Serial.begin(9600);

  setup_Light_ctrl();             // Setting up light control
}

void loop() {
  char byte = 0;
  // press q to cancel and exit
  while (byte != 'z') {
    Serial.readBytes(&byte, 1);

    // LIGHT CONTROL VIA KEYBOARD CONTROL
    // -----------------------------------
    // press 1 for Lights On
    if (byte == LIGHTS_ON) {
      //Set Light On
      Serial.print("Front & rear - Light On \n");
      currentState = ON;
    }

    // press 2 for Lights Blinking
    if (byte == LIGHTS_BLINK) {
      //Set Light Blinking
      Serial.print("Front & rear - Light Blinking \n");
      currentState = BLINKING;
    }

    // press 0 Lights Off
    if (byte == LIGHTS_OFF) {
      //Set Light Off
      Serial.print("Front & rear - Light Off \n");
      currentState = OFF;
    }

  }
  Serial.print("Done \n");
  Serial.end();
}
#include <Arduino.h>
#include <Thread.h>
const int ledPin = 13; // Define the LED pin
Thread blinkThread; // Create a thread for blinking
bool blinkCmd = false; // Variable to control blinking
void blink() {
while (true) {
if (blinkCmd) {
digitalWrite(ledPin, HIGH); // Turn on the LED
delay(500); // Wait for 0.5 seconds
digitalWrite(ledPin, LOW); // Turn off the LED
delay(500); // Wait for 0.5 seconds
}
}
}
void setup() {
pinMode(ledPin, OUTPUT); // Set the LED pin as an output
blinkThread.start(blink); // Start the blink thread
}
void loop() {
// Your code here
// Set blinkCmd to true or false based on your conditions
// For example, to enable blinking:
blinkCmd = true;
// To disable blinking:
// blinkCmd = false;
// Other code that does not affect blinking
}Threading example working
#include <Thread.h>
#include <ThreadController.h>

// ThreadController that will controll all threads
ThreadController controll = ThreadController();

//My Thread (as a pointer)
Thread* myThread = new Thread();
//His Thread (not pointer)
Thread hisThread = Thread();

// callback for myThread
void niceCallback(){
	Serial.print("COOL! I'm running on: ");
	Serial.println(millis());
}

// callback for hisThread
void boringCallback(){
	Serial.println("BORING...");
}

void setup(){
	Serial.begin(9600);

	// Configure myThread
	myThread->onRun(niceCallback);
	myThread->setInterval(500);

	// Configure myThread
	hisThread.onRun(boringCallback);
	hisThread.setInterval(250);

	// Adds both threads to the controller
	controll.add(myThread);
	controll.add(&hisThread); // & to pass the pointer to it
}

void loop(){
	// run ThreadController
	// this will check every thread inside ThreadController,
	// if it should run. If yes, he will run it;
	controll.run();

	// Rest of code
	float h = 3.1415;
	h/=2;
}