LCD160CRv1.1 - SamsungResearchUK-IoT-Meetup/multimode_sensor_platform GitHub Wiki
The LCD160CR skin
This tutorial shows how to get started using the LCD160CR skin.
For detailed documentation of the driver for the display see the lcd160cr
Plugging in the display on top of a pyboard
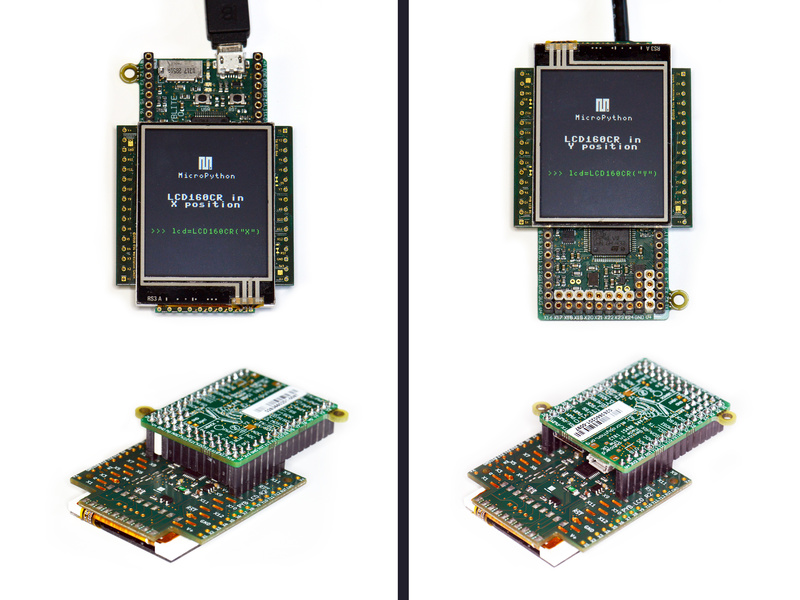
The display can be plugged directly into a pyboard (all pyboard versions
are supported). You plug the display onto the top of the pyboard either
in the X or Y positions. The display should cover half of the pyboard.
See the picture above for how to achieve this; the left half of the picture
shows the X position, and the right half shows the Y position.
Getting the driver
You can control the display directly using a power/enable pin and an I2C bus, but it is much more convenient to use the driver provided by the lcd160cr module. This driver is included in recent version of the pyboard firmware (see here. You can also find the driver in the GitHub repository here and to use this version you will need to copy the file to your board, into a directory that is searched by import (usually the lib/ directory).
Once you have the driver installed you need to import it to use it
import lcd160cr
Testing the display
There is a test program which you can use to test the features of the display, and which also serves as a basis to start creating your own code that uses the LCD. This test program is included in recent versions of the pyboard firmware and is also available on GitHub here.
To run the test from the MicroPython prompt do
import lcd160cr_test
It will then print some brief instructions. You will need to know which
position your display is connected to (X or Y) and then you can run (assuming
you have the display on position X)
lcd160cr_test.test_all('X')
Drawing some graphics
You must first create an LCD160CR object which will control the display. Do this using
    import lcd160cr
    lcd = lcd160cr.LCD160CR('X')
This assumes your display is connected in the X position. If it's in the Y
position then use lcd = lcd160cr.LCD160CR('Y') instead.
To erase the screen and draw a line, try
    lcd.set_pen(lcd.rgb(255, 0, 0), lcd.rgb(64, 64, 128))
    lcd.erase()
    lcd.line(10, 10, 50, 80)
Task: How would you change the colour of the line? How you place the line at another place?
The next example draws random rectangles on the screen. You can copy-and-paste it into the MicroPython prompt by first pressing "Ctrl-E" at the prompt, then "Ctrl-D" once you have pasted the text.
    from random import randint
    for i in range(1000):
        fg = lcd.rgb(randint(128, 255), randint(128, 255), randint(128, 255))
        bg = lcd.rgb(randint(0, 128), randint(0, 128), randint(0, 128))
        lcd.set_pen(fg, bg)
        lcd.rect(randint(0, lcd.w), randint(0, lcd.h), randint(10, 40), randint(10, 40))
Task: How would you draw two rectangles on the screen? Try to give them different colours.
Using the touch sensor
The display includes a resistive touch sensor that can report the position (in pixels) of a single force-based touch on the screen. To see if there is a touch on the screen use
lcd.is_touched()
This will return either False or True. Run the above command while touching
the screen to see the result.
To get the location of the touch you can use the method
lcd.get_touch()
This will return a 3-tuple, with the first entry being 0 or 1 depending on whether there is currently anything touching the screen (1 if there is), and the second and third entries in the tuple being the x and y coordinates of the current (or most recent) touch.
Playing around with setup commands
Let's see how easy it is to write something on the screen
    import lcd160cr

    lcd = lcd160cr.LCD160CR('X')
    lcd.set_orient(lcd160cr.PORTRAIT)
    lcd.set_pos(0, 0)
    lcd.set_text_color(lcd.rgb(255, 0, 0), lcd.rgb(0, 0, 0))
    lcd.set_font(1)
    lcd.write('Hello PyConDE Berlin!')
    print('touch:', lcd.get_touch())
Task: How would you change the orientation of the Display? How can you change the font size and font colour?
Directing the MicroPython output to the display
The display supports input from a UART and implements basic VT100 commands, which means it can be used as a simple, general purpose terminal. Let's set up the pyboard to redirect its output to the display.
First you need to create a UART object
    import pyb
    uart = pyb.UART('XA', 115200)
This assumes your display is connected to position X. If it's on position Y then
use uart = pyb.UART('YA', 115200) instead.
Now, connect the REPL output to this UART
pyb.repl_uart(uart)
From now on anything you type at the MicroPython prompt, and any output you receive, will appear on the display.
No set-up commands are required for this mode to work and you can use the display
to monitor the output of any UART, not just from the pyboard. All that is needed
is for the display to have power, ground and the power/enable pin driven high.
Then any characters on the display's UART input will be printed to the screen.
You can adjust the UART baudrate from the default of 115200 using the
set_uart_baudrate method.