Service Match Setup Documentation - Salesforce-org-Impact-Labs/01HousingandHomelessness GitHub Wiki
The following Wiki page will walk new Service Match users through important steps to configure and customize their Service Match. It will also review data that needs to exist in order to see results in Service Match.
Configuration
UI Setup
To use the custom Lightning component, activate myDomain in your Salesforce org. For more information, see Set Up My Domain.
The ReferralRecommendations page contains the Lightning component. Or you can add the component to a Contact page that you use in other apps.
- In Lightning App Builder, open your contact page. Drag the custom component to the page.
- Drag a flow component to the page and set it to the Client Profile Builder flow, and then use the checkbox to pass in the contactID as the recordId for the flow.
- Add the Birthdate field to the Contact Page Layout if you haven’t already.
Message Setup
Configuring an Email Service for the Client Recommendations Inbound Email Handler
Create the Email Service
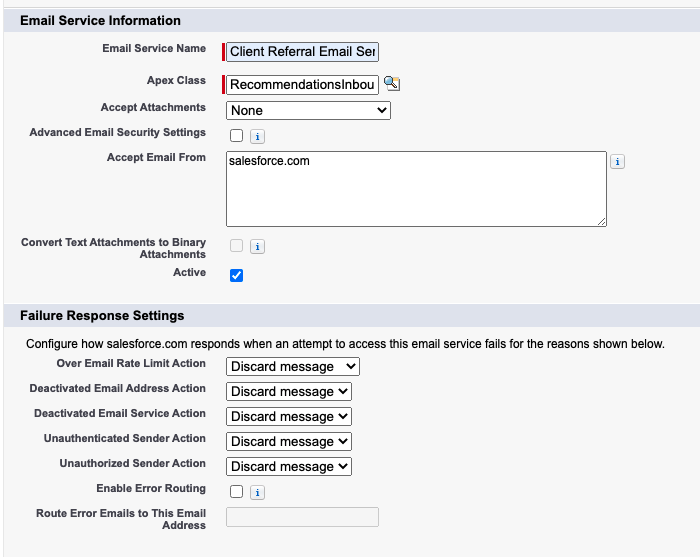
From Setup, enter Email Services in the Quick Find box. Select Email Services and select New Email Service.
- Enter a name in the Email Service Name field. The example uses Client Referral Email Service.
- In the Apex Class field, type RecommendationsInboundEmailHandler.
- Check the Activate box.
- Select Save and New Email Address.
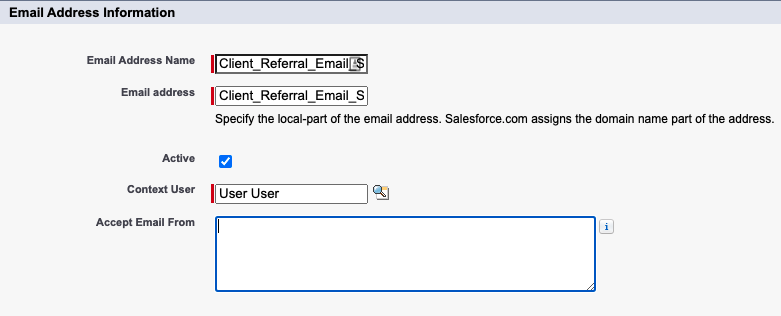
Create a New Email Address
- In Email Address Name and Email Address you can enter the name of your choice.
- Check the Active box to activate the email address.
- In the Context User field, select a user that has System Administrator privileges. This user will be the owner of any record created by the inbound email handler. Note: Create a special context user so that it doesn’t become inactive.
- Select Save.
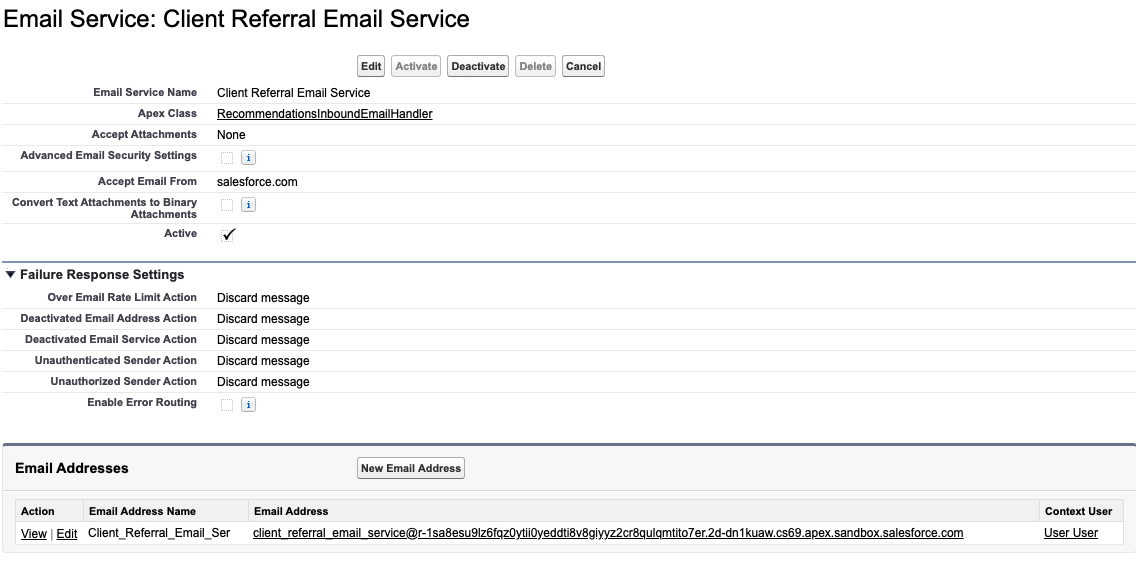
- In the Email Addresses section, copy the email address you just created. It will be a very long email address that begins with the Email Service Name you used. You'll be using this email address in the next section so you will want to paste it somewhere so you can easily access it.
Create Your Organization-Wide Email Address
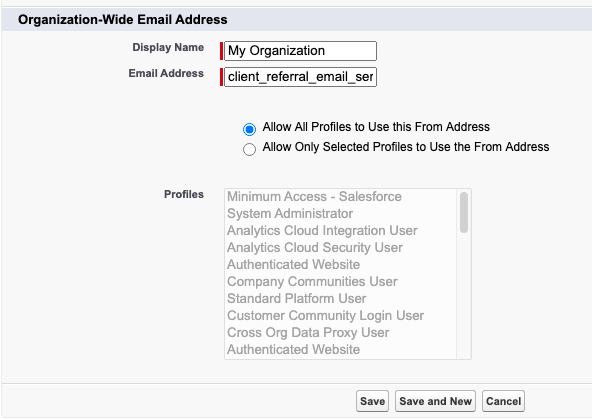
After you create the Email Address, make it an Organization-Wide Email so that you can use this email address as the Reply-To email in messages to your clients. Match the name to your organization.
- From Setup, enter Organization-Wide Addresses in the Quick Find box. In the Organization-Wide Email Addresses section, select Add.
- Enter a Display Name to appear as the Sender for system-sent emails. This is what will appear when someone receives an email from you so you may want to include something specific to your organization.
- In the Email Address field, paste the email address you copied from the last step.
- Select the profiles that you want to use this address. Make sure to include the Context User profile.
- Select Save.
Confirm the Organization-Wide Email Address
To activate the Organization-Wide email, first validate the email address.

When the Email Service handler code receives a request to validate the email address, it creates a Task. This Task is assigned to the Context User that you specified when you created the Email Address.
- Log in as the Context User and navigate to the Home tab, where you can view the Tasks assigned to this user.
- For Lightning users, ensure that the Task List is set to show My Tasks.
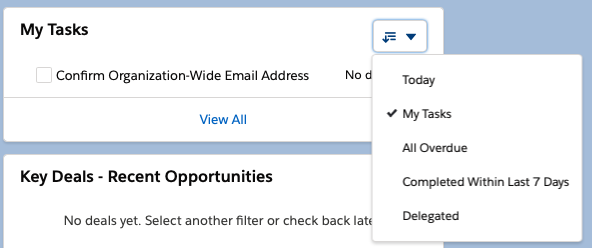
- To open the special Task, click Confirm Organization-Wide Email Address.

- The task Comments contain the text of the verification email and a link to confirm the Organization-Wide Email Address. Click the link or copy and paste it into a browser to confirm the address.

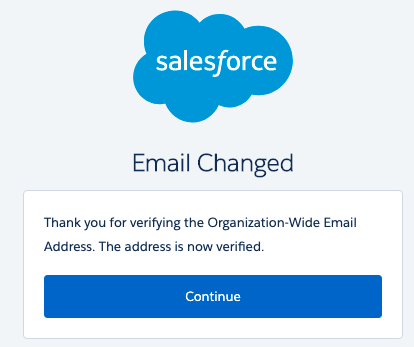
After you click the link or enter it into a browser, you see a message that the email is verified.
Configure the Email in the Custom Metadata Type Record
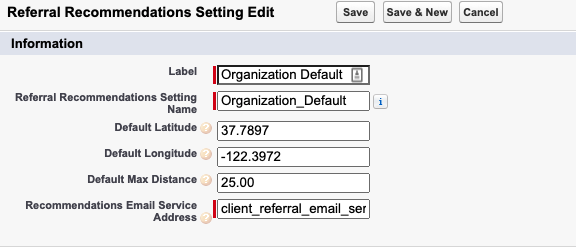
From Setup, enter Custom Metadata Types in the Quick Find box. Click the Manage Records link for the Referral Recommendations.

- Edit the Organization Default record, then enter the email service’s email address into the Recommendations Email Service Address field.
- Select Save.
Schedule Batch Jobs
To send referrals and referral follow up messages to clients, schedule two batch jobs.
- Batch_SendInitialClientReferrals
- Batch_SendReferralFollowupReminders
To schedule the batch classes to execute at least once daily, see Salesforce Help,Schedule Apex Jobs.
Suggested names for the jobs are:
- Initial Referral
- Referral Followup
You can schedule batch classes or you can run them at any time using the Execute Anonymous function in Salesforce. See Salesforce Help for more information: Executing Anonymous Apex Code
To execute the initial referral batch job, execute the following code snippet: refrec.Batch_SendInitialClientReferrals batchable = new refrec.Batch_SendInitialClientReferrals(); Database.executeBatch(batchable);
To execute the referral followup batch job, execute the following code snippet: refrec.Batch_SendReferralFollowupReminders batchable = new refrec.Batch_SendReferralFollowupReminders(); Database.executeBatch(batchable);
Data Setup
You will need Referral Programs in order to see results in Service Match. To import provider and service records, you can use an aggregator account with a supported aggregator or you can create records manually.
Custom Metadata
From Setup, search for Custom Metadata Types in the Quick Find box.
- Select Manage Records on Referral Recommendations Setting.
- Edit the Organizational Defaults and set your default latitude/longitude , your maximum distance, and email address.
To use a tool to find coordinates for your default address, see: Latitude and Longitude Finder on Map Get Coordinates.
Account
Create one or more accounts to represent providers.
Services
From the Referral Programs(refrec__Service__c object) tab, add one or more Services that the Provider provides and fill out all the information.
- Select New to create a new Referral Program.
- Enter the service name in the Name field. If this program is related to a specific provider, you can add that in the Provider field.
- Select the program type in the Type dropdown.
- In the All Types area, move over the type or types to the chosen section.
- Under the Location section, add the Latitude and Longitude for the program. To use a tool to find the coordinates for your program location, see: Latitude and Longitude Finder on Map Get Coordinates.
- Under the Housing and Employment sections, check off any areas that are relevant for that particular program.
- Select Save
- If the program has specific operating hours, you can add those on the Related tab once the program has been created and saved
Contact
Create a contact to represent someone you want to create a referral for. Their geolocation (uses the Other Address field by default) and age needs to match the service to be able to see it.