GPS Setup_Swiftnav Piksi Multi - SJSU-AD/FusionAD GitHub Wiki
About
This guide details hardware and software setup instructions for the Swiftnav Piksi Multi GNSS Module
Base Station GPS
Prerequisite
Make sure you install the Swiftnav console software on base station laptop. The software corresponding to your laptop's operating system can be found here. Wiring diagrams as well as in depth instructions regarding GPS antenna and base station setup can be found here.
Steps
-
Set up the antenna tripod and connect the antenna cable to the GPS
-
Plug in the base station to the base station laptop, and the 12V power to the base station (There should be a small pigtail with the plug attached to one of the 12V batteries in the blue cart)
-
Run the console software (run in root directory of downloaded files:
./console)- It should have a small prompt for which USB port to connect to the GPS (usually there's just one option), baud rate, and flow control
-
Set the USB port, baud rate set to 115200, flow control = None, and click OK
-
The main screen will pop up, and start showing the satellite signals
-
Wait for around 2 minutes for the base station and hotspot to gather enough satellite data
-
Navigate to the settings tab
-
Under the survey position section, click on the broadcast option
-
Click on the AUTO SURVEY on the right side of the window, you should see the surveyed position change upon the auto survey action
-
Click save to device
-
Check the command log at the bottom of the windows, make sure no error to saving to device
-
Once all those checks out, you can close the console, and unplug your laptop
-
Leave the base station running as is, don't touch the tripod antenna.
ROVER GPS
Steps
- Install the SBP drivers required for the ETHZ-Swiftnav ROS Driver:
- Navigate to the directory
FusionAD/src/utility/ethz_piksi_ros/piksi_multi_rtk_ros/ - Run the following command:
source install/install_piksi_multi.sh
- Navigate to the directory
- Connect to the Rover GPS through the ETHERNET cable
- Configure your network setting
- Go to your computer search bar by pressing the SUPER key (Windows Key), type in "Network Connections" and press ENTER key
- You should see this window pop up:
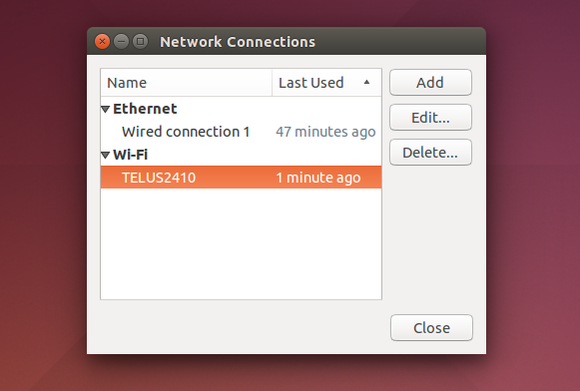
- Click "Add" and Select "Ethernet" as your type and press "Create"
- Change the Connection name to "SwiftNav" (Or to your preference)
- Navigate to the "IPv4 Settings" tab
- Change the Method to "Manual"
- Click the "Add" button under the "Address" section to add a new connection
- Input the following information for each field:
- Address:
192.168.0.50(This points your computer to an address on the same subnet as the GPS) - Netmask:
255.255.255.0 - Gateway:
192.168.0.1 - Click "Save" after all the info are filled

- Address:
- Checking Ethernet connection:
- Ping the GPS first:
- Run
ping 192.168.0.222(GPS' Address), you should be able to see the GPS responded to the ping. See image below:

- Run
- Ping your own address:
- Run
ping 192.168.0.50(Your Address), you should be able to see your address responded to the ping. See image below:

- Run
- Ping the GPS first:
- Source the FusionAD Workspace by performing
source devel/setup.bashat the root directory of the workspace - Run
roslaunch piksi_multi_rtk_ros piksi_multi_rover.launchto launch the ROVER ROS software
Check if ROVER GPS is working through Ethernet
- Look for any error on the Terminal window which the Roslaunch command was run.
- Successful launch of the ROS driver should have shown the following message on your terminal window upon launch:

- Open another Terminal pane or window and run
rostopic echo /piksi/navsatfix_best_fix- This command should display the ROS message output of the GPS in LAT/LONG/ALT.
If you don't see anything being published, that means communication was not established or there is an error.
- This command should display the ROS message output of the GPS in LAT/LONG/ALT.
OPTIONAL: Connect to ROVER GPS Through SwiftNav Piksi Console
- Make sure you are not connected to the ROVER through ROS' Driver first!
- You can also connect to the GPS through Swiftnav's Piksi Console, run the piksi console and select "TCP/IP" as your mean of communication.
- IP ADDRESS:
192.168.0.222(Default Setting) - IP Port:
55555(Default Setting)

- IP ADDRESS:
OPTIONAL: ENU Conversion Setup
The ETHZ driver comes built in with ENU conversion ability. You may set an ENU origin through an internal configuration YAML file.
- Go to
/ethz_piksi_ros/piksi_multi_rtk_ros/cfg/enu_origin_example.yamland enter your LAT/LONG/ALT origin. - Go to
/ethz_piksi_ros/piksi_multi_rtk_ros/launch/piksi_multi_rover.launchand set the argumentload_enu_origin_from_fileto betrue.- See:

- See:
Appendix: ROVER GPS Ethernet Spec
- The Rover GPS is set to its default ethernet setting:
- Address:192.168.0.222
- Netmask:255.255.255.0
- Gateway:192.168.0.1