Deploy MERN Stack to Heroku - SEIR-59/course-wiki GitHub Wiki

At this point, you have built a fullstack MERN application with a React frontend and a Node + Express + MongoDB backend. You can run your client application (frontend) and your Express API application (backend) locally on two different ports, and your client can make requests to the API. Now you want anyone on the internet to be able to access the client and API applications. You are ready to deploy to Heroku.
There are admittedly a lot of ways to deploy a MERN application to Heroku. This tutorial will cover the two simplest and most common methods:
Important: Don't get these mixed up! These two methods are very different from one another. You will only want to follow the instructions for one of the two.
No matter which deployment option you are using, you will need to set up Heroku Command Line Interface
If you have not already done this, download and install the Heroku CLI
After you install the CLI, run the heroku login command. You’ll be prompted to enter any key to go to your web browser to complete login. The CLI will then log you in automatically.
heroku login
heroku: Press any key to open up the browser to login or q to exit
 ›   Warning: If browser does not open, visit
 ›   https://cli-auth.heroku.com/auth/browser/***
heroku: Waiting for login...
Logging in... done
Logged in as [email protected]
If you’d prefer to stay in the CLI to enter your credentials, you may run heroku login -i
heroku login -i
heroku: Enter your login credentials
Email: [email protected]
Password: ***************
Two-factor code: ********
Logged in as [email protected]
The CLI saves your email address and an API token to ~/.netrc for future use. For more information, see Heroku CLI Authentication.
Before you deploy your application, you will need to make sure your file structure and git repositories are set up correctly. Your React client and Express API will be deployed as a single application. As a result, these apps will need to live a single git repository. If they were previously set up as two separate repos, you will need to migrate the files to match the structure shown below:
project <--- git repo
│
├── .git
│
├── api
│   ├── .env
│   ├── .gitignore
│   ├── app.js
│   ├── controllers
│   ├── models
│   ├── node_modules
│   ├── package-lock.json
│   ├── package.json
│   └── README.md
│
├── client
│   ├── .gitignore
│   ├── node_modules
│   ├── public
│   ├── src
│   ├── package-lock.json
│   ├── package.json
│   └── README.md
│
└── README.md
Remember: a git repository cannot exist inside another git repository.
To initialize a directory as a git repository, usegit init.
To make a git repository into a normal directory, simply delete.git(this is irreversible!)
In the route of your repository, run touch server.js. This is the file that will run when Heroku deploys your application.
-
cdinto the root of your repository - Run
npm init -y
This will add a
package.jsonto the root of your repository.
In order for the Heroku server to serve your client application, we need to create a build of the client. Building your React app bundles the app into static files for production.
-
cdinto your./clientdirectory - Run
npm run buildoryarn build - Move the
buildfolder from./clientto the root usingmv build ..
After all that, your file structure should look like this:
project
│
├── .git
│
├── api
│   ├── .gitignore
│   ├── .env
│   ├── app.js
│   ├── controllers
│   ├── models
│   ├── node_modules
│   ├── package-lock.json
│   ├── package.json
│   └── README.md
│
├── build
│   ├── static
│   ├── asset-manifest.json
│   ├── index.html
│   ├── manifest.json
│   └── robots.txt
│
├── client
│   ├── .gitignore
│   ├── node_modules
│   ├── public
│   ├── src
│   ├── package-lock.json
│   ├── package.json
│   └── README.md
│
├── package.json
│
├── README.md
│
└── server.js
Your repository's package.json needs to contain all the dependencies that are in your ./api/package.json.
- Open your
./api/package.jsonand copy the"dependencies"object - Paste that object into your repository's
package.json
The dependencies object looks something like this:
Do not just copy and paste this snippet!
  "dependencies": {
    "cors": "^2.8.5",
    "dotenv": "^8.2.0",
    "express": "^4.17.1",
    "mongoose": "^5.11.8"
}In the root package.json, add an "engines" object that contains the key "node" with a value of your current version of node. You can find your current version of node by running node -v.
After all that, your root package.json should look something like this:
Do not just copy and paste this snippet!
{
  "engines": {
    "node": "14.8.0"
  },
  "name": "mern-full-stack",
  "version": "1.0.0",
  "description": "<img src=\"https://i.imgur.com/ser5chI.png\">",
  "main": "server.js",
  "scripts": {
    "test": "echo \"Error: no test specified\" && exit 1",
    "start": "node server.js"
  },
  "repository": {
    "type": "git",
    "url": "git+https://github.com/fullstacklegend/mern-full-stack.git"
  },
  "dependencies": {
    "cors": "^2.8.5",
    "dotenv": "^8.2.0",
    "express": "^4.17.1",
    "mongoose": "^5.11.8"
  },
  "keywords": [],
  "author": "",
  "license": "ISC"
}The first thing we need to do is export the app you created in your ./api/app.js. To do this, open ./api/app.js and add the following line to the bottom of the file:
module.exports = app;Next, you need to import app from ./api/app.js and express into ./server.js.
./server.js should look like this:
const express = require('express');
const app = require('./api/app');At the bottom of ./server.js, add the line app.use(express.static('build'))
./server.js should look like this:
const express = require('express');
const app = require('./api/app');
app.use(express.static('build'));
When your server starts, it will
- Import express,
- Spin up your API application, and
- Serve the client application (in that order!)
Now your client application and API application share a URL. If you are using React Router (or a similar library), you need to make sure your client routes do not conflict with your API routes. You can do this by prefixing all API routes with /api.
Do this by prefixing your controllers:
app.use('/api/resource', resourceController)Or if you do not have controllers, you may do this by prefixing each individual route in ./api/app.js:
app.get('/api/resource', (req, res) => {
  ...
})
Additionally, we can tell our app to serve the static build files whenever the URL does not match one of the API routes by add the following line to the bottom of ./server.js:
app.get('*', (req, res)=> {
  res.sendFile(path.resolve(`${__dirname}/build/index.html`));
});In your client application, you will now need to replace the URL of all of your fetch/axios/etc calls with the live API's URL. This will look something like changing axios(http://localhost:XXXX/resource) to axios(https://project.herokuapp.com/api/resource).
-
cdinto the root of your repository - Run
heroku create [name of application](or if you have an existing heroku app, runheroku git:remote -a [name of application]) - Commit your code to the repository and deploy it to Heroku using Git.
$ git add .
$ git commit -m "make it better"
$ git push heroku main
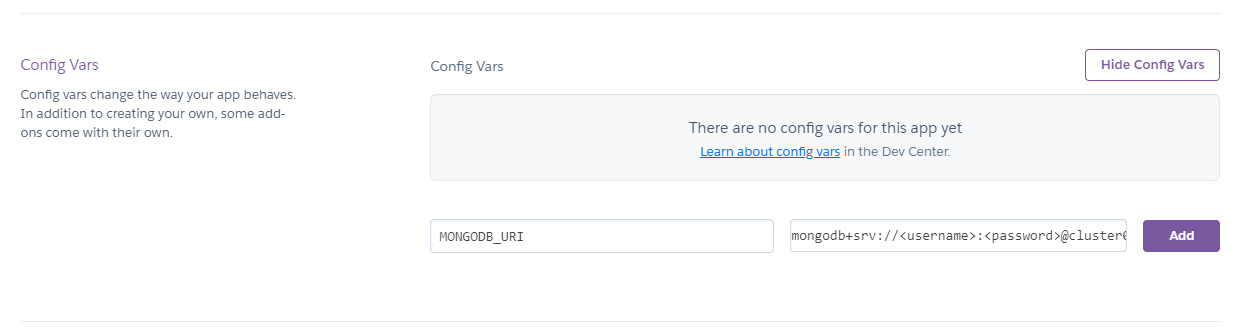
Now, go to your application's settings page on Heroku, and set the MONGODB_URI in the Config Vars. The exact name and value should correspond to the variable you defined in .env.
When you make changes to the client application and want to deploy, you will need to create a new ./build folder following these steps:
-
cdin the client directory - Run
npm run buildoryarn build - Delete the old build folder using
rm -rf ../build - Move the new build folder from the client directory to the root using
mv build ..
Or you can rewrite your build script in ./client/package.json to do that all for you like this:
{
  ..
  "scripts": {
    ...
    "build": "react-scripts build && rm -rf ../build && mv build .."
    ...
  }
  ..
}Every time you want to redeploy your application to Heroku, all you need to do is stage, commit, and push your changes again:
$ git add .
$ git commit -m "make it better"
$ git push heroku main
Before you deploy your application, you will need to make sure your file structure and git repositories are set up correctly. Your React client application will be deployed separately from your Express API application. As a result, these apps will need to live in two separate repositories. If your client and API currently exist in the same repository, you will need to make a new repository and migrate the appropriate files.
I recommend storing those repositories on your local machine inside a parent directory as shown below:
project
│
├── project_api <--- git repo
│   ├── .env
│   ├── .git
│   ├── .gitlog
│   ├── controllers
│   ├── models
│   ├── package-lock.json
│   ├── package.json
│   ├── README.md
│   └── app.js
│
└── project_client <--- git repo
    ├── .git
    ├── .gitignore
    ├── public
    ├── src
    ├── package-lock.json
    ├── package.json
    └── README.md
Remember: a git repository cannot exist inside another git repository.
To initialize a directory as a git repository, usegit init.
To make a git repository into a normal directory, simply delete.git(this is irreversible!)
In the process of making the above file structure, you should think about hosting your repositories on GitHub.
-
cdintoproject/project_api - Run
heroku create [name of API application](or if you have an existing heroku app, runheroku git:remote -a [name of API application]) - Commit your code to the repository and deploy it to Heroku using Git.
$ git add .
$ git commit -m "make it better"
$ git push heroku main
Now, go to your application's settings page on Heroku, and set the MONGODB_URI in the Config Vars. The exact name and value should correspond to the variable you defined in .env.
In your client application, you will now need to replace the URL of all of your fetch/axios/etc calls with the live API's URL. This will look something like changing axios(http://localhost:XXXX/resource) to axios(https://project_api.herokuapp.com/resource).
-
cdintoproject/project_client - Run
heroku create [name of client application](or if you have an existing heroku app, runheroku git:remote -a [name of client application]) - Commit your code to the repository and deploy it to Heroku using Git.
$ git add .
$ git commit -m "make it better"
$ git push heroku main
When you make changes to the client or API applications, you will need to use git push heroku main to have your changes deployed to Heroku.