Nano V3 Ethernet Shield W5500 — Overview - RobotDynOfficial/Documentation GitHub Wiki
Nano V3 Ethernet Shield W5500 with PoE - Overview

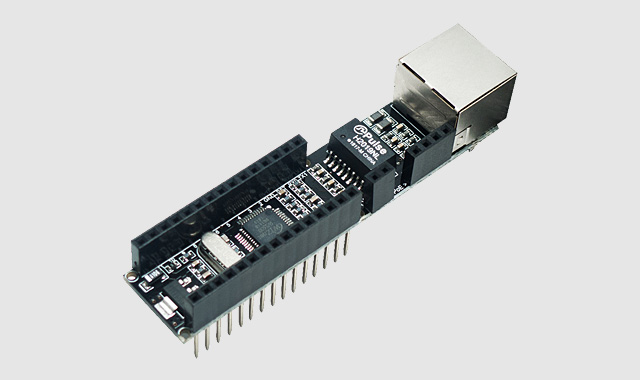
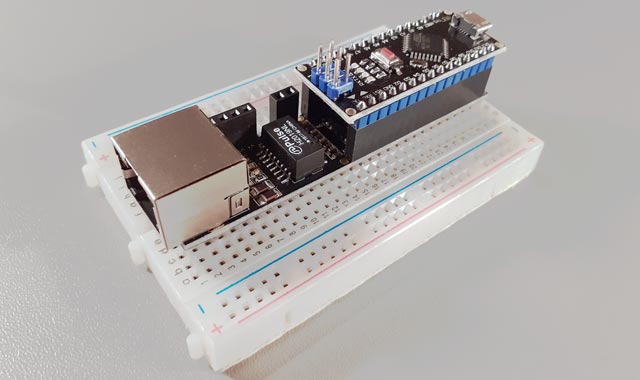
The board Nano V3 Ethernet Shield W5500 is designed to work in conjunction with the controller RobotDyn Nano V3 and allows you to add Ethernet networking support to your projects. A feature of this solution is its miniature size and the ability to add network support to your project easily - just connect a controller board and a network shield as a “sandwich” - and your server is ready! All that remains is to download the appropriate firmware, and you will be able to manage and exchange data with both your server and computers on the local network and the Internet.

Fast network chip WIZnet W5500 supports up to 8 simultaneous sockets and has a hardware implementation of the network stack that allows you to create robust and reliable network applications: various servers, network clients, etc., and also allows you to work with most modern, relevant network protocols.
| Parameter | Value |
|---|---|
| Microcontroller | WIZnet W5500 |
| PHY compliance | 10BaseT/100BaseTX Ethernet. Full and half duplex |
| Operating Voltage | 3.3 V |
| Memory | 32 Kbytes memory for TX/RX buffers |
| TCP/IP Protocols | TCP, UDP, ICMP, IPv4, ARP, IGMP, PPPoE |
| PHY Clock Speed | 25 MHz |
For those cases where power supply to your controller is difficult or impossible, the board Nano V3 Ethernet Shield W5500 supports power supply according to PoE standard. A small adapter that plugs into a dedicated connector on the side of the Ethernet Shield board provides support for this.
There are boards Nano V3 Ethernet Shield W5500 both with and without PoE module - you can choose the option that is best suited for the implementation of your project.

On the board Nano V3 Ethernet Shield W5500 a powerful 3.3 V power regulator is installed, designed for a load of up to 0.8A, which allows you to freely power both the WIZnet W5500 network interface chip itself and additional plug-in modules. A high-quality power supply is a key to the stable and trouble-free operation of your network projects on the Nano V3 Ethernet Shield W5500.
Programming Nano V3 Ethernet Shield W5500 is hassle-free in the usual Arduino style: connect Ethernet library to the project and write your code or modify the code from the examples that come bundled with this library or use free code of one of the many Open Source projects for Arduino.
You can use the Ethernet2 library or its more advanced successor Ethernet3 with this board.
5 reasons why you should pay attention to the board Nano V3 Ethernet Shield W5500 and use it in your projects:
1 Unique design This is the original RobotDyn development, which has no analogs both in concept and in technical capabilities.
2 Miniature dimensions Ethernet Shield is specially designed to work with a miniature board RobotDyn Nano V3 and allows you to build a fast and functional server for your projects in one go.
3 Powerful W5500 chip The shield is based on the powerful and productive WIZnet W5500 network interface chip, which has 8 sockets and implements a network stack in hardware.
4 PoE support This board, using a special adapter, supports the PoE standard for receiving power via a network cable and allows you to create projects without using power supplies or batteries.
5 Professional solution RobotDyn engineers created this board for advanced DIY enthusiasts and professional developers - it supports unique settings, for example, it allows you to control the reset of the W5500 chip and use its interrupts (IRQ).
To get started with Nano V3 Ethernet Shield W5500 you need only a few things:
1 The board itself Nano V3 Ethernet Shield W5500 2 Controller board RobotDyn Nano V3 3 A micro USB cable for connecting to a computer 4 Ethernet network cable to connect to your local network
The procedure is as follows: you connect the “sandwich” of the board Nano V3 Ethernet Shield W5500 and RobotDyn Nano V3, connect the Ethernet network cable to the shield and the USB cable to the corresponding connector on the microcontroller. That's all. Now you can program the system and work with your new network project.