Nano V3 Ethernet Shield — Basic Example — Web Server - RobotDynOfficial/Documentation GitHub Wiki
A Basic Example of a Web Server on Nano V3 Ethernet Shield W5500
In this article, we will examine the creation and operation of a simple web server on the shield Nano V3 Ethernet Shield W5500. This example will allow you to understand the principle of operation of web servers on microcontrollers and get acquainted with the circuitry and new motherboards of ** RobotDyn ** company.
In this experiment, we will need the following equipment:
- Board Nano V3 Ethernet Shield W5500
- Microcontroller RobotDyn Nano V3 (or compatible)
- Development board (optional)
- Micro USB cable
- Ethernet cable
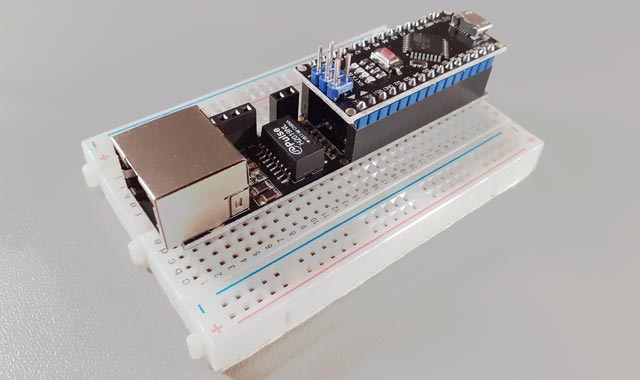
The assembly of the stand is very simple: just connect the board “sandwich” Nano V3 Ethernet Shield W5500 and RobotDyn Nano V3. Optionally, this assembly can be installed on a breadboard - this will add stability to the entire structure and make it possible to easily connect various peripherals for conducting experiments in the future.
*** Warning: pay attention to the wiring and the correct connection of the shield and the microcontroller board, otherwise the board and shield may fail. ***
To complete the assembly of the stand, you need to connect it to your computer and local network.
Connection to a computer is carried out using a cable with ** Micro USB ** connector. A standard USB port current of 500 mA is enough to power the entire structure, so additional power is not required.
Ethernet cable you can connect your future server to appropriate outlet in your room or directly to to a router or switch, depending on the configuration of your local network.
Without a network shield, your microcontroller is deprived of the opportunity to interact with the outside world, it can only locally control some equipment. Adding a network card to your project opens up wide possibilities: your controller will be able to exchange data with other microcontrollers, send data to the Internet, receive various control commands over the network, etc.
In addition, with the help of a network card, you can create an interactive web interface for your device and manage it as easily as you do with regular sites.
In this lesson, we will create a simple web server and analyze in detail how it works. The interaction will be as follows: in the address bar of the browser, you enter IP address of your Arduino server, press Enter and on the web page you see the response of your server.
As an answer to the Arduino server, various information can be displayed, in our example we will display the inscription “** Analog port 0 is **” and then the current value of the zero analog port of the controller (A0). The inscription will look something like this:

Despite the fact that this is only one line, but understanding the principle of its output, you will be able to create any arbitrarily complex web pages and even entire websites in the future.
So, we collected the test bench, connected it to the computer and the local network, now it is time to start creating a web server sketch. First, we give the full text of the sketch, and then we will analyze its work in detail.
/*
Web server example
(based on standard example by David A. Mellis & Tom Igoe)
(c) 2019 RobotDyn
License: GNU GPL 2.1

A simple web server that shows the value of the analog input pin.

Circuit:
* [Nano V3 Ethernet Shield W5500](https://robotdyn.com/nano-v3-ethernet-shield-w5500-v2.html) (use D10, D11, D12, D13 pins)
* [RobotDyn Nano V3](https://robotdyn.com/nano-v3-atmega-328-usb-ttl-ch340g-micro-usb.html)
* Analog input attached to pin A0
*/

// SPI library
#include <SPI.h>

// Ethernet2 library (support WIZnet W5500 chip)
#include <Ethernet2.h>

// MAC address
byte mac [] = {0xDE, 0xAD, 0xBE, 0xEF, 0xFE, 0xED};

// IP address
IPAddress ip (192, 168, 1, 177);

// Ethernet server on 80 port (default for HTTP)
EthernetServer server (80);

const byte analogPort = 0;

// Setup

void setup() {
// Initialize Serial port
Serial.begin(115200);

// Print start message
Serial.println("Start WEB Server example ...");

// Start Ethernet connection
Ethernet.begin(mac, ip);

// Start HTTP server
server.begin();

// Print IP address
Serial.print("Server at:");
Serial.println(Ethernet.localIP());
} // setup ()

// Functions

void responseHeader(EthernetClient cl) {
// send a standard http response header
cl.println("HTTP/1.1 200 OK");
cl.println("Content-Type: text/html");
cl.println("Connection: close"); // connection close after response
cl.println();
}

void sendPage(EthernetClient cl) {
// Get value of analog input pin
int value = analogRead(analogPort);

// Send Web-page
cl.println("<!DOCTYPE HTML>");

cl.println("<html>");

cl.print("Analog port ");
cl.print(analogPort);
cl.print(" is ");
cl.println(value);

cl.println("</html>");
}

// Server Works

void serverWorks() {
// listen for incoming clients
EthernetClient client = server.available();
if (client) {
Serial.println();
Serial.println("New client");

// an http request ends with a blank line
boolean currentLineIsBlank = true;

while (client.connected()) {
if (client.available()) {

// read character from client
char c = client.read();

// and print to Serial
Serial.write(c);

// if you've gotten to the end of the line (received a newline character)
// and the line is blank,
// the http request has ended, so you can send a reply
if (c == '\n' && currentLineIsBlank) {
// Response (send Web-page)
responseHeader(client);
sendPage(client);
break;
}

if(c == '\n') {currentLineIsBlank = true;}// starting a new line
else if (c != '\r') {currentLineIsBlank = false;} // gotten a character on the current line
} // client.available()
} // client.connected()

delay(1); // give browser time to receive data
client.stop(); // close connection
Serial.println("Client disconnected");
} // if (client)
} // serverWorks()

// Loop

void loop() {
serverWorks();
}
Despite of the sketch seeming large and complicated, after further analysis of its work it will become very clear.
In this mini-project, we will use the Arduino IDE v.1.8.5. The Arduino ecosystem is constantly evolving and new versions are often released - you could also use newer versions of the Arduino environment.
*** Please note: this article assumes that you are an experienced Arduino user, familiar with the basic principles and techniques of working with microcontrollers and the Arduino IDE. If you are experiencing any problems understanding this article, please refer to the documentation and examples on the system developer’s website https://www.arduino.cc***
Most Arduino projects require third-party libraries. Libraries are collections of functions designed in a certain way, focused on solving certain problems. For you, as a user of these libraries, it is important to know only how to connect the libraries to the sketch and be able to use their functions (which are usually described in the corresponding documentation).
In our case, we need to connect two libraries: SPI and Ethernet2.
// SPI library
#include <SPI.h>

// Ethernet2 library (support WIZnet W5500 chip)
#include <Ethernet2.h>
The SPI library is present in the standard package of the Arduino IDE, so you just need to connect it in a sketch with one line.
#include <SPI.h>The Ethernet2 library can be downloaded from the GitHab website at this link and installed in a standard way. The description of the library installation procedure in the Arduino IDE is beyond the scope of this article; if you are unfamiliar with it, you can read about it on the Arduino developers website.
After installing the Ethernet2 library it can be connected in a sketch in one line.
#include <Ethernet2.h>As the preliminary steps are completed, we can begin to create the sketch of the web server itself.
Each network device must have a unique 6-byte identifier, called a MAC (Media Access Control) address. When you buy network equipment this identifier is already contained in each device. In our case we can set this address in the sketch.
What specific byte values should I choose for the MAC address? It is a good idea to use the address already set in the example sketch. If you have several Arduino devices on your network, you can change the last byte in this address to ensure its uniqueness for each network device.
// MAC address
byte mac [] = {0xDE, 0xAD, 0xBE, 0xEF, 0xFE, 0xED};
If you have several Arduino devices on your network change the last byte of the MAC address arbitrarily, for example, instead of 0xED, enter 0xEE.
// MAC address
byte mac [] = {0xDE, 0xAD, 0xBE, 0xEF, 0xFE, 0xEE};If the MAC address identifies the network device at the hardware level, then another 4-byte identifier, called IP (Internet Protocol) address, is required to operate at the software level of the network TCP/IP stack.
There are certain rules for specifying such addresses and their ranges specially specified, but in our case, you only need to know the rules for the address space on your local network.
// IP address
IPAddress ip (192, 168, 1, 177);
For us, only the last byte 177 is important. This is the "local address" which you can change in the range from 1 to 254 as you wish. Here it is only important to remember that both MAC addresses and IP addresses must be unique, that is, not be the same for different devices on the same network.
*** Note: if in the settings of your local network the first three bytes differ from those indicated in the sketch, then you need to change these bytes in the sketch accordingly. ***
We create the web server object (server) on the default port 80. Due to the fact that the entire complexity of the web server implementation is hidden in the Ethernet library, we can create this server in one line.
// Ethernet server on 80 port (default for HTTP)
EthernetServer server (80);According to our task we display the value of the analog port A0 of the Arduino controller on the web page. To do this we create the constant analogPort and assign the value of 0 (port A0) to it.
const byte analogPort = 0;In future we will use this constant to tell the function analogRead() what port to read. If you want to display data from another port, for example A1, you just need to change 0 to 1 like this:
const byte analogPort = 1;Now let's move on to writing code. There are two functions in Arduino that must be present in every sketch: setup() and loop().
The setup() function is performed once at the system startup and is intended for settings that need to be made only once at the start of operation of the module.
The loop() function is an infinite loop where all the sketch code that performs any useful actions is placed.
But Arduino programming is not limited to these two functions, we can create as many of our own functions as necessary. The sketch of our web server was built on this principle - all of its functionality is divided into several functions, the operation and purpose of each of them we will describe later.
Let us analyze the operation of the setup() function in more detail. First, its code:
void setup() {
// Initialize Serial port
Serial.begin(115200);

// Print start message
Serial.println("Start example ...");

// Start Ethernet connection
Ethernet.begin(mac, ip);

// Start HTTP server
server.begin();

// Print IP address
Serial.print("Server at:");
Serial.println(Ethernet.localIP ());
} // setup ()
The first line initializes the Serial port of the microcontroller at a speed of 115200 baud. In some sketches you can see other port speeds, for example 9600, but in this case we will use a higher speed.
// Initialize Serial port
Serial.begin(115200);
Note: if we set the speed of the serial interface to 115200, then the same speed must be set in the settings of the Serial Monitor window.
And then we send a message to the serial port about the start of our web server.
// Print start message
Serial.println ("Start WEB Server example ...");
Then we initialize Ethernet with the MAC and IP addresses that we have previously set and start our web server. From this moment it starts working and will respond to requests coming over the network.
// Start Ethernet connection
Ethernet.begin (mac, ip);

// Start HTTP server
server.begin ();
And the last thing we do in the setup() function is send an informational message to the Serial about which IP address our server is running on using the library function Ethernet.localIP().
// Print IP address
Serial.print("Server at:");
Serial.println(Ethernet.localIP());
Below is the result of the setup() function and its output to Serial Monitor.
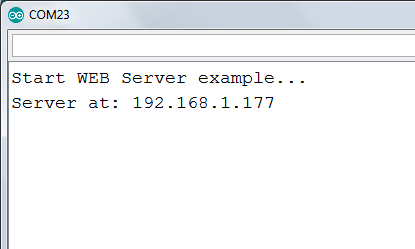
This is where the setup() function’s work is over; we proceed to the description and analysis of the loop() function’s operation.
As you remember, the loop() function is an infinite loop and everything that is in it simply repeats until the microcontroller is turned off.
void loop() {
serverWorks();
}
In our case, loop() contains only one function serverWorks(), which implements all the functionality of the web server. It would be possible not to use the serverWorks() function, but to put all of its code directly into the body of the loop() function, but this should not be done - this will impair the structure and readability of the project code.
Now, for a general understanding of the processes that are going on, let’s see what happens when you send a request to the web server from the browser. In the address bar of the browser, you type the IP address of the Arduino server:
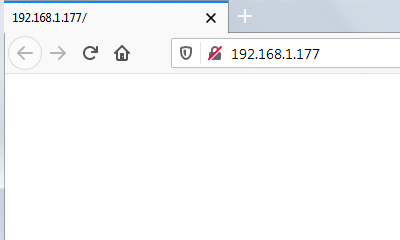
When you press Enter, the browser sends a request to the server at the specified IP address. This query looks something like this (details may vary depending on your software):
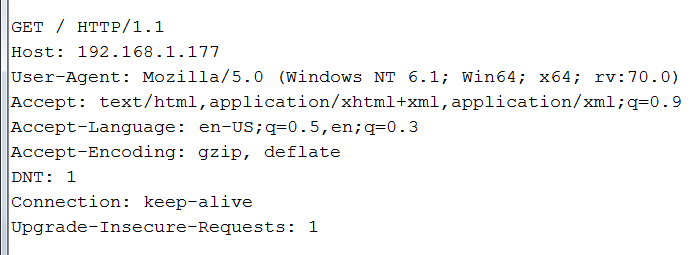
The request contains a lot of different information, but for us in this case two points are important, these are:
Get /meaning that the browser requests the main "index" page of the server, and an empty line after
Upgrade-Insecure-Requests: 1telling the server that the request is over and the browser starts waiting for a response from the server. That's, in fact, all the magic of GET requests from the browser to the server. Now we move on to the operation of the serverWorks() function, which implements the functionality of our web server.
And, finally, we get to the code of the web server itself. This code is a standard example from the delivery of the Ethernet2 library and for our purposes it’s not even necessary for you to understand it, you just need to know that it contains calls to our two functions responseHeader() and sendPage() that we will describe later.
void serverWorks() {
// listen for incoming clients
EthernetClient client = server.available();
if (client) {
Serial.println();
Serial.println("New client");

// an http request ends with a blank line
boolean currentLineIsBlank = true;

while (client.connected()) {
if (client.available()) {

// read character from client
char c = client.read();

// and print to Serial
Serial.write(c);

// if you've gotten to the end of the line (received a newline character)
// and the line is blank,
// the http request has ended, so you can send a reply
if (c == '\n' && currentLineIsBlank) {
// Response (send Web-page)
responseHeader(client);
sendPage(client);
break;
}

if (c == '\n') {currentLineIsBlank = true;} // starting a new line
else if (c! = '\r') {currentLineIsBlank = false;} // got a character on the current line
} // client.available ()
} // client.connected ()

delay(1); // give browser time to receive data
client.stop(); // close connection
Serial.println("Client disconnected");
} // if (client)
} // serverWorks ()
The serverWorks() function constantly waits for the client to connect and, as soon as the client connects to the server, analyzes its request and returns a web page in response. Web page delivery is performed by responseHeader() and sendPage() functions.
So, the whole server response process can be divided into several steps:
1 A user connects to the server (using a browser) 2 The user's browser sends a standard GET request 3 The serverWorks() function accepts and parses the browser’s GET request 4 If the request is correct, the serverWorks() function passes control functions responseHeader() and sendPage() 5 The responseHeader() and sendPage() functions form a standard response and send the web page to the browser 6 The user sees the web page of the Arduino server in the browser window
Below is the output of the serverWorks() function in the Serial Monitor of the Arduino IDE development environment when receiving a GET request from the browser:

The function works, sending a web page and disconnecting the client. Now our web server is ready to serve the next request.
In fact, this is one function for generating a web server response, divided into two for ease of understanding and better code structuring. The server response to the request consists of two parts:
1 Sending a header with meta information (responseHeader() function) 2 Sending the actual body of the web page (sendPage() function)
Let's consider these functions in more detail.
The responseHeader() function sends the response header with meta information. It generates data about the protocol and its version, response code and its result, type of sent content and connection status - all this information is used by the browser to display the web page correctly.
void responseHeader(EthernetClient cl) {
// send a standard http response header
cl.println("HTTP/1.1 200 OK");
cl.println("Content-Type: text/html");
cl.println("Connection: close"); // close connection after response
cl.println();
}
As you can see from the presented fragment of the server code, sending meta-information ends with sending of an empty string.
The sendPage() function is the main part of our server code - this is where the page that we see in the browser window is formed. Having understood the principle of forming this page, you can easily create any web pages for your projects.
void sendPage (EthernetClient cl) {
// Get value of analog input pin
int value = analogRead(analogPort);

// Send Web-page
cl.println("<!DOCTYPE HTML>");

cl.println("<html>");

cl.print("Analog port");
cl.print(analogPort);
cl.print("is");
cl.println(value);
cl.println("</html>");
}
The first line of the sendPage() function gets the current value of the controller analog port analogPort and assigns it to the value variable.
// Get value of analog input pin
int value = analogRead(analogPort);
Next is the formation of the sent web page using standard HTML tags.
cl.println("<!DOCTYPE HTML>");

cl.println("<html>");

cl.print("Analog port");
cl.print(analogPort);
cl.print("is");
cl.println(value);

cl.println("</html>");
And here is what you see as the result of these actions in your browser window:
And here is the HTML code of the web page sent by the server:
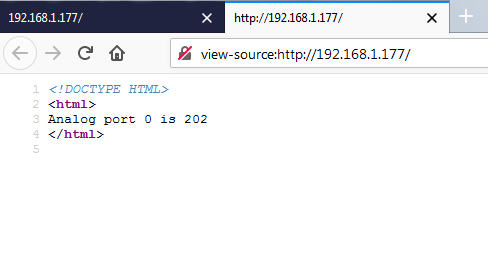
That is all about how the web server works and how it generates the web pages on the Arduino microcontrollers. Perhaps it might seem a little complicated at start, but after carefully reading this manual and experimenting with your Nano V3 Ethernet Shield W5500, you will undoubtedly become the master of network operation of Arduino controllers.
Armed with the RobotDyn Nano V3 Ethernet Shield W5500 and the information in this article, you can create your own interesting network projects or improve third-party Open Source projects - because now you understand how Arduino web servers work.
Overview Nano V3 Ethernet Shield W5500 Specifications and Connection Nano V3 Ethernet Shield W5500 Buy Nano V3 Ethernet Shield W5500 Buy RobotDyn Nano V3