Fire Emblem: The Sacred Stones Guide - RetroAchievements/guides GitHub Wiki
Fire Emblem: The Sacred Stones Achievement Guide
Fire Emblem: The Sacred Stones is the 8th instalment in the series, and has a total of 114 achievements on RetroAchievements. I will be going through all of the achievements and offering a guide to complete each one in what will hopefully be a timely manner. Let’s get started. If you’re looking for information on a specific achievement, use ctrl+f and search for the name of the achievement, it should send you straight to it! Alternatively, you can look at the headings!
General Achievement information
To start, many of the achievements in this game are based on story progression. The first 9 are easy to pick up, and simply require playing through chapter 1-8, including 5x, which is a mandatory bonus chapter. After this point, the game splits into two routes, based on a decision at the end of chapter 8 that determines which Lord's story you will follow, being Eirika and Ephraim respectively. Regardless of the lord you choose, you will play through chapters 9-14 and their respective maps with them before they merge back together with the other lord in chapter 15 and will stay together until the end of the game. An easy way to get around playing through the first 9 maps again is when the game gives you the save “A New Journey” , pick your lord and then make your chapter 9 save in a new slot. This way, you can reload from “A New Journey” when the time comes to go down the other route.
We will call chapters 9-14 on Eirika route route A, such as 9A, 10A etc, and Ephraim's route route B, such as 9B, 10B etc.
The next easy achievements to pick up are the recruitment achievements, as they are also tied to story progression. Throughout the game, there will be many opportunities to recruit new characters. Some join you immediately, some are found in villages, and others may appear as green (ally) or red (enemy) units that need to be spoken to with certain characters. More on this in the recruitment achievements section.
The next achievements require you to beat certain chapters on difficult mode. These are chapter 8, 9A-14A, 9B-14B, and the final chapter. These ones can be picked up passively by starting the game on difficult mode, which acts as the games hard mode option. Don’t worry, the game isn’t actually all that difficult on this mode, especially by fire emblem standards. People who have played the series before may compare Sacred Stones' difficult mode to the normal mode of Binding Blade, the 6th game in the series.
As a final achievement tip, always have backup saves before going into a chapter! There will be instances where a chapter has multiple achievements, and it may be too difficult to acquire all of them in one go! In this instance, make sure you have a backup save or two ready to tackle these chapters, or soft reset before saving after completing the achievement so you can go for the next one!
General Gameplay Tips
This section is designed primarily for people who are new to the game. For those of you who have played this game before, or have experience with other fire emblem games, feel free to skip this section, but you might find something new if you decide to read it!
Tip 1 - Use Seth
Seth as a unit is very powerful. In most Fire Emblem games, there is an archetype of unit called the Jagen, named after Jagen from the first fire emblem game. These characters typically start with a very powerful weapon and are already promoted. While Seth falls into both of these categories, there is one major aspect where he differs from other Jagens in the series. In most other games, Jagens have very low growth rates, which are hidden stats that determine how likely it is for a character to gain stats when levelling up. These make Jagens only really useful during the early game, and they are typically quick to fall off. By the time they do, other members of your army are ready to pick up the slack and contribute.
Seth, on the other hand, has incredible growth rates, making him viable for the entire game. During the early game, he will gain experience very slowly, so it’s best to avoid using him to kill minor enemies, and giving the experience from those units to others. During the early game, it’s best to use him sparsely. If you find yourself in a position where a character is at risk of dying, you can use seth as a shield, or just have them outright kill the enemy threatening your character. Letting him kill bosses is a decent way to gain experience on him too, though try not to do this with every boss. His usefulness will really come into play around chapter 9 and beyond, where more promoted enemies start appearing for him to gain more experience from.
Additionally, Seth starts with two powerful weapons, a Silver Lance and Steel Sword. Try not to use these weapons too much before you hit chapter 9, as they are very powerful and keeping them on high durability will allow him to do more when he becomes more useful. During the early game, once you unlock the shop, consider giving him iron weapons, or even slim weapons, as they do less damage but have more durability. In some instances, he can even weaken an enemy enough to let another character kill them while taking minimal damage.
Tip 2 - Promotion
Once a unit reaches level 10, they can be promoted with a special item. This will be covered in the promotion achievements section, where I will go over the promotion based achievements. It might be tempting to promote a character right away, and in some instances it can be worth it, such as with Gerik, Cormag and Knoll. But in most scenarios, it is better to wait until the character has gained a few more levels, typically between 13-15. There are a few reasons behind this.
Reason 1: Promoted units generally gain less exp when fighting and killing enemies. This means level ups become much slower, especially if you promote a unit during the early game, where very few enemies are promoted.
Reason 2: Your characters can level up to level 20 before promotion, and level 20 after promotion at max. If you promote before level 20, there is no way to gain back those lost levels. In most instances, the exp gained after hitting level 15 will be minimal, so losing those 5 levels is typically a reasonable trade off for the stat boosts and other bonuses that promoting gives. Promoting at level 10 immediately means you miss out on the potential growths your units would have gained from levelling up to 15 too.
The three examples I mentioned above, Gerik, Cormag and Knoll, start at level 10 with their promotion items already in their inventory (In Knolls case, you can use the master seal from the village near where he starts on the map). In these circumstances, their base stats (the stats they start with), are typically high enough to merit promotion immediately for the point in the game that they are recruited, and they can quickly become some of the strongest characters in the game. (With the exception of Knoll. While it’s fine to promote him early, he typically isn’t all that good.)
Classes to look out for when promoting are mounted classes such as paladin and great knight, flying classes such as the wyvern knight/lord classes, and the bishop class for its incredible slayer skill which is very important towards the end of the game! In general, classes that are locked to one weapon type such as the Swordmaster class, or don’t have a mount, such as Sage, are worse, but still viable!
Tip 3 - Utilise your Thief
In chapter 3, you will recruit the thief Colm, and he has multiple tricks up his sleeve.
To start, he is the only character for the majority of the game capable of opening doors and chests without a key, by using his lockpick item. Only thieves can use the lockpick item! This makes getting the items found inside chests much simpler, and usually there will not be enough keys on a map to open all of the doors.
Second, the thief class has access to a unique skill called steal, allowing you to steal items from enemies you are faster than. This can range from simple healing items like vulneraries and elixirs, to gems that can be sold for money, to promotion items that you might need! This makes Colm a vital unit to bring to most maps, until you recruit Rennac in chapter 14A or 14B.
Colm's combat utility isn’t the best, but he is still reasonable to use and it’s important to level him up to make sure has enough speed to steal items from specific enemies.
Tip 4 - Experience
In general, there is not enough experience to level up everyone you recruit to a reasonable level. As a result, it’s best to try and keep a small but balanced party to share the experience, making the game much easier and less time consuming. The amount of units that can be deployed to the final chapter is 14, so starting in the mid game, try to build towards a final team of 14.
If you do want to use everyone, there are ways around this. In chapters 5, 10A, and 12B there are arenas that your units can visit. By paying some gold, that unit can fight a random unit of a similar strength. If your unit wins, they will gain experience and you will earn more gold than you paid. Your unit can die in the arena, so be careful if you plan to do this! There are also a few achievements based on winning one round in the arena in each of these chapters.
Alternatively, after chapter 8, you unlock the Tower of Valni. This area has a few post-game achievements attached to it, however for the time being, this serves as a training ground. You can enter the tower Valni and select a group of units to fight against some monsters, allowing you to infinitely grind experience, and earn gold while doing so. This can be time consuming, though later on it will become necessary for some achievements.
Tip 5 - Trainees
Throughout the game you will recruit three special characters. Ross, Amelia, and Ewan. These units are called trainees, and start in special classes called the Journeyman, the Recruit, and the Pupil respectively.
Upon reaching level 10 in these classes, at the start of the next chapter you will be able to promote them into a basic class without using an item, essentially giving them an extra 10 levels over other units in the game. These units start off particularly weak compared to the rest of the cast, and require quite a bit of effort to bring up to speed.
The exception to this Ross. Due to him joining as early as chapter 2, and with how quickly he gains experience from killing enemies, you can easily bring him up to level 10 in the journeyman class by the end of chapter 3 if you’re careful. This allows you to easily promote him into the fighter class like his father Garcia, or the Pirate class. At this point, due to still being level 1, he will continue to gain experience very quickly.
If you want to get most of the promotion achievements in one playthrough, I recommend you invest some time into both Ross and Ewan, as there are some classes that only they can reach. More on that in the promotion achievements section.
Tip 6 - Be attentive
By pressing the A button on an enemy, you can see their effective movement and attack range at any given time, allowing you to position your units accordingly and avoid mistakes that could kill your units during the enemy turn.
Additionally, by pressing R on an enemy, ally, or your own unit, you can see their stats and inventory. This allows you to see how challenging an enemy may be, or see if they have any items for your thief to steal, such as gems or promotion items!
Tip 7 - The Weapon Triangle
The weapon triangle is a system that makes some weapons better at fighting other weapons. There are two triangles in the Sacred Stones to keep in mind.
Triangle 1: Swords beat Axes. Axes beat Lances. Lances beat Swords.
Triangle 2: Anima Magic (Fire, wind, thunder spells) beat Light Magic (Shine, Lightning, etc). Light Magic beats Dark Magic (Flux, Nosferatu, etc). Dark Magic beats Anima Magic.
In combat, the character with the weapon triangle advantage will receive a bonus of +1 damage dealt and +15 to accuracy, while the character with the weapon triangle disadvantage will receive a penalty of -1 damage dealt and -15 to accuracy.
Bows and Staves are unaffected by the weapon triangle, so those units don’t need to worry about what type of enemy they are going up against. Additionally, certain weapons called “reavers” (swordreaver, axereaver, lancereaver) invert the weapon triangle, making lances beat axes, axes beat swords, and swords beat lances. These are also important to look out for!
Tip 8 - Rescue!
This tip is brought to you by HeroMaster, thanks for the help! In the GBA FE games, there is a mechanic called rescue that allows one unit to pick up another and carry them around. This has multiple utility uses, helping you bring your slower units across the map, being ferried across by your higher movement units. The “aid” stat of a character determines the maximum size of a character they can pick up, which is determined by other characters “con” stat. To put it simply, a unit with an aid stat higher than another unit's con stat can pick up that unit.
Mounted units are especially powerful with using rescue, such as Seth! (Yay! More Seth utility!) After rescuing a unit, a mounted unit is able to use the rest of their movement to continue moving after rescuing! For characters who are stuck at 5-6 movement for the majority or entirety of the game, such as Eirika and Ephraim until after chapter 16, rescuing them with one of higher movement units can be vital to bringing them closer to action and objectives such as seize points, allowing you to finish maps faster. It can also be used to bring units out of danger.
Other units can also take a rescued unit on the turn they were rescued and drop them immediately after. Chaining together well timed rescues can bring a unit from one end of a map to the other in a single turn if planned correctly!
Do be careful when using this mechanic though, as the unit currently rescuing will suffer a stat penalty to their skill and speed equal to half of their current values in those stats, making them much slower in combat and much less accurate.
Tip 9 - Abusing the AI
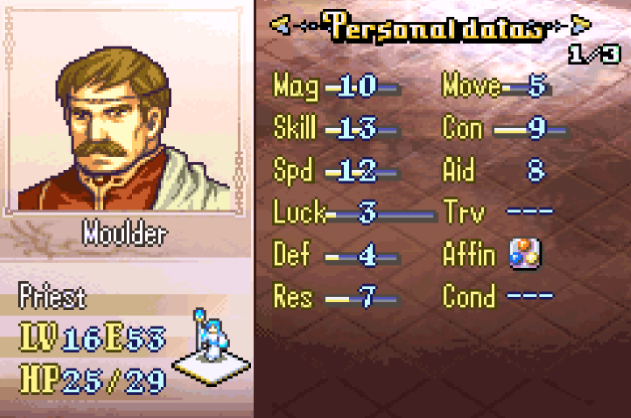
This is a little bit of a more advanced tip, and shouldn’t affect your gameplay too much. Healers, such as Moulder and Natasha, only gain exp by using staffs to heal other allies. With the right set of circumstances, you can abuse the enemy AI to heal your units infinitely. By setting up in a position where one of your units gets constantly hurt, you can heal them repeatedly with your healer to give them almost infinite exp. This is also a great opportunity to grind out support points at the same time! This strategy takes a lot of time, but can be worth it, allowing you to get your healers levelled up very quickly, very early into the game, to promote them into much stronger units. Below I have an example from chapter 7.
By positioning my units in front of the chapter 7 boss, I have been able to abuse their ai. The boss doesn’t move, and will always attack with their javelin until it breaks, allowing me to use Moulder to heal Ross, who has no weapon equipped, until the javelin breaks. My units are also positioned in a way that support partners are placed next to each other, allowing infinite grinding of support points at the same time. Once the javelin breaks, all I need to do is move all of my units forward one square to do the same thing with the boss's steel lance! The unit I used for this grinding, Ross also gained 1 exp for every round of combat and even levelled up during the process!
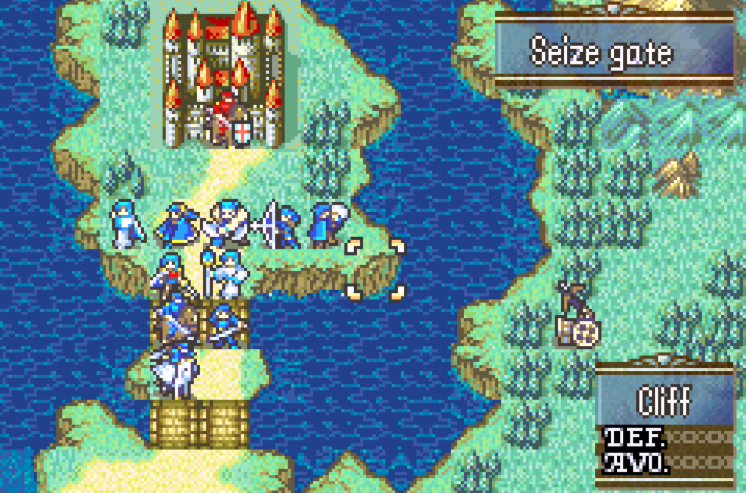
There are many examples where you can abuse the AI, especially for bosses that do not move. I also used this chapter to grind Neimis bow rank and exp by having her hit the boss for 1 damage over and over again once their weapons were broken! Since the boss is sitting on a gate tile, they heal at the start of their turn, and Neimi was doing less damage than what was being healed!
By the time the bosses weapons dried up, Moulder had reached level 16 and was ready for promotion! Neimi had also become strong enough to kill the boss herself with some minor assistance!
Tip 10 - Backup Saves
Always keep a backup save of the previous chapter! This way, if you miss an achievement, or forget about one, you can go back! A big example of this is chapter 19, which has 4 separate achievements linked to it, those being map completion, 5 turn completion, the secret shop, and making sure 5 green units survive. I forgot about that last one until after I had beaten the game for the first time, but was lucky enough to have a backup save of that exact chapter, allowing me to recreate my 5 turn completion with some minor adjustments to ensure the green units lived! This will save your life! Bonus tip: Before saving, make sure you have every achievement from the last chapter!
Recruitment based Achievements
There are 19 achievements for recruiting new characters throughout the course of the game. I will go over each of these achievements individually and discuss how to recruit each character from start to finish.
1. The Great Garcia
In chapter 2, the fighter Garcia, and his son Ross will appear as green units on the right side of the map. If you play on easy mode, the game actually teaches you about rescue and recruitment here. To recruit them, simply have Vanessa rescue and drop Ross, then talk to Ross with Eirika to recruit him. After this, do the same for Garcia, and let Ross talk to him to recruit him.
2. The Thief From Renais
In chapter 3, the thief Colm will appear on turn 2 from the stairs by the northern door as a green unit and will open the door on his turn. To recruit him, talk to him with your Archer, Neimi, who joined you on this chapter automatically. On turn 1, it’s best to place Neimi as close to the stairs as possible, so she can talk to him on turn 1.
3. The Monk Watcher
At the sound end of chapter 4 there is a lone village. By bringing any unit to this village and visiting it, the mage Lute will appear and will join your party. An easy way to recruit her quickly is by having Vanessa fly down to the village, which can typically be done by the end of turn 3.
4. The Wandering Swordsman
In chapter 5, the Myrmidon Joshua will appear as an enemy unit. Be careful, he has a killing edge sword that allows him to land critical hits much more often. To recruit him, Natasha, the cleric that joins you automatically in this chapter, needs to talk to him. There are two strategies for this. Option A is to bait out the enemies around him and then bring Natasha over to him. Joshua will never attack Natasha on his turn, making her safe to enter his attack range. Option B is to unequip all of Seth's weapons, either via putting them in the convoy (which can be done by standing him next to Eirika and pressing the supply button) or via trading them to other units, and using him to bring Joshua closer. Seth is one of the only units at the stage in the game who can take a critical hit from Joshua, and he can be quickly healed after with Moulder or Natasha.
5/6. The Orphan of Grado I & II
In chapter 9 on both routes, the Recruit Amelia can be found as an enemy unit. In chapter 9A (Eirika's route), she appears in the bottom left corner of the map on turn 5, and in chapter 9B (Ephraim's route), she can be found guarding the entrance to the fortress. In 9A, she will leave before the beginning of turn 12 and will return in chapter 13A.
To recruit her in chapter 9A, you need to be fast. You can talk to her with either Eirika or Franz to do so, and an easy method is to have Tana or Vanessa carry either of the two across the ocean via rescue down to her location. Vanessa may be a safer option here if you have been investing time and experience into her, as she will be less likely to die to the pirates in the water, and if she is promoted she will have higher movement, allowing you to get there faster. Amelia may also attempt to attack one of your units, and due to how weak she is, she can be easily killed. Amelia will not move if none of your units are in her attack range, so to avoid this, carry Franz to a spot just north of her, where he is outside of her attack range. With his higher movement as a cavalier, during the next turn he will be able to move next to her and recruit her.
To recruit her in chapter 9B, there are no time constraints. Following the method before, clear out the enemies in front of her, and then run Franz over to her to recruit her. She can also be recruited by Ephraim, so alternatively, we can use the strategy I suggested for Joshua, by bringing a high defense unit into her attack range with no weapons equipped, bringing her closer to allow either Ephraim or Franz to talk to her.
7. The Gang of Frelia
In chapter 10A, three green units will be present on the left side of the map. These units are Innes the Sniper, Gerik the Mercenary, and Tethys the Dancer. To recruit these three units, the best strategy is to have Tana or Eirika make their way down to them. Talk to Innes first with either character, and then allow Innes to talk to Gerik or Tethys, and then recruit the final of the three by talking to them with the one you talked to with Innes.
8/9. The Princess and Axe of Rausten I & II
In chapter 11A and 11B two characters will appear that can be recruited, the troubadour L’arachel, and her loyal Berserker Dozla. They appear as green units. L’arachel can be recruited by talking to her with Eirika or Ephraim, and Dozla can be recruited by talking to him with L’arachel.
In chapter 11A, the two appear on the south side of the building the player begins outside of, and will be attacked by monsters. Dozla is typically capable of fending off these monsters, but L’arachel has no combat capabilities. If you wait too long, one, or both of them will inevitably die. Don’t worry too much, just progress the map at a reasonably swift pace until Eirika can reach L’arachel. The left side of the map is a trap. It is much safer to send Eirika through the right side of the map with the majority of your army, and leave a strong unit or two behind such as Seth to deal with the enemies that come from the left.
In chapter 11b, the two will appear on a boat in chapter 11b on the right side of the map. This chapter is notorious for being difficult, and the same time sensitive nature from chapter 11A makes another appearance. Play slowly and carefully while trying to get Ephraim over to the boat to recruit them, and then be careful not to let L’arachel get caught off guard by a monster in the fog. In general for this map, I recommend using Seth and Duessel heavily, their amazing stats help greatly for fending off the waves of monsters that will come your way, and make getting to the two new characters much easier. Flying units such as Cormag are also vital here, capable of taking down some of the flying enemies that will appear.
A general point to note about fog of war maps is that they can be tricky, but can be made far easier via a couple of things. First of all, make sure you bring Colm! Colm, as a thief, has a much further vision range in fog of war than others, and can allow you to see enemies from first away. The other is to bring the torch item or torch staff. The torch items illuminates the area around the person who used it, allowing you to see further into the fog, and the torch staff lets you choose an area to illuminate, the range of which being dependant on your magic staff. If you've trained up your staff users to a high enough level, this range can be quite far, and will let you illuminate a large amount of the map early on!
10/11. The Crimson Flash I & II
In chapter 10A and 12B, the Myrmidon Marisa will appear as an enemy unit. She can be recruited by talking to her with Gerik in chapter 10A, or Ewan in chapter 12B.
In chapter 10A, Marisa will eventually start moving towards the location where Innes, Gerik and Tethys start. An easy way to recruit her is to leave Gerik just out of range, and let her move closer to him so he can talk to her and recruit her, then use whatever units you have in the area to mop up the enemies. Like Joshua, she comes with a very dangerous weapon in the form of the Shamshir, which gives her a very high critical hit rate, so be careful.
In chapter 12B, she is a bit harder to recruit due to requiring Ewan. Ewan is recruited during the same chapter, we’ll go into that soon. The best method for this is one we used before. Bring a unit with high defense into her range with no weapons equipped, so she can attack them, bringing her close enough to Ewan for him to talk to her.
12/13. The Pupil of Saleh I & II
In chapter 12A and 12B, the Pupil Ewan is available to recruit.
In chapter 12A, Ewan can be found by entering the southern of the two houses. Alternatively, he will be recruited at the end of the chapter so long as either Saleh or Tethys are alive, though I’m unsure if this counts for the Achievement. In chapter 12B, Ewan can be recruited by visiting the village with the red house. Very easy on both routes!
14/15. Aloof Lanceman I & II
In chapter 13A and 10B the Wyvern Knight Cormag can be recruited. He starts as an enemy unit in both maps, and can be recruited by talking to him with Either Eirika, Ephraim, Tana, or Duessel, who is recruited in 10B as well.
In chapter 13A, Cormag will appear as reinforcements from the south-western fortress on turn 5. It’s very easy to bring Tana up to recruit him on this turn, though make sure you are able to kill the boss of the chapter on the same turn to ensure you get the achievement for beating this map in 5 turns.
It’s much the same in chapter 10B. Cormag starts in the south easternmost part of the map, and will not start moving until turn 5. An easy way to recruit him is to bring Tana just outside of his range for when he starts moving, and then talk to him. Once again, make sure you can beat the boss on the same turn you recruit him to get the achievement for beating the map in 5 turns. I heavily recommend using the Tower of Valni to grind most of your units up to a point where this map can be completed easily, it’s abnormally difficult.
16/17. The Rich Merchant I & II
In chapter 14A and 14B, the Rogue Rennac will appear as an enemy unit. To recruit him in both chapters, talk to him with L’arachel. You can choose to talk to him with Eirika or Ephraim, however doing so will require you to pay 9980 gold to him for his services. With L’Arachel, he can be recruited for free in what is a very funny dialogue.
For both of these maps, it’s quite simple, make sure you rush down the right side of the map quickly to ensure you can catch up to him early so L’arachel can talk to him. In chapter 14B, be careful of the druids with the berserk staves while doing so, as they can make your units attack enemy and ally units uncontrollably. If you have a restore staff, make sure to bring it with you on a healer or other unit that can use it. (like L’arachel!)
18. Lance Instructor
In chapter 10B, the Great Knight Duessel can be found as a green unit. To recruit him, talk to him with Ephraim. In Eirika's route, he joins automatically at the start of chapter 15, so the achievement only covers the 10B recruitment.
The general strategy for this is simple. Either walk Ephraim down to Duessel, or use a fast unit like Vanessa to carry him there while Tana makes her way towards Cormag.
19. Graceful Syrene
In chapter 17, the FalcoKnight Syrene appears as a green unit. To recruit her, talk to her with Tana, Vanessa, or Innes, or by ensuring she survives until the end of the chapter, though once again I am unsure if that counts towards the achievement.
She starts very close to the starting position of the map, which makes it easy to fly Vanessa or Tana towards her by the end of turn 2. She is a decent unit, though outclassed by your other fliers at this point, and will last a decent while against the druids attacking her. Regardless, it’s best to recruit her quickly.
That covers all of the achievements for the base game/story progression recruitments. There are 10 more achievements for recruiting characters in the post game creature campaign that will be covered here.
Valni Explorer/Massacre/Conqueror
In the post game, there are 5 units that can be recruited via progressing through the Tower of Valni. I will list below who these characters are and how to recruit them. These are all enemies and characters you encountered through the game.
Caellach (Hero) - Finish floor 3
Orson (Paladin) - Finish floor 6
Riev (Bishop) - Defeat 200 or more enemies in the same tower run
Ismaire (Swordmaster) - Finish the tower once
Selena (Mage Knight) - Finish the tower three times
Going down/Into the Depths/Bowels of the Earth/Burrowed Deep/Lagdou Massacre
The second location of the creature campaign is the Lagdou ruins, which works very similarly to the Tower of Valni. Once again, there are 5 characters which can be recruited here, being enemies and characters previously encountered throughout the game.
Glen (Wyvern Lord) - Finish floor 5
Valter (Wyvern Knight) - Finish floor 7
Hayden (Ranger) - Defeat 200 or more enemies in the same ruins run
Fado (General) - Finish the ruins once
Lyon (Necromancer) - Finish the ruins three times
A general strategy for these achievements is to just ensure your characters are as strong as possible before going in, and ensure that your legendary weapons have high durability for the final floors, as they typically have the strongest monster. The final floor of the Lagdou ruins for example contains multiple powerful NecroDragons.
Those are all of the achievements for recruiting characters! Moving on, we'll next cover achievements linked to promotions!
Promotion based Achievements
There are a total of 22 achievements for promoting units, one for each class units can be promoted into. We will go over what these classes are, who can be promoted into them, and where to find all of the promotion items required. Fair warning, this will require you to spend some time in your second run. If done optimally, the second run will only have 1 promotion left, so don’t worry about following this guide to the letter if you’d prefer to play in your own way.
Promotions
Knight Crest Paladin: Franz, Kyle, Forde and Amelia Great Knight: Franz, Kyle, Forde, Gilliam and Amelia General: Gilliam and Amelia
Elysian Whip FalcoKnight: Tana and Vanessa Wyvern Knight: Tana, Vanessa and Cormag Wyvern Lord: Cormag
Guiding Ring Sage: Moulder, Lute, Artur and Ewan Bishop: Artur, Natasha and Moulder Mage Knight: Lute and L’arachel Summoner: Knoll and Ewan Druid: Knoll and Ewan Valkyrie: L’arachel and Natasha
Hero Crest Hero: Gerik, Ross and Garcia Warrior: Ross and Garcia Swordmaster: Joshua and Marisa Assassin: Joshua and Marisa
Ocean Seal Rogue: Colm Assassin: Colm Warrior: Ross Berserker: Ross
Orion’s Bolt Sniper: Neimi Ranger: Neimi
Solar/Lunar Brace Great Lord: Eirika and Ephraim
Alongside these promotion items, there is also the Master Seal, which allows any unit at level 10 or above to promote into one of their promotion options. Now I will present a list of an optimal routing for your first run, that allows all but 1 of these achievements to be collected. This list assumes that Ross is promoted from Journeyman to Pirate, and Ewan is promoted from Pupil to Dark Mage.
Optimal Promotions
Knight Crest Paladin: Franz (Other Cavalry or Amelia promoted to Cavalry work too) Great Knight: Forde (Other Cavalry or Amelia promoted to Cavalry work too) General: Gilliam (Amelia promoted to Knight works too)
Elysian Whip FalcoKnight: Tana Wyvern Knight: Vanessa Wyvern Lord: Cormag
Guiding Ring Sage: Artur Bishop: Moulder Mage Knight: Lute Summoner: Knoll or Ewan Druid: Knoll or Ewan Valkyrie: L’arachel
Hero Crest Hero: Garcia Ranger: Gerik Swordmaster: Joshua (Marisa works too) Assassin: Marisa (Joshua works too) Warrior: Ross (Promoted into Fighter)
Ocean Seal Rogue: Colm Berserker: Ross (promoted into pirate) Warrior: Ross (On another save, promoted into Pirate)
Orion’s Bolt Sniper: Neimi
This way, every single class is covered at least once. Due to how the hero crest promotions work in combination with Neimi being the only character capable of becoming a sniper, Ross is forced to become a warrior or Berserker on your first playthrough, and then the other one on your second. Once again, this guide is only for people who want to get as many of these achievements as possible on their first run, and use their second run as a “victory lap.” play how you want to!
Finally, I’ll cover each promotion item individually and where to find each one in order of chapter availability.
Promotion Item Locations
Elysian Whip - 3 required Chapter 8 (chest) Cormag starting inventory (13A and 10B) Secret Shops Skirmish drops (Elder Bael, Cyclops, Deathgoyle)
Guiding Ring - 6 required Chapter 5 (End of chapter, if all villages were visited) Chapter 10A (Dropped by Pablo) Chapter 12B (Dropped by enemy Shaman) Chapter 14A/14B (chest) Chapter 15 (steal from enemy Shaman) Chapter 17 (Dropped by enemy Mage) Secret Shops Skirmish drops (Elder Bael, Cyclops, Arch Mogall, Gorgon)
Hero Crest - 4 required Gerik Starting Inventory Chapter 10B (Village) Chapter 14A (Dropped by enemy Myrmidon) Chapter 16 (Dropped by enemy Hero on Eirika Route, dropped by enemy Warrior on Ephraim Route) Secret Shops Skirmish drops (Elder Bael, Cyclops, Wight)
Knight Crest - 3 required Chapter 7 (Dropped by Murray) Chapter 10B (End of chapter, if all npcs survive) Chapter 13A (Dropped by Aias) Chapter 14B (Dropped by Vigarde) Chapter 16 (Chest) Secret Shops Skirmish drops (Elder Bael, Cyclops, Maelduin)
Ocean Seal - 2 required Chapter 9A (Dropped by Enemy Pirate) Chapter 9B (Chest) Secret Shops Skirmish drops (Cyclops)
Master Seal - 2 required (1 Elysian Whip replacement, 1 guiding ring replacement) Chapter 15 (Village) Final part 1 (Chest) Fado starting inventory Ismaire starting inventory Skirmish drops ( Elder Bael, Cyclops, Wight)
Solar/Lunar Brace - 1 of each required Reward for completing chapter 16
As stated previously in the general tips section, levelling up every single unit is a bad idea, however we can use the tower of Valni to quickly bring the units we are not using to level 10 and promote them, allowing these achievements to be obtained somewhat quickly! Moving on, we'll next cover item based achievements!
Item Achievements
This section will cover the 7 achievements based on finding items throughout the game. These are the 6 “For Your Troubles” Achievements and the “RNG Superstar” Achievement.
For Your Troubles
There are a total of 6 items that can be obtained throughout the game by meeting certain criteria during chapters. These are the following;
Chapter 5 - Visit every village to be given a Guiding Ring. This one isn’t too hard, just play fast and send some units down each path to ensure all the villages are reached. Remember to be careful of Joshua's killing edge!
Chapter 6 - Ensure all 3 green units survive to be given an Orion’s Bolt. This one is really easy. Despite being the first fog of war chapter, it’s very easy to run Seth to the boss within the first five turns and kill him, just be careful of an axe fighter in the northern quadrant of the map with a halberd, they can be a threat with their effective damage against cavalry.
Chapter 9A - Visit Every village to be given an Angelic Robe. Another simpler one, just make sure to visit the villages before they are destroyed!
Chapter 10B - Ensure all of the green unit cavalry survive to be given a Knights Crest. I find this one rather hard to fail, the cavalry all have vulneraries that they will use to heal themselves, and you can defend them quite easily thanks to their positioning in the map. Beating the map in 5 turns for that achievement also makes this quite simple!
Chapter 17 - Ensure all green units survive to be given a rescue staff. The Green units on this map all appear in the centre of the map, making them easy to get to from the starting location and quite far away from all of the enemies at the start! Just send units to the enemies and you’ll rarely run into problems here.
Chapter 19 - Ensure at least 4 green units survive to be given a Light Brand. This does not include Mansel, but does include the General next to him. Easily done if you beat the map in 5 turns for that achievement. If you’re not going for the 5 turn achievement, this one is significantly harder. If you can, rely on the chokepoints set up around the palace to rescue drop the green units into safe locations.
As for some more general tips for these item achievements, remember to always keep the rescue command in mind. If a green unit is close to dying, don’t be afraid to end the map early or use the rescue command to bring them to a safe place, or to just hold on to them. As for other items, don’t be afraid to follow a guide for each map!
RNG Superstar
The RNG Superstar asks you to find all 9 of the items hidden in the desert in one session. During chapter 15, the desert contains 9 hidden items. The Warp staff, the Silence staff, The Body Ring, the Wyrmslayer, a Killer Bow, the Silver Card, Metis’s Tome (I like to use this one on Myrrh to make her already incredible growth rates even better!), the Swiftsole (gives any unit that uses it +2 to their movement!) and the Eclipse Tome. They can be found in these locations:
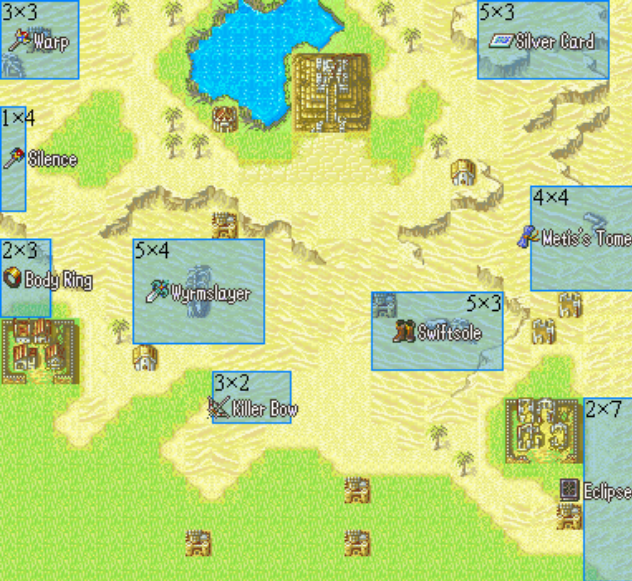
When one of your units stands on one of these tiles there is a chance that the item will be found. The chance is equal to the characters (luck stat+1)% Thieves and Rogues have a 100% chance of finding these items. As a general strategy for this, clear out the map of most or all enemies, then have a flier carry Colm or Rennac across the map using rescue to the appropriate locations. Then, have them end their turn in the locations to find the items and keep moving. Make sure to grab them all during chapter 15 to get the achievement, getting them after in a skirmish won't work!
These items are all very useful, and there are even more reasons to bring a thief/rogue to this map, such as stealing the Hoplon guard from Caellach, which prevents the enemy from critical hitting the holder, and the Fili shield from Valter, which protects a flying unit holding it from taking effective damage from bows. Taking these items from Caellach and Valter makes killing them much easier after you have grabbed all of the items across the map, and you can get your thief/rogue to safety after by using rescue!
Those are all of the item achievements, moving on to the misc achievements!
Miscellaneous Achievements
This section is for achievements that didn’t fit into the other categories. Most of these are very missable achievements, so make sure you read this section thoroughly!
Mila’s Favor
Weird name for this one, considering Mila is a god in an entirely different world to this one! This achievement is pretty simple, just recruit every character following my recruitment guide and make sure no one dies until you beat the game! If a character dies, don’t worry, you can just soft reset the game and restart the chapter they died on!
Magvellian Gladiator I, II & III
In chapters 5, 10A and 12B there are arenas that can be found on the map. These arenas allow you to pay some gold to send one of your units to fight a similarly strong enemy. If they win, they gain experience and you gain more gold than what you paid to enter. If the unit dies in the Arena, they are considered dead, so be careful if you’re doing this on your first run, aiming for that no death achievement!
To get these three achievements, simply enter the arena once during each chapter, and kill the opponent you’re set up against. With some luck, you’ll get this on your first try! For the best results, try sending in high level basic units with consistent accuracy, good bulk, and good speed. A level 13+ Franz with a sword would do well here for example! For chapter 5, avoid sending Joshua, Neimi, Lute, Colm, and Ross if he is yet to promote or is a low level fighter/pirate. Seth can work but he will be put up against some powerful promoted units.
S Rank Weaponry
There are 9 achievements in the game that ask you with equipping the legendary weapons found throughout the game. To do this, the characters need to have an S rank in that weapon class. On your character's stat screen, found by pressing R, you can see their current level with all of their available weapons, and how close they are to the next level. Below I will provide some example characters who make good candidates for each weapon. Note that characters who use multiple weapon types can only acquire an S rank in one!
Excalibur (Anima magic): Lute and Saleh Garm (Axe): Ross and Garcia Audhulma (Sword): Eirika and Joshua Vidofnir (Lance): Tana and Vanessa Nidhogg (Bow): Innes and Neimi Latona (Staff): Moulder, Natasha and L’arachel Ivaldi (Light magic): Moulder and L’arachel Gleipnir (Dark magic): Knoll and Ewan
Veteran
The Veteran achievement tasks you with raising a unit to level 20 and then looking at their stats by pressing R. This is very easy to do thanks to the Tower of Valni, you can relatively quickly grind any unit up to level 20!
Bonds of Trust
Bonds of trusts tasks you with raising two units support status to rank A. Supports in this game are special conversations unlocked by characters working together! Some pairings increase their support rankings much faster than others! An easy way to grow support pairings is to have two units that have a support pairing stand next to each other, and then spam the end turn option after all enemies have defeated on a “seize” map (such as chapter 3) until their conversations are unlocked.
You can also the tower of Valni as a way to farm support conversation while farming exp at the same time!
There are a lot of very easy and very fast support chains to unlock, some of which will be listed below.
Eirika and Ephraim Eirika and Seth Garcia and Ross Colm and Neimi Ephraim and Myrrh (Fastest in the game) And many, many more.
To see exactly how supports in fe8 work, and to see a list of all supports and how fast they grow, head over here: https://serenesforest.net/the-sacred-stones/characters/supports/
Secret Shops
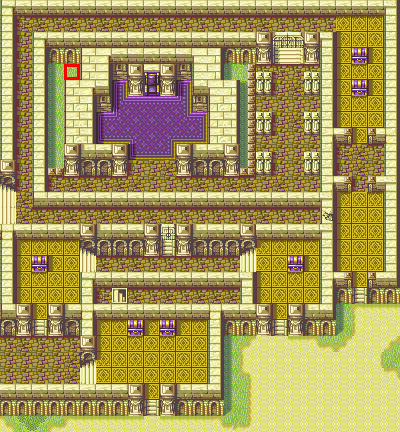
During chapters 14A, 14B and 19 there are secret shops that can be found by bringing a unit holding a member card to the appropriate tile. The easiest way to get the member card is to recruit Rennac during 14A or 14B, who starts with one in his inventory.
14A (highlighted in red)
14B (highlighted in red)
19 (highlighted in red)
The Real Easy Mode
Starting in chapter 16, Myrrh joins your party. She is a unique unit called a Manakete, capable of using her Dragonstone to turn into a powerful dragon. She starts at level 1, and despite her seemingly low stats, is an incredibly powerful unit worth investing a lot of exp into for the rest of the game. Her Dragonstone only has 50 uses, and once broken, you can’t get another one, so be careful with her! Not too careful though, she’s incredibly powerful and there isn’t much game left at this point, so don’t be afraid to use her a little liberally.
This achievement asks you to bring her to level 15 before the end of chapter 16. This is simply done using strategies we mentioned before to train other units such as Ross, though she doesn’t exactly need it, as she is more than capable of killing most enemies on her own. Just be mindful of her low HP and the fact she is weak to archers like other flying units and you’ll be fine!
With that, we've covered every achievement in the game!
Routing
Here I'll offer a general route, or at least what I did to beat the game and get all of the achievements. You can follow this if you want, or not!
Pre Route Split
Starting with the first 8 chapters of difficult mode, I opted to ignore most of the characters recruited, notably, I made sure to use Colm, Neimi, Lute, Moulder, Eirika, Seth, Ross, Joshua and Franz. I heavily abused the ai during these chapters, which allowed me to promote Seth, Lute, and Neimi before the route split, giving me a perfect start for each route! At this point, I ensure I had a backup save of chapter 9B while I moved on to chapter 9A.
Eirika Route
Here, I made sure to use Tana, recruit Amelia in chapter 9A, and promote both Ross and Colm using soft resets and the ocean seal to get the promotion achievements for warrior, berserker, assassin, and Rogue. Eventually, I decided to use that ocean seal officially on Ross to promote him into a rogue. I did this same strategy with Franz, Lute and Neimi to get the achievements for Paladin, Great Knight, Sage, Mage Knight, Sniper, and Ranger. In 10A, I made sure to visit the Arena and used the Hero Crest that Gerik starts with on Joshua to get the Sword Master achievement. After this chapter, I used the Guiding ring dropped by Pablo to promote Moulder into Bishop, then Sage, and kept him as a sage. In hindsight, Bishop would have been better here. In chapter 11A, I made sure to recruit L'Arachel and Dozla and focused on using her. In chapter 12A, I mostly ignored using Saleh, and remembered to pick up Ewan from his house for his recruitment achievement. It was after this chapter that I promoted Tana into both Wyvern Knight and FalcoKnight. In 13A, I played this map twice. The first time, I completed the map within five turns relatively easily by brute forcing my way through the enemies guarding the boss with Franz and Seth, before letting Lute and a few other units nuke the boss. I then replayed it to ensure I could recruit Cormag, immediately promoting him to Wyvern Lord, and kill the boss on turn 6 instead. In chapter 14A I was quick to recruit Rennac with L'Arachel and ensure he visited the secret shop. At this point, I was able to use my second hero crest to promote Gerik into a Hero.
Post Route Split
With the two forces joined together, I ensured that I grabbed all 9 items in the desert of chapter 15, and completed the map. I also made sure to promote Knoll into both Summoner and Druid after the chapter. In chapter 16, with some careful planning I was able to bring Myrrh all the way to level 15, and then finished the map to get two achievements. In chapter 17, I used warp strategies with lute to warp Ephraim to the boss to kill him on turn 2. In chapter 18, I once again used warp to speedrun the map and destroyed most of the eggs before they could hatch. In chapter 19, I once again used warp to kill Riev as early as turn 2, though I later went back after I beat the game to get both the secret shop achievement and the 5 green unit survival achievement. In chapter 20, I once again used warp to warp Myrrh to the boss and kill him, allowing Eirika to seize on the same turn with another warp. (Note, I used all 3 uses of the Hammerene staff on warp.) In the final chapter, I used my final two warp uses to warp Tana with the fili shield up to the boss to clear out one enemy guarding him, another warp to warp Myrrh to the boss, let her attack, then had L'Arachel use the Latona staff to heal Myrrh to full hp, so she could defeat the boss on enemy phase. Then, the Demon King only took 2 turn to take down and the run was complete. At was at this point that I went back for the two final achievements in chapter 19, thanks to a backup save.
Ephraim Route
At this point, the only base game achievements I were missing were promoting a unit to general, equipping Ivaldi, and equipping Gleipnir. During chapter 9B, I made sure to recruit Amelia, and defeat the map. 10B I also played twice. The first time was to complete the map in 5 turns, an the second to recruit Cormag and Duessel, finishing it in 6 turns. It was in this time that I also acquired the final "for your troubles achievement" by keeping the npc cavalry units alive. In chapter 11B, I made sure to recruit L'Arachel and Dozla again. In 12B, I recruited Ewan and Marisa, and visited the arena for four achievements after beating the map. In chapter 14B, I made sure to recruit Rennac and access the secret shop before ending the chapter for 3 more achievements upon completion. I then completed chapter 15 and the work I needed to do on Eirika route was complete.
Post Game
Next, I went back to my Eirika route file in the creature campaign post game. My first goal was to bring Gilliam to level 10 and promote him into General with a Knight Crest. I also grinded my light tome rank on Saleh and my Dark tome rank on Knoll in the tower of Valni until they could equip Ivaldi and Gleipnir. With that done, only the creature campaign remained. I completed the Tower of Valni 3 times to recruit Caellach, Orson, Ismaire and Selena, and made sure to get 200 kills on one of those runs to recruit Riev. I also completed the Lagdou ruins 3 times Glen, Valter, Fado and Lyon, ensuring one run had 200 kills to recruit Hayden.
With that, my run was complete. There are obviously improvements to be made, sure as using Gilliam early on to make sure he's ready to promote and avoid grinding, alongside using Knoll and a light magic user more.
Credits
This guide was written by me, Skill Issue! I’m more than happy to put this together for one of my favourite games with an INCREDIBLE set of achievements, thank you so much to tele for creating this set over 3 years ago!
The information in this game was primarily taken from Serenes Forest and the Fire Emblem Wiki, alongside some of my own personal memory of the game and some routing I created myself, such as in the case of the promotion routing.
Additional thanks to HeroMaster for proofreading and offering their own input!
If you made it this far, thank you so much for reading through this guide, and I hope it helps you Master this game! Good luck, I hope you enjoy your time with Fire Emblem: The Sacred Stones!