Final Fantasy XII: International Zodiac Job System Missable Achievements Guide - RetroAchievements/guides GitHub Wiki
Set developed by siouxerskate and SnowPin, guide written by benit149
Hello, and welcome to my missable achievement guide for Final Fantasy XII: International Zodiac Job System, an updated version of the original Final Fantasy XII that only saw release in Japan for PS2. Other regions would eventually receive Final Fantasy XII: The Zodiac Age for Playstation 4 and Steam, and a further revision on Nintendo Switch. All of these versions have a variety of tweaks and adjustments for things like treasure, item drops, the battle system, the License Board, and an added Trial Mode. Due to how complex explaining all of the differences between these releases would be, I will strictly only be focusing on the mechanics for International Zodiac Job System, or IZJS for short.
The way the set is designed is not very intuitive as far as knowing the order these missables will occur in, which is a common complaint I’ve seen in discussions about the set. I doubt it will change anytime soon either, so I decided that if I did guides for other long JRPGs with complex sets, I would do one for this as well. Hopefully this will do the set a little more justice now that I’ll be presenting the missables in a more chronological order. I won’t be covering the non-missables in any great detail unless the requirements are vague and out of the way for a new player to understand.
As my objective is to outline basic gameplay mechanics, explain a couple of exploits, and present the missable achievements in a sensible manner, this will not be a full walkthrough of the entire game. I used Red Scarlet’s GameFAQs guide for my playthrough, especially since it’s tailored to the IZJS version, whereas most others you may find will be for Zodiac Age, which is not entirely the same. Be warned that not everything the game has to offer is covered there, so use it in conjunction with this guide to be sure you don’t miss anything.
A lot of credit goes to other RA users, Final Fantasy Wiki, YouTube videos, guides and walkthroughs for providing me with as much information as I could find, which I compiled here as best as I could. I would like to shout out to everyone who helped me along the way, whether through actively giving me advice or providing a guide for explanation.
TABLE OF CONTENTS
Since this guide is going to be loaded with tons of information and links leading you to different guides, I have broken this down into separate pages so as not to overwhelm you. I will also sprinkle these links in throughout the walkthrough, but here’s the easiest spot to find them.
- Story-Related Missables -> you are here
- Hunt-Related & Misc. Missables
- Gameplay Mechanics
- Monster Drops Checklist
- Tricks & Exploits
STORY-RELATED MISSABLES
Obviously, there will be heavy story spoilers involved due to many achievements requiring specific plot triggers, and I will be discussing job selections for specific bosses right now. If you wish to enjoy the story, please stop reading here.
I won’t be covering the majority of the non-missable achievements unless their requirements are vague and potentially difficult to understand for a new player. I’ve broken down the missables into two categories:
-
Story-related, which involves either acquiring items before a specific plot moment, doing time-sensitive sidequests, or defeating one-time story bosses with a variety of restrictions
-
Hunt-related, which involves doing missions to defeat optional monsters, along with some other requirements like stealing, doing a boss challenge, or some miscellaneous tasks. Since I felt this main page would get bloated with too much information if I kept them together, I put these missables in a separate page
Be sure to brush up on the first few achievements for both categories, since they will either be setting up for a late-game achievement or teaching you mechanics that will be repeated later.
Job Selection
For your job selection, I would go with the following and my reasoning for each:
Vaan: any class you want, especially if you want to have him balance out the others’ classes. He doesn’t have any difficult boss challenges beyond Mimic Queen, which is really easy
Penelo: any class that lets her learn the Remedy Lore 3 license to cleanse Doom, for when she has to solo Ahriman. Archer, Shikari and Machinist all have this license, so choose any one of them for her
Balthier: I went with Time Mage, which you definitely want for spells like Float and Haste. His boss challenge against Cid in Pharos is a three-phase fight that also includes a summon, but the Reverse Mote can help with this regardless of what class you give him. There is an optimal spot to farm them, which I will alert you to during the guide
Fran: Black Mage or Red Mage. You want a class that can inflict Sleep, and those are the only two classes that have access to the spell. Without Sleep, her boss challenge can be quite annoying
Basch: I went with Samurai, which has some hefty HP bonuses early on. He has two duels against Gabranth, and he can hit pretty hard when his HP is low. You will definitely want Reverse Motes for this, so I suppose it doesn’t really matter what class you choose for him
Ashe: White Mage, especially for Holy and buffs. Her solo challenge is the biggest one, going against the final boss’ three phases back-to-back-to-back. Once again, Reverse Motes will be extremely useful
Of course it’s entirely up to you, but these choices make some of the challenges more bearable. Definitely have a class that can learn all of the Potion Lores at least, especially for the three Beast My Guest achievements, which is why I recommend Archer as one of the classes – it can learn all of the item lore licenses without the need for Espers, and can attack flying enemies.
Deliver a small package for your reward...
When you get the quest to hunt the Rogue Tomato, do not leave Rabanastre yet. First, receive the Small Package from the green bangaa in Southern Plaza and deliver it to the Hapless Merchant (brown bangaa arguing with a soldier) in East Gate. This must be done before exiting the East Gate into the Estersand to fight the Rogue Tomato, meaning the window for this is absurdly tight.
Obtain a Diamond Armlet before returning to Old Dalan
Dalan will give Vaan the mission to retrieve a Sunstone from some nomads in the southern Giza Plains. Once at the nomad camp, Penelo will join the party. You can charge the Sunstone up and complete the quest, but do not return to Lowtown to speak to Dalan yet. You want to head to Rabanastre’s western exit to the Westersand area. Absolutely make a save before venturing out, because these enemies are significantly more dangerous than the ones seen in the other desert areas. Starting from Rabanastre, head to the west exit, then the south exit, and finally hug the northernmost area while heading to the northwest exit. You’ll wind up in an isolated area where a rare treasure urn can spawn at the northwest ledge 25% of the time. If it does not show up for you, you need to move two screens away, or just get a Game Over on purpose and retry from town. If the urn shows up, nab it for your Diamond Armlet.
Obtain a Gladius before giving a Sunstone to Old Dalan
Just like with the Diamond Armlet, you need to find a Gladius before returning to Dalan with the Sunstone. This involves stealing from the Lindbur Wolf in the Westersand, which is a rare monster. To spawn Lindbur Wolf, you must first kill 20 Wolves in Westersands. Afterward, from Rabanastre, go to the southwest exit to reach the dead-end section of Shimmering Horizons. You need to cast Protect on your allies and Blind on the wolf, then lure him to the zone line. If the situation gets dangerous, you can zone out and heal. If you haven’t chosen the appropriate jobs for those spells, do the Dustia Trick up to about level 25 and have Penelo spam Cure or throw Potions, zoning out if her healing isn’t keeping up with the damage. The steal is a 3% base chance, and you can’t get Thief’s Cuffs at this point in the game. If you do such leveling up though, you will have missed out on some level-restricted boss battles.
![]() New and Exciting Ways to Kill a Man (5)
New and Exciting Ways to Kill a Man (5)
Defeat Firemane without Gambits active
While progressing through Garamsythe Waterway with Vaan, Balthier, Fran and Amalia, flee from every battle you come across. While this boss fight doesn’t have a level restriction, the next one will at level 12. Since new characters join at a slightly higher level than Vaan, and you will be getting a guest character then, it’s vital to stay as low level as you can while managing any upcoming bosses. I’ll inform you of each level milestone for the subsequent bosses so you don’t over-level by mistake.
For this achievement, it is ridiculously easy to miss because you definitely will have been relying on Gambits to make your life easier while in Garamsythe Waterway. No achievement notification will show up either during the fight. You simply need to turn off everyone’s Gambits before initiating the fight with Firemane. Make a save in Central Waterway Control before beginning in case you mess up. You will need to manually assign attacks to your characters, while healing with Fran or Amalia’s magic or items if an emergency comes up. The boss itself isn’t too hard as long as you keep up with juggling everyone’s actions and reviving any fallen characters with Phoenix Downs. The important thing is to have everyone’s Gambits turned off – the battle can then proceed however it wants.
Don’t let Charge drop below 25% in Barheim Passage during escape. Must start from the beginning of Barheim Passage and do in one session
I suggest you do this separately from A Shocking Escape because your characters need a decent number of levels to be able to kill the first Battery Mimic you come across ASAP, and it would be too complicated to attempt both challenges at once.
When Basch joins as a guest member at Barheim Passage, you first need to turn the power on to the dungeon. You will now have a Charge gauge that goes down as power is consumed. Once ready, open the gate with the switch - this lowers the meter from 100% to 70%. The shopkeeper Burrough will tell you that opening a gate consumes 30% of energy, so you need to recharge the power as you make progress. In the dungeon proper, there are Battery Mimics that also drain the power, so you need to get rid of them ASAP. When you defeat one, you will regain all of the energy they siphoned. On the minimap, the damaged power conduits will be indicated by an exclamation mark, which the Mimics will be attracted to, so they shouldn’t be too hard to find.
The real challenge will come with the Mimic Queen, the boss of this area. Have your controlled character go after the Tiny Mimics since they’ll be siphoning power during the fight, then focus on the Queen and dispatch any more of the Tinies as they respawn. The achievement will pop when you kill the Mimic Queen. Be sure to do everything in one gameplay session, which means no resetting or allowing the power to drop below 25%.
Defeat Mimic Queen with just Vaan and Guest in the party, no HP to 0, LVL <= 12
Do this separately from Keep On the Lights because you need everyone’s levels to be 12 or lower. The maximum level requirement for the boss after Mimic Queen is level 15, so you don’t have a lot of room to work with here. Flee from battles if needed, although I fled from all battles in Garamsythe Waterway and was around level 5-7 when I reached Barheim. If Basch’s level is below 12 when he joins, go ahead and do some grinding.
Once you reach the save crystal and save your file, remove Balthier and Fran from the party in the main menu. You only want Vaan and Basch participating in the fight. If you do it right, you will see the achievement notification icon during the battle. “No HP to 0” means your active characters cannot die during the fight. This will be the same for some level-restricted boss fights going forward. Depending on the classes you’ve chosen, this will either involve Vaan healing if he’s a White Mage or stocking up on a LOT of Potions purchased from Burrough. If he’s in a class that has Potion Lores, even better.
My initial setup was to have Basch’s Gambits be attacking the same target as Vaan, and having him use Potions at less than 70% HP. Go after the Tiny Mimics ASAP so they don’t drain the power too rapidly. Once they’re gone, focus on the Queen, killing off the Tinies as they come up. You also want to be below level 10 or 11 because you’re still gaining experience from killing the Tinies, so you may level up during the fight. Once the Queen is down enough health, it will start using Ground Shaker, which is very painful. Even worse is Shockstorm, which will hit for around 170+ damage to both characters. From here, I removed Basch’s Potion Gambit and had him solely focus on attacking now that the Queen didn’t focus on creating new Tiny Batteries as often. I had Vaan use items any time either of them were damaged, especially since his attack was not as strong as Basch’s.
After escaping Barheim to the Estersand, this was where I took some time to fight low-level enemies not for experience, but actually for building up LP to improve everyone’s License Boards without gaining too many levels. Once you leave Rabanastre for Bhujerba, you cannot return until you’re done with all of the story events involving rescuing Penelo and Ashe. If you’re not confident, make a save in Rabanastre as a backup before going to Bhujerba. I made Basch a Samurai, which has easy access to a bunch of HP nodes early on which you will definitely need for the next achievement.
Obtain a Runeblade from Ktjn after answering her questions
Ktjn is a Viera woman whom you need to speak to at several points throughout the game. The first time she’s available is after escaping Barheim. Ktjn is located in Rabanastre’s Muthru Bazaar area and can be found in a little crevice in the stairwell. The questions themselves are not missable since they will refresh every 15 to 20 minutes after destroying the Sun Cryst. The missable aspect comes in how you answer the questions themselves since the rewards will be different depending on your responses. You want to have the value be at +4 by the end of the sidequest to get the Runeblade, so reply in any way that gives +1 point. These are the points in the game you need to speak to her, and how to answer each of her questions.
After clearing Barheim: “But the land, I cannot hear it… Should this not trouble me as a Viera?”
- Yes, you should be ashamed. (+1 point)
- No, don’t be silly. (-1 point)
Note that if you go to Bhujerba but forget to speak to her, you can always board the Skyferry back to Rabanastre. Just be sure not to speak to Marquis Ondore to start the Dreadnought Leviathan sequence.
After clearing Dreadnought Leviathan and rescuing Ashe: “I knew my choice would bring hardship, yet…”
- You should’ve thought it through. (+1 point)
- Things will get better. (-1 point)
After clearing Raithwall’s Tomb: “Do you think it possible?”
- Sure, if you put your mind to it. (-1 point)
- I don’t know your sister. (no points)
- It’ll never happen. (+1 point)
After reaching Mt. Bur-Omisace for the first time: “What do you think?”
- I think it’s a good idea. (+1 point)
- I am not sure. (-1 point)
- It’ll never happen. (+1 point)
Return to Ktjn after defeating Judge Bergan at Mt Bur-Omisace to conclude the side quest. Ktjn will make her decision and, although she doesn’t say so explicitly, she will be traveling to the Clan Hall. Go to the Clan Hall and speak with her in the center of the room to receive your reward.
![]() I Will Have My Pound of Flesh (10)
I Will Have My Pound of Flesh (10)
Kill all of Ba'Gamnan's henchmen then defeat him in Lhusu Mines - Site 2 (stay in Lhusu Mines - Site 2, no Seitengrat equipped, no HP to 0, LVL <= 15)
The next boss’ level cap is 22. It will take a long time to get there after clearing this achievement since you need to traverse through Leviathan, Ogir-Yensea Sandsea and Nam-Yensa Sandsea before even reaching Raithwall’s Tomb.
After the confrontation with Ba’Gamnan in Lhusu Mines, your are encouraged to run away from him and his henchmen for story reasons. Don’t leave the screen you start the chase on though. Stick around and fight the bounty hunters. Lamont’s level doesn’t matter here since he leaves prior to the fight. Set everyone’s Gambits up to attack the same target as the party leader’s since you want to save Ba’Gamnan for last. You should have some HP+ nodes unlocked on your License Boards.
Go for Rinok first since he has an attack that does quite a bit of damage to a single target. Once he’s down, attack Bwagi and Gijuk, then defeat Ba’Gamnan last. Use Hi-Potions as needed since they’ll keep up with the damage better than Potions. As long as you come prepared, you should be able to defeat these guys below level 15.
Finish "I'm Captain Basch" minigame in 100 seconds or less
After going through Lhusu Mines and dealing with Ba’Gamnan, you will be back in Bhujerba and need to raise attention. Vaan volunteers for the job, where you need to press Square and have him shout near some citizens to raise a Rumor Level meter. You want this to reach 100% in 100 seconds (1 minute and 40 seconds) from starting the minigame. I will quote the suggestion that RedrumOverdose made in the achievement’s comments, but this will take several attempts to get the route right. Save at the crystal, practice a few times, then go for it when you’re ready.
“A tad northeast of the save crystal, there's a big green guy with another dude. It might take a second for them to populate, but you'll get 6% from them off the bat.
“Then, walk south out of the Lhusu Square into Miner's End. There's a guy with a book at the Y-shape there. Hit him up for a 20% jump. If you run to him, he won't load for a bit and then when you press Square, he'll communicate with you instead of you doing your testifying so no need to rush to him. But from here on, go ahead and L1 run. It's real easy to accidentally turn left into the main area of Miner's End since the map shows you need to go left but because you turned right to see the guy with the book, remind yourself to continue in that direction. It took me a few times to get it right.
“From here, you'll charge into Cloudsbourne Row and at the first intersection, you'll want to go north (right). At the next intersection, you'll find another guy with a book who will give you another 20%.
“Then, turn east (right) and follow the backwards "C" shaped road to the end. Don't worry about anyone along the way, just make sure you talk to the guy with the book there for an additional 20%.
“Straight ahead in the next screen, you'll see a close book guy with a cartographer Moogle and you'll get 25% from the pair.
“From here, turn south (left) and sprint the short distance to just in front of the weapon shop there and you'll have another guy with a book to get you that final push.”
Once you’re done with that, go back to Rabanastre via Bhujerba’s aerodrome and speak to Ktjn as well before meeting with Ondore.
Defeat first Demon Wall in The Tomb of Raithwall (all Lvl <= 22, No Seitengrat equipped)
The next two bosses’ level cap will be level 25.
There are two Demon Walls in Raithwall’s Tomb. This first one is optional to fight, and is significantly harder to defeat than the second mandatory one. You’re supposed to run away from it, but you obviously can’t do that for this challenge. One thing I did was run around in Lhusu Mines looking for Aero Motes and Dark Motes in chests. This way if I ran out of Mist Charges for everyone, I had enough attack items to fall back on. If you have a Black Mage, their magic can compensate as well. My highest level character was Vossler at level 21, and I got upwards of 30 Motes before attempting this.
This is also where you will want to know how to perform Quickenings effectively, as they will be doing the bulk of the damage. You definitely want to unlock at least one Quickening node for everyone at some point. If you haven’t practiced Quickening chains yet, this is your time to do so. Demon Wall will eventually banish one of your characters, so swap out the ejected character for someone else with a full Mist Charge and initiate another Quickening chain with them. If no one has Mist Charges left, throw those Motes or cast spells like your life depends on it, because it does! Even with all of this preparation, it was still an extremely close call for me, so don’t be surprised if this takes you a few attempts as well.
Defeat Belias with just Vossler (all three members in party, no party gambits on, only action by party can be potion, All LVL <= 25, must enter the room with gambits off)
Cripes, this is needlessly complicated. Prior to the fight, everyone needs to be level 25 or lower, have everyone’s Gambits turned off except for Vossler’s (“no party Gambits on” refers to the six main protagonists, and doesn’t apply to guests), and you can deal damage only with Vossler. If someone gets the Oil status, have Vossler use a Handkerchief to remove it, preferably on himself. If anyone else uses one, it will invalidate the “potions only” portion of the achievement. If you do the setup I’m about to recommend, you won’t need to worry too much about the main party.
Another issue is that the main party must ALWAYS have three members in it. If you’re setting up in the menu and you want to change characters, select a fourth character before removing the character you want to preserve the three-character limit. Note that there isn’t a “no HP to 0” restriction, so you can have characters die. If you intend to revive them, have Vossler use the Phoenix Down and no one else. If Vossler dies, you need to reset. I suggest not reviving your normal party members, especially since you’ll need all the potions you can get.
The key to victory will be your equipment providing magic resistance. In the huge room after defeating the second Demon Wall, chain kill 10 to 12 Seekers (greyish bats), then move as far away from the center of the area with Waystones as possible while preserving the chain. Then move back up toward the Waystones, and a rare game called Barmuu should be there. If not, soft reset and try again. You want to steal Lamia’s Tiara from it, which gives 25 magic resistance. Have Vaan, Balthier and Fran as your party members so everyone can steal. If you did the Gladius steal earlier, you should know to zone out and try again if you don’t steal a Lamia’s Tiara or are having trouble.
How many of the tiaras you need will depend on the classes you give your characters. If you went with the class choices I recommended, then Samurai, Black Mage and White Mage can equip it. If not, don’t forget about the Manufacted Nethicite’s ability to halve elemental damage in exchange for inflicting permanent Silence. Should you successfully steal a tiara, you can leave the dungeon to reset and do the process again.
Anyone who has Potion Lores in their License Board should also invest in those to improve the potions’ efficacy. Archer and Time Mage provide the highest number of Potion Lore tiles. Invest in HP increases as well to help with surviving Belias’ big attack. From there, have Vossler dealing the damage while manually having the others use potions. Be warned - Hi-Potions are NOT allowed here! Only the regular Potions are acceptable! Thus, you absolutely want a full stack of 99 Potions going into this to be certain you won’t run out.
For the fight itself, it’ll consist of your characters standing aside while Vossler does all of the work. He can use Expose and Wither, then Traveler one time to deal some hefty damage depending on the number of steps you’ve taken. Be wary of Firaja, as it will inflict heavy fire damage and cause the Oil status, which boosts fire damage further. This is why you wanted the equipment for the three characters – so they take less damage from it so you can focus on healing only Vossler. From there, just be patient and let Vossler do his thing until Belias goes down.
Even after all of that, you still need to be on your toes for the next missable boss-related achievement…
Steal from and defeat Vossler with Fran in party (no summon, no Quickenings, no Seitengrat epuipped, no HP to 0, LVL <=25)
The next two bosses’ level cap is level 30, and the first one will involve only using a guest member to deal damage, while the second requires using just a specific party member plus the same guest.
Once you’re done with Belias, get the Dawn Shard and exit the tomb. You can save at the crystal outside so you don’t have to do that rigamarole again, though teleporting is temporarily blocked. I had my party be Fran, Vaan (Uhlan) and Ashe (White Mage). When the fight initiates, Fran will be in Berserk status, though she’ll break out of it eventually. Since you need to steal from Vossler, either Vaan or Balthier need to be doing the stealing. The item you steal from him doesn’t matter, so long as you acquire something from him. Vossler will eventually do the Enrage move to boost his damage, so use Hi-Potions and/or Cura to heal. He also likes casting Reflect on himself, so this is why I had Ashe/White Mage with me – cast Dispel on him, and he’ll keep trying to put Reflect back up, taking some of the bite out of his attacks.
Once Vossler is down and you go through the cutscenes, remember to pay a visit to Ktjn.
Receive your gift in Archades for helping July with an investigation
While you won’t be getting this achievement until reaching Archades later in the story, you do need to initiate the sidequest involving July before completing the events at Mt. Bur-Omisace. After defeating Vossler and returning to Rabanastre, go to the entrance of Nalbina and find two Imperial guards named Gibbs and Deweg blocking the path to the northwest. Speak to the girl July, then the moogle Gurdy who is floating in front of the chocobos in the pen and rent one from him for 800 gil. Ride it towards Gibbs and Deweg and they’ll take off, ending this part of the sidequest. Once in Archades, find July in the magic shop and speak to her for your reward.
Obtain the Thief’s Cuffs from Zertinan Caverns before meeting the Garif Tribe War-chief
If you see the achievement notification for Passage of Death, it’s also time to do this one. There’s no achievement notification until you go into the room where the Thief’s Cuffs can be acquired. This isn’t as complicated as stealing the Deathbringer, and your stealing chance will improve with this accessory, so let’s get it first to make your life a little easier. It is found as a treasure in Zertinan Caverns' The Undershore, which is the area with the blue save crystal. It’s a 25% chance to appear, but is always Thief's Cuffs. Just like with the Diamond Armlet, if you don’t see the treasure urn, move two screens away and check again. This map helped me find the room in question.
To get to Zertinan Caverns, start from Rabanastre and go to the Westersand. Go through until you reach Shimmering Isle, then proceed west into that area until you reach an entrance leading underground. Once there, keep going southwest until you see a boulder you need to push into the quicksand. Hurry past the Buers since they are too dangerous to fight right now. The next room you reach will be the one with the save point, and the path you need to traverse in that room will be invisible on the map.
Obtain the Barheim Key and an extra gift from a Moogle
The next achievement involves stealing the Deathbringer from an enemy in Barheim Passage, but it’s been blocked off. So how do you get back in there? This is going to involve a lot of running around to get items, and some of them are missable if you’re foolish enough to sell them. They are the Cactoid Flower from the Flowering Cacoid mob hunt (this is a key item, so it can’t be lost), and the Great Serpentskin from the Nidhogg mob hunt in Bhujerba, which can be sold and will screw you out of this if you do so. From here, I will quote a reply posted in GameFAQ’s Q&A section
“To begin this quest, speak to Dantro in Dalmasca Estersand/Outpost. He's the guy that issued the Flowering Cactoid mob hunt. He'll ask you to give the flower to his wife. Head North a few screens until you reach Dalmasca Estersand/South Bank Village (the place with the merchant and Gate Crystal). Go there and talk to Dantro's wife, who will be outside a house on the Eastern side of the village, near the river bank. She'll give you a Bundle of Needles. Now exit and re-enter this area. Go to the riverbank and speak with the little boy Chigri. Eventually, choose to go to North Bank Village. Speak to him again, and after the next scene, have him take you back to South Bank Village. Now talk to Dantro's wife once more, she should speak of what she did with your flower. Go behind her house and examine the flower on the floor. It will turn into a Cactoid and follow you. Go talk to Chigri, and return to the North Bank Village. Talk to the big Cactoids to finish this part, gaining you Gil and the Wyrmfire Shot bullets.”
This will get you the Covered Up In Flowers achievement. Continuing on…
“Go back to South Bank Village (the boy takes you back and forth now for free) and talk to Dantro’s wife. She requests Shells. Search the river bank right near the house and examine anything shiny you see. These are the Shells. Two are found in the village, and three are along the riverbank in the water just north of the village. Depending on how many you collect, the treasure at the end of this quest will increase. Give these to the Wife. She then requests another item called Nebralim, but it is located near Dantro himself. So go back South to the Outpost and speak to Dantro. Search around the camp, near any boxes you see, or anywhere you see something shiny. You should get 2 vials of Nebralim. Give these back to Dantro’s Wife. The final item she wants are these Flowers located in the northern parts of the Estersands.
“This part could be hard if you haven’t reached level 25+. The enemies in The Yoma and Broken Sands sections are that level, so they can be hard. However, run north anyway to the Broken Sands. Search around the huge boulders you see to find some of these Flowers. Bring them back to Dantro’s Wife. Now, if you want the treasure at the end of this quest (the EXTRA treasure I mean, not the Barheim Key) then give her the Great Serpentskin. If you do, you get more stuff based on what you gave Dantro’s Wife. It goes:
- Great Serpentskin, 5 Shells, 2 vials of Nebralim, 3 Flowers = Golden Amulet, Magick Gloves, Balance Mote
- Great Serpentskin, 2 Shells, 2 vials of Nebralim = Magick Gloves, Balance Mote
- Great Serpentskin only = Balance Mote
“Now you must leave the South Village, and re-enter. Talk to Dantro’s wife. Then leave and re-enter once more. Talk to her again. She tells you the traveler is all healed. Look around the house to find her, and speak with her. The Traveler thanks you with the Barheim Key.”
Obtain a Deathbringer sword before meeting the Garif Tribe War-chief
Got the Thief’s Cuffs and the Barheim Key? All right, it’s finally time to do this one. This is a 3% steal chance from the Ithuno monsters in Barheim Passage. To get back to the dungeon, head for the Estersand and keep going north until you reach the Banks of the Nebra section. There, head all the way southeast, and you will find a locked door that can be opened with the Barheim Key. In the dungeon, head for the section called Special Op Sector 5, which you can see on this map.
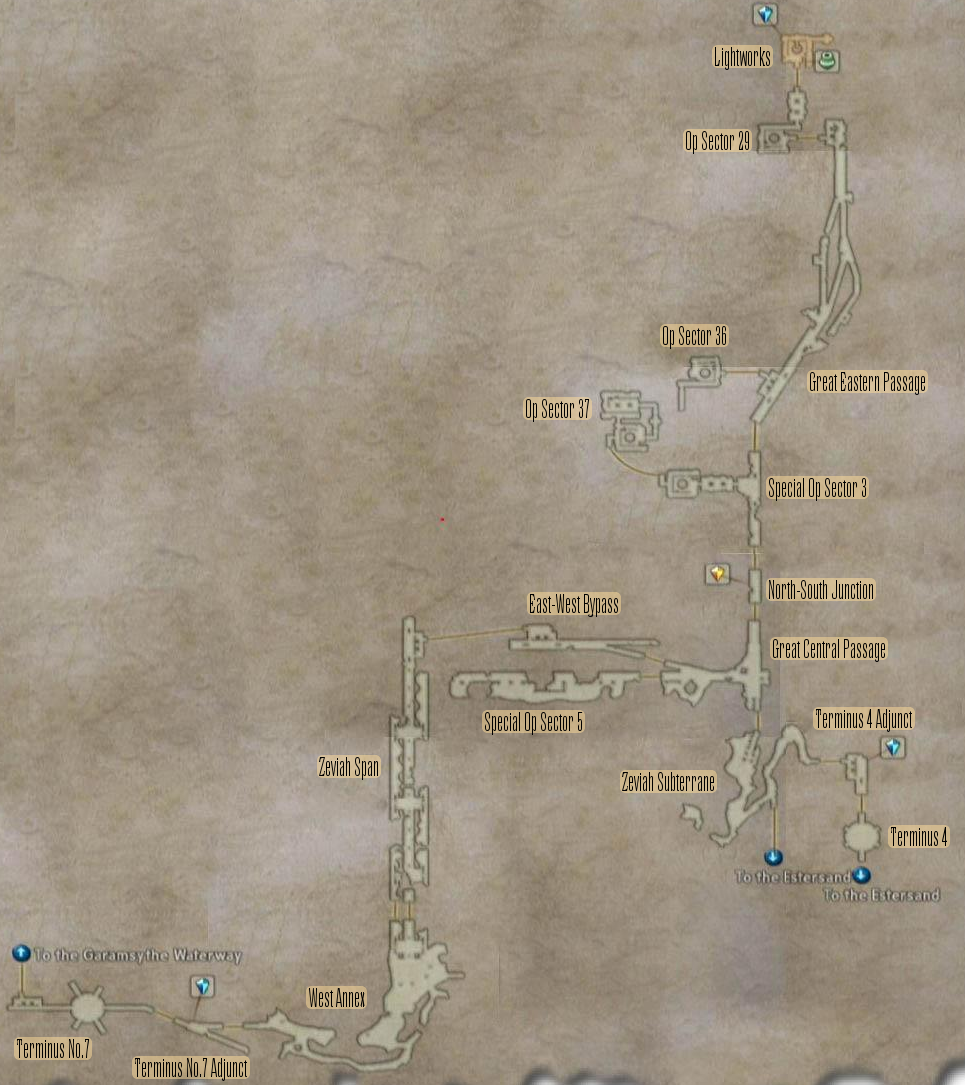
Ithuno has a 20% chance to spawn there, disguised as a treasure chest at the end of the area behind a big rock on the train tracks. If a chest appears there, one will know it is Ithuno if the bottom section of it is purple and the chest itself is silver (other chests in the area are green). Although the spawn rate is supposed to be 20% per entry, the player may need to enter the screen countless times until it appears. Once you find one, have two thieves on stealing duty while your White Mage heals. The Deathbringer is the only item Ithuno will ever have, but it is very difficult to steal. Equipping the Thief’s Cuffs only improves the chances to 6%, but it’s better than nothing.
Be warned that the enemies in this room are incredibly dangerous at this point in the story. Don’t engage them whatsoever unless you don’t mind using Quickenings to dispatch any monsters harassing you during your stealing attempts. Find your Ithuno, steal from it, then hightail it outta there. Make a save at the nearby crystal in case your party dies during this. I made a screenshot of where exactly to look, as well as what the Ithuno looks like and that it indeed has the Deathbringer.
Defeat Tiamat with just Larsa (all three members in party, no party gambits on, only action by party can be potion, All LVL <= 30)
The next boss’ level cap is also level 30.
Same deal as with the Belias challenge only using Vossler. Tiamat is the boss of Henne Mines, and while it’s weak to the earth element, there are no spells or Motes that can inflict damage of that type. Turn off everyone’s Gambits, place Potions in the item command’s top slot, stand back and keep Larsa topped up. I farmed Knots of Rust in Lhusu Mines and had Larsa throw them at Tiamat. The boss can inflict the Petrify status, so have some Gold Needles in stock and only have Larsa use one if needed. It can also cause Disable, which is dangerous if it hits Larsa because then his ability to use any items, magic or attacks are cut off for a short amount of time. He’s the only one who can use good healing or status curing items, and Tiamat might still bully him while in that state, meaning you need as many jobs with Potion Lores unlocked as possible. Just like with Vossler, you are allowed to set up Gambits for Larsa, so I had him set up to throw as many attack items as I had in stock before being forced to watch him slowly chip away at Tiamat. Larsa is shockingly good at parrying attacks, so you may get lucky there as well.
Stay alert, because the next achievement’s requirements will happen very shortly after you leave Eruyt and head east to the save crystal.
Defeat Elder Wyrm with only Fran and Larsa in party (Larsa gambits off, no Seitengrat equipped, No HP to 0, no Espers, no Quickenings, LVL <=30)
The next boss’ level cap is level 32.
Fran needs to be the party leader, not Larsa. Everyone else must be removed prior to the fight starting. Depending on the class you chose for Fran, this may or may not be an easy win. Elder Wyrm is susceptible to Sleep, and the Nihopalaoa accessory grants 100% success for the spell to work. If she doesn’t have access to Sleep, you can use a Nihopalaoa + Alarm Clock on the boss instead. If she’s any class other than the Mages, you can look for Aero and Aeroga Motes since the boss is weak to wind element. Aero Motes can be found in Lhusu Mines, while Aeroga Motes are in Zertinian Caverns – Undershore where the Thief’s Cuffs were found, but the chest is a 30% spawn rate, so I didn’t bother with this.
Larsa also has Shades of Black which allows him to cast a random Black Magic spell. This is going to be your primary source of damage since you can get some good spells like Aeroga, Scathe and Flare for free. Sleep can also occur that can incapacitate the boss for a bit, though I only saw it once. You definitely want Larsa to cast Bubble on both himself and Fran to boost their HP. You have to worry about two Treants accompanying the Elder Wyrm, so get rid of them first or else they’ll harass you too much. Once the boss’ health gets low enough, it’ll do an attack called Sporefall. It doesn’t cause any damage, but can inflict numerous status ailments that complicates this battle even further. Of these, Confuse is the most dangerous. You don’t want your characters attacking each other to the point of dying, so have loads of Smelling Salts on hand to cure it. Sporefall won’t always hit both allies, instead targeting one, but if that happens, you better pray an attack snaps one of them out of Confuse.
This took me two attempts, and it was frustrating. The first time, I didn’t have enough healing items to keep up with the damage and statuses, and right when I was about to kill the boss too. Upon restocking, my second attempt went much better. Since I made Fran an Archer, the unlocked Potion Lores allowed her to spam more effective Hi-Potions while Larsa focused either on Shades of Black, the occasional Cura, or Bubble. I also improved Fran’s Remedy Lores, so the few of them I had helped me cleanse after Sporefall for the first half of the fight. Prior to the battle, I also farmed for 50 Aero Motes and had Fran throw them when she had the chance. They don’t do great damage, but they supplement Larsa’s spells well enough. You just need a lot of them for it to be worthwhile. Another way I snuck in damage was to use Traveler, though it’s availability will depend on the job you’ve chosen and how many steps you’ve taken.
Defeat Mateus with only one character and Belias, without using Attack command, and deliver the final blow by selecting Belias' Hellfire Attack (no Seitengrat equipped, no HP to 0, no Quickening, LVL <= 32)
The next boss’ level restriction is level 35, and it must be done with Penelo solo.
Whoever you assigned Belias to earlier will have to be the one participating in this fight. I had assigned him to Penelo who was a Knight, then unlocked Souleater so she could do damage without using the Attack command, with Belias healing her. Souleater is a Technick available after meeting the Gran Kiltias on Mt. Bur-Omisace, so you can either go there or to Rabanastre to purchase it. You also want at least two Mist Charges to summon Belias with. I experimented with one and it was hardly enough, so I went with three. Note that I once accidentally used the Attack command on Penelo herself (slip of the hand), but the achievement was not invalidated. The challenge will fail if Mateus is targeted with it, so turn off Penelo’s Gambits to be safe.
Once set up, summon Belias and have him use Painflare on Mateus, manually inputting the command each time. Your character should be on healing magic or Hi-Potion duty for themselves due to the Ice Azers’ damage. Belias should get some Curas off mostly for himself, but is helpful for you if your own healing isn’t keeping up with the damage. When Belias’ timer starts to get low, have him do Hellfire, then resummon him and continue the process. The killing blow must be with Hellfire, so get Mateus’ HP down as low as you reasonably can before initiating it. It only does around 1000 to 1200 damage, so it’s not as impressive as you might think when Painflare is doing around 600 or so each. Since my Penelo was a Knight and I had an Ice Shield on hand, it greatly helped with reducing the ice-elemental damage.
Even though the Ice Azers will just harass you with damage in the first half of the fight, get rid of them when you can. Once Mateus’ health is low enough, they will start healing him for about the same amount as a Painflare. I had Souleater for the job, combined with Belias’ unlimited Cura castings. Watch out for Mateus’ strongest attack Blizzaja. It shouldn’t kill Belias, but if your character isn’t protected from ice-elemental damage, they could be in real trouble.
After acquiring Mateus as a summon, I gave him to Penelo so she could unlock Curaga on her License Board. If you do the same as me, don’t forget to buy the spell from a magic shop. This will come in handy for the next challenge.
Once this boss fight is over, you will be fighting Judge Bergan in Mt. Bur-Omisace next. There are no restrictions involved with his fight, but be sure to pay a visit to Ktjn afterward to have her move to the Clan Hall. Speak to her there and, as long as you answered her questions correctly, you should get the Runeblade and Sister’s Path out of the way.
![]() Where is the Zodiac Spear? (25)
Where is the Zodiac Spear? (25)
Obtain an Ensanguined Shield from a treasure chest before entering the Sochen Cave Palace for the first time
You will not see an achievement notification icon for this unless you enter the room with the chest containing the shield.
You need to go to the optional dungeon called Necrohol of Nabudis, which is accessed at the westernmost exit from the Salikawood. This dungeon is extremely dangerous for the party at this point, but if you have the Float spell, you can at least eliminate the damage from the numerous traps here. Set it on your party members before entering, since there are traps right at the beginning. I actually recommend running through the dungeon one character at a time, healing up and reapplying Float when you reach a safe spot. Go to the room labeled Cloister of the Highborn. From the entrance, go north twice to reach this room. Use this video to show you where exactly you need to look for the chest containing the Ensanguined Shield (warning, the video’s intro is a bit loud). Once you have it and (if) you manage to escape with your skin intact, you’re free to go through Phon Coast and Tchita Uplands to reach Sochen Cave Palace.
I made a short video demonstrating my own attempt at doing this prior to the next boss challenge, and it was both vicious and tedious. It took me about three hours’ worth of attempts before I finally got the chest to spawn. You do have the option of grinding a bunch to help survive the dungeon, but you’d have to forego the remaining boss challenges for it. Since I didn’t want to waste time like that, I decided to approach it this way to be more efficient, even if it was way more dangerous.
Defeat Ahriman with just Penelo in the party (no Seitengrat, LVL <= 35, no summon, no Quickening)
The next boss’ level cap is level 50, and is the third Beast My Guest boss involving Reddas.
What an awful achievement this is. It practically punishes you for choosing a bad class for Penelo. If you made her a Knight like I did, Souleater will not work here because it will damage her instead. The most popular strategy is to use a Dark Energy, which can be found rarely in a chest at Mt. Bur-Omisace – Temple Grounds with a Diamond Armlet equipped. The chest will respawn very rarely, and the likelihood of it containing gil is 80%. Expect to spend a ludicrous amount of time zoning in and out of Temple Grounds until you find one.
If you want to get one without using the chest, Darkmare in the Stilshrine of Miriam drops the Grimoire Togail, and you also need to poach it to have a slim chance at getting Grimoire Aidhed. The latter is easier to get from Mallicant in Zertinian Caverns, but they may be too dangerous for you to challenge without good equipment or Seitengrats. Bat Wing can be stolen from Aerieel in Lhusu Mines, or poached from Seeker in Barheim Passage. These are the ingredients needed to make a Dark Energy in the Bazaar. You are able to repeatedly make the Dark Energy in the Bazaar if you so choose, though the materials are not easy to acquire. Just be sure to sell the materials one set at a time rather than all at once, or else you will lose all of the materials just in exchange for one Dark Energy.
However you acquire your Dark Energy, use it on Ahriman, but at a specific time. Dark Energy deals 50,000 damage to the enemy, but using it right away will not kill it. Ahriman has 62,149 HP, and if you use the Dark Energy without dealing the additional 12,149 damage first, it will continuously clone itself and teleport all around, making the fight essentially impossible for Penelo to solo if that happens. Be careful not to use one while the boss is teleporting around either, since it is momentarily invincible until its health bar returns.
Note that if you intend to use Dark Energy for bosses, I suggest you use it to help you get the achievement, then reset to get the Dark Energy back and beat the boss normally. It’s not necessary to get one however. I did so because choosing Penelo to be a Knight was a bad decision for me.
A less-than-efficient strategy I devised was to start the hunt for Antlion to gain access to the depths of Lhusu Mines, then go back far enough to encounter Killer Mantises. You don’t need to complete the hunt itself – just gain access to the depths. Steal some X-Potions from them (don’t kill too many or else your level will go too high), then go to Jahara and get the accessory Pheasant Netsuke from a chest in the far left of the town. This boosts the potency of healing items, which damage Ahriman due to it being undead. I was doing 2700 damage with Knight Penelo having unlocked Potion Lore 1 with Belias. Your results will differ depending on the class you chose for her. I experimented with the Elixir, and no, it doesn’t work. Neither do Phoenix Downs.
If you would prefer to tackle this boss without Dark Energy, provided you can protect yourself from Doom, you can look for Holy Motes in Westersand – The Midfault. This video shows the precise location the chest spawns at. You cannot have a Diamond Armlet equipped. Penelo also needs to learn Remedy Lore 3, if she is able to. Ahriman can cast Doom on her, so if she can’t heal it and you don’t finish the boss off in time, you’re screwed. Reflectga Mote can prevent it as well. Ahriman will eventually split itself into multiple copies, so you would need Aeroga Motes to deal with them as well. If Penelo is a Black Mage, Firaga is effective against them too.
Once you’re all done with this boss and reach the upper part of Archades, go to the magic shop and speak to July. If you did the mini-quest for her in Nalbina earlier, she will give you the reward for it, and you’ll get the Chocobo Past achievement.
Go through the horror that is earning Chops in Archades, then make your way into Draklor Laboratory. There are two specific rooms rather late into the area that spawn chests with some of the best Motes in the game. One room has Bio Motes available, while the other spawns a single chest that can contain either Aeroga or Reverse Motes. If you intend to farm for these Motes, it must be done now since Draklor is a one-time dungeon. There are no challenges associated with Cid’s boss battle, so take him down however you want.
After this fight and a lot of story events later, you will eventually have to ascend the Pharos at Ridorana, a very long slogfest of a tower with repetitive puzzles. The Esper Hashmal is encountered as a boss fight late into the dungeon, and his regular attacks can inflict Disease. You definitely want to protect from this through two methods. The first is buying Vaccines in the Nalbina-Archades Skyferry route after acquiring the Treaty Blade. The other is equipping Bubble Belts, of which two are available at this point. One is in a chest in the Feywood’s Ice Field of Clearsight, somewhere in the center. The other is given as a reward for completing the Antlion hunt. Since the Bubble and Disease statuses cannot coexist on the same character, having Bubble on someone prior to the fight is guaranteed protection against Disease. Preparing for this ahead of time will also save you some headaches for the upcoming boss challenges due to how good the Bubble Belt is.
Defeat Pandemonium with just Reddas (all three members in party, no party gambits on (Reddas gambits OK), only action by party can be potion, all LVL <= 50)
All future boss challenges will have their level cap at level 60.
As if Ahriman with only Penelo wasn’t bad enough, you now need to deal with a boss only using a guest member, and your allies can solely use Potions that are virtually worthless at this point in the game. I said, “Screw this,” and acquired two Dark Energy from the Mt. Bur-Omisace chest to make my life easier. Pandemonium has 116,678 HP, so I had Reddas whittle its health down enough with Aeroga Motes since it’s weak to wind before using the Dark Energy.
If you don’t want to do it that way, at least have equipment that prevents Petrify, and have Reddas use a Gold Needle on himself if he gets afflicted. Aeroga Motes are still your friend here, and Knot of Rust spam followed by a Dark Matter is also a popular strategy. You don’t need to bother with healing Slow or Blind on Reddas since he’ll be throwing items anyway.
Defeat Gabranth with just Basch and Reddas in the party (no Seitengrat, No Hp to 0, Reddas gambits off, no summon, Quickenings OK, LVL <= 60)
Gabranth has 64,049 HP, so don’t waste any important items on him. If you got Bubble Belts for dealing with Hashmal, it will make the fight go more smoothly. Since I made Basch a Samurai, he had plenty of HP to tank Gabranth’s hits while Reddas manually used X-Potions. Compared to many of the other boss challenges, this one is shockingly easy.
Cid’s battle immediately occurs after the fight with Gabranth, so you need to quickly enter the menu and swap out Basch for Balthier, which will activate the achievement notification icon. Turn off Basch’s Gambits as well during Gabranth’s fight so you don’t accidentally target Cid with him.
Defeat Cid, Famfrit, and Cid again with just Balthier and Reddas in the party (no Seitengrat equipped, no summon, no HP to 0, Quickening OK, LVL <= 60)
This fight is broken down into three phases, and you can only use Balthier and Reddas for all of them. Cid has 82,093 HP. Get his health down to half, and he’ll summon Famfrit to take over for the second phase. Cid will be invincible while Famfrit is out, so you need to defeat the Esper ASAP. Famfrit has 149,060 HP, so this will be difficult without Dark Energy to help you. He is weak to fire elemental damage and the Oil status, but you’d be hard-pressed to take advantage of it if Balthier is not a Black Mage. Even if you gave Belias to Balthier, that isn’t an option since summons are banned. All of that is on top of Cid performing his cinematic attacks which can damage your party quite severely. If you have the Bubble spell or a Bubble Mote, definitely use it on both allies to improve their odds of surviving. Reverse Mote or the Reverse spell are amazing as well. Just be sure not to use healing items while the status is active or else it will damage the character. Once Famfrit is down, defeating Cid in the third phase will be simple.
Note that Mhulme found that the achievement will be invalidated if you use a Dark Energy on Cid during the first phase when his health is low enough for a one-hit kill without triggering the second phase. All three phases need to be fought consecutively.
Defeat Gabranth with just Basch and deliver the final blow with a Quickening (no Seitengrat, No HP to 0, no summon, Quickenings OK, LVL <= 60)
Basch has to be your sole party member at the point you step on the elevator, not when you activate the switch that triggers the battle. The easiest way to ensure this is to run through the Bahamut with Basch as your sole party member. Otherwise, it’s essentially the same battle as before, except the killing blow must be with a Quickening. Since Reddas is not around to throw healing items, use Reverse Motes to nullify Gabranth’s damage for a short time, reapplying the status as needed. Gabranth gets especially nasty with his combos as his HP starts getting low. He will cast Renew at half health if you can’t inflict Silence on him, but he only does it once, so don’t worry if he gets it off. Just whittle him down enough, then start your Quickening chain. If it isn’t enough to kill him yet, use a Hi-Ether or Elixir and try again. Be sure not to use them while in Reverse status however.
Defeat all forms of Vayne with just Ashe in the party and deliver the final blow with a Quickening (no Seitengrat, no summon, no HP to 0, LVL <= 60)
This must be done separately from Knot a Problem since the killing blow there is done with a Dark Matter. After defeating Gabranth but before using the lift, switch Basch for Ashe and buff her. I made her a White Mage, so most of my strategies revolved around casting Holy and throwing Reverse Motes. Larsa will be assisting in this battle as an unofficial guest. Reverse Motes might not a good idea for Vayne’s first phase since Larsa will throw healing items at Ashe, which can punish you severely if you use the Motes at a bad time. If you can time them well however, then they can be effective.
The second phase has Vayne accompanied by five flying swords. Gabranth replaces Larsa as an unofficial guest, and you don’t need to worry about keeping him alive. Reverse Motes are safe to use from now on, so keep at it and fight with your best attacks. If you have a Dark Energy, it wouldn’t be a bad idea to use one to incapacitate the swords.
The third phase is The Undying, and this is the one you need to use a Quickening on to kill him. The trouble is that you can’t see the boss’ health bar, so you’ll either have to guess where he’s at or use a calculator. If you want to keep tabs on his health, he has 228,299 HP. Aeroga Motes do really good damage on him, so if you stocked up in Draklor, use them now. Reverse Motes are still your best friend, although you don’t want to use an Elixir while in the state if you need to refill your Mist Charges. I had Dark Energy on hand, so I threw whatever I had at him. His defense will go up a lot when he’s low, and he will erect barriers that prevent physical and magical damage. Just be patient, whittle him down, keep those Reverse Motes up, and wait for your chance to do your Quickenings.
Steal a Dark Matter from The Undying and deliver the last blow to him with a Dark Matter (no restrictions besides Strong Mode)
This has to be done separately from Game of Thrones since Ashe needs to kill The Undying with a Quickening there. The Strong Mode restriction simply means you cannot be in New Game +. It has to be done in a New Game file. Hopefully you’ve been throwing loads of Knots of Rust at enemies throughout the entire game, because now’s the time for them to pay off. First, steal the Dark Matter off of The Undying. The achievement notification icon will show up once you successfully steal from him. Damage him enough until he does Perfect Defense and wait for it to wear off (or calculate the damage), then you can either damage him a little more or throw the Dark Matter if you’re confident it will kill him.
If you don’t feel you’re ready for this, you’re free to level up and get better gear to your heart’s content now that you’ve done all of the level-restricted missables (provided you remember to do the Belito hunt with Balthier solo at level 60). I experimented by throwing a Dark Matter at a random enemy to see its damage value before deciding to take on the final boss.
Defeat Ramora Cutter with Reks in Strong Mode
This is more of a heads up than an actual warning. While this isn’t missable, you would want to start a new run in New Game +, otherwise known as Strong Mode. If you don’t, you’d have to go through the final boss gauntlet again for the option to come up. This is otherwise super easy since Reks will be at level 90. There are no other achievements that require you to be in Strong Mode, so go ahead and reset if you want. Note that Knot a Problem forbids you from being in Strong Mode.
CONCLUSION
That should be everything you need to help you handle the game’s missables in either chronological order for the story, or in a sensible manner for the hunt-related and miscellaneous missables. This was quite exhausting for me to write since I was going into this blind, and some of my class choices wound up not being the best. Even so, if I was able to pull through, you should be able to as well with some research and asking around. The strategies I outlined are only the ones I used for my run. There are surely other methods you can use for your own class setup, so I left a lot of room for you to experiment.
I know the set is enormous, but I think that if you get the story-related missables out of the way first, you can then relax and enjoy the side content at your own pace. That’s how I approached this set, especially for a new player learning the story route and seeing what gets unlocked as I progressed along. I don’t think there’s much else to say except the usual – happy cheevo hunting, and eat that elephant one bite at a time!
- Benit149, September 2025