EarthBound Guide ‐ Main Set and Subsets - RetroAchievements/guides GitHub Wiki
1) Synopsis
| Set Difficulty | Main set: 4/10, Rare Drops: 6/10, Camera Shy: 3/10 |
| Approximate time to master | Main set: Around 30 Hours, Rare Drops: Around 30 Hours, Camera Shy: Around 15 Hours |
| Minimum numbers of playthroughs needed | 1 for each set |
| Number of missable achievements | Main set: 30, Rare Drops: 6 |
| Does difficulty affect achievements? | Not applicable |
| Hardest achievement of the set | Main Set: Bionic Slugger - - Rare Drops: Manly Fish's Brother's Horn of Life / Bionic Kraken's Gutsy Bat - - Camera Shy: Psychic Prodigy's Perilous Quest |
2) Introduction
EarthBound/MOTHER 2, released in 1994 in Japan and 1995 in the US. It was developed by Ape Inc. and HAL Laboratory, and directed by a mythological figure called Shigesato Itoi.
EarthBound is like... Van Gogh. It wasn't appreciated when it first released in North America. It totally FLOPPED, the game had a weird marketing campaign and it was also quite pricey.
But many years after its release, more people started discovering EarthBound through various means, and nowadays it is revered as a "cult classic".
Personally, I've played EarthBound for the first time when I was 6 or 7, and I've been a fan of it ever since! I remember being alone at home playing EarthBound on the CRT TV that I had, and having to turn it off when I reached the last part of the game cause it was very spooky!
There's a couple of achievements for getting all gift boxes in specific areas, I'll link a checklist I made, and I'll point out which gift boxes are missable in the guide, so if you follow the guide without skipping anything, you shouldn't miss anything.
What will this guide cover?
I will cover 3 things in this guide, the Main set achievements, the Rare Drops Subset and the Camera Shy Subset at the end. I'll cut right to the chase and try not to spoil anything, but I'll still give some tips and tricks along the way.
3) Walkthrough
Beginning of the Game
| Badge | Title | Description | Points |
|---|---|---|---|
| You'll Catch Cold Dressed Like That! | Head out in your PJs | 1 |
MISSABLE! Just don't talk to your mom after waking up, go straight to the door and get out of the house.
| Badge | Title | Description | Points |
|---|---|---|---|
| Earthbound Gamers Do It One-handed | Go out at night and investigate the loud noise ... using only your left hand | 3 |
MISSABLE! This is an easy one. In EarthBound, you can easily Talk to/Check stuff without having to open the menu by simply pressing the L button. Get out of the house, go up the mountain and talk to porky by pressing L, then just go back home. Do not press any button that's not the D-Pad or L.
| Badge | Title | Description | Points |
|---|---|---|---|
| Buzzkill | Mourn the loss of a friend | 1 |
You'll get this automatically while progressing with the story.
Make sure to return home after this and you'll get Picture #1!
Early Game
| Badge | Title | Description | Points |
|---|---|---|---|
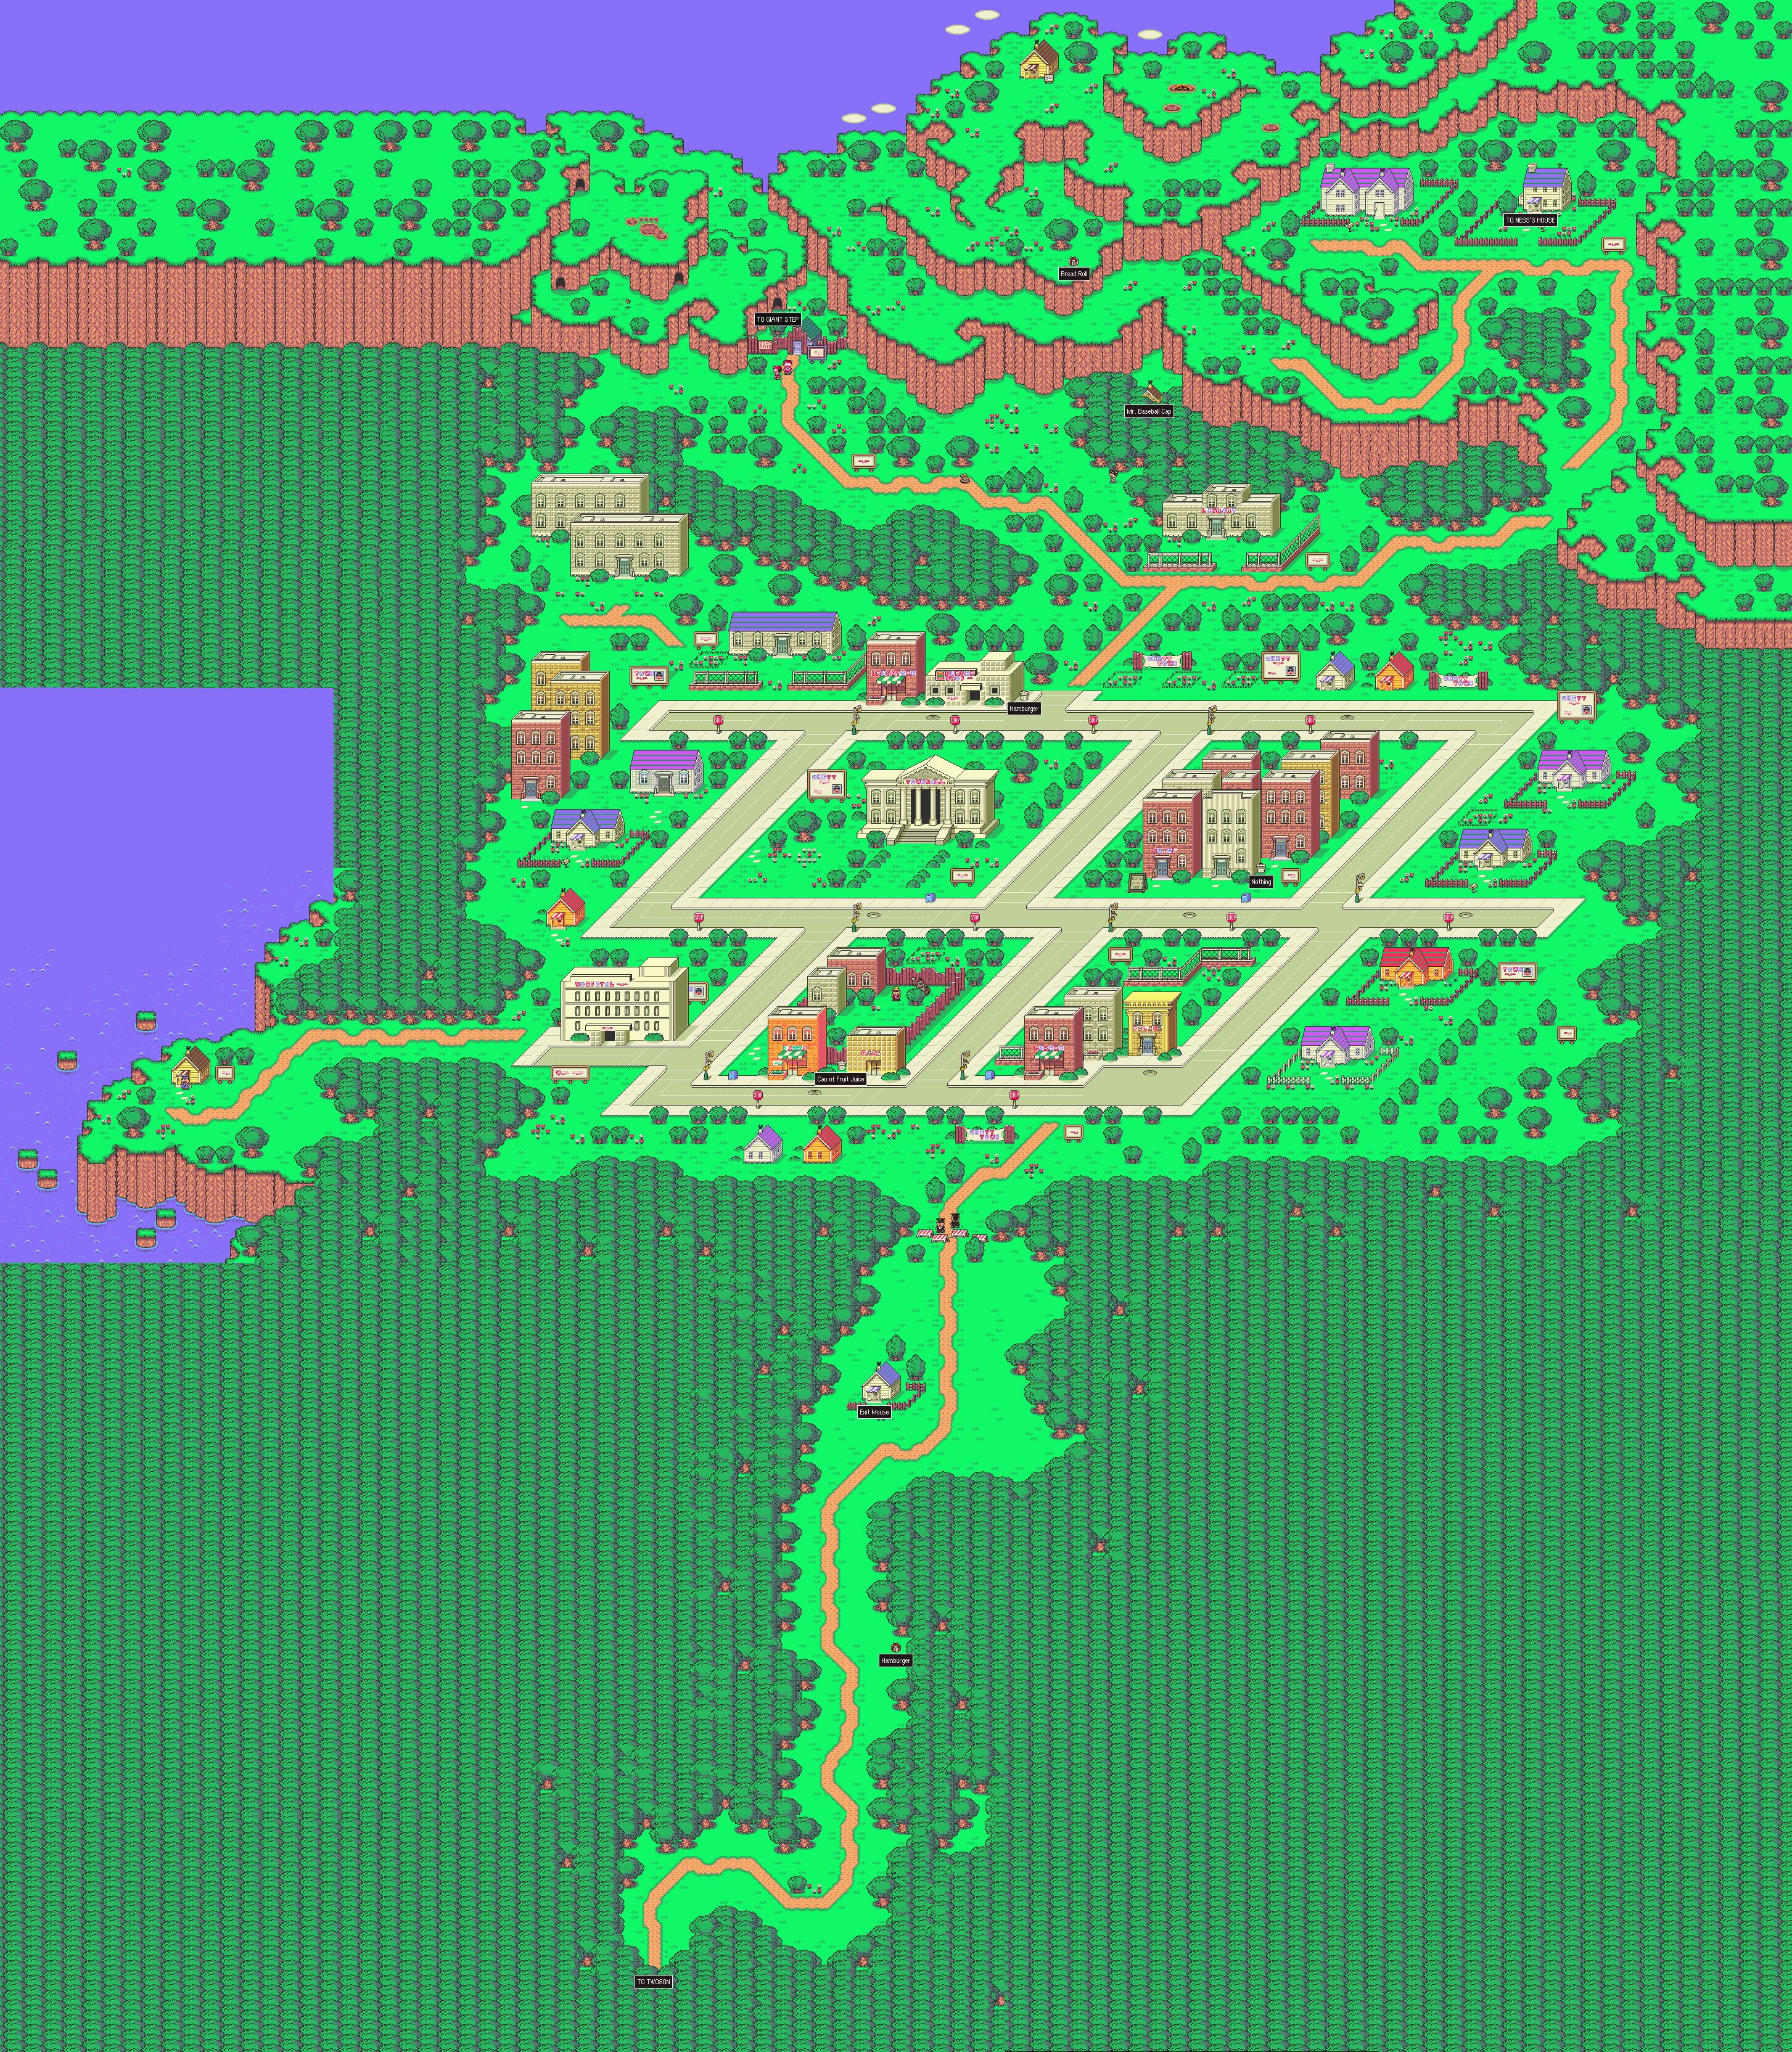
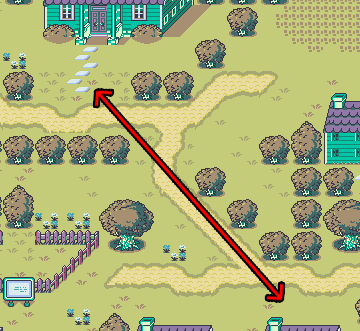
| It's a Secret to Everybody | Find the Secret Clubhouse | 2 |
West from the Onett Library, go North and you'll see a kid with grey clothes and black hair. Try going through the trees behind him northward. Inside the Secret Clubhouse, you can also talk with another kid to get the Mr. Baseball Cap, a pretty good cap for this point of the game.
| Badge | Title | Description | Points |
|---|---|---|---|
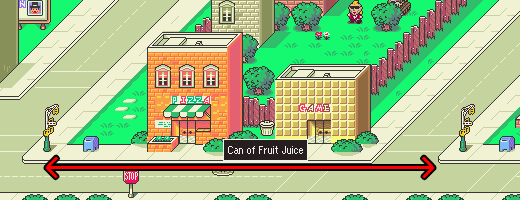
| Trashburger? | Just brush it off a little, it'll be fiiiine | 1 |
Next to the Onett Burger Shop there's a trash can, open it to get a burger.
RARE DROP # 1
If you're using the Rare Drops Subset, there's a rare drop you can get now.
| Badge | Title | Description | Points |
|---|---|---|---|
| Skate Punk's Pizza | Get a Pizza from the Skate Punk in Onett. | 10 |
This Rare Drop is MISSABLE! Once you defeat the boss in the arcade, punks will stop spawning!
You're looking specifically for the Skate Punk, he has a 1/128 chance of dropping a Pizza. Once you get the drop, MAKE SURE TO ADD IT TO YOUR INVENTORY!
Skate Punk Suggested Farming Area
| Badge | Title | Description | Points |
|---|---|---|---|
| Jumping the Sharks | Put an end to the Sharks' reign of tyranny | 3 |
You'll get this automatically while progressing with the story.
| Badge | Title | Description | Points |
|---|---|---|---|
| That Was Easy! | Get your first insta-win | 1 |
Once you're strong enough, you can insta-kill enemies if you get a green or blue swirl when engaging them. Once you are around level 8-9, you should totally be able to insta-kill coil snakes. You'll probably get this by progressing normally, though.
| Badge | Title | Description | Points |
|---|---|---|---|
| Your Sanctuary I | Claim Giant Step | 5 |
You'll get this automatically while progressing with the story. I don't really have many tips for this boss fight, it's pretty simple. If you have around 20-30 PP, you can use PSI Rockin' 1 or 2 times to kill the Black Antoids and use the remaining 10 PP to heal twice.
| Badge | Title | Description | Points |
|---|---|---|---|
| Is This Legal? | Face-off against the Onett Police Force and win | 4 |
You'll get this automatically while progressing with the story.
| Badge | Title | Description | Points |
|---|---|---|---|
| Nifty Presents for Ness | Loot all gift boxes in Onett and Giant Step | 5 |
| Badge | Title | Description | Points |
|---|---|---|---|
| Ding-Ding! | Ring the Bell while riding your bike | 1 |
In Twoson, there's a Bike Shop. Get a Bike, and while riding it press R. (You should return the Bike after this, it'll become useless very soon and will only use inventory space.)
When entering the Cycle Shop, you should get Picture #2!
Make sure to go into Mach Pizza in Twoson to get the phone number, you'll need it later.
| Badge | Title | Description | Points |
|---|---|---|---|
| If I Give You This, Will You Go Away?!? | Bother the man at the Twoson Hotel | 5 |
Talk to the man on the left room at the Twoson Hotel many times until he gets fed up and gives you an item.
| Badge | Title | Description | Points |
|---|---|---|---|
| Retro Achievement | Tame a New-Age Retro Hippie | 5 |
They spawn around Twoson.
| Badge | Title | Description | Points |
|---|---|---|---|
| Harvest Moon | Buy a Fresh Egg and sell it for 110 dollars with the 'For Sale' sign | 5 |
In Burglin Park, buy the "For Sale" Sign. After this, buy a Fresh Egg for 12 dollars and Fast Forward until the Fresh Egg has turned into a Chicken. You can now sell it with the For Sale sign for 110 bucks. (You can farm more money if you need/want.)
| Badge | Title | Description | Points |
|---|---|---|---|
| Insatiable Sweet Tooth | Sprinkle Sugar onto a Cookie | 2 |
In Burglin Park, you can also buy Sugar Packets. If you have a Sugar Packet and a Cookie in your inventory, eat the Cookie and Ness will sprinkle sugar onto it and eat it.
| Badge | Title | Description | Points |
|---|---|---|---|
| These Are Free, Right? | Eat a condiment all by itself | 1 |
You can buy condiments in Burglin Park. Eating ketchup by itself isn't that bad imo. Mayonnaise is a whole different story, though.
| Badge | Title | Description | Points |
|---|---|---|---|
| Oh, Come Now, He's Not All That Bad... | Invest in Orange Kid | 5 |
Go to Orange Kid's house on southern Twoson and give him 200 bucks. Thou shalt not use the suporma.
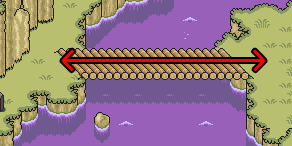
In Peaceful Rest Valley, after you've erased the pencil statue, continue going north and ignore the bridge to get Picture #3!
| Badge | Title | Description | Points |
|---|---|---|---|
| Gift-Gathering Gala | Loot all gift boxes in Twoson and Peaceful Rest Valley | 5 |
There's one gift box with a Teddy Bear in Polestar, too.
| Badge | Title | Description | Points |
|---|---|---|---|
| Caught Blue-handed | Get caught stealing from the Happy Happy Village food stand | 5 |
MISSABLE! Once you reach Happy-Happy Village, on the east side, there'll be a stand with bananas and eggs. Just get one and decide not to pay. After this, talk with the guy near the stand, you'll enter a battle, win and you'll get the achievement.
| Badge | Title | Description | Points |
|---|---|---|---|
| Insane Killing Spree | Defeat at least eight Insane Cultists in a single battle | 5 |
MISSABLE! Insane Cultists sometimes will call for help. Try always having only one in combat with you, when another cultist joins the battle, kill one. Once the Insane Cultist H joins the battle, kill everyone and you'll get the achievement.
RARE DROP # 2
If you're using the Rare Drops Subset, there's a rare drop you can get now.
| Badge | Title | Description | Points |
|---|---|---|---|
| Insane Cultist's PSI Caramel | Get a PSI Caramel from an Insane Cultist. | 10 |
This Rare Drop is MISSABLE! Once you defeat the boss in Happy-Happy HQ, Insane Cultists will stop spawning!
Insane Cultists have a 1/128 chance of dropping a PSI Caramel. Once you get the drop, MAKE SURE TO ADD IT TO YOUR INVENTORY!
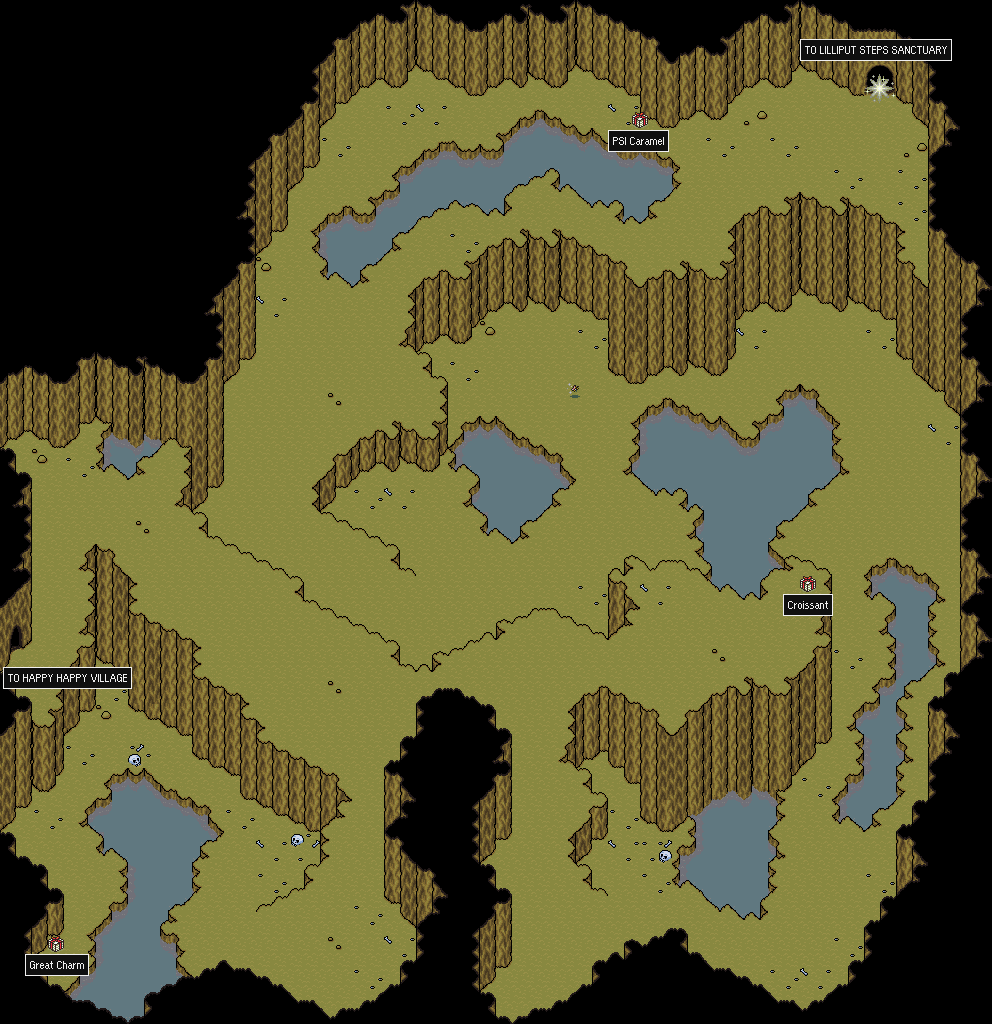
Insane Cultist Suggested Farming Area
BEFORE YOU CONTINUE! There's 2 Gift Boxes inside Happy-Happy HQ, which are MISSABLE! Make sure to get them now!
| Badge | Title | Description | Points |
|---|---|---|---|
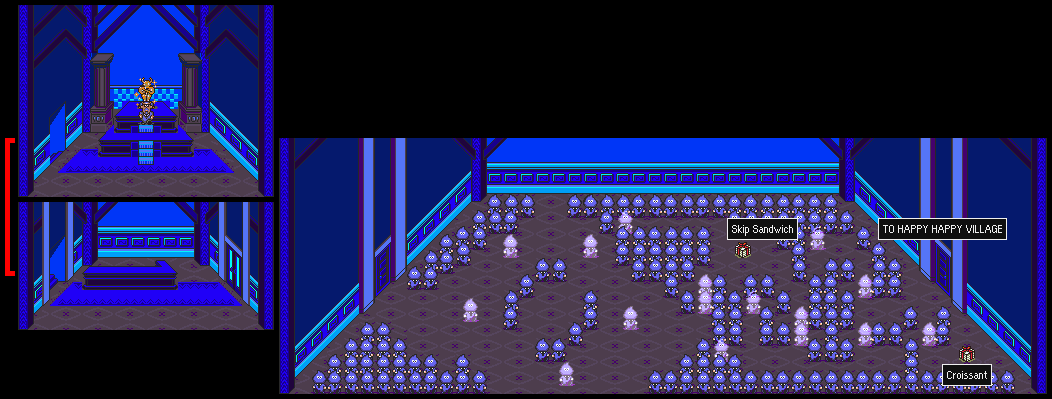
| Happiness is a Blue Gun | Tame Mr. Carpainter without using any PP | 5 |
MISSABLE! Buy the Sand Lot Bat from the Happy-Happy Village Store and equip it. If you need, buy some food to heal. As long as you have the Franklin Badge that Paula gave you, you should be good, as it will deflect all thunder-based attacks that Mr. Carpainter uses.
After rescuing Paula, leave the cabin and walk straight down, you'll get Picture #4!
| Badge | Title | Description | Points |
|---|---|---|---|
| Let's End This!!! | Win a battle while suffering mortal damage | 5 |
You'll probably get this if you fight a Territorial Oak. It will burst into flames and do mortal damage to Paula, and sometimes to Ness too, be VERY careful! Mashing A might help to make the battle end faster.
| Badge | Title | Description | Points |
|---|---|---|---|
| Noteworthy Unwrapping | Loot all gift boxes in Happy-Happy Village and Lilliput Steps | 5 |
Don't forget to loot the Happy Happy HQ Gift Boxes, those are MISSABLE!!!
| Badge | Title | Description | Points |
|---|---|---|---|
| Whac-a-Mole | Tame Mondo Mole, and don't let Paula's HP reach zero | 5 |
MISSABLE! Use PSI Paralysis on that bastard to make this achievement much easier. Use PSI Thunder with Paula, it'll fail many times, but once it hits it will deal a good amount of damage.
| Badge | Title | Description | Points |
|---|---|---|---|
| Your Sanctuary II | Claim Lilliput Steps | 5 |
You'll get this automatically while progressing with the story.
| Badge | Title | Description | Points |
|---|---|---|---|
| Four Fried Chickens and a Coke | Watch your first 'Runaway Five' concert | 4 |
You'll get this automatically while progressing with the story. After getting the Backstage Pass, walk into the Chaos Theater to get Picture #5!
BEFORE YOU CONTINUE!
Make sure to not get the picture on the north of the Threed Graveyard, we'll get it later. Also, DO NOT open any Trash Can in Threed! We'll use one later.
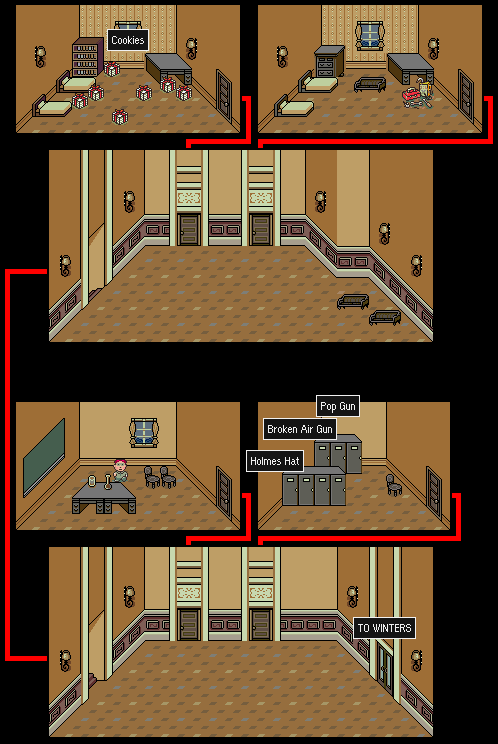
Once you're in control of Jeff, the third party member, make sure to get all 7 Cookies inside a room in Snow Wood Boarding House. There's also a Pop Gun, a Broken Air Gun and a Hard Hat in the Locker Room. Make sure to get all this, everything in the Boarding House is MISSABLE!
DO NOT Throw away the Broken Air Gun!!
| Badge | Title | Description | Points |
|---|---|---|---|
| Uki Uki Kukyuki | (Thanks for the gum.) | 4 |
You'll get this automatically while progressing with the story.
If you walk below one of the tents next to the lake, you'll get Picture #6!
| Badge | Title | Description | Points |
|---|---|---|---|
| Supreme Ruler | Check and see how an enemy measures up | 2 |
Use the Ruler in battle.
| Badge | Title | Description | Points |
|---|---|---|---|
| Tales from the Cryptid | Spot Tessie in the Loch | 5 |
You'll get this automatically while progressing with the story.
Inside Brick Road's Maze, read the sign in the middle of the maze to get Picture #7!
RARE DROP # 3
If you're using the Rare Drops Subset, there's a rare drop you can get now.
| Badge | Title | Description | Points |
|---|---|---|---|
| Attack Slug's Bomb | Get a Bomb from an Attack Slug. | 10 |
Attack Slugs have a 1/128 chance of dropping a Bomb. Once you get the drop, MAKE SURE TO ADD IT TO YOUR INVENTORY!
This is not missable, but I'd recommend doing it now that you only have Jeff. The XP will come in handy, so he'll be in par with the others once he joins the main party.
Attack Slug Suggested Farming Area
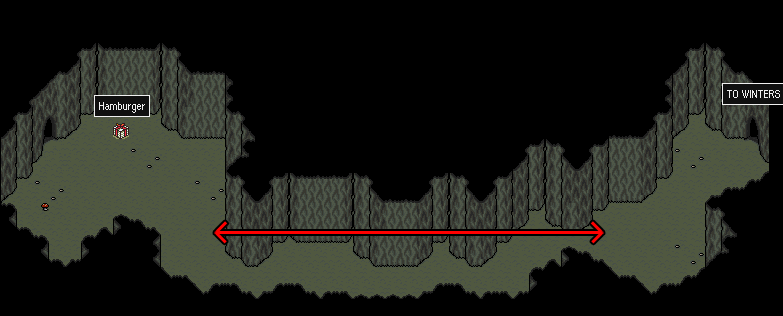
| Badge | Title | Description | Points |
|---|---|---|---|
| Brains vs. Brawn | Solo a Cave Boy with Jeff | 5 |
MISSABLE! Make sure to have the Hard Hat, the Cheap Bracelet and the Stun Gun equipped. Heal yourself with food if needed. Shouldn't be too hard. DON'T use Jeff's Bottle Rocket, you'll need that very soon.
| Badge | Title | Description | Points |
|---|---|---|---|
| Bundles of Bliss | Loot all gift boxes in Snow Wood, Brick Road, Pond Cave, and the lab | 5 |
MAKE SURE TO GRAB EVERYTHING IN SNOW WOOD, THOSE GIFT BOXES ARE MISSABLE!
There's a single gift box on the second floor of the lab.
| Badge | Title | Description | Points |
|---|---|---|---|
| Take to the Sky | Take flight with the Sky Runner! | 5 |
You'll get this automatically while progressing with the story.
| Badge | Title | Description | Points |
|---|---|---|---|
| Ghostly Photobomb | Have your picture taken while at least one person in your party is possessed by a ghost | 10 |
MISSABLE! Make sure to not have the picture on the north of the Threed Graveyard. Get into a fight with a Zombie Possessor, get one of your characters possessed, and then walk up to the gravestone that's all by itself between the two main graveyards. You'll get Picture #8!
By doing this, if you're following the guide, you should also get:
| Badge | Title | Description | Points |
|---|---|---|---|
| Picture Perfect | Have your picture taken 8 times | 5 |
You can use Jeff's Bottle Rocket on the Fight against the Mini Barf to defeat it easily.
| Badge | Title | Description | Points |
|---|---|---|---|
| BOING! | Have Dr. Saturn operate on you | 5 |
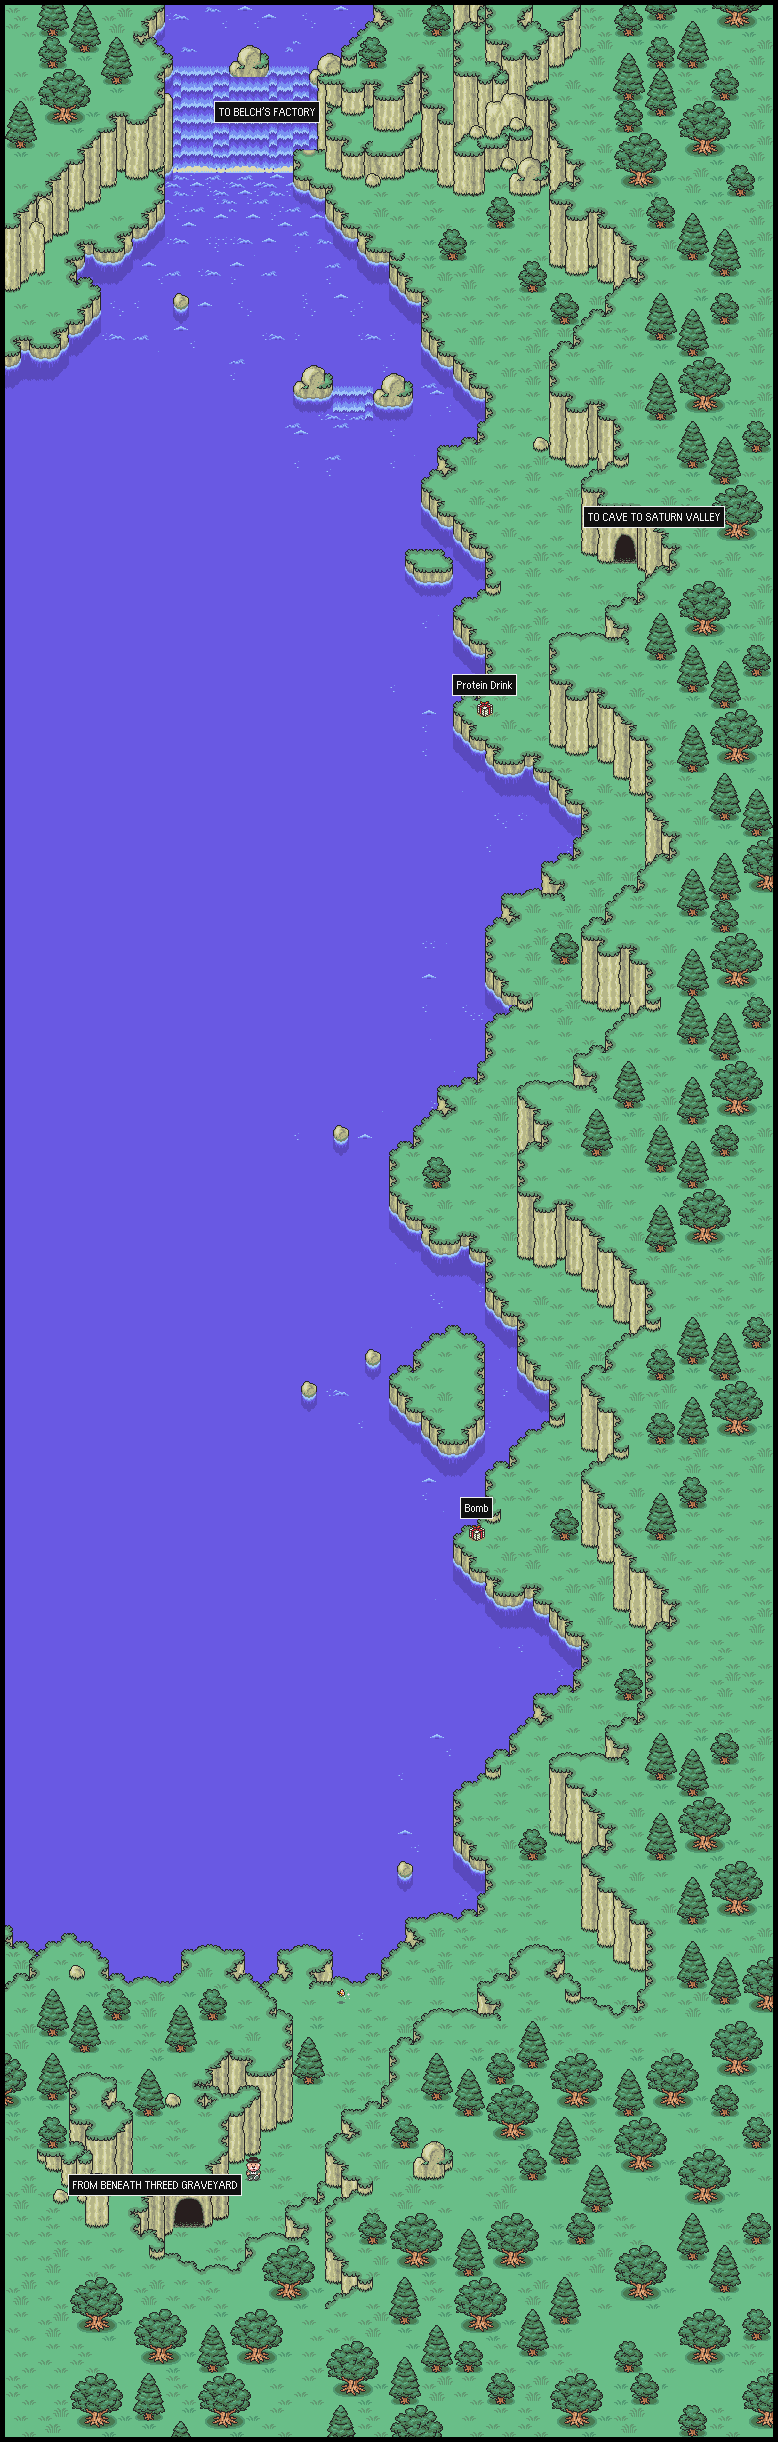
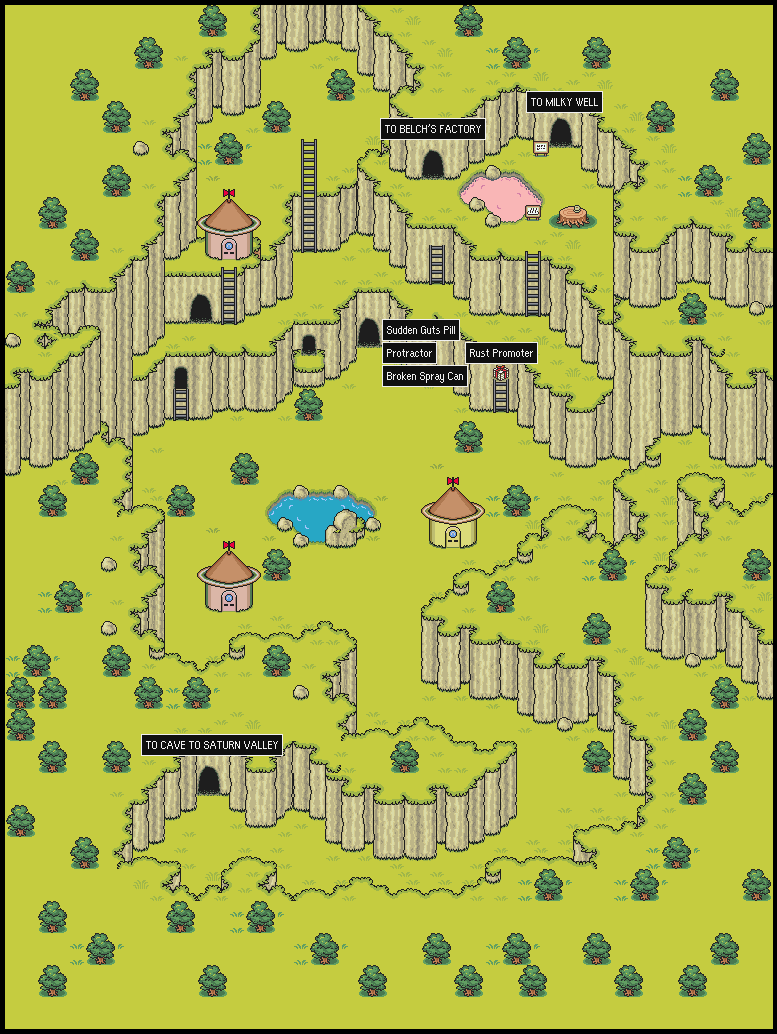
If one of your characters has a Status Ailment, including being dead, go to the house in the southeast of Saturn Valley and talk to Dr. Saturn, you'll get healed! It's free, so it's a great spot for healing. (The Hotel on the southwest is also free if you need to heal your HP/PP!)
| Badge | Title | Description | Points |
|---|---|---|---|
| A Meditation in Patience | Successfully enter Belch's base | 5 |
You'll get this automatically while progressing with the story.
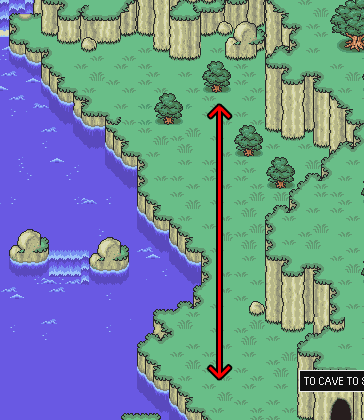
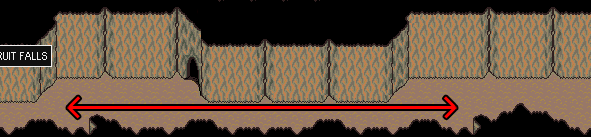
Also, in Grapefruit Falls, you'll get Picture #9!
There's some enemies in Belch's Base called Foppies! They're a great way to farm XP, so just fast forward and auto fight them! I usually level up to around level 30 in Belch's Base, but if you feel that your characters are too weak, you can also farm to level 40!
| Badge | Title | Description | Points |
|---|---|---|---|
| You've Come Far | Chill out and enjoy a coffee break in Saturn Valley | 5 |
Talk to the Mr. Saturn next to the entrance of Milky Well and enjoy your No Woman, No cry-flavored coffee.
Its a nice scene, enjoy it!
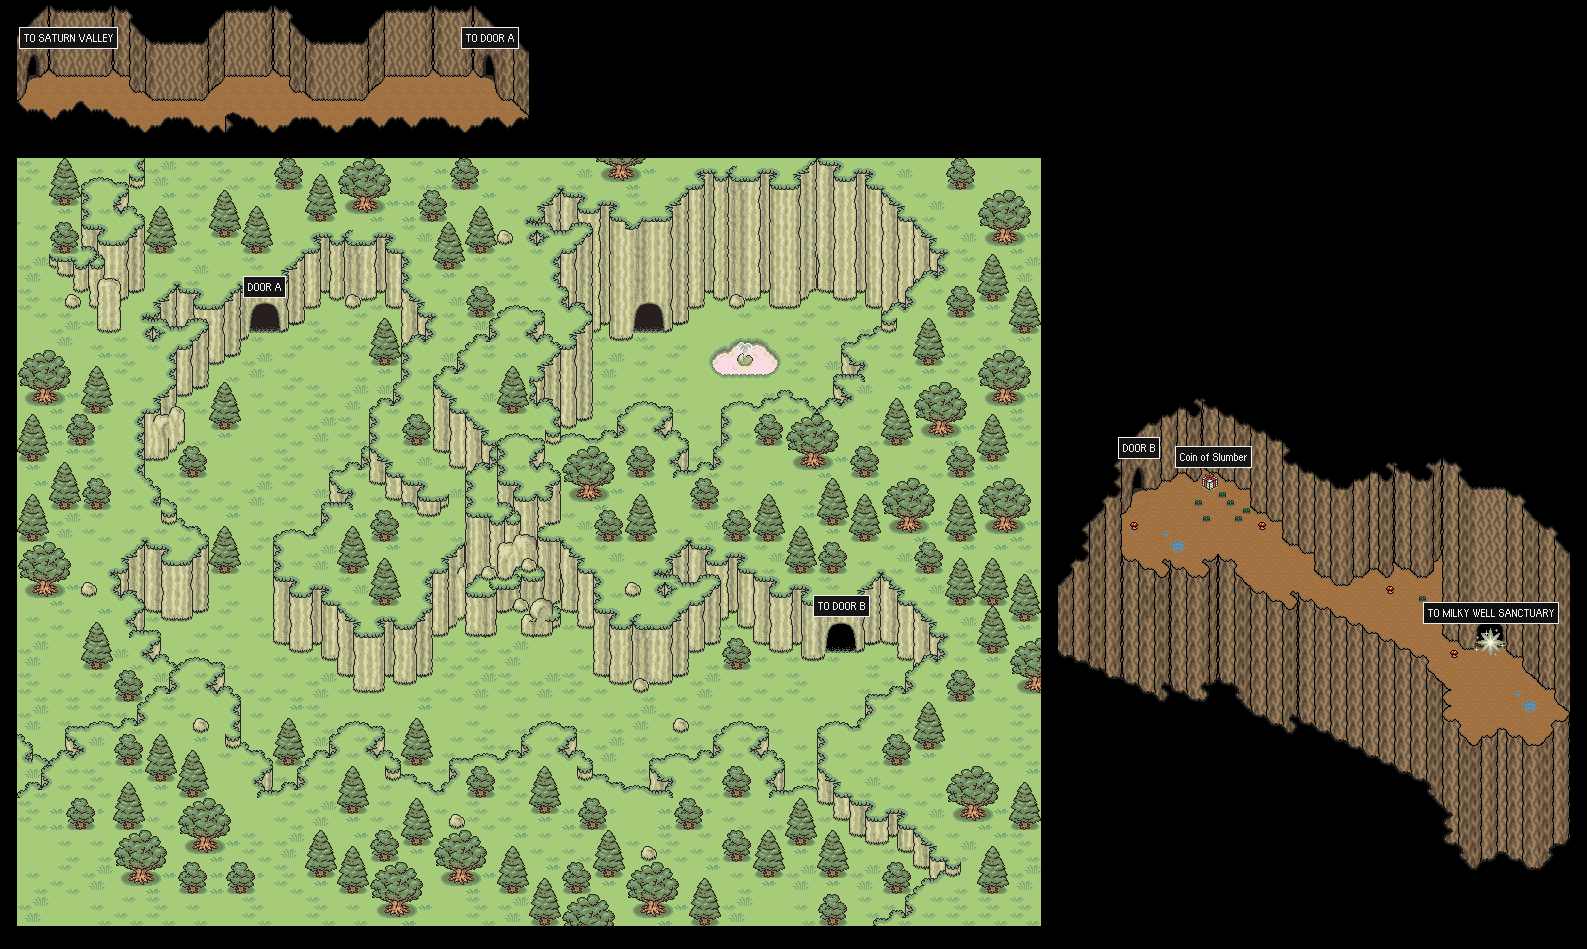
After this medicinal herb break, go into Milky Well to get Picture #10!
| Badge | Title | Description | Points |
|---|---|---|---|
| Special Surprise Spectacle | Loot all gift boxes in Grapefruit Falls, Saturn Valley, and Milk Well Cave | 5 |
| Badge | Title | Description | Points |
|---|---|---|---|
| Your Sanctuary III | Claim Milky Well | 5 |
You'll get this automatically while progressing with the story.
This can be a tough boss fight if you're not prepared. PSI Rockin' and Fire work very well in this fight. Once the Mobile Sprouts are defeated, use PSI Freeze instead. If you're mushroomized, DON'T use PSI Rockin' or PSI Fire. If you're diamondized, you can heal yourself in the Hot Springs outside the cave.
| Badge | Title | Description | Points |
|---|---|---|---|
| Fix it, Jeff! | Repair a Broken Air Gun | 5 | |
| Fix it, Jeff II | Repair a Broken Laser | 5 |
Fix it, Jeff! is MISSABLE! If you throw the Broken Air Gun away you'll miss this achievement permanently.
If Jeff's IQ is high enough, he'll work through the night when sleeping at a hotel and fix broken items. You can sleep over and over on Saturn Valley's Hotel until you get it. You need 12 IQ to repair the Broken Air Gun to turn it into a Magnum Air Gun. (Found in Snow Wood) You need 24 IQ to repair the Broken Laser to turn it into a Laser Gun. (Found in Belch's Factory)
| Badge | Title | Description | Points |
|---|---|---|---|
| Freed Threed | Bring light back to Threed | 5 |
You'll get this automatically while progressing with the story.
Walk in front of the Circus Tent to get Picture #11!
| Badge | Title | Description | Points |
|---|---|---|---|
| Pre-Teen Crisis | Get food out of the trash while Ness is broke and homesick | 10 |
MISSABLE! When Ness is between levels 16-75, he has a ~1% chance of getting Homesick after every battle. Homesickness will cause Ness to have a chance of missing turns while in combat. By this point in the game you've probably gotten Homesick. There're two ways of curing Homesickness, either going back home and talking to your mom, or calling her.
To do this achievement, you'll need to be Homesick. You might get Homesick while farming Foppies. Once Ness is Homesick, return to Threed, deposit ALL of your money into the bank so you have $0 cash. Then, check the Trash Cans in Threed, one of them has a Skip Sandwich. Once you get it, this achievement will pop up.
| Badge | Title | Description | Points |
|---|---|---|---|
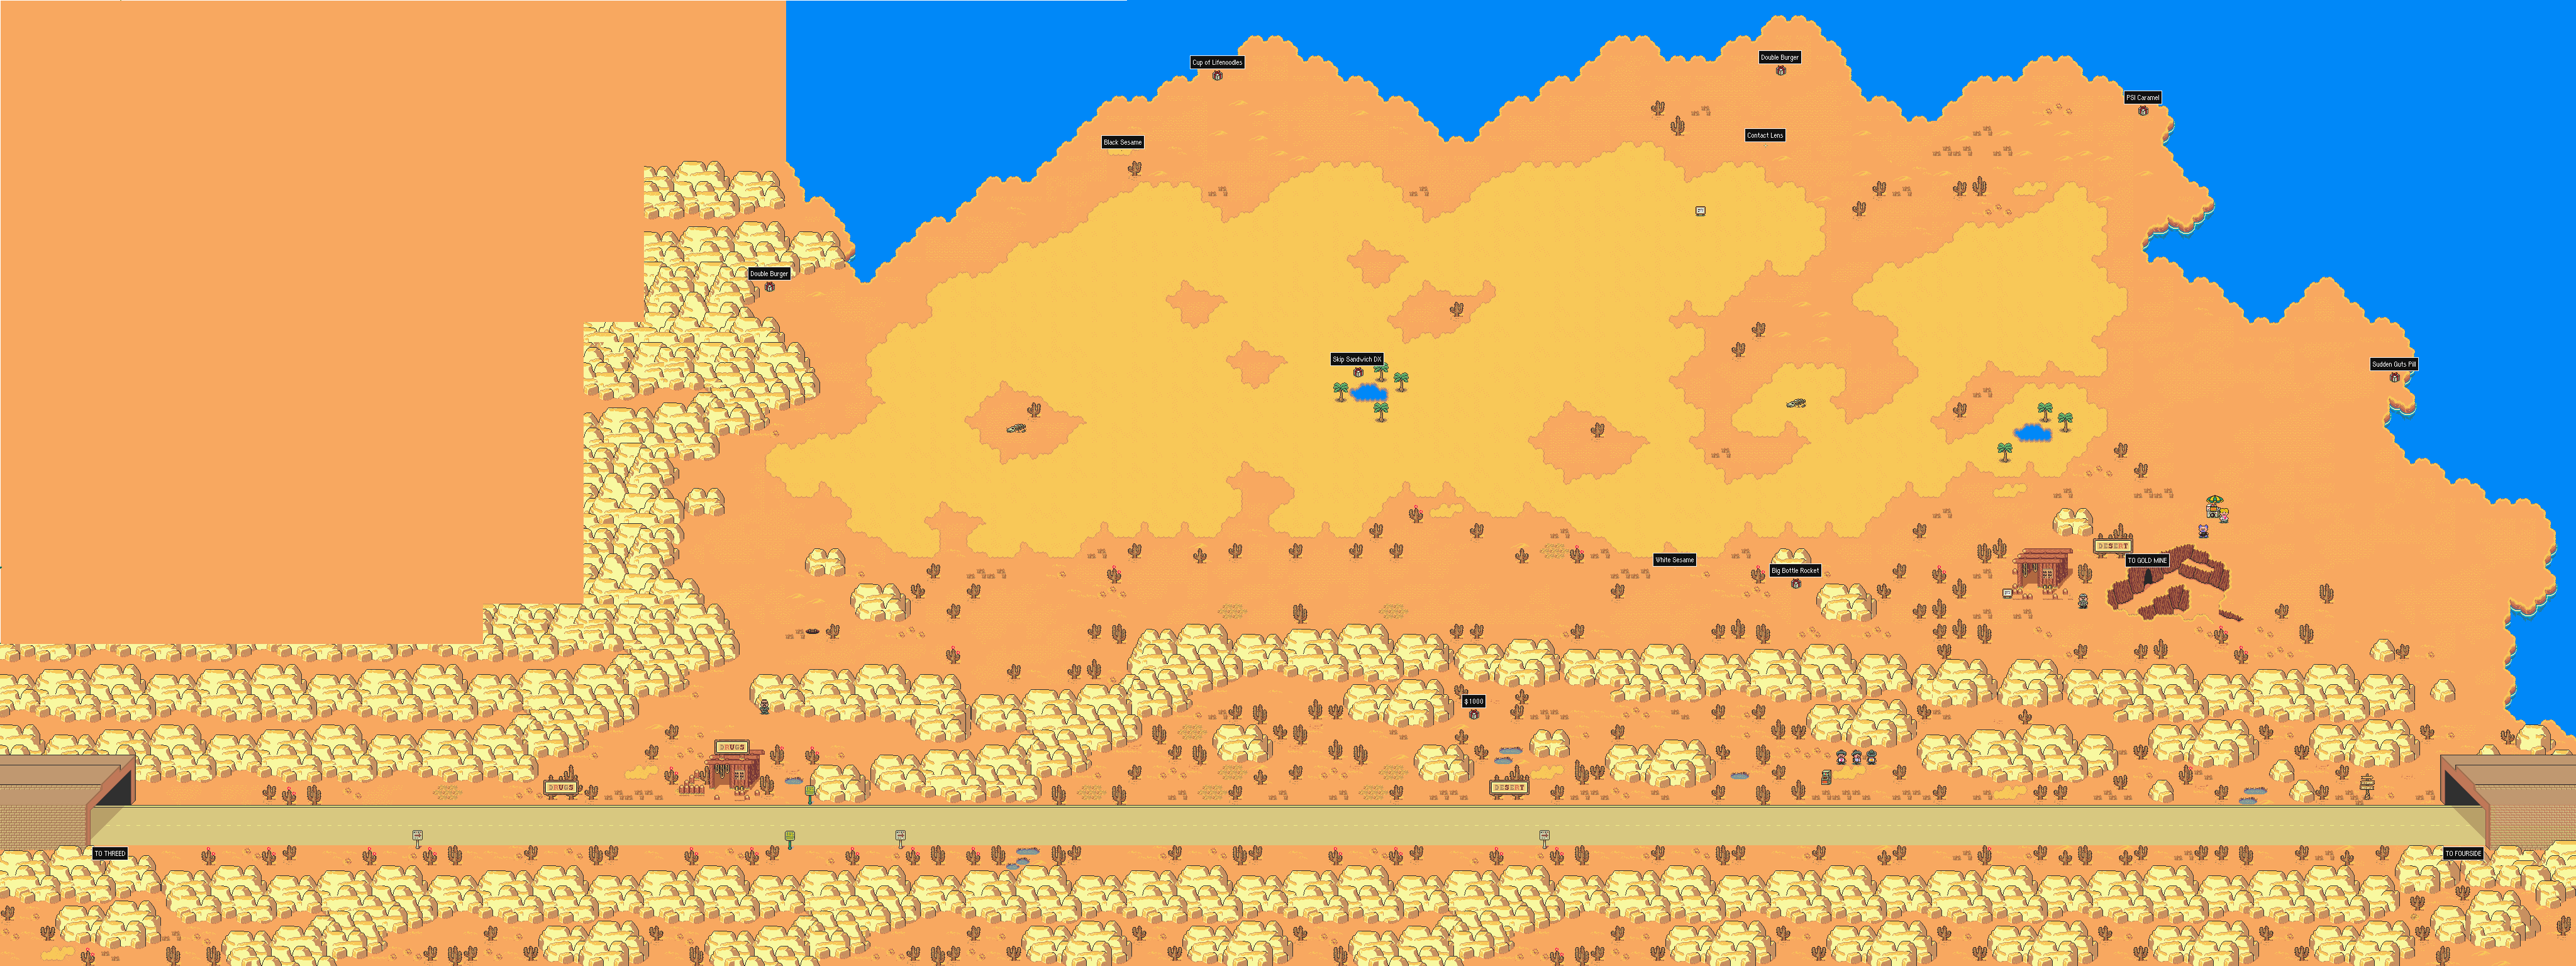
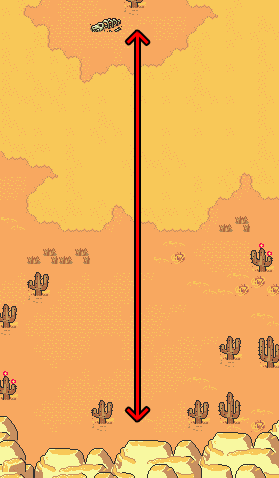
| Fighter Pilot Eyes | Find both Sesame Seeds in the desert | 10 |
Talk to the two Sesame Seeds in Dusty Dunes Desert, the locations are on this map:
By talking to the Black Sesame Seed, you'll also get Picture #12!
Make sure to also grab the Contact Lens in the desert!
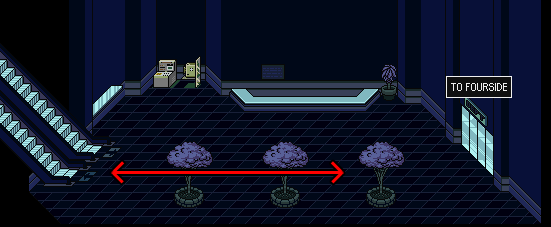
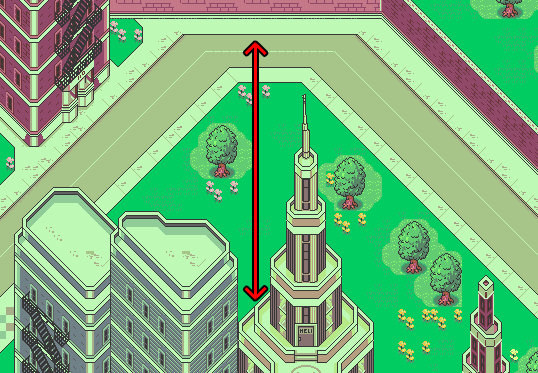
When approaching Fourside, walk near the top of the bridge to get Picture #13!
| Badge | Title | Description | Points |
|---|---|---|---|
| Dry White Toast | Catch the 'Runaway Five' at the Topolla Theater | 5 |
MISSABLE! Once you arrive at Fourside, enter Topolla Theater and buy a ticket, then watch the Runaway Five's performance.
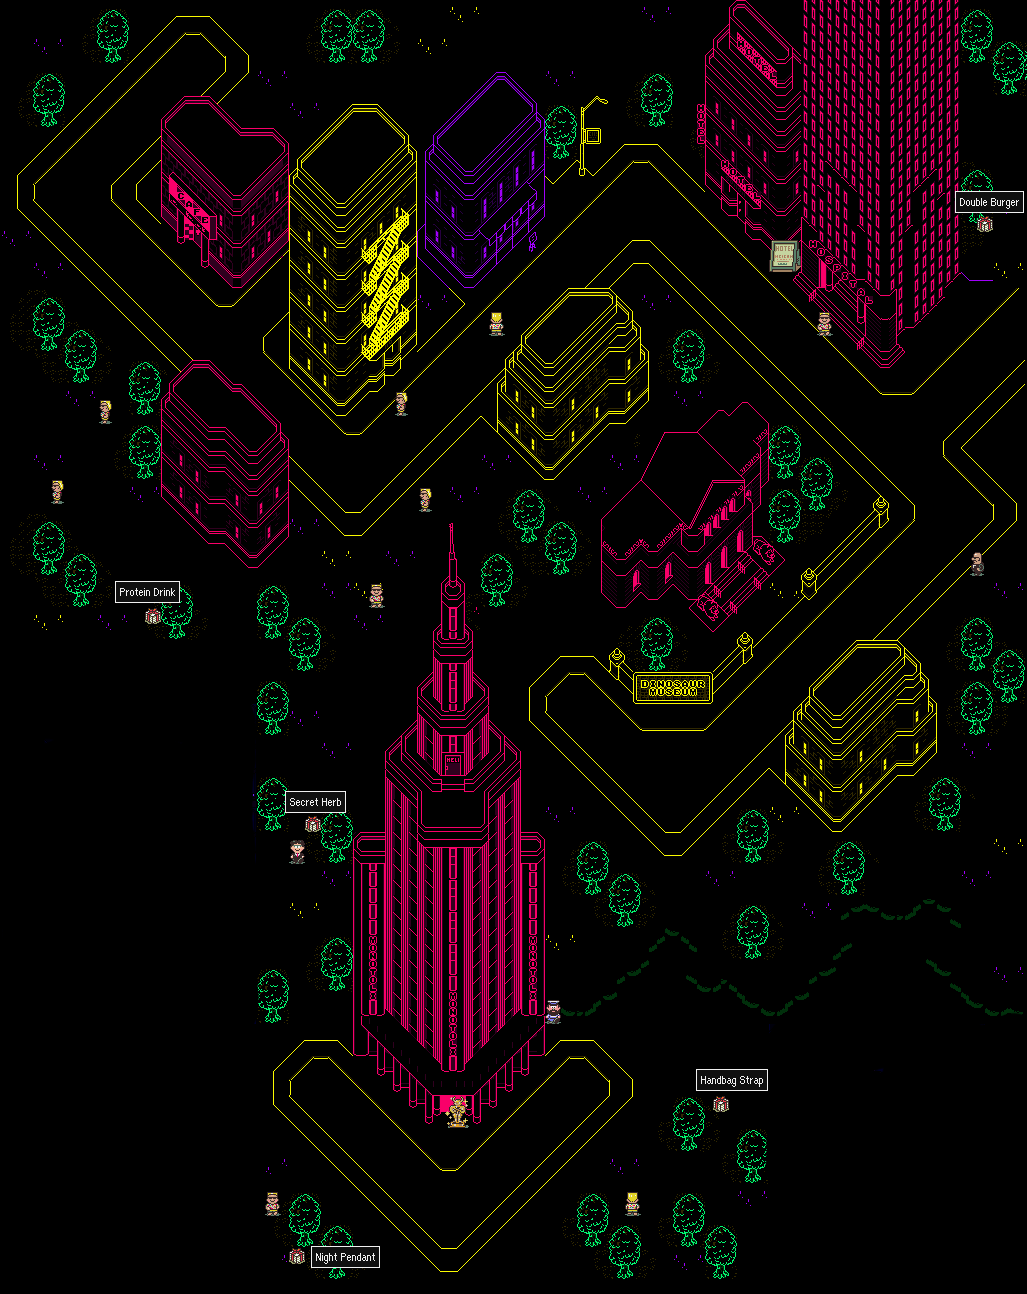
Walk between the Fourside Dept. Store and Monotoli Building, to get Picture #14!
| Badge | Title | Description | Points |
|---|---|---|---|
| Eagle Eyes | Return the Contact Lens to its owner | 10 |
If you grabbed the Contact Lens on the Desert, go to the 2nd Floor of the Bakery in Fourside and give the Lens to the man in there. As a reward, he'll give you... (·•᷄ࡇ•᷅)
| Badge | Title | Description | Points |
|---|---|---|---|
| Roughly the Third Strongest, Give or Take | Defeat all five Guardian Diggers | 5 |
You'll get this automatically while progressing with the story.
If you're leveled up enough, a PSI Freeze Gamma should kill a Guardian Digger easily.
| Badge | Title | Description | Points |
|---|---|---|---|
| Now That's How you Make an Exit! | Use an Exit Mouse | 3 |
Talk to the mouse without a sign inside the Gold Mine, then use the Exit Mouse.
When coming out of the Gold Mine, you should get Picture #15!
| Badge | Title | Description | Points |
|---|---|---|---|
| Gift Extravaganza | Loot all gift boxes in Dusty Dunes Desert and the Gold Mine | 5 |
| Badge | Title | Description | Points |
|---|---|---|---|
| Gettin' the Band Back Together | One last performance from the Runaway Five! | 5 |
You'll get this automatically while progressing with the story.
In the top floor of the Fourside Dept. Store, walk near the toys to get Picture #16! Halfway there!
By doing this, if you're following the guide, you should also get:
| Badge | Title | Description | Points |
|---|---|---|---|
| Shutterbug Ness | Have your picture taken 16 times | 5 |
RARE DROP # 4
If you're using the Rare Drops Subset, there's a rare drop you can get now.
| Badge | Title | Description | Points |
|---|---|---|---|
| Musica's Sudden Guts Pill | Get a Sudden Guts Pill from a Musica while the Fourside Department Store is under alien control. | 10 |
Musicas have a 1/128 chance of dropping a Sudden Guts Pill. Once you get the drop, MAKE SURE TO ADD IT TO YOUR INVENTORY!
This is MISSABLE! Once you defeat the boss fight at the top of the Fourside Dept. Store, Musicas will stop spawning!
| Badge | Title | Description | Points |
|---|---|---|---|
| The Auto-Fight of Your Life | Tame the Department Store Spook using only Auto-Battle | 10 |
MISSABLE! Pray to RN-Jegus. If you want to increase your odds, buy a Teddy Bear...
| Badge | Title | Description | Points |
|---|---|---|---|
| Everdead | Try Everdred's patience as he shares his last words | 5 |
MISSABLE! Just keep asking him to repeat his story until he gets fed up. Pretty funny scene :)
| Badge | Title | Description | Points |
|---|---|---|---|
| This is Madness! | Welcome to Mooooonsiiiide | 5 |
You'll get this automatically while progressing with the story.
Make sure to get ALL 5 Gifts in Moonside, these are MISSABLE!
RARE DROP # 5
If you're using the Rare Drops Subset, there's a rare drop you can get now.
| Badge | Title | Description | Points |
|---|---|---|---|
| Enraged Fire Plug's Sudden Guts Pill | Get a Sudden Guts Pill from a Musica while the Fourside Department Store is under alien control. | 10 |
Enraged Fire Plugs have a 1/128 chance of dropping a Sudden Guts Pill. Once you get the drop, MAKE SURE TO ADD IT TO YOUR INVENTORY!
This isn't missable, but it's easier to farm them in Moonside.
Enraged Fire Plug Suggested Farming Area
RARE DROP # 6
If you're using the Rare Drops Subset, there's a rare drop you can get now.
| Badge | Title | Description | Points |
|---|---|---|---|
| Dali's Clock's PSI Caramel | Get a PSI Caramel from a Dali's Clock. | 10 |
Dali's Clocks have a 1/128 chance of dropping a PSI Caramel. Once you get the drop, MAKE SURE TO ADD IT TO YOUR INVENTORY!
This isn't missable, but it's easier to farm them in Moonside.
Keep going in and out of the Café to reload the map and enemy spawns.
Dali's Clock Suggested Farming Area
BEFORE YOU CONTINUE!
Make sure to have grabbed all 5 Gift Boxes in Moonside, these are MISSABLE! Once you beat the boss in Moonside, you won't be able to come back!
| Badge | Title | Description | Points |
|---|---|---|---|
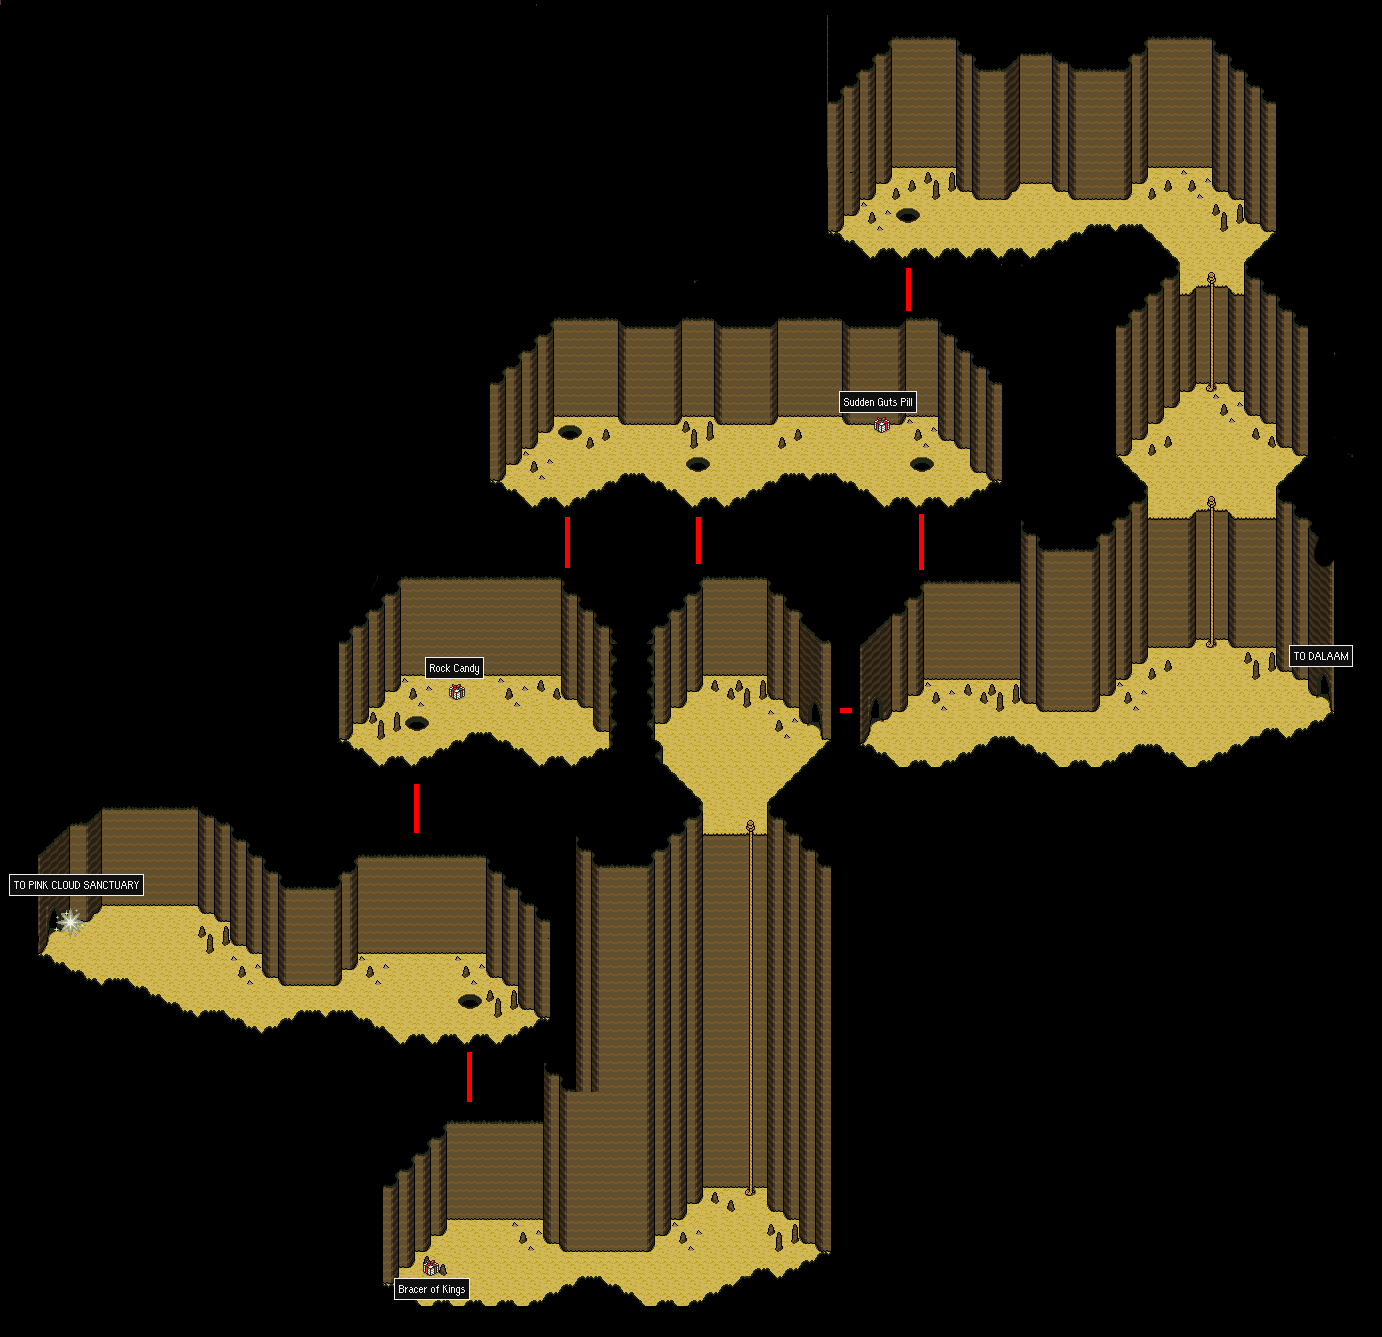
| The King Banana | Meet his royal highness, the Talah Rama, inside the monkey caves. | 5 |
You'll get this automatically while progressing with the story.
God, I hate the Monkey Caves. The only items you need to get to the Talah Rama are:
- The Pencil Eraser (Make sure to have it on your inventory)
- One Pizza (Call Mach Pizza and order a Small Pizza)
- One Protein Drink (Fourside Dept. Store)
- One Ruler (Jeff starts with one. Alternatively, Fourside Dept. Store)
- One Skip Sandwich (Fourside Bakery)
| Badge | Title | Description | Points |
|---|---|---|---|
| Chimps' Curious Chests | Loot all chests in Monkey Cave | 5 |
Take your time to do this. It can get kind of obnoxious. You can get a Fire Pendant, the Neutralizer and a Bag of Dragonite. Neat!
Achievement Cleanup
If you talk to the Monkey next to the Talah Rama and follow him, you'll learn PSI Teleport α.
Now that you have this, you can easily travel to previously visited locations.
First, Travel to Onett and buy the Seaside Property on the Southwest for $7500. By doing this, you should get:
| Badge | Title | Description | Points |
|---|---|---|---|
| First-time Homeowner | Purchase the seaside property | 10 |
Also, inside the property, in front of the couch, you should get Picture #17!
Teleport to Threed. In the leftmost room on the second floor of the Threed Hospital, check the drawers to find the Insignificant Item.
Now teleport to Twoson. In the leftmost room on the second floor of the Twoson Hospital, give the man the Insignificant Item and he'll give you a Magic Truffle!
By doing this, you should get:
| Badge | Title | Description | Points |
|---|---|---|---|
| Significant! | Discover the significance of the Insignificant Item | 10 |
That's all folks. Let's get back to the Main Story.
| Badge | Title | Description | Points |
|---|---|---|---|
| Metal Gear Solid | Skip past all the Robo Sentries on the 48th floor | 25 |
MISSABLE! Might take a few tries. Buy 2 Skip Sandwiches DX and save on the First Floor of the Monotoli Building so you can just reload your game if you fail.
It might also be a little RNG dependent.
Fly to Winters on the Sky Runner after Paula rejoins your party!
RARE DROP # 7
If you're using the Rare Drops Subset, there's a rare drop you can get now.
| Badge | Title | Description | Points |
|---|---|---|---|
| Mighty Bear Seven's Super Plush Bear | Get a Super Plush Bear from a Mighty Bear Seven. | 10 |
Mighty Bear Sevens have a 1/128 chance of dropping a Super Plush Bear. Once you get the drop, MAKE SURE TO ADD IT TO YOUR INVENTORY!
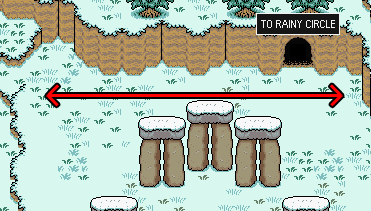
This isn't missable, but I think this is a good moment to farm for this. You'll get some levels, and you just landed next to Stonehenge, where they spawn.
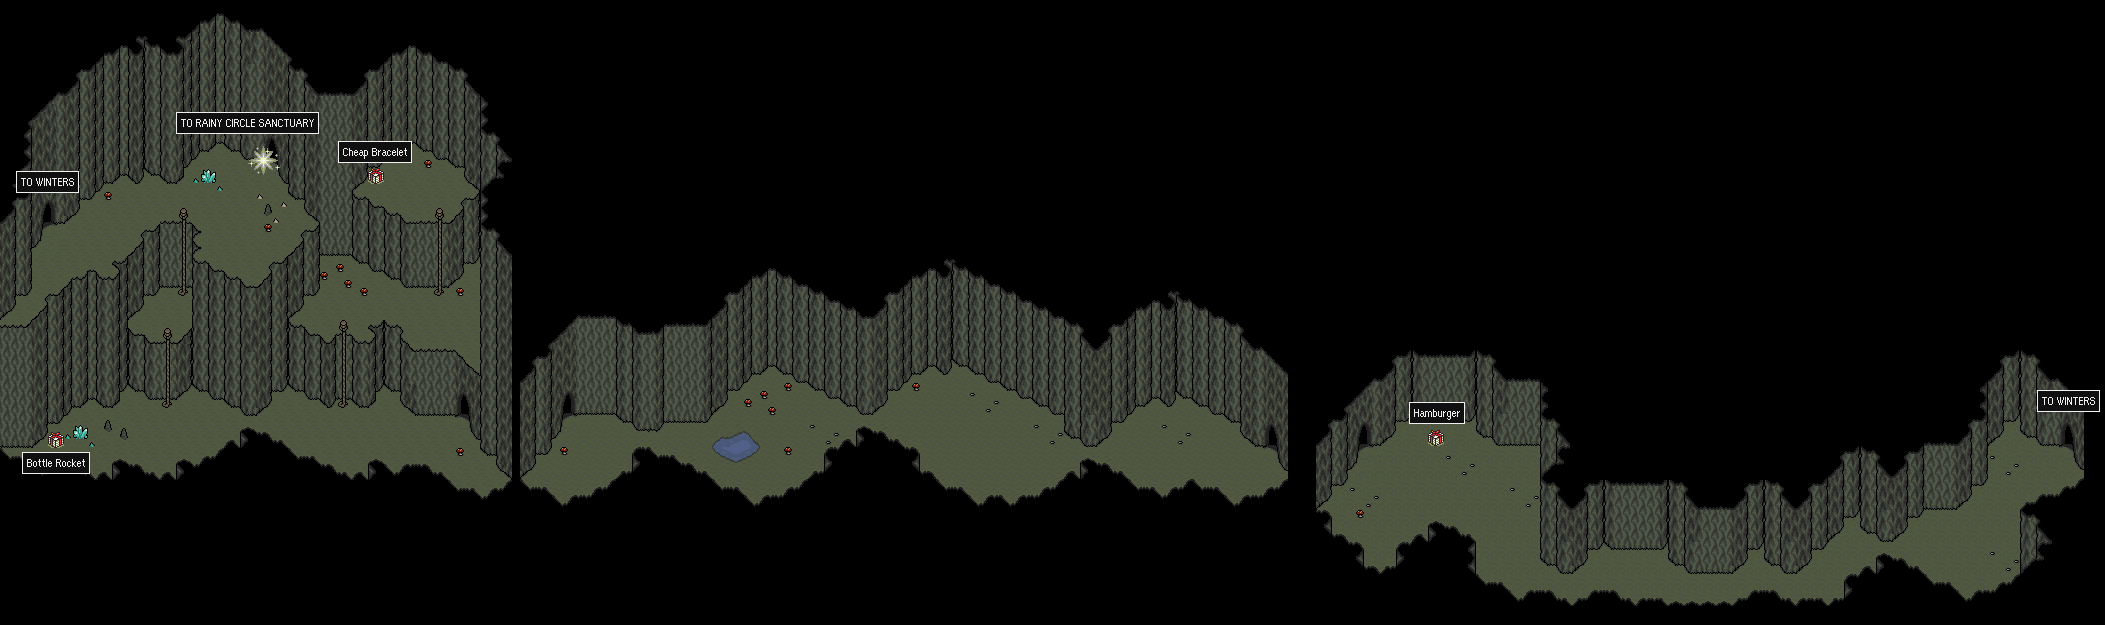
Mighty Bear Seven Suggested Farming Area
| Badge | Title | Description | Points |
|---|---|---|---|
| Trippy Wallpaper, Man | Tame Shrooom! with at least one character Mushroomized | 10 |
MISSABLE! Use PSI Fire with Paula and any Bottle Rockets you might have with Jeff. You can also try using PSI Flash β with Ness. It might Insta-kill it. If Ness is mushroomized, don't use PSI Rockin'. If Paula is mushroomized, don't use PSI Fire. You can also just defend with your mushroomized character if you want, it's safer.
| Badge | Title | Description | Points |
|---|---|---|---|
| Your Sanctuary IV | Claim Rainy Circle | 5 |
You'll get this automatically while progressing with the story.
Follow the tips on the previous achievement.
After getting the fourth melody, return to Dr. Andonuts Lab and get on the Sky Runner to fly to Summers! This is in my opinion when the next section of the game starts!
Mid Game
Welcome to Summers! Mid-Late game is the most fun part of the game imo, so I hope you enjoy!
Go to Toto (East of Summers) and talk with one of the sailors. He'll talk to you about his wife. Then, go inside one of the houses in Toto, an NPC will give you the Stoic Club's phone number. Call the Stoic Club to make a reservation and inside, talk with everyone, the sailor's wife will offer you "magic" cake.
Yeah... We're doing that again.
| Badge | Title | Description | Points |
|---|---|---|---|
| A Message from Eternity | Help Poo suffer through his Mu training | 5 |
You'll get this automatically while progressing with the story.
After Poo joins your party, head into the Summers museum and defeat both Shattered Men. This will give a good amount of XP so Poo can level up a little. Get the Hieroglyph Copy.
Walk into the Summers Hotel to get Picture #18!
Walk into the center of the Summers Restaurant to get Picture #19!
Walk around the beach umbrellas near the gelato vendor in Summers to get Picture #20!
Now you can do two things, either sail to Scaraba, or get the fifth and sixth melody. We'll do the latter.
Teleport to Fourside.
| Badge | Title | Description | Points |
|---|---|---|---|
| Project DIVA | Catch a solo Venus performance at the Topolla Theater | 10 |
You'll get this automatically while progressing with the story.
Inside the Fourside Museum, walk up to the sign by the dinosaur bones and you should get Picture #21!
Once you're in the Fourside Sewers, make sure to get the Broken Bazooka from one of the trash cans.
| Badge | Title | Description | Points |
|---|---|---|---|
| Fix it, Jeff III | Repair a Broken Bazooka | 10 |
You need 45 IQ to repair the Broken Bazooka to turn it into a Heavy Bazooka. This is an amazing item. You can't equip it, but you can USE it in battle an unlimited amount of times. It does a lot of damage and sometimes it hits multiple enemies.
| Badge | Title | Description | Points |
|---|---|---|---|
| Your Sanctuary V | Claim Magnet Hill | 5 |
You'll get this automatically while progressing with the story.
This is a pretty straight-forward boss fight. Use PSI Freeze with Paula and Poo, heal when needed with Ness or just bash. If you have bottle rockets use them with Jeff.
| Badge | Title | Description | Points |
|---|---|---|---|
| Surprise Unveiling | Loot all gift boxes and chests in Fourside and Moonside | 5 |
MISSABLE! If you grabbed all 5 gifts in Moonside and the 2 gifts on Monotoli Building, the last gift you need should be in Magnet Hill. It contains the Carrot Key.
When coming out of the Fourside Museum, you should get Picture #22! 10 More to go!
Teleport to Dalaam/Ramma.
Walk up to the palace in Dalaam to get Picture #23!
Walk up to the throne in Dalaam Palace to get Picture #24!
Use the Carrot Key on the rabbit statues in southern Dalaam. This will give you access to the next dungeon, Pink Cloud.
| Badge | Title | Description | Points |
|---|---|---|---|
| Kingly Regalia III | Obtain the Bracer of Kings | 5 |
Fall through the hole next to the Sanctuary Guardian to find a lonely gift box that contains the Bracer of Kings.
Poo can only equip 4 items in the game, the Sword of Kings as a weapon, the Cloak of Kings in his body armor slot, the Bracer of Kings in his arms and the Diadem of Kings as an accessory. If you follow this guide, you'll get all 4 of them. (Any other item that Poo equips will decrease his stats instead of increasing them.)
If you got all gift boxes in Dalaam and Pink Cloud, you should also get:
| Badge | Title | Description | Points |
|---|---|---|---|
| Gifts from the East | Loot all gift boxes and chests in Dalaam and Pink Cloud Cave | 5 |
| Badge | Title | Description | Points |
|---|---|---|---|
| Feel the Thunder | Tame Thunder and Storm without the Franklin Badge | 10 |
MISSABLE! Call Escargo Express to deposit the Franklin Badge. Apparently PSI Flash isn't allowed for this achievement, so don't use that. PSI Freeze with Paula and Poo, Bottle Rockets with Jeff, Ness should heal the party when necessary.
| Badge | Title | Description | Points |
|---|---|---|---|
| Your Sanctuary VI | Claim Pink Cloud | 5 |
You'll get this automatically while progressing with the story.
If you deposited it, pick-up your Franklin Badge again and give it to Paula.
There's not much else to do here in Dalaam so, fly to Summers again!
Walking near the Ship Captain in Toto will give you Picture #25!
If you talk with the Sailor on Toto now that Poo is in your party, he'll offer to take you to Scaraba! Make sure you're prepared, you're gonna be fighting a boss-fight before arriving at your destination.
| Badge | Title | Description | Points |
|---|---|---|---|
| Release the Kraken! | Tame the monstrous Kraken | 5 |
You'll get this automatically while progressing with the story.
You can use PSI Paralysis on the Kraken, use PSI Freeze with Paula and Poo, Bottle Rockets or the Heavy Bazooka with Jeff and heal with Ness when needed.
After this Boss fight, you should get to Scaraba!
| Badge | Title | Description | Points |
|---|---|---|---|
| What a Turd | Find Pokey's 'gift' in Scaraba | 2 |
What a turd indeed. Check northeast Scaraba and you'll find something in the ground that has the characteristic Pokey aroma.
Walk around the Bazaar Area to get Picture #26!
| Badge | Title | Description | Points |
|---|---|---|---|
| Smooshed Criminal | Engage the Master Criminal Worm in battle in Scaraba and win (No Auto-Win) | 10 |
The Criminal Worms are like EarthBound's Metal Slimes, while the Master Criminal Worms are like EarthBound's Metal Babbles. They give a big chunk of XP if you kill them.
Just keep walking around the desert south of Scaraba until you find one. To catch it easily, use teleport α and try teleporting anywhere. The enemies will freeze and you can just run to it. Just make sure not to actually teleport lol.
Walk up to the Pyramid Entrance once you solve the Puzzle to get Picture #27!
If you opened the caskets in Threed, and all the sarcophagi in the Pyramid, you should get:
| Badge | Title | Description | Points |
|---|---|---|---|
| Tomb Treasures | Steal the contents of all the caskets in the game | 5 |
Walk around the desert south of Dungeon Man to get Picture #28!
| Badge | Title | Description | Points |
|---|---|---|---|
| Tearful Goodbye | After a long journey, a comrade departs | 5 |
You'll get this automatically while progressing with the story.
BEFORE YOU CONTINUE!
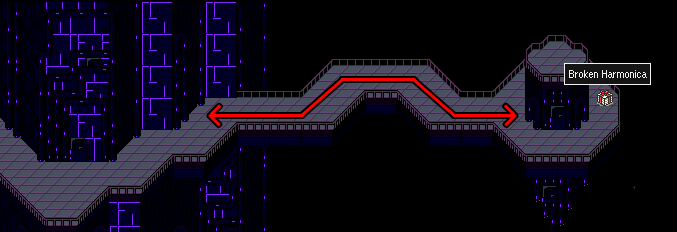
When you enter Dungeon Man for the second time to look for the submarine, make sure to open the gift box that contains the Talisman Ribbon. This gift box is MISSABLE!
Buy a Multi Bottle Rocket from the Military Guy in Deep Darkness. You'll need it soon.
In Deep Darkness, use the Hawk's Eye to reveal the dark parts of the map.
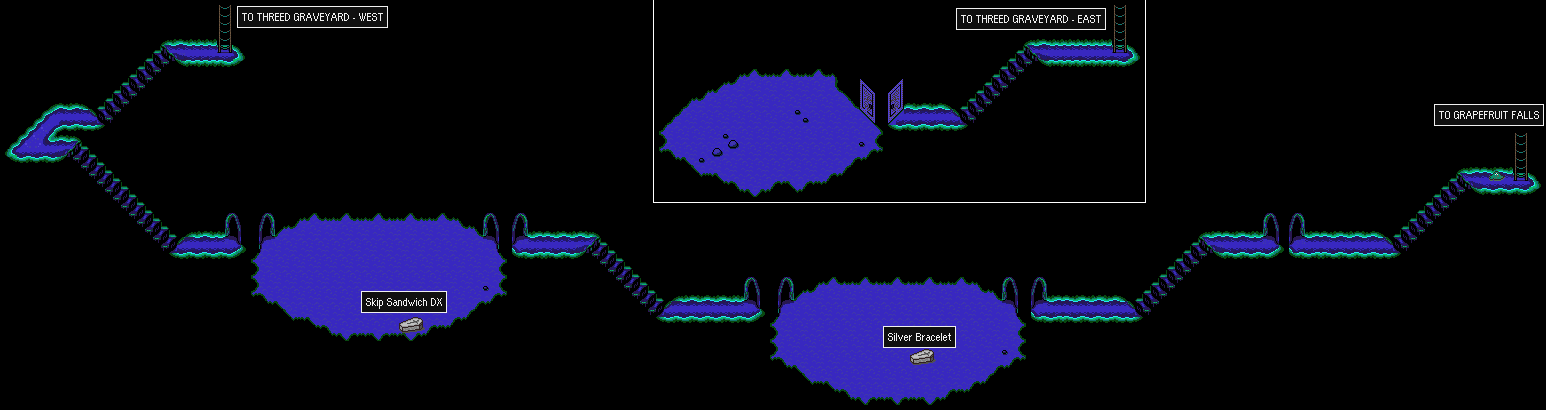
| Badge | Title | Description | Points |
|---|---|---|---|
| Truffle Uppagus | Find a Magic Truffle in Deep Darkness. | 5 |
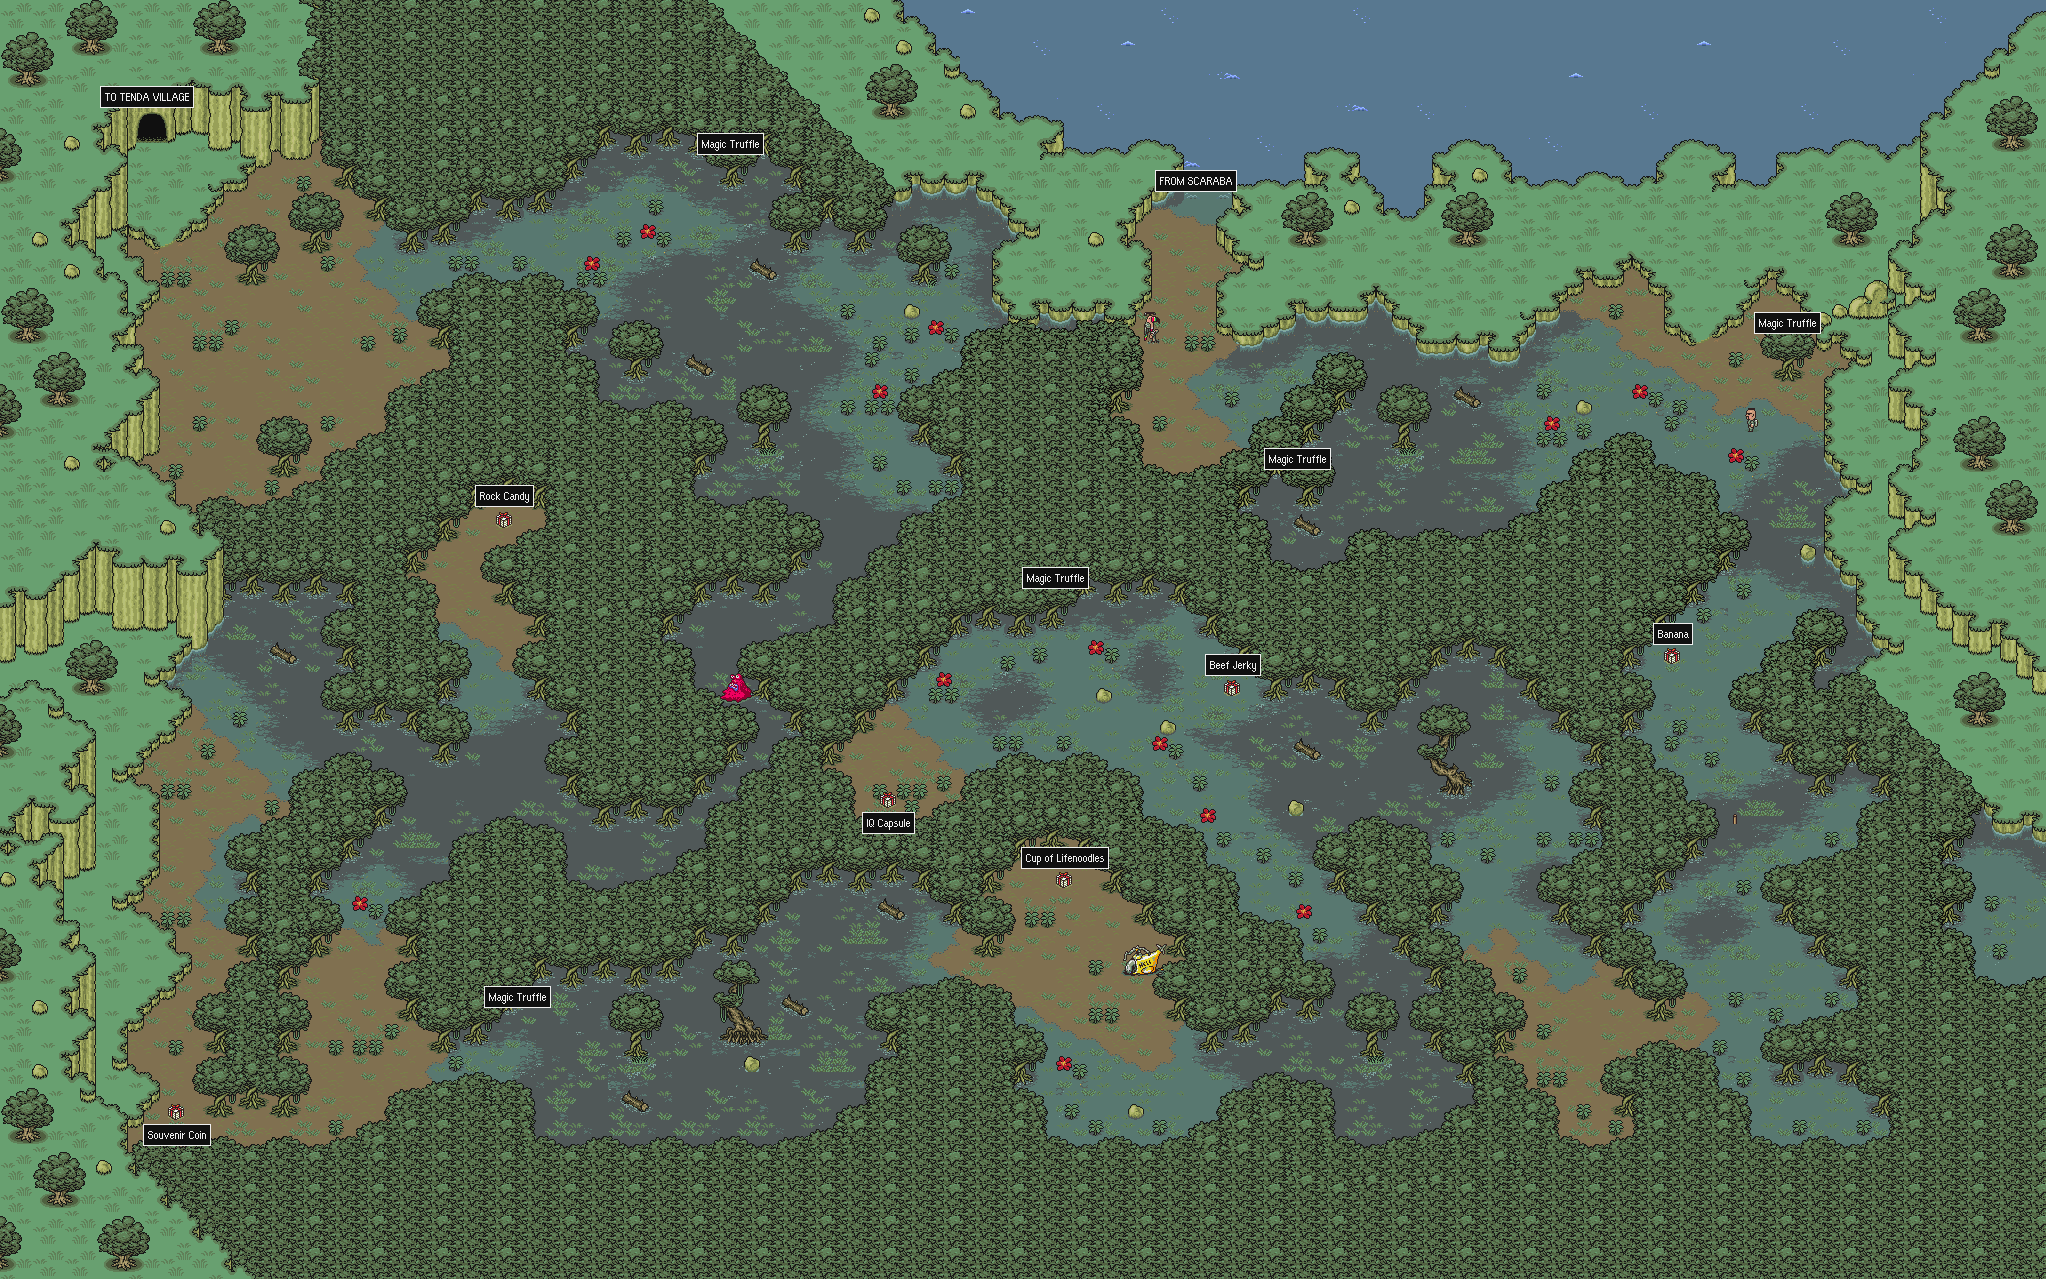
There's 5 total. You only need 1, though.
Walk near the myna bird in the central area of Deep Darkness to get Picture #29!
If you grabbed all gifts in Dungeon Man and Deep Darkness, you should also unlock:
| Badge | Title | Description | Points |
|---|---|---|---|
| Deep Dive Surprise | Loot all gift boxes in Dungeon Man and Deep Darkness | 5 |
MISSABLE!
| Badge | Title | Description | Points |
|---|---|---|---|
| OHKO | Tame the Deep Darkness boss in only one move | 10 |
MISSABLE! Defend with Ness and Paula, Multi Bottle Rocket with Jeff.
Master Barf drops the Casey Bat. DON'T EQUIP IT! It might look like a great weapon, but it MISSES 75% OF THE TIME!
After defeating Master Barf, you'll reach Tenda Village, a village full of shy little green people. You won't be able to talk to them as they're very shy. Talk with the Elder and he'll tell you about a book that can help them overcome their shyness.
| Badge | Title | Description | Points |
|---|---|---|---|
| The Trash Whisperer | Dig through every trash can in the game | 10 |
There's 25 (26) Trash Cans in the game.
- 3 in Onett
- 1 at Apple Kid's House
- 4 (5) at Threed (I don't know if the one with the Jar of Fly Honey counts toward this achievement)
- 3 in Saturn Valley
- 6 in Belch's Factory
- 2 in the Monkey Caves
- 5 in Fourside's Sewers
- 1 in Tenda Village
You should be able to get this achievement now.
Leave Tenda Village to receive two calls.
Walk to the Stonehenge base entrance from below to get Picture #30!
Farming session incoming!
| Badge | Title | Description | Points |
|---|---|---|---|
| Kingly Regalia I | Obtain the Sword of Kings | 10 |
MISSABLE! Even if you're not using the Rare Drops subset, there's five 1/128 items you'll need to farm in order to master the main EarthBound set. The first one of those five is the Sword of Kings. Please read the next Rare Drop section, even if you're only using the main set.
RARE DROP # 8
| Badge | Title | Description | Points |
|---|---|---|---|
| Starman Super's Sword of Kings | Get the Sword of Kings from a Starman Super. | 10 |
Starman Supers have a 1/128 chance of dropping the Sword of Kings. Once you get the drop, MAKE SURE TO ADD IT TO YOUR INVENTORY!
THIS IS MISSABLE! Once you defeat the Boss at the end of the Stonehenge Base, Starman Supers will stop spawning!
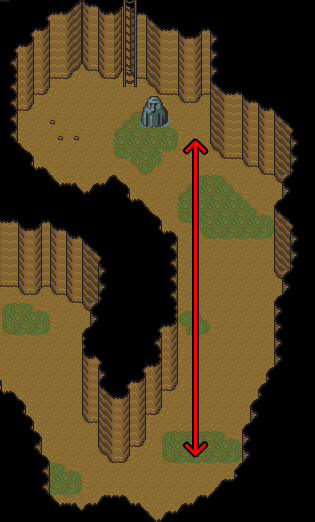
Starman Super Suggested Farming Area
If you're only using the Main Set, you can proceed with the story once you get the Sword of Kings. If you're using the Rare Drops Subset, there's still 2 more things to farm before you can continue.
RARE DROP # 9
If you're using the Rare Drops Subset, there's a rare drop you can get now.
| Badge | Title | Description | Points |
|---|---|---|---|
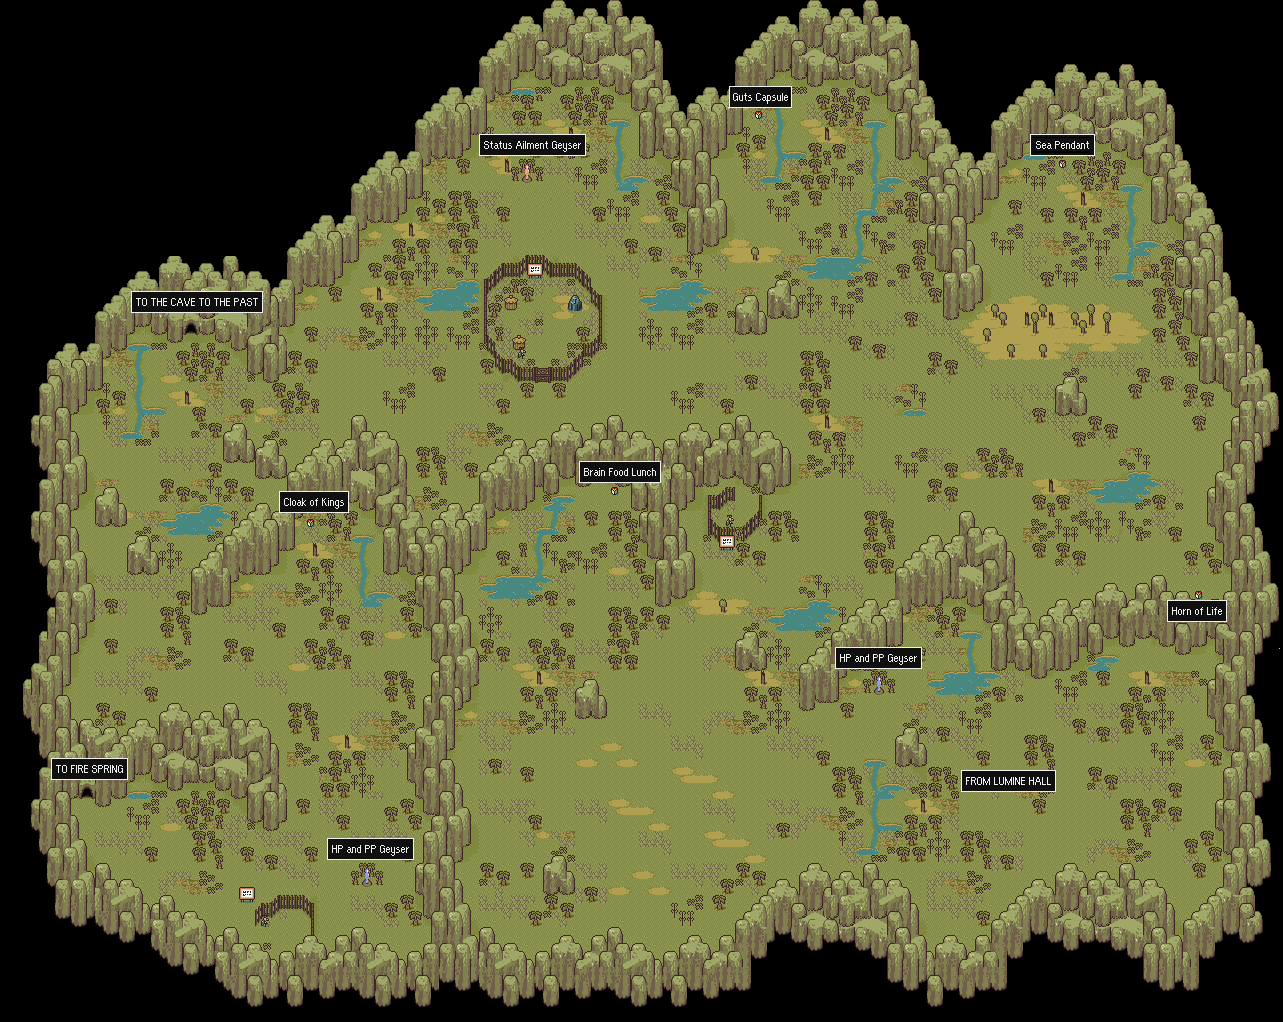
| Starman's Brain Food Lunch | Get a Brain Food Lunch from a Starman. | 10 |
Normal Starmen have a 1/128 chance of dropping a Brain Food Lunch. Once you get the drop, MAKE SURE TO ADD IT TO YOUR INVENTORY!
THIS IS MISSABLE! Once you defeat the Boss at the end of the Stonehenge Base, Starmen will stop spawning!
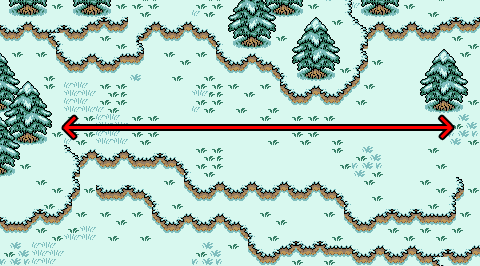
Starman Suggested Farming Area
RARE DROP # 10
If you're using the Rare Drops Subset, there's a rare drop you can get now.
| Badge | Title | Description | Points |
|---|---|---|---|
| Military Octobot's Meteotite | Get a Meteotite from a Military Octobot. | 10 |
Military Octobots have a 1/128 chance of dropping a Meteotite. Once you get the drop, MAKE SURE TO ADD IT TO YOUR INVENTORY!
THIS IS MISSABLE! Once you defeat the Boss at the end of the Stonehenge Base, Military Octobots will stop spawning!
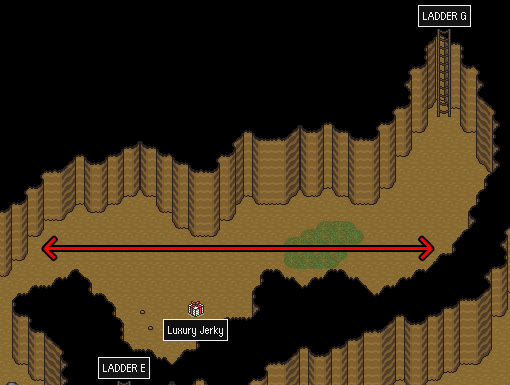
Military Octobot Suggested Farming Area
| Badge | Title | Description | Points |
|---|---|---|---|
| Because I Know Something You Don't Know | Defeat Starman Deluxe ... using only your left hand. | 10 |
MISSABLE! Win the fight by only using the D-Pad and L to confirm. Bash with everyone and use Multi Bottle Rockets with Jeff.
After defeating Starman DX, talk with the Mr. Saturn on the room to the left to receive the Saturn Ribbon. Also talk to Apple Kid, he'll tell you where to find Overcoming Shyness. Teleport to Onett and look for the book in the library. (First Room on the leftmost bookshelf)
Late Game
We're in the Endgame now.
| Badge | Title | Description | Points |
|---|---|---|---|
| Overcoming Shyness | Help the Tenda overcome their inadequacy | 5 |
You'll get this automatically while progressing with the story.
After you cure the Tenda's shyness, you'll automatically get Picture #31!
That's all the pictures! the last picture will be added to your album automatically once you finish the game.
| Badge | Title | Description | Points |
|---|---|---|---|
| You've Come Farther | Chill out and reminisce again, you've earned it! | 5 |
MISSABLE! Same thing as in Saturn Valley. After curing everyone's shyness, talk to the Tenda next to the chief and enjoy...
| Badge | Title | Description | Points |
|---|---|---|---|
| Tendamart | Barter at the Tenda Village item shop for the Hall of fame bat | 10 |
Leave Tenda Village and Teleport β to Saturn Valley. Buy 7 Horns of Life at the Saturn Valley shop and return to Tenda Village. Trade the 7 Horns of Life until you get the Hall of Fame Bat.
Once you reach the next dungeon, Lumine Hall/Hole, there's a gift box that contains the next Kingly Regalia, the Diadem of Kings!
| Badge | Title | Description | Points |
|---|---|---|---|
| Kingly Regalia IV | Obtain the Diadem of Kings | 5 |
In Lumine Hall you'll find an enemy that's very similar to the previously mentioned Foppies called Fobbies! These are also a good way to farm XP quick. I wouldn't recommend farming much though, you're gonna wanna be below level 80-90 before the last sanctuary.
After completing all 8 sanctuaries and an additional boss fight, you'll get a HUGE bonus to all of Ness' stats. If Ness is level 99 by that time, he won't benefit from this boost, so be mindful of that!
Also, if you opened all the gift boxes in Stonehenge Base and Lumine Hall, you should get:
| Badge | Title | Description | Points |
|---|---|---|---|
| Boxes of Delight | Loot all gift boxes in Stonehenge Base and Lumine Hall | 5 |
| Badge | Title | Description | Points |
|---|---|---|---|
| Your Sanctuary VII | Claim Lumine Hall | 5 |
You'll get this automatically while progressing with the story.
Use the Shield Killer or the Neutralizer to remove the boss' shield. You can also just bash him 3 times to remove it, but be careful. After that just use Multi Bottle Rockets with Jeff, PSI Rockin' γ with Ness, and PSI Freeze with Paula and Poo. The Franklin Badge will also help in this battle.
| Badge | Title | Description | Points |
|---|---|---|---|
| Kingly Regalia II | Obtain the Cloak of Kings | 5 |
You can find the Cloak of Kings in a gift box at the Lost Underworld. You should now have Poo fully equipped!
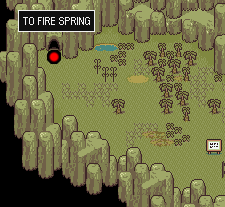
Make sure to also get the Sea Pendant and equip it on Ness! This Pendant gives 100% immunity to PSI Flash, so Ness won't be able to get Insta-Killed.
| Badge | Title | Description | Points |
|---|---|---|---|
| Joyous Gift Journey | Loot all gift boxes in Lost Underworld and Fire Spring | 5 |
| Badge | Title | Description | Points |
|---|---|---|---|
| Diamond Dogs | Tame Diamond Dog with at least one character Diamondized | 25 |
MISSABLE! This might be a little tricky. Make sure that Ness has the Sea Pendant, and equip Paula with the Night Pendant. Use PSI Freeze on the first phase of the fight, and use Jeff's Heavy Bazooka. Once the second phase starts, wait until Diamond Dog diamondizes either Jeff or Poo.
If Jeff gets diamondized, heal with Ness, PSI Freeze with Paula and Poo until the Diamond Dog becomes tame. If Poo gets diamondized, heal with ness, PSI Freeze with Paula, Neutralizer with Jeff to removes the Diamond Dog's psychic shield and then use Multi Bottle Rockets.
As an alternative, you can fly to Winters and fight a Mook, wait until it diamondizes Jeff or Poo and then return to Fire Spring.
BEFORE YOU CONTINUE!
Before heading into the sanctuary... Make sure Ness has the Sea Pendant equipped, give him the Franklin Badge and any PP-recovering items you might have!
| Badge | Title | Description | Points |
|---|---|---|---|
| Your Sanctuary VIII | Claim Fire Springs | 10 |
You'll get this automatically while progressing with the story.
| Badge | Title | Description | Points |
|---|---|---|---|
| Who Needs Courage? | Lead all of the Flying Men to their deaths. | 10 |
MISSABLE! In Magicant, there's a house with some bird people that will join your party. Just like the teddy bears, when they receive enough damage, they'll die. A new tombstone will appear next to the house each time a Flying Man dies. There's 5 of them.
The best way to get them killed is fighting Loaded Dice in hopes that they'll summon a Care Free Bomb.
This might take some time, but you'll eventually get it if you keep fighting the Loaded Dice.
BEFORE YOU CONTINUE!
Make sure to get all 5 Gift Boxes in Magicant. These are MISSABLE!
| Badge | Title | Description | Points |
|---|---|---|---|
| Ness' Nightmare | Tame the Sea of Eden boss after it runs out of PP | 10 |
MISSABLE! If you have the Sea Pendant, this should be easy. Make sure you have enough HP and PP before starting the battle!
Just defend/heal until you see the achievement icon pop up on the bottom right of the screen. Ness' Nightmare will use PSI Rockin' α, Shield β and PSI Rockin' Ω.
Ness' Nightmare has 882 PP. PSI Rockin' α uses 10 PP. Shield β also uses 10 PP. PSI Rockin' Ω uses 98 PP.
It will take some time, but as long as you have the Sea Pendant and enough PP to heal, you should be alright.
Once Ness' Nightmare depletes its PP, just Auto-Fight and you'll win!
After defeating Ness' Nightmare you'll get a HUGE bonus on all stats and a whopping 200,000 XP!
Now it's time to farm for three more 1/128 items! I waited until this point in the game because of the bonus that Ness' Nightmare gives you. If you farmed for these items you might've gotten to level 99 and you wouldn't have been able to benefit Ness with this huge bonus.
Now that Ness is an ABSOLUTE UNIT, it's time to farm for:
| Badge | Title | Description | Points |
|---|---|---|---|
| Fix it, Jeff IV | Repair a Broken Parabolic Antenna | 10 |
You'll need to farm for the Broken Antenna, which is a rare 1/128 drop. Jeff needs 65 IQ to repair it and turn it into the Gaia Beam, Jeff's ultimate weapon.
Please read the next Rare Drop section, even if you're only using the main set.
RARE DROP # 11
If you're using the Rare Drops Subset, there's a rare drop you can get now.
| Badge | Title | Description | Points |
|---|---|---|---|
| Uncontrollable Sphere's Broken Antenna | Get a Broken Antenna from an Uncontrollable Sphere. | 10 |
Uncontrollable Spheres in Lumine Hall have a 1/128 chance of dropping the Broken Antenna. Once you get the drop, MAKE SURE TO ADD IT TO YOUR INVENTORY!
Uncontrollable Sphere Suggested Farming Area
Next up, the Star Pendant. You can farm these in Fire Spring.
The Star Pendant adds 30 defense, provides high defense against PSI Fire and Freeze, and also provides an immunity towards Paralysis and Flash attacks. It's the best body armor for Ness, Paula and Jeff. But you only need to get one for the achievement.
| Badge | Title | Description | Points |
|---|---|---|---|
| Fallen Star | Obtain a Star Pendant | 10 |
Please read the next Rare Drop section, even if you're only using the main set.
RARE DROP # 12
If you're using the Rare Drops Subset, there's a rare drop you can get now.
| Badge | Title | Description | Points |
|---|---|---|---|
| Major Psychic Psycho's Star Pendant | Get a Star Pendant from a Major Psychic Psycho. | 10 |
Major Psychic Psychos in Fire Spring have a 1/128 chance of dropping the Star Pendant. Once you get the drop, MAKE SURE TO ADD IT TO YOUR INVENTORY!
Major Psychic Psycho Suggested Farming Area
Next up, the Goddess Ribbon, Paula's best accessory.
Once Onett gets invaded by aliens, you'll be able to find Ghosts of Starmen there.
| Badge | Title | Description | Points |
|---|---|---|---|
| The Cutest Ribbon of All | Obtain the Goddess Ribbon | 10 |
Please read the next Rare Drop section, even if you're only using the main set.
RARE DROP # 13
If you're using the Rare Drops Subset, there's a rare drop you can get now.
| Badge | Title | Description | Points |
|---|---|---|---|
| Ghost of Starman's Goddess Ribbon | Get a Goddess Ribbon from a battle containing a Ghost of Starman. | 10 |
Ghost of Starmen in Onett (Invaded) have a 1/128 chance of dropping the Goddess Ribbon. Once you get the drop, MAKE SURE TO ADD IT TO YOUR INVENTORY!
Ghost of Starmen Suggested Farming Area
Alright, that's everything we can get for now. All the remaining achievements will be unlocked later.
This next section includes 11 more rare drops you should farm now if you're using the Rare Drops Subset. If you're only using the main set, feel free to skip it.
Rare Drops Farming
RARE DROP # 14
If you're using the Rare Drops Subset, there's a rare drop you can get now.
| Badge | Title | Description | Points |
|---|---|---|---|
| Territorial Oak's PSI Caramel | Get a PSI Caramel from a Territorial Oak. | 10 |
Territorial Oaks in Peaceful Rest Valley have a 1/128 chance of dropping a PSI Caramel. Once you get the drop, MAKE SURE TO ADD IT TO YOUR INVENTORY!
Territorial Oak Suggested Farming Area
RARE DROP # 15
If you're using the Rare Drops Subset, there's a rare drop you can get now.
| Badge | Title | Description | Points |
|---|---|---|---|
| Plain Crocodile's Meteornium | Get a Meteornium from a Plain Crocodile. | 10 |
Plain Crocodiles in Grapefruit Falls have a 1/128 chance of dropping a Meteornium. Once you get the drop, MAKE SURE TO ADD IT TO YOUR INVENTORY!
Plain Crocodile Suggested Farming Area
RARE DROP # 16
If you're using the Rare Drops Subset, there's a rare drop you can get now.
| Badge | Title | Description | Points |
|---|---|---|---|
| Violent Roach's Secret Herb | Get a Secret Herb from a Violent Roach. | 10 |
Violent Roaches in Saturn Valley Caves have a 1/128 chance of dropping a Secret Herb. Once you get the drop, MAKE SURE TO ADD IT TO YOUR INVENTORY!
Violent Roach Suggested Farming Area
RARE DROP # 17
If you're using the Rare Drops Subset, there's a rare drop you can get now.
| Badge | Title | Description | Points |
|---|---|---|---|
| Smilin' Sphere's Meteornium | Get a Meteornium from a Smilin' Sphere. | 10 |
Smilin' Spheres in Dusty Dunes Desert have a 1/128 chance of dropping a Meteornium. Once you get the drop, MAKE SURE TO ADD IT TO YOUR INVENTORY!
Smilin' Sphere Suggested Farming Area
RARE DROP # 18
If you're using the Rare Drops Subset, there's a rare drop you can get now.
| Badge | Title | Description | Points |
|---|---|---|---|
| Mad Taxi's Xterminator Spray | Get the Xterminator Spray from a Mad Taxi. | 10 |
Mad Taxis in Fourside have a 1/128 chance of dropping a Xterminator Spray. Once you get the drop, MAKE SURE TO ADD IT TO YOUR INVENTORY!
Mad Taxi Suggested Farming Area
RARE DROP # 19
If you're using the Rare Drops Subset, there's a rare drop you can get now.
| Badge | Title | Description | Points |
|---|---|---|---|
| Whirling Robo's Meteotite | Get a Meteotite from a Whirling Robo. | 10 |
Whirling Robos in Winters have a 1/128 chance of dropping a Meteotite. Once you get the drop, MAKE SURE TO ADD IT TO YOUR INVENTORY!
Whirling Robo Suggested Farming Area
RARE DROP # 20
If you're using the Rare Drops Subset, there's a rare drop you can get now.
| Badge | Title | Description | Points |
|---|---|---|---|
| Conducting Spirit's Brain Food Lunch | Get a Brain Food Lunch from a Conducting Spirit. | 10 |
Conducting Spirits in Lumine Hall have a 1/128 chance of dropping a Brain Food Lunch. Once you get the drop, MAKE SURE TO ADD IT TO YOUR INVENTORY!
Conducting Spirit Suggested Farming Area
RARE DROP # 21
If you're using the Rare Drops Subset, there's a rare drop you can get now.
| Badge | Title | Description | Points |
|---|---|---|---|
| Hyper Spinning Robo's Meteotite | Get a Meteotite from a Hyper Spinning Robo. | 10 |
Hyper Spinning Robos in Lumine Hall have a 1/128 chance of dropping a Meteotite. Once you get the drop, MAKE SURE TO ADD IT TO YOUR INVENTORY!
Hyper Spinning Robo Suggested Farming Area
RARE DROP # 22
If you're using the Rare Drops Subset, there's a rare drop you can get now.
| Badge | Title | Description | Points |
|---|---|---|---|
| Chomposaur's Magic Fry Pan | Get a Magic Fry Pan from a Chomposaur. | 10 |
Chomposaurs in the Lost Underworld have a 1/128 chance of dropping the Magic Fry Pan. Once you get the drop, MAKE SURE TO ADD IT TO YOUR INVENTORY!
Chomposaur Suggested Farming Area
RARE DROP # 23
If you're using the Rare Drops Subset, there's a rare drop you can get now.
| Badge | Title | Description | Points |
|---|---|---|---|
| Mechanical Octobot's Meteotite | Get a Meteotite from a Mechanical Octobot. | 10 |
Mechanical Octobots in Onett (Invaded) have a 1/128 chance of dropping a Meteotite. Once you get the drop, MAKE SURE TO ADD IT TO YOUR INVENTORY!
Evil Eyes have a 1/16 chance of dropping a Meteotite too, so make sure to keep adding the meteotites to your inventory until this achievement pops; That means that the Mechanical Octobot is the one that dropped it.
Chomposaur Suggested Farming Area
RARE DROP # 24
If you're using the Rare Drops Subset, there's a rare drop you can get now.
| Badge | Title | Description | Points |
|---|---|---|---|
| Manly Fish's Brother's Horn of Life | Get a Horn of Life from a Manly Fish's Brother. | 25 |
Manly Fish's Brothers have a 1/128 chance of dropping a Horn of Life. Once you get the drop, MAKE SURE TO ADD IT TO YOUR INVENTORY!
Oh god, this is a painful one. It might take a looooong time, so if you're getting frustrated, take a break! You need to be perseverant, you'll eventually get it!
Manly Fish's Brother Suggested Farming Area
Manly Fish's Brother Suggested Farming Area II
If you're bored, keep alternating between these two areas.
The Final Dungeon
BEFORE YOU CONTINUE!
After you give the Zexonyte to Dr. Andonuts, DO NOT GO INTO THE PHASE DISTORTER AGAIN!
This is the point of no return of the game, once you enter the phase distorter, there's no way of coming back.
Make sure you have:
- 96 Achievements unlocked. Only ones you should be missing are: -- Present Parade -- Bionic Slugger -- In the Bowels of Hell -- Fuzzy Pickles! -- On a Mission from God -- Kidnap Success! -- Polestar Reunion -- Better Late than Never -- Smiles and Tears
- 31 Pictures
- The Sea Pendant, Franklin Badge and Star Pendant in your inventory.
Also, buy a lot of PP-recovering items and fill Jeff's remaining inventory with Multi Bottle Rockets. 3 is enough. (These will be used for the final battle)
Make a copy of your save as a backup.
Once you're ready, get into the Phase Distorter and prepare to reach the Spooky, Scary Final Dungeon!
Once you're in the cave of the past, the Phase Distorter will only let you do two things, Healing and Saving.
There's only 1 present in the Cave of the Past. If you opened all presents in Magicant, you should get:
| Badge | Title | Description | Points |
|---|---|---|---|
| Present Parade | Loot all gift boxes in Magicant and Cave of the Past | 5 |
MISSABLE!
Now prepare for the most tedious achievement in the EarthBound set... Getting the Gutsy Bat.
| Badge | Title | Description | Points |
|---|---|---|---|
| Bionic Slugger | Obtain the Gutsy Bat | 50 |
Please read the next Rare Drop section, even if you're only using the main set.
RARE DROP # 25
If you're using the Rare Drops Subset, there's a rare drop you can get now.
| Badge | Title | Description | Points |
|---|---|---|---|
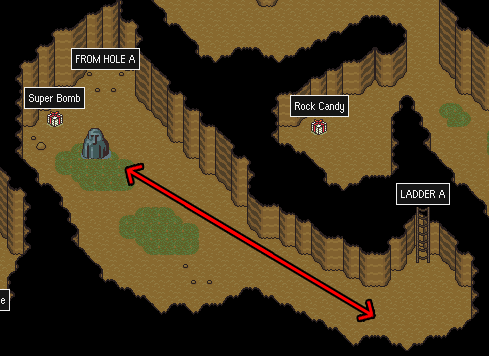
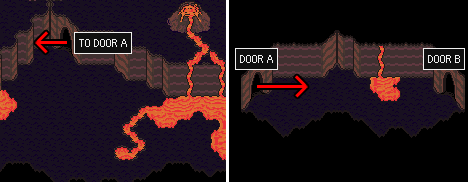
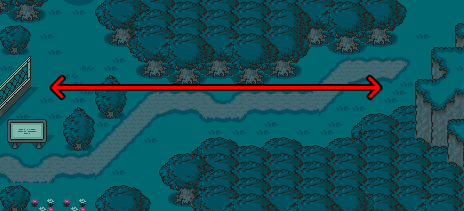
| Bionic Kraken's Gutsy Bat | Get a Gutsy Bat from a Bionic Kraken. | 50 |
Bionic Krakens have a 1/128 chance of dropping the Gutsy Bat, the best weapon for Ness. Once you get the drop, MAKE SURE TO ADD IT TO YOUR INVENTORY!
Bionic Kraken Suggested Farming Area (I'd also recommend just going in and out of Giygas' Lair)
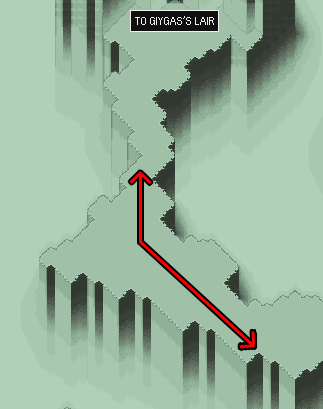
Only fight when a single diamond is left in the upper pathway of the recommended spot. Occasionally you'll also find a single Starman Super.
This is such a painful achievement to get... This is a very rare spawn and on top of that they have a 1/128 drop. Take many breaks, this will take a while. Listen to some podcasts, watch a show or some YouTube videos to keep yourself distracted/entertained. It took me 185 Bio-Krakens to finally get the drop. Using fast-forward, I spent around 10 hours farming for the Gutsy Bat.
May god be with you, and good luck.
Once you've gotten the Gutsy Bat, SAVE, heal and head into Giygas' Lair.
Equip the Sea Pendant on Ness, the Star Pendant on Paula, and give the Franklin Badge to Paula.
Paula is going to be the most important party member in the final battle, so keep her alive at all costs!
Once you're prepared, start the final battle.
| Badge | Title | Description | Points |
|---|---|---|---|
| In the Bowels of Hell | Defeat Giygas' servant without letting anyone's HP drop to zero | 10 |
MISSABLE! On the first phase of the battle, bash Giygas' servant with Ness, PSI Shield Σ with Paula to make Giygas' PSI Rockin' disappear, Multi Bottle Rocket (Or Heavy Bazooka) with Jeff to Giygas' Servant and PSI Freeze γ to Giygas' Servant with Poo. On the next turn, do the same but instead of PSI Shield Σ with Paula, use PSI Freeze Ω on Giygas' Servant.
You should easily beat this first phase and get the achievement.
Once the second phase starts, Heal with Ness, PSI Freeze Ω with Paula, Heavy Bazooka with Jeff (MBRs don't work from now on), Poo should use PSI Brainshock α and then PSI Freeze γ.
Giygas' Servant will appear again, and you'll start the third phase of the boss fight.
All of your characters should either defend or heal now, except for Paula. PRAY with Paula on EVERY TURN. You need to keep her alive so she can pray 9 times. Once she prays 9 times, you'll defeat Giygas for good!
The war against Giygas is over...
| Badge | Title | Description | Points |
|---|---|---|---|
| On a Mission from God | Clear the game | 25 |
Congratulations, you've beaten EarthBound!
ദ്ദി/ᐠ - ⩊ -マ.ᐟ Great job, Super Player!
After beating Giygas, you'll automatically get Picture #32!
If you've gotten all 32 pictures, you'll also unlock:
| Badge | Title | Description | Points |
|---|---|---|---|
| Fuzzy Pickles! | Get all event photos and clear the game | 25 |
Ending
Jeff and Poo will leave the party, and you'll be able to visit all previous locations from the game with Paula. Take all the time you need, and visit the people that you've met throughout your long journey. Don't go back to Polestar yet.
The game will end once you go back home and talk to your Mother.
Before you do that, make sure to visit Tenda Village and talk with the elder. He'll give you back the "Overcoming Shyness" book. Take it back to the Onett library to get:
| Badge | Title | Description | Points |
|---|---|---|---|
| Better Late Than Never... | Ending - Return a book to the Onett Library | 10 |
Once you're ready, go home in Onett with Paula. You'll unlock:
| Badge | Title | Description | Points |
|---|---|---|---|
| Kidnap Success! | Ending - Make sure Paula never goes home | 10 |
Once you get this achievement, reset the game and load your save file. You'll need to defeat Giygas again!
After defeating Giygas for a second time... This time, take Paula to Polestar.
Goodbye, Paula! You'll unlock:
| Badge | Title | Description | Points |
|---|---|---|---|
| Polestar Reunion | Ending - Escort Paula back home | 10 |
And now, go back home and talk to your mom to roll the credits!
| Badge | Title | Description | Points |
|---|---|---|---|
| Smiles and Tears | Ending - Return home | 10 |
I really hope you enjoyed EarthBound! It's a beautiful game. If you're using the Camera Shy Subset, go to the next section of the guide!
Also, if you enjoyed the guide or you found it helpful, it'd mean the world if you could wishlist my game, Sea of Souls, on Steam! If you liked EarthBound, I'm sure you'll like Sea of Souls a whole lot! :)
Camera Shy Subset
"Camera Shy" is a fun challenge. You need to complete the game with the least amount of pictures. There's 32 pictures in the game, and 29 of them are avoidable. The idea of this challenge is finishing the game with only 3 pictures in your album. I'll quickly describe the places you should AVOID and how to avoid them.
Make sure to save frequently! If you trigger a picture you can just reload your save.
After defeating Starman Jr. DO NOT go back home. Go to the Onett Hotel and SAVE there. From now on, if you die, you should respawn in the Onett Hotel.
The reason you do this, is because Picture #1 is just outside your house, so if you died and respawned at your house, you'd lose the challenge.
Obviously, don't buy the Onett House so you can avoid Picture #2.
After defeating Titanic Ant and claiming Giant Step you should get:
| Badge | Title | Description | Points |
|---|---|---|---|
| Lensophobia | Collect the melody from Giant Step while avoiding the camera as much as possible | 5 |
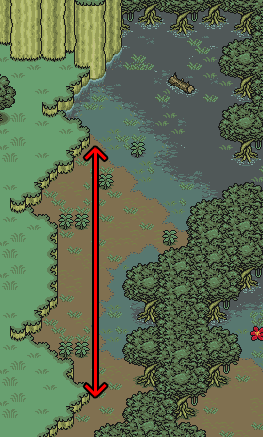
On to Twoson! Don't enter the Cycle Shop so you can avoid Picture #3!
After erasing the Pencil Statue, don't go north, just cross the bridge. North of the pencil statue is where you get Picture #4!
Once you rescue Paula, don't go directly south, go up and around the cabin to avoid Picture #5!
After defeating Mondo Mole and claiming Lilliput Steps you should get:
| Badge | Title | Description | Points |
|---|---|---|---|
| Psychic Phenom's Photo Phobia | Collect the melody from Lilliput Steps while avoiding the camera as much as possible | 10 |
On Chaos Theater, try to squeeze your way in from the left or right to avoid Picture #6. Be careful when you leave, too.
In Winters, Picture #7 is below the tent next to where you find Tessie. Go around it to avoid the picture.
To avoid Picture #8, just don't read the sign in Brick Road's Maze.
Avoid the Stonehenge Base for now.
Stay away from the big gravestone north of Threed to avoid Picture #9.
Picture #10 in Grapefruit Falls is UNAVOIDABLE! This is the first of the three pictures that can't be avoided.
When entering Milky Well, stay as far left as possible so you can avoid Picture #11.
After defeating Trillionage Sprout and claiming Milky Well you should get:
| Badge | Title | Description | Points |
|---|---|---|---|
| Candid Camera and the Coy Clairvoyant Kid | Collect the melody from Milky Well while avoiding the camera as much as possible | 10 |
Once you've freed Threed, don't go in the Circus Tent to avoid Picture #12.
Don't talk to the Black Sesame Seed to avoid Picture #13.
Walk on the lower part of the bridge when entering Fourside to avoid Picture #14.
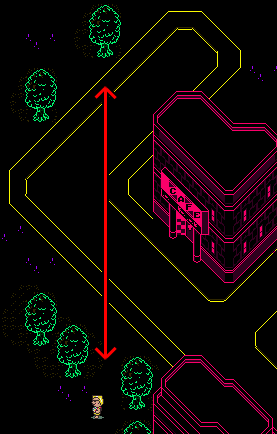
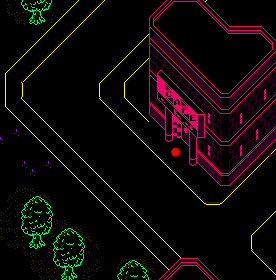
Stay away from the park north of Monotoli Building and the Fourside Dept. Store to avoid Picture #15.
Stay away from the toys in Fourside Dept. Store to avoid Picture #16.
Okay, this is a really cool one. When you go out of the Gold Mine after defeating the 5 Guardian Diggers, you'll get Picture #17. I've read that some people poison themselves with a Thirsty Coil Snake before the fight with the last guardian digger, but there's a much easier way!
Leave the Gold Mine and walk straight down once you do so you don't trigger the picture. Now just fast forward until all of your characters have sunstroke, and their HP slowly depletes until they die! You'll respawn outside of the gold mine and you'll avoid the picture!
Once you arrive at winters, avoid the Stonehenge Base. We'll be back soon.
After defeating Shrooom! and claiming Rainy Circle you should get:
| Badge | Title | Description | Points |
|---|---|---|---|
| Whispering Wonders | Collect the melody from Rainy Circle while avoiding the camera as much as possible | 10 |
Don't go inside the Summers Hotel so you can avoid Picture #18.
Don't go inside the Summers Restaurant so you can avoid Picture #19.
Stay away from the beach so you can avoid Picture #20.
In Toto, go through the north part. Picture #21 is below the ship captain, so you'll have to go all the way around.
Once you're back to Fourside to get the Fifth Melody, Picture #22 is on the steps outside Fourside Museum.
There's one trick that you can use to avoid that picture. Use PSI Teleport α to travel over its hot spot. You'll speed right over the hot spot and the game won't even realize it.
Stay away from the sign next to the Dinosaur Bones to avoid Picture #23.
After defeating the Plague Rat of Doom and claiming Magnet Hill you should get:
| Badge | Title | Description | Points |
|---|---|---|---|
| Shutter Shunning Superboy | Collect the melody from Magnet Hill while avoiding the camera as much as possible | 10 |
In Dalaam/Ramma, don't go inside the palace so you can avoid both Pictures #24 and #25.
After defeating Thunder and Storm and claiming Pink Cloud you should get:
| Badge | Title | Description | Points |
|---|---|---|---|
| Silent Savior | Collect the melody from Pink Cloud while avoiding the camera as much as possible | 10 |
In Scaraba, avoid the Bazaar area so you can avoid Picture #26.
Use the PSI Teleport trick to enter the Pyramid and avoid Picture #27. This might take a few tries!
Don't approach the Oasis south of dungeon man so you can avoid Picture #28.
Stay away from the Myna Bird in central Deep Darkness to avoid Picture #29.
When you enter Stonehenge Base, MAKE SURE TO ENTER FROM THE TOP PART! Avoid the lower part or you'll get Picture #30.
That's all the pictures you can avoid!
Once you give the "Overcoming Shyness" book to the Tendas, you'll automatically get the second unavoidable picture, Picture #31.
After defeating Electro Specter and claiming Lumine Hall you should get:
| Badge | Title | Description | Points |
|---|---|---|---|
| Telepathic Tyke's Top-Secret Trials | Collect the melody from Lumine Hall while avoiding the camera as much as possible | 10 |
After defeating Carbon Dog / Diamond Dog and claiming Fire Spring you should get:
| Badge | Title | Description | Points |
|---|---|---|---|
| Mystical Mute | Collect the melody from Fire Spring while avoiding the camera as much as possible | 10 |
Finally, after defeating Giygas and completing the game, you'll get the third and last unavoidable picture, Picture #32.
You'll also get:
| Badge | Title | Description | Points |
|---|---|---|---|
| Psychic Prodigy's Perilous Quest | Defeat Giygas while avoiding the camera as much as possible | 10 |
Congratulations for mastering the Camera Shy subset!
Take care! :>