Avatar: The Last Airbender (Nintendo DS) - RetroAchievements/guides GitHub Wiki
| Set Difficulty | 5/10 |
| Approximate time to master | 20-25 hours |
| Minimum numbers of playthroughs needed | 1 |
| Number of missable achievements | Everything aside from progression; chapters cannot be returned to upon completion |
I made this set! I think this is a cool game, and I want you to be able to play it without stressing over missing items. The game is structured in such a way that once you clear a chapter, you cannot return to a previous one, so everything outside of progression is missable.
IMPORTANT: All boss challenges can be retried from a game over! Don't worry if you trip into the boss fight without saving. If you fail the challenge, just die and restart.
ALSO IMPORTANT: Some minigames can be retried (Earthbending Practices 1, 2, and 3). The others cannot! Save before starting them if you want to retry.
This walkthrough doesn't tell you anything about the progression achievements; the game will tell you where to go. However, the missables are more vague and harder to find, so I will explain where to go to find them, and how to complete them. I will also provide a full item map for the 100% item collection achievements.
Set and guide by: ChaoticAdventure
Mastery badge by: ZeeRA
Chapter 1: Attack of the Fire Navy
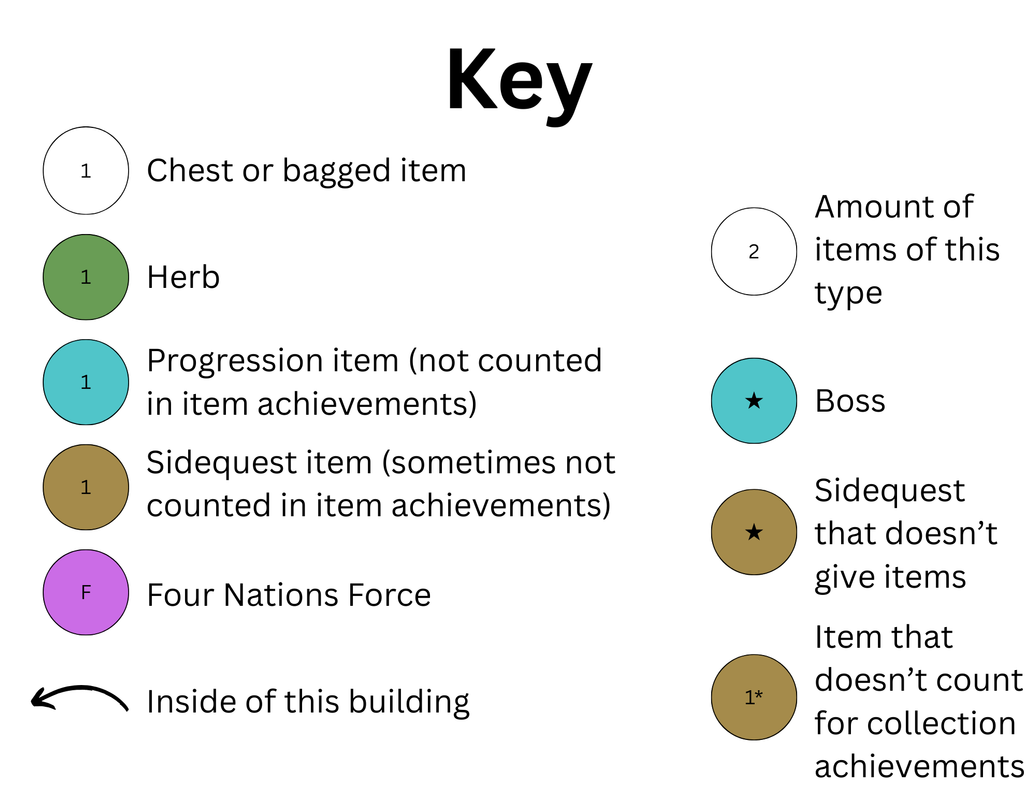
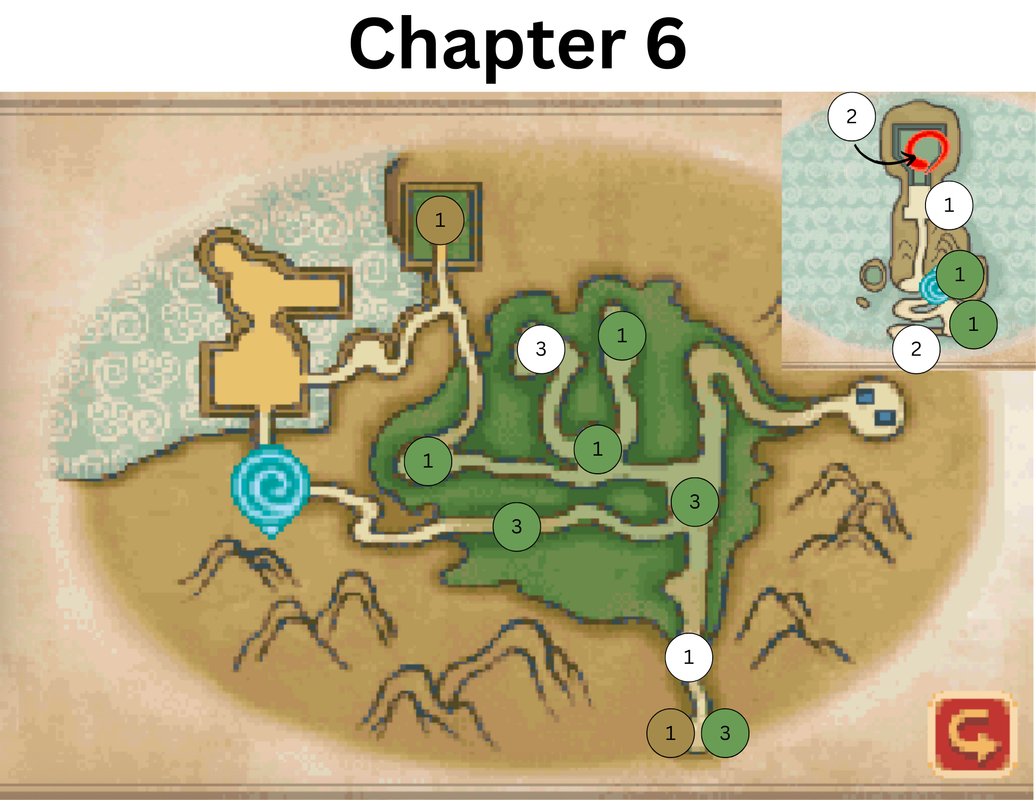
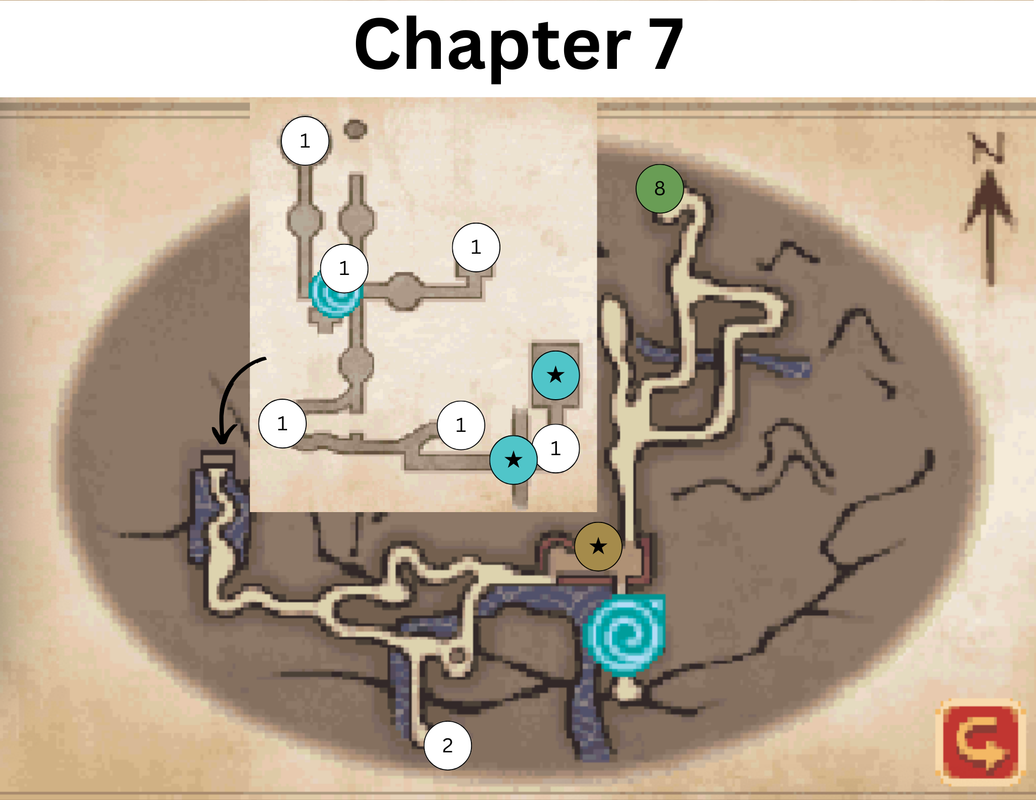
In each chapter, I have provided an item map in case you'd rather not follow the full guide. Here is the key for it. (If you are colorblind, or the image is not loading, message me on RA and I can send you alternate versions.)
Throughout the game, you will pick up herbs, which you can mix at the herbalist; there is an herbalist in every chapter except for the first. Herbs can be mixed in any order. Also, you will sometimes get rewarded with items, specifically the Sources, which you may not know what to do with. Here is a chart of each medicine, their cost, and the combinations that get them.
| Item | Effect | Cost | Herbs |
| Medicine A | One character's PWR increases to 150% for 30 seconds | 15g | A/D, C/C |
| Medicine B | One character's PWR increases to 150% for 60 seconds | 120g | C/D, D/E |
| Medicine C | One character's DEF increases to 150% for 30 seconds | 15g | A/C, A/E, C/E |
| Medicine D | One character's DEF increases to 150% for 60 seconds | 25g | A/F, B/E, C/F |
| Medicine E | One character's SP increases to 150% for 60 seconds | 15g | E/E |
| Medicine F | One character's SP increases to 150% for 30 seconds | 25g | E/F |
| Medicine G | One character's HP is restored 100% | 40g | A/A |
| Medicine H | All characters' HP is restored 100% | 120g | A/B, B/C |
| HP Source | Raises one character's HP permanently by +6 or +9 | 80g | B/B |
| DEF Source | Raises one character's DEF permanently by +1 or +3 | 150g | B/D, B/F, D/F |
| STR Source | Raises one character's STR permanently by +1 or +3 | 150g | D/D |
| SP Source | Raises one character's SP permanently by +1 or +3 | 150g | F/F |
The Calm Before the Storm [1]
Find the remains of a fight
Conqueror of Large Kitchen Utensils [10]
Defeat the Flamethrower Machine and complete Chapter 1
A Child's Woes [1]
Give the child the herb her mother needs and get rewarded
At any point during the chapter, go to the southernmost part of the map to pick up an herb. Then, bring it to the child standing outside a building in the eastern part of the city.
Let's Just Put This in a Bag [3]
Catch a fish with Katara's Waterbending
After meeting up with Katara and Sokka, head to the easternmost part of the map to fish. Save before you get there if you want to be able to retry! This minigame uses the stilus. You have to hold down your stilus (or mouse, or finger) on top of the fish, and eventually Katara will catch it. There's also a leaderboard for this minigame that tracks how long you take!
Don't Get Too Close! [10]
Defeat the Flamethrower Machine without taking damage
This boss is fairly easy, and so is the damageless challenge. If you want to figure out the strategy for yourself, stop reading here! If you want to know how to beat it easily, keep going.
Stand at the bottom of the arena, at a diagonal to the direction the Flamethrower Machine is facing. When it starts spitting flames, use your defensive bending to fly above it. Then, press attack three times in a row to use the combo attack, which has longer reach and will hit the boss. Continue doing this, being careful not to get too close, as once you're within hitting range the boss will just swipe you with its leg.
This Isn't Pai Sho! [5]
Win Four Nations Force and earn some cash
This is not required to be done in Chapter 1, but I highly recommend it. If you'd rather do it later, you can also get this achievement in chapter 2, 3, 4, or 5. You'll get five chances in each chapter, or as many as you want if you save beforehand.
More about Four Nations Force
Four Nations Force is a board game. If you are playing as the larger red pieces (Nations), your goal is to remove four of the small black pieces (People) from the board by jumping over them, similar to checkers. If you are playing as the People, your goal is to block in the Nations pieces so that they cannot move.
General strategies: Nations: Try to keep your pieces along the edges. Sometimes the opponent is stupid and leaves easy openings at the very beginning; try to take those if you can. People: It's a lot harder to win as the People, in my opinion. Try to build blocks of pieces starting from the edges, and be careful that a Nations piece cannot take any of yours along a diagonal. Also, try to block off a square along the edge that the Nations pieces can't reach.
Items in the Northern Water Tribe [3]
Collect all of the optional items in Chapter 1
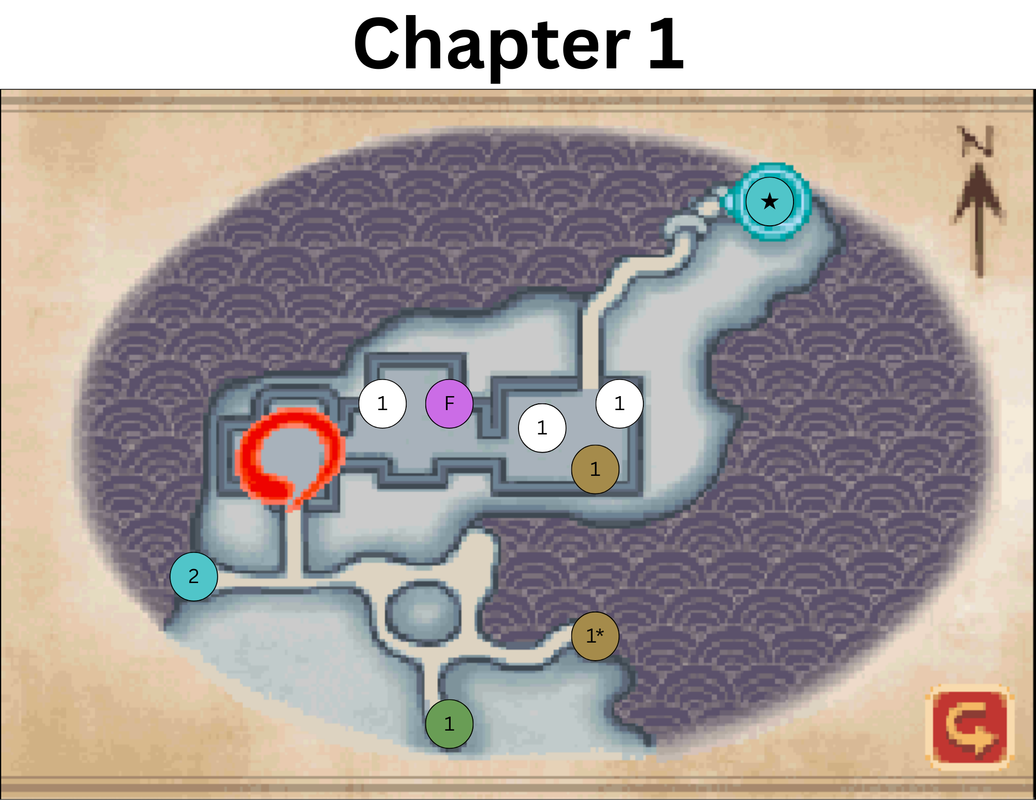
Super Stinky [3]
Find the Fire Nation Uniform
IMPORTANT: Items inside and just outside the barracks, where the Fire Nation Uniform is located, CANNOT BE OBTAINED once you have left. Make sure you get all of these items! Once you have the Uniform, leaving the building will return you to the other side of the pond. The items you need from there are: 2 potatoes outside of the back door, and 2 Sources inside of the bedrooms.
Rescuing Katara [10]
Defeat the Fire Lancer and complete Chapter 2
Absolute Power Corrupts Absolutely [5]
Recover the stolen goods in the Fire Nation Outpost
At some point in the chapter, a man at the northern harbor will tell you that goods are being stolen from his ship. After he does so, go into town and talk to the Fruit Shop merchant, who will tell you to talk to the gossipers in the northwest part of town. The gossipers will tell you to go to the east near the prison. Save before entering this area. This fight is not easy; try to keep the Fire Captain from attacking you at all, as he does a lot of damage! After this fight, you will be brought back to the northern harbor and receive your reward.
The Damsel Does the Saving [25]
Defeat the Fire Lancer while only playing as Katara
Long-range attacks are the best way to defeat this boss, which is why I'm having you play as Katara! It's also a good time to show off her attacks. Katara's normal attack goes all the way across the room, so if you aim right and trust Aang and Sokka to keep the Fire Lancer busy, it's easy enough to defeat him.
Be careful, though; if Aang and Sokka's health get too low, they'll go on the defensive and stop distracting the boss.
Items in the Fire Nation Outpost [10]
Collect all of the optional items in Chapter 2
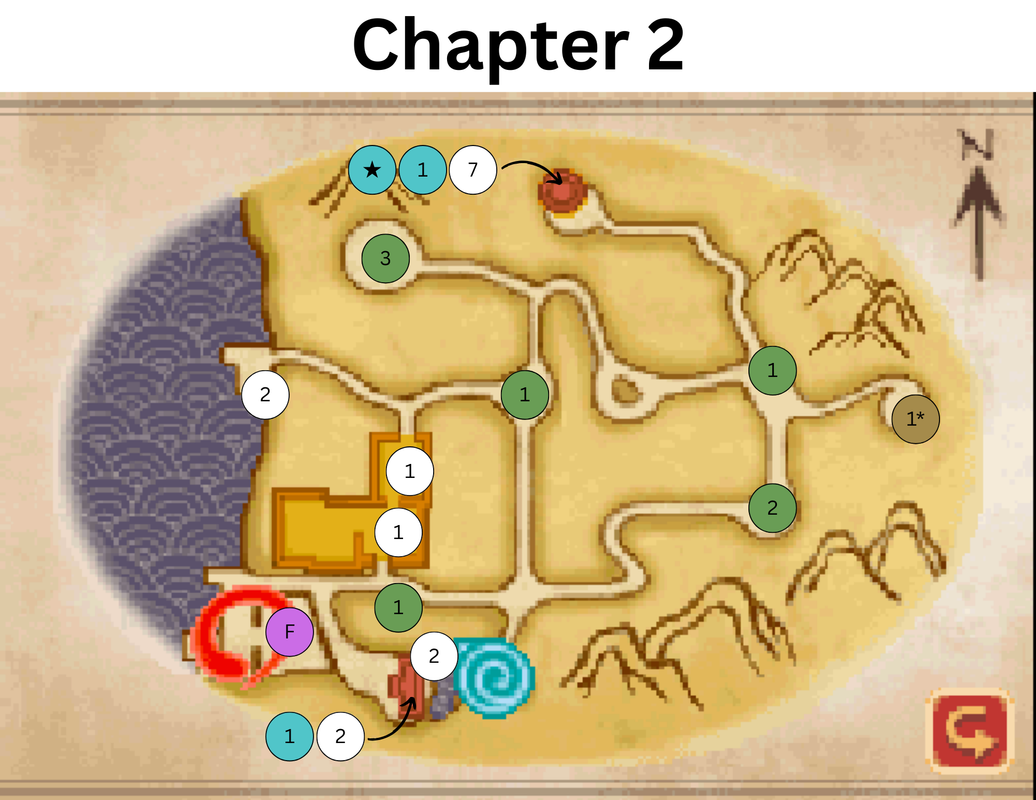
These Strong Warriors [3]
Save Haru's village and tell the Elder the good news
Not So Helpful After All [10]
Defeat the Spirit Bear and complete Chapter 3
You'd Better Be Sorry [3]
Stop the poachers in the forst and pick up your reward
Talk to the old man south of the Fruit Shop. He will direct you to the northwest part of the forest to defeat some hogmonkey poachers. Find them there and defeat them for your reward! The poachers aren't too difficult, though the archers can be annoying; they constantly run away from you. It's best to run in the opposite direction they are going to try to intercept them, instead of chasing after them like your friends.
Fruit Gatherer [2]
Get two rubyfruit from a girl by saving many fruits
Talk to the Herbalist; she will tell you about Rubyfruit. Meanwhile, in a stunning case of good timing, Momo runs off and finds a girl trying to carry - you guessed it - Rubyfruit! As Momo, help the girl carry the fruit by defending it from mice while she fetches a basket. You have to save a majority of the fruits in order to get two as a reward; if you save too few, you'll only get one, or none if you do badly enough. There is a leaderboard for how many of the fruit you can save!
Practice Makes Better [2]
Complete Haru's first Earthbending Practice
After catching up with Haru and getting the letter from the Elder, you can go to the southwestern part of the forest to practice Earthbending. You can retry as many times as you want. Just hit the floating rock within three attempts. There is a leaderboard for the fewest attempts taken! Exit and re-enter the room to retry.
You Won't Take Me This Time [25]
Defeat the Spirit Bear while only playing as Sokka
The Spirit Bear is large and strong. You can try to attack it up close, but it's probably better to try to keep a distance. Items can also help with more difficult bosses, so don't forget that they exist!
Items in the Forest [10]
Collect all of the optional items in Chapter 3
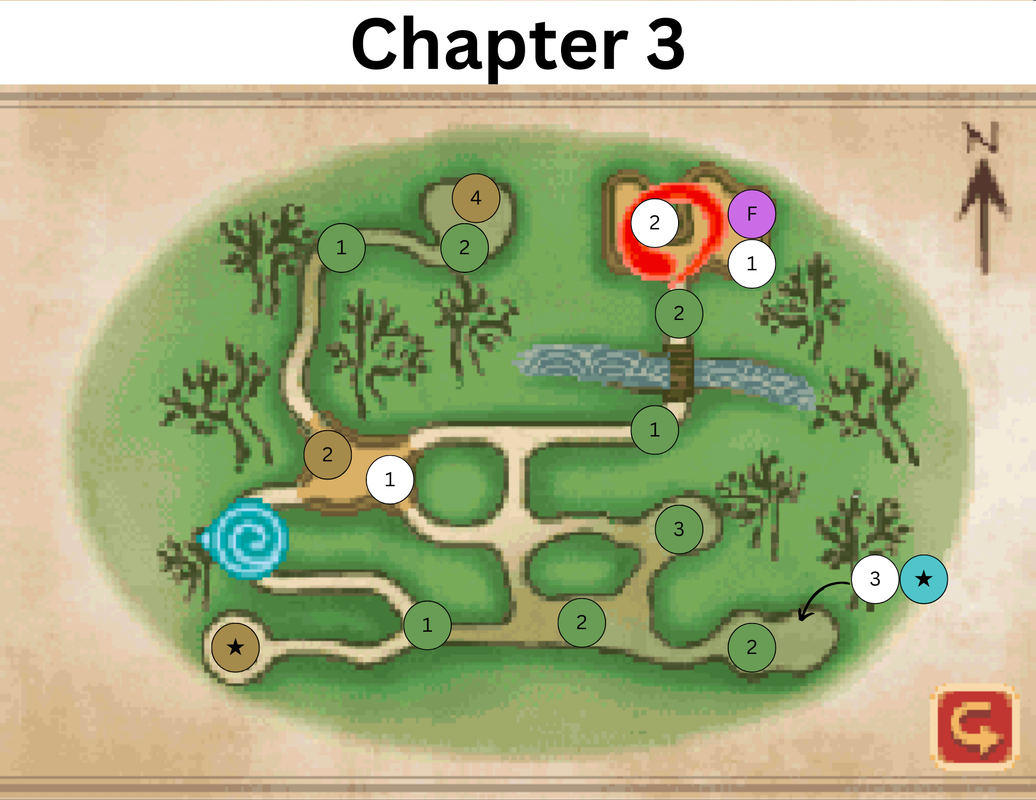
IMPORTANT: I didn't add an achievement for it, but during progression you will enter the library. There are 3 Sources in a secret room here. If you do not get them while here for the story, you will not be able to go back for them!
What Is This Even For, Anyway? [3]
Get King Bumi's Thermal Paste
Earth Versus Earth [10]
Defeat the Consul and complete Chapter 4
My Cabbages! [2]
Get a healthy cabbage in Omashu by catching a lot of cabbages
Save before this if you want to be able to retry! East of the market, the Cabbage Merchant's cabbages will go flying! If you've seen the show, this might feel very familiar. Except this time, the Gaang are going to do their best to help. Catch as many cabbages with your 'stylus' as you can. If you catch enough, you'll get a healthy cabbage as a prize and get the achievement! If you don't, you may receive an unhealthy cabbage, or nothing.
Practice Makes Perfect [2]
Complete Haru's second Earthbending Practice
On the way to the market, there's an Earth Kingdom Soldier who wants to practice Earthbending with you. This time, the minigame is a bit different; smash rocks as they come out of the ground! Smash at least 35 for a nice reward. This minigame has a leaderboard that keeps track of how many rocks you smashed!
This Might Be Stealing [5]
Find and loot both of the secret treasure rooms in Omashu
There are two treasure rooms hidden in Omashu; they are incredibly difficult to spot, so I have instructions for you. The rooms are inside walls, and the doors are slightly off-color to the original wall color. Remember that you can turn your camera! Room 1: Nearby the teahouse. Room 2: Near King Bumi's storehouse, where you went to make the paste.
Haru, Master Earthbender [25]
Defeat the Consul without using items
You only get Haru in this fight anyway. My strategy to fighting him was just to attack non-stop with your normal attack, as shown in the icon. Don't forget to dodge when he throws rocks at you, though! You can use items before the fight, but not in the middle.
Items in Omashu [10]
Collect all of the optional items in Chapter 4
At this point, you can also buy one of Sokka's skills at the General Store, if you have the money. I suggest buying it if you can, but no worries if you can't; you will be able to in Chapter 5 as well.
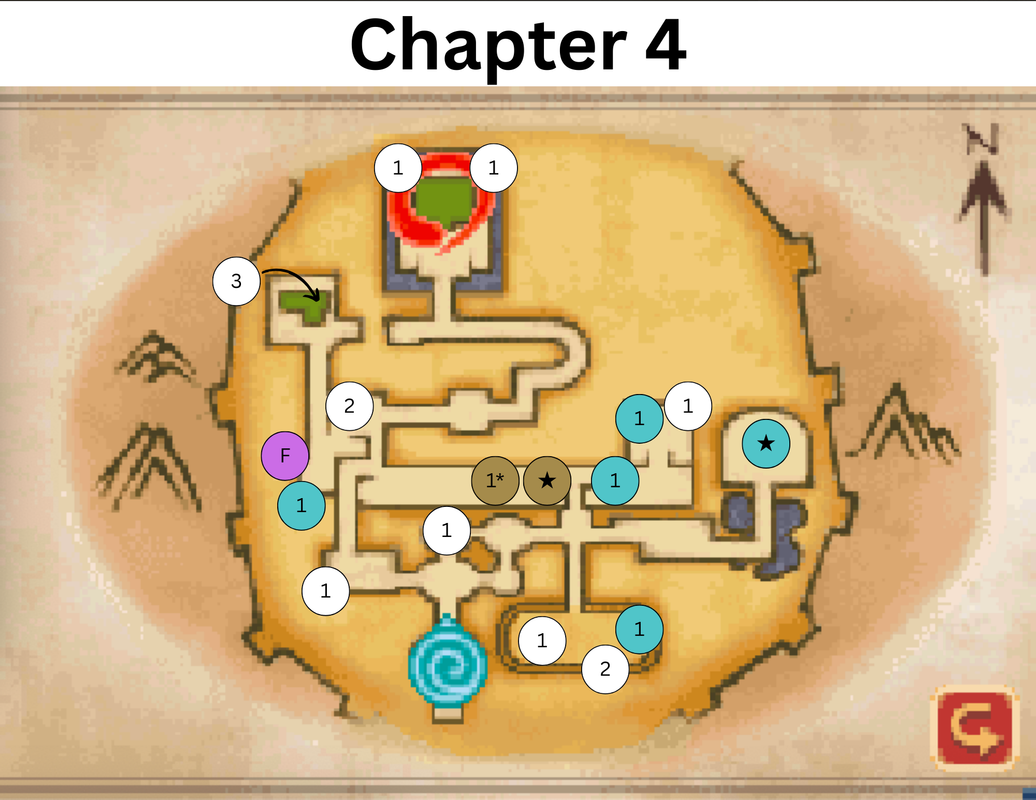
**NOTE: This is the last chapter you can buy Sokka's Firecrackers in.
Hey, Stop Repairing It! [10]
Defeat the Water Tank and complete Chapter 5
This boss can be very annoying. Use an item to increase your attack if you can afford it, and be patient.
Hopefully We Won't Need This [5]
Defeat a Gorilla-Goat and find the Water Scroll
The Gorilla-Goat (and the scroll) is located in the middle of the island. He's not so hard to defeat. Learn the scroll if you want to learn a skill for Katara; if one of your friends collapses during a battle, you can bring them back!
That's Just Karma [2]
Rescue a would-be thief from a mess of his own making in the island village
Speak to the boy standing in the east side of the village, north of the Fruit Shop; remember that you can turn your camera if you can't see him. He'll try to steal Sokka's boomerang, but in the process you'll be ambushed! Defeat the robots and give the boy a good lesson to get your reward.
Fishy Business [5]
Trade a fish to a desperate fisherman on the beach
On the southeast beach, you'll find a man who desperately needs a fish. If you caught one in Chapter 1, you can trade it to him!
Items in the Sacred Caverns [10]
Collect all of the optional items in Chapter 5

Where Are My Friends? [10]
Defeat the Drill Machine and complete Chapter 6
Demolitionist [5]
Purchase Sokka's Firecrackers and Bombs
At the market, you can buy Sokka's Bombs. You can also buy them in Chapter 7.
Practice Makes Mastery [5]
Complete Haru's last Earthbending Practice and receive the Earth Scroll
This Earthbending Practice is located at the southernmost part of the forest, and is a combination of both previous practices. Complete the first part, and score enough points in the second part, to receive the Earth Scroll. Use it to teach Haru a skill; a stronger rock attack! In my notes I just called it "Shoot Rocks 2".
A Game with a Mentor [2]
Play a game with an old friend and receive the Air Scroll
In the northern garden, you can play a game of Four Nations Force with someone you may recognize if you've watched the show. No matter if you win or lose, you'll be gifted with the Air Scroll. Teach it to Aang and he'll learn another bending skill.
Seriously, Give Them Back! [25]
Defeat the Drill Machine without using items
Just don't use any items and this will be a breeze. All you have is Aang, so make good use of his long-range special attacks!
Items in the Air Temple [10]
Collect all of the optional items in Chapter 6
Just as Annoying the Second Time [10]
Defeat the Water Tank for a second time
This boss still sucks. Up your attack if you can and use long-range attacks to take it down.
The Meaning of Balance [25]
Defeat the final boss and beat the game!
The end. Or... wait...
It's Your Problem Now [5]
Sell a healthy cabbage for an absurd amount of money
If you got a healthy cabbage back in Chapter 4, you can sell it here for a LOT of money. Be sure to spend that money on herb mixing!
Items in the Fortress [10]
Collect all of the optional items in Chapter 7
I hope you enjoyed the game! And my first ever set. Enjoy your awesome mastery badge and points.