Creating Training Data - byuawsfhtl/RLL_computer_vision GitHub Wiki
There are two different teams that can help us create training data, whether it be for HWR or for segmenting
Current team lead: see the RA schedule
Just send them instructions and some examples.
They are good at labeling lots of data fast.
- Upload the images you need labeled to box - use this link and make a folder for your project https://byu.app.box.com/folder/126115982901?s=mhes8u2ubpl5nl6qk037ehutdegefrbi (link no longer works, try another method)
- Upload the jsons from label me of the labeled images (this requires labeling 3-10 images to give Ghana an example of how to label it properly) If you need a review of how to use Labelme, you can ask anyone on my team who is working at the same time as you
- Put a shareable link to it on this google doc https://docs.google.com/spreadsheets/d/1XCdqq25v2u2aEUF9GKRcCdsMHtXVAkCVQk0g7_A4JRc/edit?usp=sharing
- Email Augustine and Ryan about the task [email protected] [email protected]
To have transcriptions for each image, we need a CSV with the image name and the transcription. To create this:
- Save a list of all the images to be transcribed to a CSV.
- Create an empty column for the transcription by inserting a comma after each file name. (You can use the sed command or python for this.)
- Upload the CSV to Google Drive. Put the images in a place that is accessible to whomever will be transcribing it.
- Send to Rapid Response Team or Ghana.
This is just some paths and commands to get the program up and running.
- Activate the environment by running:
V:\tools\envs\labelme\Scripts\activate - Run the program by running
python -m labelme - Open up the directory that you images are in
- Create polygons around regions of interest and give them proper titles
- The csv's and images can then be used to train a model to do segmenting
**Label me can also be accessed using the following:
- Go to the V drive by typing "v:" into the command prompt.
- In the command prompt go to the following directory: V:\FHSS-JoePriceResearch\papers\current\tree_growth\homelands\US\Skagit\skagit_obits\1_Layout_Parser_Code\Miniconda\condabin.
- once there, type: activate labelme
- then type: python -m labelme
- This will open the labelme application. From here you can follow instructions 3-5 on the first set instructions given under Labelme.
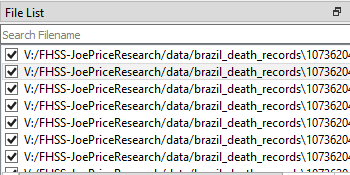
You can press open or open directory. Open will show photos and open directory will only show folders. I suggest using open directory and navigating to the folder of interest. After opening that folder, and image should pop up and all the files in the folder should show up in the file list (bottom right) like so:
When you get to an image you want to label, you press "Create Polygons" and then create a shape around the objects you are interested in. (Do not use "Create Rectangles" as it will cause errors when training the data in Detectron2.) It will end up looking like so:
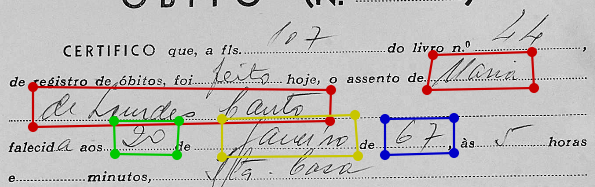
Note for Census Images, we label each column with its number and the header of the image.
Make sure your labels are consistent and we suggest that under file, you press "save automatically." This will save time so you don't have to press save after every image. Once you are done with an image, you press "Next Image" and the next image should appear. Once an image is labeled, a check mark appears next to the file path for that image. This way you can find where you left off easily by pressing the first image that doesn't have a checkmark.
Open command prompt (on the remote desktop or lab computer)
For Lab Computers
See above

For Remote Desktop (unsure if this is still accurate)
R:
cd JoePriceResearch\Python\Miniconda\Scripts
activate labelmerd
labelme
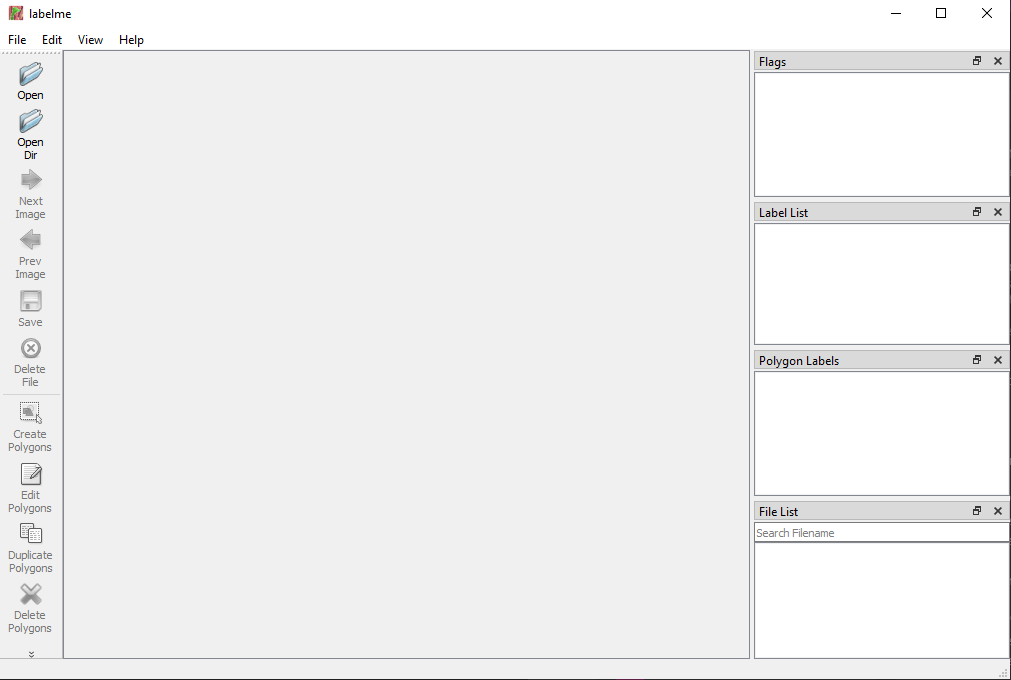
After pressing enter on that last line, the program opens and should look something like this.
Here are a few shortcuts that should help speed up the labeling process:
- Ctrl + n: Same as selecting "Create Polygons"
- Ctrl + j: Allows you to edit existing polygons. (Use Ctrl + n to go back to making polygons or reselect "Create Polygons" from the sidebar)
- Ctrl + z: Undo your last action.
- Ctrl - : Zoom out. (You can also scroll back on your mouse wheel while pressing Ctrl)
- Ctrl + : Zoom in. (You can also scroll forward on your mouse wheel while pressing Ctrl)
- d: Move to the next image.
- a: Move to the previous image.
This page shows a tool to speed up making labelme data. For example, if labeling a table format, you can get away with labeling every other row. It also allows mass edits, sorting of polygons, etc.
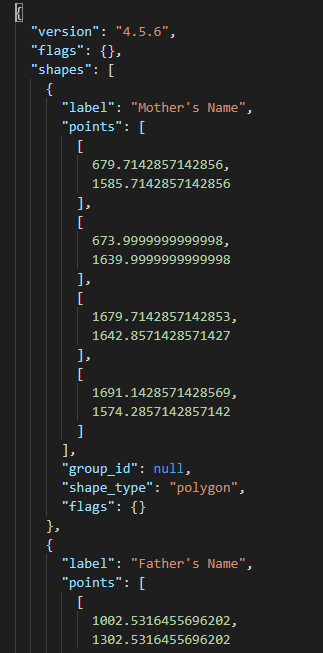
Labelme creates .json files for every labeled image.
These json files look something like this. They have the label and give the points in the image where the corners of the polygons are. This is the information detectron2 uses to train a model to predict where these labeled segments are on new images.
Congratulations! If you've made it this far without any problems, you likely have successfully created training data.
If you are working over a remote desktop connection or on a lab computer, you probably will not need to do these steps.
Python must be version 3.6 otherwise it doesn't seem to be able to read .jpg images.
conda create --name Python=3.6
There seems to be issues if we create an environment on the remote desktop but try to use it on lab computers or visa versa. So, create the environment wherever you intend on using it.
pip install labelme
Sometimes you have to install qt bindings
pip install PyQt5
More info found here: https://github.com/wkentaro/labelme
Sometimes when running Detectron2 (or in general), you will get errors that come back to problems with how the labelme data was created. Here are a few of the more frequent issues and how to solve them.
Sometimes you will receive a set of training data where instead of having polygon's with 4 points, you will have a polygon with a hidden 5th point. This is usually discovered during the labelme2coco step when running detectron2 to create a model.
Previously, the only way to identify images with problems was to look through every image in the training set and look for anything suspicious.
However, we now have a script that will identify labels that do not have 4 points. The script can be found at: V:\FHSS-JoePriceResearch\data\computer_vision\helpful_scripts
The script is called extra_points.py. To use the script, copy and paste it into the folder where your json files are at. Run it by typing the following command in the command prompt:
FOR %i in (*.json) DO python extra_points.py %i
The script will save the names of all files that contain a label with an irregular amount of points in a text/csv file named incorrect_imgs.txt.
Once you are done with the incorrect_imgs.txt file and the extra_points.py file, remove them from the folder.
If python is not working, open up the labelme environment and try again.
Polygons with an extra hidden point have a somewhat transparent quality in the location where two points are overlapping.
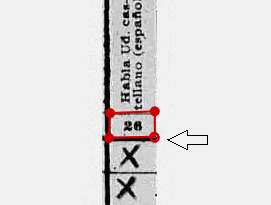
This is easier to see if you use the edit polygon feature and move over the corners of the polygon. An example is given of moving over a corner that does not contain the extra point, and a corner that does.
Corner without extra point
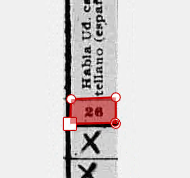
Corner with extra point
Even in the corner without the extra point, it is easier to identify which corner has an extra point.
After identifying the offending polygon, there are two options
- Delete the problematic images and json files from the training dataset (This is the quickest option, but shouldn't be done with smaller datasets if a lot of images will be deleted)
- Delete the problematic polygons and create a new polygon to take its place (Following this, you need to replace the old json file in your training data with the new, updated json file) This should solve the labelme2coco error
If you are getting errors with having more classes than expected, or getting some really strange output, there is a good chance that there is a discrepancy in the class names/ polygon labels. This is most often a difference of one character, such as using a lowercase letter instead of an uppercase letter
There are 2 ways to fix this
- Go through all of the images in lableme and rename the incorrect polygon labels
- If you already know what the error is, you can use a script (label_name_replacer.py) that will go through the json files and substitute the incorrect label with the correct label
Go through all of the images in lableme and rename the incorrect polygon labels If you already know what the error is, you can use a script (label_name_replacer.py) that will go through the json files and substitute the incorrect label with the correct label
FOR %i IN (*.json) DO python label_name_replacer.py %i old_name new_name - replaces the old_name text of the file with new_name
- FOR %i in (*.json) DO python label_name_replacer.py %i three 3 - replaces three with 3 in the text of the json file (should replace the label name only, but may want to be careful)
If python is not working, open up the labelme environment and try again.
The label_name_replacer.py script can be found at: V:\FHSS-JoePriceResearch\data\computer_vision\helpful_scripts
Once you are done with the label_name_replacer.py script, remove it from the folder.
When running detectron, if you find that the number of occurrences of each label is inconsistent, run a script to identify which images have repeated labels.
(Tanner will insert instructions on how to use his code here)