楽天リワードSDK iOS Ad 機能 - RakutenReward/RakutenRewardSDK GitHub Wiki
こちらは、楽天リワードSDKをご利用の開発者様で、アプリネイティブ広告をご利用のためのガイドになります。 動作環境は楽天リワードSDKのドキュメントをご参照ください。(楽天リワードSDK) こちらの機能はSDK5.0バージョン以降になります。
7.0.0ではSDKの組み込みはiOS 8から可能ですが、SDKの機能はiOS 11以上で有効です (iOS 8 - 10のユーザはSDKの機能を利用できません) 7.0.0からWKWebViewを使用しております。
- アプリケーションを開発者ポータルに登録する(開発者ポータル)
- SDKをダウンロードページよりダウンロードする(SDKダウンロード)
- 開発者ポータルよりアプリを登録する(アプリごとにキーを取得する)
- SDKをプロジェクトにインポートする
- SDKを初期化する(初期化処理を行う)
- Adのレイアウトをアプリに追加する
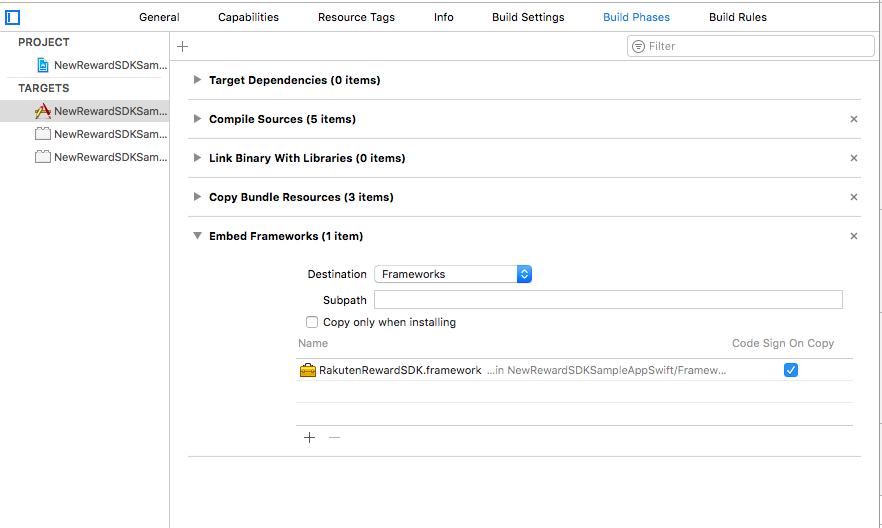
"RakutenRewardSDK.framework" を "Embed Framework" に追加する。
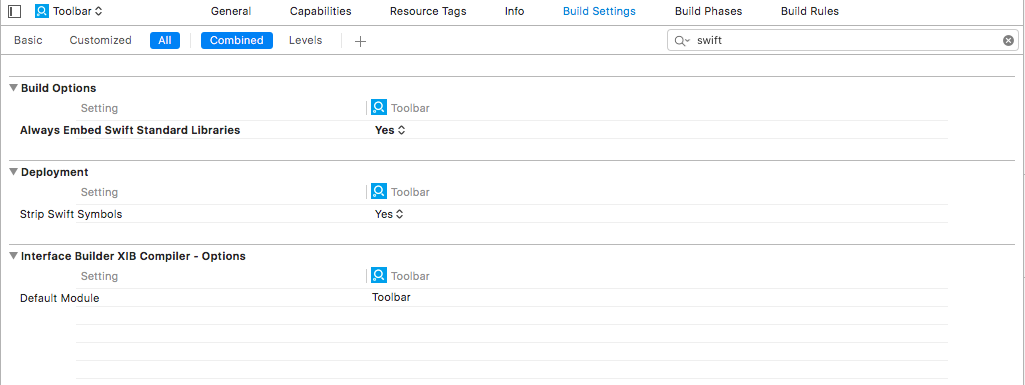
Swift の Framework を読み込むために”Build Settings”で Swift のコンパイルに関する設定をする必要が あります。 “Always Embed Swift Standard Libraries” を Yes に設定します。
Objective-C での設定に加えて、Objective-C++ で Swift のヘッダーを読み込むのに必要な場合があり ます。(RewardSDK.h ではなく RewardSDK-Swift.h)
#import <RakutenRewardSDK/RakutenRewardSDK-Swift.h>
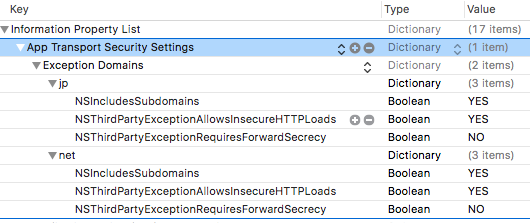
SDK を使用する上で、いくつかのドメインに対して ATS の設定が必要になります。 下記のドメイン に対して、ATS の例外設定を追加してください。 (こちらに設定している理由は広告主様のページがSSL設定をしていないケースがあるからです)
- jp
- net
SDKの初期化に関しましては、楽天リワードSDK導入マニュアルを参照してください。
※こちらはリワードSDKのミッション機能を使う場合になります。ネイティブAdの機能のみを使う場合は以下を呼び出します。
import RakutenRewardSDK

class AppDelegate : UIResponder, UIAppliationDelegate {
      func application(application: UIApplication, didFinishLaunchingWithOptions launchOptions: Any]?) → Bool {
            RakutenRewardAds.sharedInstance.initialize(appCode: "YOUR_APP_CODE")
      }
     func applicationWillEnterForeground(_ application: UIApplication) {
             RakutenRewardAds.sharedInstance.initialize(appCode: "YOUR_APP_CODE")
     }
}
#import <RakutenRewardSDK/RakutenRewardSDK.h>

-(BOOL)application:(UIApplication *)application didFinishLaunchingWithOptions:(NSDictionary *)launchOptions {
       [[RakutenRewardAds sharedInstance] initializeWithAppCode: "YOUR_APP_CODE"];
       return YES;
}

-(void)applicationWillEnterForeground:(UIApplication *)application {
        [[RakutenRewardAds sharedInstance] initializeWithAppCode: "YOUR_APP_CODE"];
}
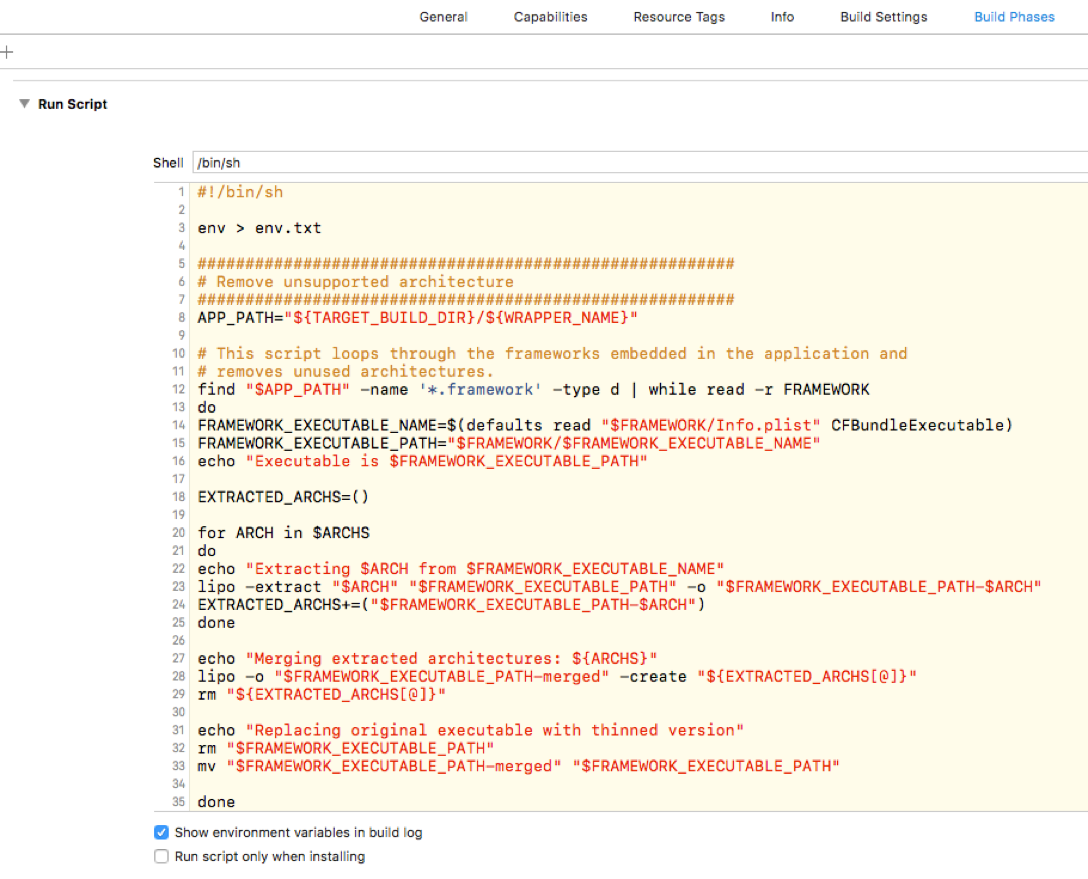
SDK は実機及びシミュレータに対応した、ユニバーサルフレームワークの形式を取っています。 そのためアプリをアーカイブして iTunes Connect にアップロードする際、 simulator 用の architecture が 含まれていることによるエラーが発生する場合があります。 その際は下記のように simulator 用の architecture をビルドから除外する設定を追加してください。
- “Build Phases” を選択
- 左上の+ボタンからNew Run Script Phase を選択
- 下記のスクリプトを追加(サンプルアプリからコピー可能) ※スクリプト内で使用している${TARGET_BUILD_DIR}等の環境変数がセットされていることをご確認ください。
# Create log to check environment variables
env > env.log

UNIVERSAL_OUTPUTFOLDER=${BUILD_DIR}/${CONFIGURATION}-universal
FRAMEWORK_NAME=RakutenRewardSDK

# Build Device and Simulator versions
xcodebuild -target "${PROJECT_NAME}" ONLY_ACTIVE_ARCH=NO -configuration ${CONFIGURATION} -sdk iphoneos  BUILD_DIR="${BUILD_DIR}" BUILD_ROOT="${BUILD_ROOT}" build
xcodebuild -target "${PROJECT_NAME}" -configuration ${CONFIGURATION} -sdk iphonesimulator ONLY_ACTIVE_ARCH=NO BUILD_DIR="${BUILD_DIR}" BUILD_ROOT="${BUILD_ROOT}" build

# make sure the output directory exists
mkdir -p "${UNIVERSAL_OUTPUTFOLDER}"

# 1. Copy the iphone device's framework structure to the universal folder
cp -R "${BUILD_DIR}/${CONFIGURATION}-iphoneos/${FRAMEWORK_NAME}.framework" "${UNIVERSAL_OUTPUTFOLDER}/"

# 2. Copy the Modules content from simulator's framework to universal folder
cp -R "${BUILD_DIR}/${CONFIGURATION}-iphonesimulator/${FRAMEWORK_NAME}.framework/Modules/${FRAMEWORK_NAME}.swiftmodule/x86_64.swiftmodule" "${UNIVERSAL_OUTPUTFOLDER}/${FRAMEWORK_NAME}.framework/Modules/${FRAMEWORK_NAME}.swiftmodule/"


# 3. Create universal binary file using lipo and place the combined executable in the copied framework directory
lipo -create -output "${UNIVERSAL_OUTPUTFOLDER}/${FRAMEWORK_NAME}.framework/${FRAMEWORK_NAME}" "${BUILD_DIR}/${CONFIGURATION}-iphonesimulator/${FRAMEWORK_NAME}.framework/${FRAMEWORK_NAME}" "${BUILD_DIR}/${CONFIGURATION}-iphoneos/${FRAMEWORK_NAME}.framework/${FRAMEWORK_NAME}"

# 4. Copy the framework to the project's directory
cp -R "${UNIVERSAL_OUTPUTFOLDER}/${FRAMEWORK_NAME}.framework" "${PROJECT_DIR}"

# 5. Open the project's directory in Finder
open "${PROJECT_DIR}"
Ad 機能では広告の最適化のためユーザの位置情報を取得しております。 位置情報を取得するため、 Info.plistに位置情報を取得するための設定を追加します。
<key>NSLocationWhenInUseUsageDescription</key>
<string>広告最適化のため位置情報を取得します</string>
SDKでは3つのバナータイプとインタースティシャルタイプの広告を提供いたします。
| 広告名 | サイズ | クラス名 | 広告タイプ(Swift) | 広告タイプ(Objective-C) |
|---|---|---|---|---|
| バナー(320x50) | 320 x 50 | RakutenADBannerView | RAdSize.Banner | RAdSizeBanner |
| インタースティシャル | 全画面 | RakutenADInterstitial |
広告は60秒自動で更新されます(変更不可)。
- RakutenADBannerView(UIView) を storyboard に追加する
- 登録したUIViewをRakutenADBannerViewに設定する
- コードに紐付ける
- locationid を設定する
- 広告タイプ(サイズ)を設定する
- 広告をロードする
- プロパティを定義する
- インスタンスを作成してViewに追加する
- locationid を設定する
- 広告タイプ(サイズ)を設定する
- 広告をロードする
3〜5の部分は、Storyboardの4〜6の部分と同じです。
(以下の例は320x50のバナーになります)
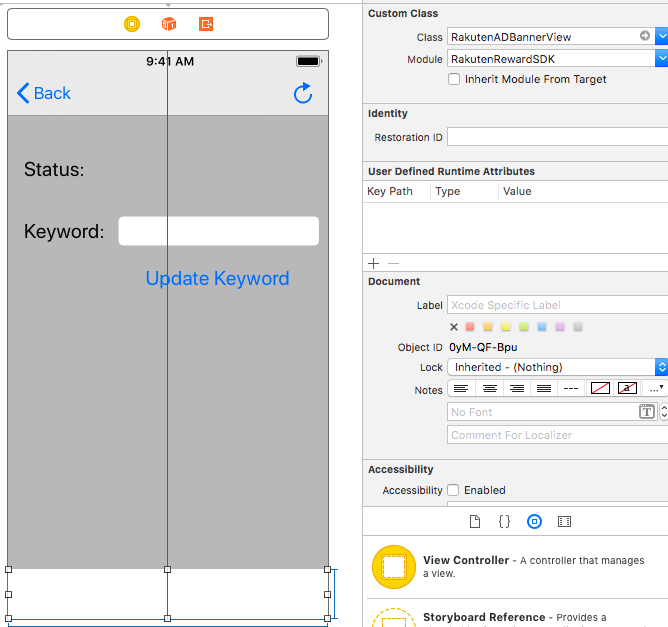
UIView(サイズ width: 320, height: 50) をstoryboard もしくはxibに追加する。 (任意の場所に置くことができます)
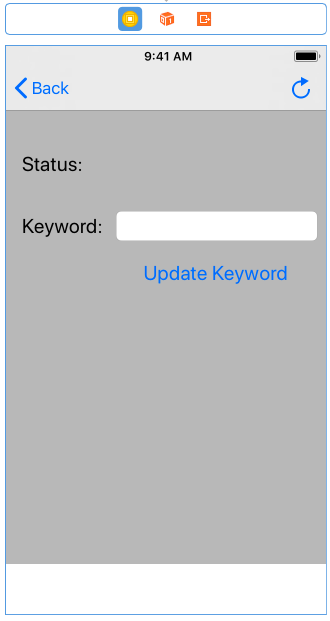
設置したUIViewをXCodeのInspectorよりRakutenADBannerViewに設定する
Storyboard からドラッグ&ドロップでUIをコードに紐付けます
@IBOutlet weak var bannerAdView: RakutenADBannerView!
@property (weak, nonatomic) IBOutlet RakutenADBannerView *bannerAdView;
※locationIdは、広告位置を区別してレポートに反映させるために使用します。(現在使用していませんが必須項目にしております)
self.bannerAdView.locationId = "YOUR_LOCATION_ID"
self.bannerAdView.locationId = @"YOUR_LOCATION_ID";
※locationidは英数字20文字まで利用できます
self.bannerAdView.adSize = RAdSize.Banner
self.bannerAdView.adSize = RAdSize.Large
self.bannerAdView.adSize = RAdSize.Rectangle
self.bannerAdView.adSize = RAdSizeBanner;
self.bannerAdView.adSize = RAdSizeLarge;
self.bannerAdView.adSize = RAdSizeRectangle;
self.bannerAdView.load()
[self.bannerAdView load];
広告のロードはサイズも指定できます。
self.bannerAdView.load(AdSize: RAdSize.Banner)
self.bannerAdView.load(AdSize: RAdSize.Large)
self.bannerAdView.load(AdSize: RAdSize.Rectangle)
[self.bannerAdView loadWithAdSize:RAdSize.Banner];
[self.bannerAdView loadWithAdSize:RAdSize.Large];
[self.bannerAdView loadWithAdSize:RAdSize.Rectangle];
var bannerAdView: RakutenADBannerView
@property (weak, nonatomic) RakutenADBannerView *bannerAdView;
self.bannerAdView = RakutenADBannerView(frame: CGRect(x:0, y: 0, width: 320, height: 50))
self.view.addSubview(self.bannerAdView)
self.bannerAdView = [[RakutenADBannerView alloc] initWithFrame: CGRectMake(0,0,320,50)];
[self.view addSubview:self.bannerAdView];
このデリゲートは広告イベントのコールバックを提供します。
/// Tells the delegate an ad request loaded an ad.
/// - parameter bannerView: RakutenADBannerView
@objc func didReceiveAd(bannerView: RakutenADBannerView)
/// Tells the delegate an ad request failed.
/// - parameter bannerView: RakutenADBannerView, message: Error message, code: RADErrorCode
@objc func didFailToReceiveAd(bannerView: RakutenADBannerView, message: String, code: RADErrorCode)
| メソッド | 説明 |
|---|---|
| didReceiveAd | 広告を取得に成功した |
| didFailToReciveAd | 広告の取得に失敗した |
このコールバックを受け取るにはデリゲートを実装してセットする必要があります。 (以下はその例になります)
class YourViewController : UIViewController {
    override func viewDidLoad() {
         super.viewDidLoad()
         self.bannerAdView.delegate = self
    }
}

extension YourViewController : RakutenADBannerViewDelegate {
    func didReceiveAd(bannerView: RakutenADBannerView) {
    }

    func didFailedToRecveiveAd(bannerView: RakutenADBannerView, message: String, code: RADErrorCode) {
    }
}
#import "RakutenRewardSDK/RakutenRewardSDK.h"

@interface YourViewController : UIViewController<RakutenADBannerViewDelegate> {

}

@implementation YourViewController {
    -(void)viewDidLoad {
         [super viewDidLoad];
         self.bannerAdView.delegate = self;
    }

    - (void)didReceiveAdWithBannerView:(RakutenADBannerView * _Nonnull)bannerView {
    }

    - (void)didFailToReceiveAdWithBannerView:(RakutenADBannerView * _Nonnull)bannerView message:(NSString * _Nonnull)message code:(enum RADErrorCode)code {
    }
}
didFailToReceiveAdWithBannerViewで受け取るエラーコードは以下のようになります。
| エラー | 値 | 説明 |
|---|---|---|
| NetworkError | 1001 | ネットワークエラー |
| NoAvailableAd | 1002 | 広告の供給が止まっています |
| Unknown | 9999 | 予期せぬエラーが発生しました |
loadメソッドを呼び出すことで広告をリロードできます。
self.bannerAdView.load()
[self.bannerAdView load];
楽天リワードSDKの広告では検索ワードに連動した広告(クーポン)を配信しております。 特定のワードやユーザ入力に連動した広告を出す場合は以下のメソッドを使って検索ワードを更新します。
self.bannerAdView.keyword = "カバン"
self.bannerAdView.keyword = @"カバン";
※設定をしてもサーチクーポンが必ず表示されることはありません。
インタースティシャル広告を実装する手順は以下になります (インタースティシャル広告は縦表示のみをサポートします。横表示の場合は表示されません。また 縦表示から横表示に変えた場合は自動的に閉じます)。
※バージョン7以降ではiPhoneの場合強制的に縦表示になります
- RakutenADInterstitialのインスタンスをViewController上で作成する
- locationidを設定する
- 表示するViewControllerを設定する
- (任意) RakutenADInterstitialDelegate を設定する
- 広告をロードする
var interstitial = RakutenADInterstitial.instantiate()
#import "RakutenRewardSDK/RakutenRewardSDK.h"
@interface YourviewController : UIViewController
@property (nonatomic,strong)  RakutenADInterstitial *interstitial;
@end

@implementation InterstialAdTestViewController

- (void)viewDidLoad {
    [super viewDidLoad];
    // Do any additional setup after loading the view.
    _interstitial = [[RakutenADInterstitial alloc] instantiate];
}
@end
interstitial?.locationId = "abc"
_interstitial.locationId = @"123";
interstitial?.rootViewController = self
_interstitial?.rootViewController = self;
interstitial?.delegate = self
_interstitial.delegate = self;
interstitial?.loadAd()
[_interstitial loadAd];
オプションとしてこちらも用意してあります。
interstitial?.loadAd(true)
この場合、広告を開くには以下のメソッドを呼びます
interstitial?.showAd()
このデリゲートはインタースティシャル広告イベントのコールバックを提供します。
| メソッド | 説明 |
|---|---|
| interstitialDidReceiveAd | 広告を受け取ることに成功した |
| interstitialDidFailToReceiveAd | 広告を受け取ることに失敗した |
| interstitialWillPresentScreen | インタースティシャル広告が表示される時 |
| interstitialWillDismissScreen | インタースティシャル広告が閉じる時 |
| interstitialDidDismissScreen | インタースティシャル広告が閉じた時 |
| interstitialWillLeaveApplication | インタースティシャル広告がアプリ〜ションから削除される時 |
/// Tells the delegate an ad request loaded an ad.
/// - parameter ad: RakutenADInterstitial
@objc func interstitialDidReceiveAd(ad: RakutenADInterstitial)
/// Tells the delegate an ad request failed.
/// - parameter ad: RakutenADInterstitial, message: Error message, code: RADErrorCod
@objc func interstitialDidFailToReceiveAd(ad: RakutenADInterstitial, message: String, code: RADErrorCode)
/// Tells the delegate that an interstitial will be presented.
/// - parameter ad: RakutenADInterstitial
@objc optional func interstitialWillPresentScreen(ad: RakutenADInterstitial)
/// Tells the delegate the interstitial is to be animated off the screen.
/// - parameter ad: RakutenADInterstitial
@objc optional func interstitialWillDismissScreen(ad: RakutenADInterstitial)
/// Tells the delegate the interstitial had been animated off the screen.
/// - parameter ad: RakutenADInterstitial
@objc optional func interstitialDidDismissScreen(ad: RakutenADInterstitial)
/// Tells the delegate that a user click will open another app
/// (such as the App Store), backgrounding the current app.
/// - parameter ad: RakutenADInterstitial
@objc optional func interstitialWillLeaveApplication(ad: RakutenADInterstitial)

extension YourViewController: RakutenADInterstitialDelegate {
    func interstitialDidReceiveAd(ad: RakutenADInterstitial) {
        // Callback when interstitial ad received
    }

    func interstitialDidFailToReceiveAd(ad: RakutenADInterstitial, message: String, code: RADErrorCode) {
        // Callback if interstitial ad failed
    }

    func interstitialWillDismissScreen(ad: RakutenADInterstitial) {
        // Callback before dismiss interstitial ad
    }

    func interstitialDidDismissScreen(ad: RakutenADInterstitial) {
        // Callback after dismiss interstitial ad
    }

    func interstitialWillLeaveApplication(ad: RakutenADInterstitial) {
        // Callback when interstitial ad leave application
    }

    func interstitialWillPresentScreen(ad: RakutenADInterstitial) {
        // Callback when interstitial ad will present on screen
    }
}
@interface YourTestViewController : UIViewController<RakutenADInterstitialDelegate>
@end

@implementation InterstialAdTestViewController

- (void)interstitialDidFailToReceiveAdWithAd:(RakutenADInterstitial * _Nonnull)ad message:(NSString * _Nonnull)message code:(enum RADErrorCode)code {
    NSLog(@"Callback if interstitial ad failed: %@", message);
}

- (void)interstitialDidReceiveAdWithAd:(RakutenADInterstitial * _Nonnull)ad {
    NSLog(@"Callback when interstitial ad received");
}

- (void) interstitialWillDismissScreenWithAd:(RakutenADInterstitial *)ad {
    NSLog(@"Callback before dismiss interstitial ad");
}

- (void)interstitialDidDismissScreenWithAd:(RakutenADInterstitial *)ad {
    NSLog(@"Callback after dismiss interstitial ad");
}

- (void)interstitialWillPresentScreenWithAd:(RakutenADInterstitial *)ad {
    NSLog(@"Callback when interstitial ad will present on screen");
}

- (void)interstitialWillLeaveApplicationWithAd:(RakutenADInterstitial *)ad {
    NSLog(@"Callback when interstitial ad leave application");
}
@end
RakutenADInterstitialDelegateで受け取るエラーコードは以下のようになります。
| エラー | 値 | 説明 |
|---|---|---|
| NetworkError | 1001 | ネットワークエラー |
| NoAvailableAd | 1002 | 広告の供給が止まっています |
| Unknown | 9999 | 予期せぬエラーが発生しました |


