Whackers - Qosmetics/UnityProject GitHub Wiki
Exporting Whackers
Now that you have opened the Whackers scene, you should be seeing a screen similar to this:

Don't worry if it's not exactly the same, you should be able to find all the menus mentioned in this guide with little effort.
Now we'll break down the various tools qosmetics has here that can prove useful to you.
Template
From left to right, we'll first see the Whackers scene hierarchy, there's not a lot of note here, except the Template whackers there, which are just there to show a basic setup for making whackers.
Scene view
Then we see the scene view, this view is pretty much just the same as any other, except as mentioned in the Layout page, there's the Qosmetics project overlay, which can still be toggled on/off in the Project Settings.
Whacker (Script)
Next is the inspector for the Whacker. Here there's the options to configure the whacker for export, letting you edit the metadata for it. Here you can fill out the objectname, the author, description, and even configure a thumbnail. If there is no thumbnail you can make one using the Generate thumbnail button.
Next there is the export button, using this button you can easily export the whacker you've currently selected, to a location of your choosing. If you have Pushing to Quest enabled in the Project Settings, you can even click that here to export the file, and then push it to your quest.
Trail (Script)
There is also the Trail script, this was not visible in the first screenshot so here's another showing it:
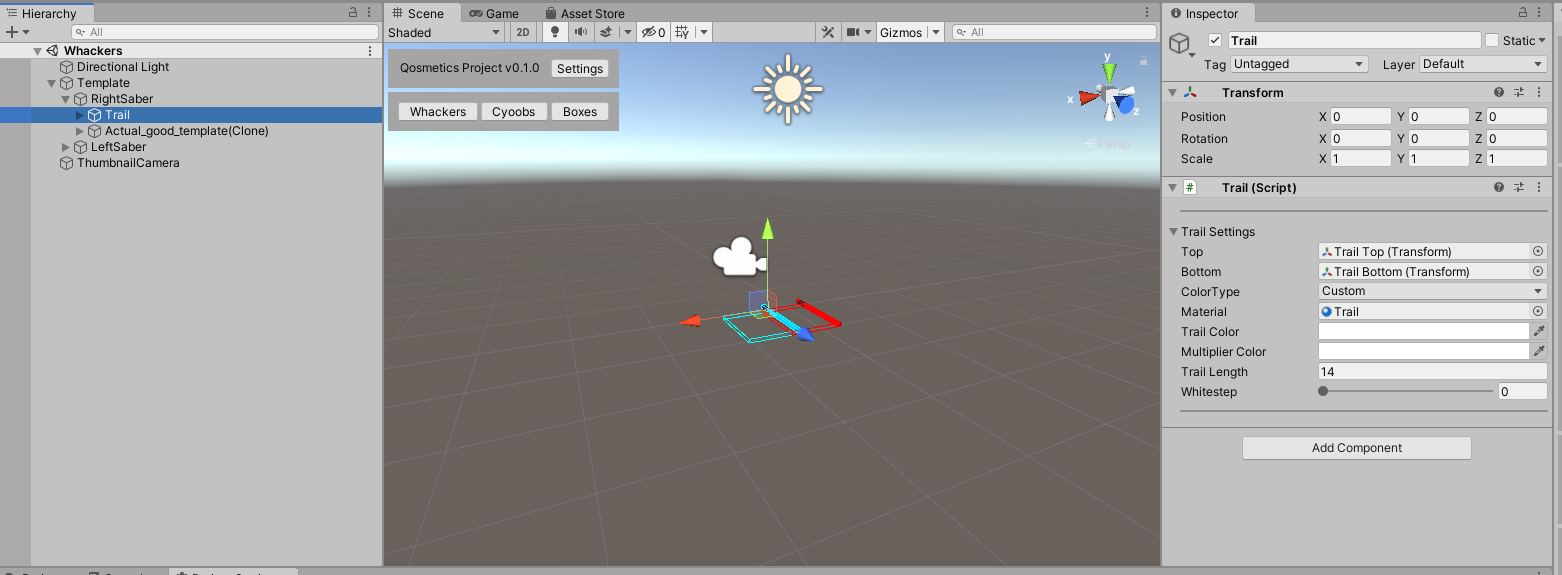
For trails not a lot changed compared to the old project. Trails pretty much still just consist of the same things.
- Top: The transform signifying the top of your trail
- Bottom: The transform signifying the bottom of your trail
- ColorType: The colortype to use, use either of the following:
- Left Color
- Right Color
- Custom Color
- Material: The material to use for the trail
- Trail Color: The Trail color, only visible if Custom Color is selected for the ColorType
- Multiplier Color: The color the main color gets multiplied by, always applied.
- Trail Length: The length of the trail, 14 is a good default usually
- Whitestep: how much of the trail is going to have the whitestep, whitestep is a gradient from white to the color, and the value * 100 is the percent that it fully is transitioned at.
Whacker Tools
Lastly, there are the whacker tools, these provide you with some sanity checks for the objects you are making, or let you easily make templates, and all around are just useful for making whackers. Each of these subcategories can be expanded/folded using the little triangle. We'll break these down as well:
Visualizers
In here you can show some of the visualizers concerning whackers. This helps when deciding if your model is the right size for the hitbox of the whackers in game, or to estimate the length of the trail in game.
There are 3 types of visualizers here, with the following effects:
- Show Guides: This will show you the target size of a whacker when making one, if you go much bigger than this you might make a whacker that doesn't play very well.
- Show Trail Guides: This will estimate the size of the trails related to the whacker. These shrink and grow with the trail length you have on them, and also move based on their trail top and bottom transforms.
- Show Trail Preview: Shows a preview of what the trail might look like in the game, uses the trail config directly.
Create Whacker
Using this tool lets you create a basic whacker using a template model for the whackers, making it easy for you to just setup a whacker properly. You'll probably still have to apply the materials properly to the whacker.
General
- Name: the objectName used for the whacker
- Create RightSaber: Whether to also create the right whacker object, if you don't do this it will only make the left object.
- Template prefab: The prefab to use to make the whacker object, this will put your model in the object hierarchy.
Trails
- Trail Material: the material to use for the trail
- Trail Length: the length to use for the trail
- Trail Width: the width of the trail to use, this will move the bottom transform more up the whacker if you make it shorter.
Fixing
This category is a lot shorter, containing only 1 item.
Fix Length
This will more or less quickly fix the length of the whacker so it fits within the bounding box of the whacker, but it's probably better to just do that manually.
Beat Saber Look
With this you can test out what things will look like in game, currently just containing custom colors.
Colors
Change the preview left and right color. then click Apply while you have a whacker selected and it will apply those colors to it's materials.
KEEP IN MIND, THIS WILL CHANGE MATERIALS IN YOUR PROJECT!!!
Other tools
These tools did not fit in any category, but are still useful.
- Select all renderers: selects all the renderers on the whacker you are editing, can be useful if you need to do something with all of them
- Select trail transform: let's you select the top or bottom transforms of all trails on a whacker, to let you edit them all at the same time