Layout - Qosmetics/UnityProject GitHub Wiki
Project Layout
This page will show the layout of the Qosmetics Unity project so that you can learn about the different tools you have at your disposal for making models for Qosmetics
The project is not 1:1 compatible with the old project, any metadata (author, description, object titles) you have saved previously WILL NOT carry over automatically to the new project, so I recommend not deleting your old project yet.
Main View Overlay
In the main scene view of the project, you should see an overlay that offers a few buttons:

There are a few buttons here:
- Settings
- Whackers
- Cyoobs
- Boxes
In order to understand the last 3, we'll have to explain the settings one first.
Settings
The settings button will open the settings menu in the project properties. Since the overlay can be turned off there, you can also reach the settings through Edit -> Project Settings... -> Qosmetics Exporter
Clicking the settings button will open the following settings page:
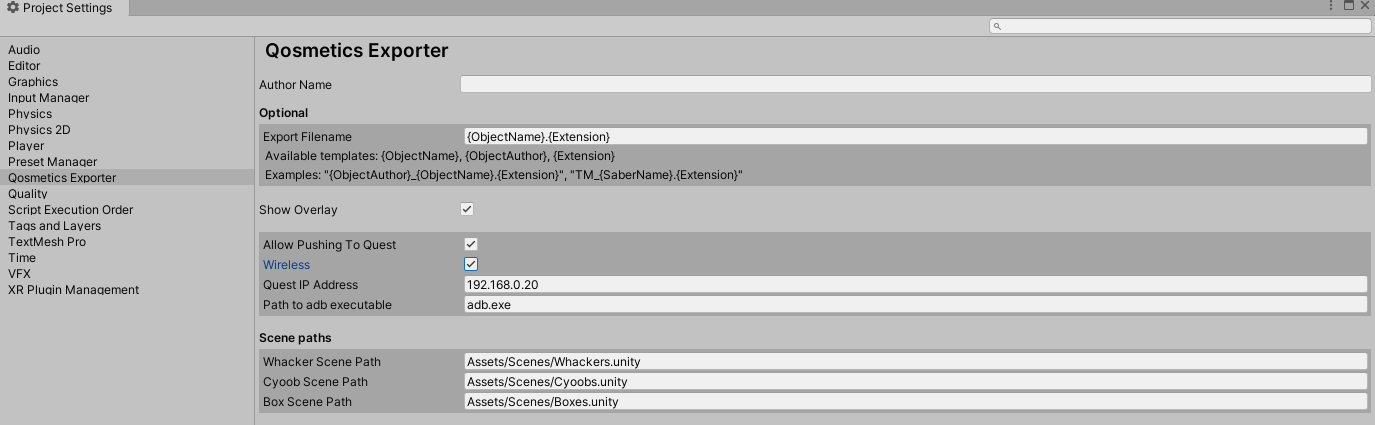
And now we'll break down the settings seen here so that you know what each of them do:
Qosmetics Exporter
- Author name: The name to automatically input on the author field when making a new model, can easily be overridden in the specific model config
Optional
-
Export Filename: Format for the exported filename default, this makes it easier for you to have the default names of your objects be pre-formatted, can also easily be overridden in the specific model config.
-
Available templates include:
{ObjectName}: The name of the object as inputted in the objectName field in the model config.
{ObjectAuthor}: The name of the author as inputted in the author field in the model config.
{Extension}: The extension of the file type, differs per file type (.whacker/.cyoob/.box)
-
-
Show Overlay: whether or not to show the overlay in the main scene view.
Pushing to Quest
- Allow Pushing to quest: whether or not to allow the project to push your files to the quest automatically. If you enable this a new button appears next to the export button that lets you automatically push the file to your quest, to make it easier to test things.
- Wireless: This only shows up if you allow pushing to quest. Allow the pushing to your quest to be done wirelessly, this does mean you need to setup wireless ADB yourself.
- Quest IP Address: This only shows up when you toggle Wireless on, and requires you to input the quest IP address for the wireless connection.
- Path to adb executable: This only shows up if you allow pushing to quest. Requires you to put in the command to use the adb executable, if your adb install is on path,
adb.exewill suffice, but if it's stored on your C disk for example, it'd beC:/adb.exe
Scene paths
The project comes with different scenes for each of the different model types, and has default file names for these. You can however change these in this part of the settings.
- Whacker Scene path: the path for the Whackers scene (sabers)
- Cyoob Scene path: the path for the Cyoobs scene (notes)
- Box Scene path: the path for the Boxes scene (walls)
Make sure these start with Assets/!
Opening Scenes
Now that we know about the settings, and the scene paths, we can explain the last 3 buttons in the overlay. As you may guess, each of these opens their respective scene at the path specified in the settings. The project comes with the default scenes pre-made, so really there is no need to change the filepaths or make those scenes yourself.
Just clicking one of the buttons will open the correct scene, and open the tools menu for that specific type of cosmetic, which we'll get to later.
Qosmetics Submenu
Just like the scene open buttons open the different kinds of tools menu for that specific type of cosmetic, you can also just open these tool menus manually, by going to the Qosmetics tab on the toolbar at the top, and just clicking the correct menu.
Now that we know how to open the different scenes and open the tool menus for the different cosmetic items, it's time to choose what kind of object we want to make: