CollectionView section - QDDCoder/LZLearniOS GitHub Wiki
private lazy var layout = UICollectionViewFlowLayout()
private lazy var collectionView = UICollectionView(frame: CGRect(x: 10*PionWidth, y: NAVBAR_HEIGHT, width: ScreenW-20*PionWidth, height: ScreenH-NAVBAR_HEIGHT),collectionViewLayout: layout).then {
    $0.backgroundColor = .white
    $0.register(LZRXCollectionCell.self, forCellWithReuseIdentifier: "LZRXCollectionCell")
    $0.register(RXSwiftCollectionHeadView.self, forSupplementaryViewOfKind: UICollectionView.elementKindSectionHeader, withReuseIdentifier: "headerViewId")
    //高度代理
    $0.delegate=self

    //拖动使用
    $0.dropDelegate=self
    $0.dragDelegate=self
    //开启可拖动
    $0.dragInteractionEnabled = true
    //弹簧加载是一种导航和激活控件的方式,在整个系统中,当处于 dragSession 的时候,只要悬浮在cell上面,就会高亮,然后就会激活
    $0.isSpringLoaded=true
    //重排序节奏)可以调节集合视图重排序的响应性。 是 CollectionView 独有的属性(相对于UITableView),因为 其独有的二维网格的布局,因此在重新排序的过程中有时候会发生元素回流了,有时候只是移动到别的位置,不想要这样的效果,就可以修改这个属性改变其相应性
    $0.reorderingCadence = .slow


    //隐藏纵向滑动线
    $0.showsVerticalScrollIndicator = false

    //系统自动调整scrollView.contentInset保证滚动视图不被tabbar,navigationbar遮挡
    $0.contentInsetAdjustmentBehavior = .scrollableAxes

    // 点击事件
    $0.rx.itemSelected.map {[weak self] (indexPath) in
        return (indexPath,self!.dataSource[indexPath])
    }.subscribe(onNext:{(index,model) in
        ToastView.instance.showToast(content: "点击了===>>>\(index.section)===>>>\(model.name)")
    }).disposed(by: disposeBag)


    self.view.addSubview($0)
}
//设置数据绑定的中间件
private var dataSource = RxCollectionViewSectionedReloadDataSource<SectionModel<String,HomeCategoryModel>> { (_, collectionView, indexPath, item) -> UICollectionViewCell in
    let cell = collectionView.dequeueReusableCell(withReuseIdentifier: "LZRXCollectionCell", for: indexPath) as! LZRXCollectionCell
    cell.textInfo.text=item.name
    cell.backgroundColor = .randomColor
    cell.dragStateDidChange(.lifting)
    return cell
}.then {
    // 设置sectionHeader
    $0.configureSupplementaryView={(model, collection, info, indexPath) -> UICollectionReusableView in
        let header = collection.dequeueReusableSupplementaryView(ofKind: info, withReuseIdentifier: "headerViewId", for: indexPath) as! RXSwiftCollectionHeadView
        header.titleLabel.text=model.sectionModels[indexPath.section].model
        header.backgroundColor = .randomColor
        return header
    }

    //设置可移动
    $0.canMoveItemAtIndexPath={(dataSourceIn,indexPath) -> Bool in
        return true
    }
}private var response:BehaviorSubject<[SectionModel<String, HomeCategoryModel>]>?
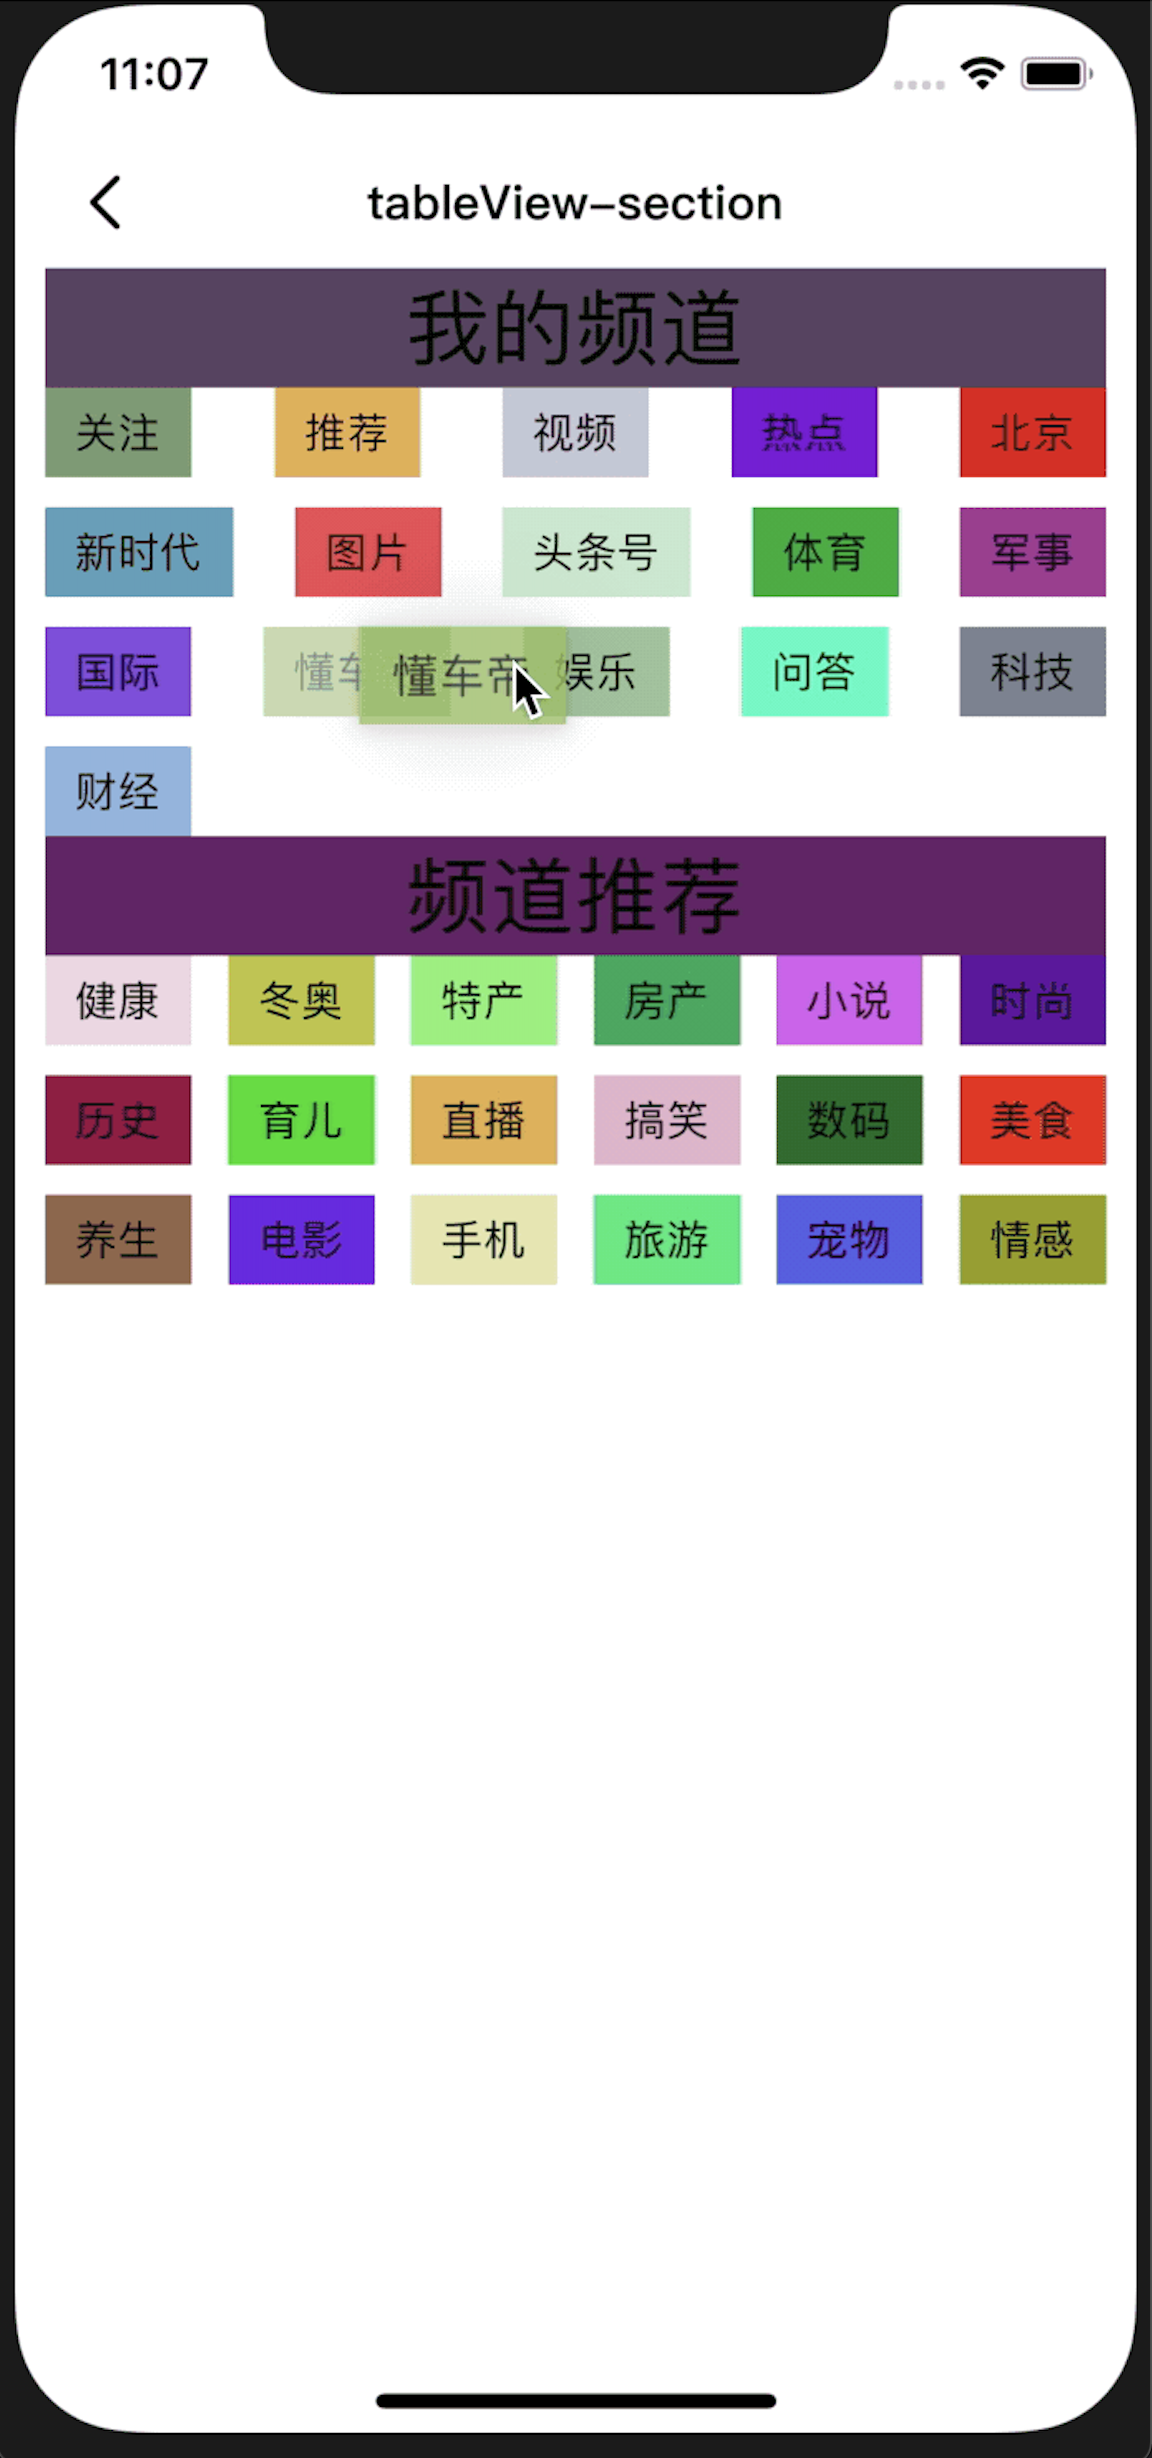
private var dataModel=[SectionModel(model: "我的频道", items:
[
HomeCategoryModel(withName: "关注", withJump: UIViewController.self),
HomeCategoryModel(withName: "推荐", withJump: UIViewController.self),
HomeCategoryModel(withName: "视频", withJump: UIViewController.self),
HomeCategoryModel(withName: "热点", withJump: UIViewController.self),
HomeCategoryModel(withName: "北京", withJump: UIViewController.self),
HomeCategoryModel(withName: "新时代", withJump: UIViewController.self),
HomeCategoryModel(withName: "图片", withJump: UIViewController.self),
HomeCategoryModel(withName: "头条号", withJump: UIViewController.self),
HomeCategoryModel(withName: "娱乐", withJump: UIViewController.self),
HomeCategoryModel(withName: "问答", withJump: UIViewController.self),
HomeCategoryModel(withName: "体育", withJump: UIViewController.self),
HomeCategoryModel(withName: "科技", withJump: UIViewController.self),
HomeCategoryModel(withName: "懂车帝", withJump: UIViewController.self),
HomeCategoryModel(withName: "财经", withJump: UIViewController.self),
HomeCategoryModel(withName: "军事", withJump: UIViewController.self),
HomeCategoryModel(withName: "国际", withJump: UIViewController.self),
]),
SectionModel(model: "频道推荐", items:
[
HomeCategoryModel(withName: "健康", withJump: UIViewController.self),
HomeCategoryModel(withName: "冬奥", withJump: UIViewController.self),
HomeCategoryModel(withName: "特产", withJump: UIViewController.self),
HomeCategoryModel(withName: "房产", withJump: UIViewController.self),
HomeCategoryModel(withName: "小说", withJump: UIViewController.self),
HomeCategoryModel(withName: "时尚", withJump: UIViewController.self),
HomeCategoryModel(withName: "历史", withJump: UIViewController.self),
HomeCategoryModel(withName: "育儿", withJump: UIViewController.self),
HomeCategoryModel(withName: "直播", withJump: UIViewController.self),
HomeCategoryModel(withName: "搞笑", withJump: UIViewController.self),
HomeCategoryModel(withName: "数码", withJump: UIViewController.self),
HomeCategoryModel(withName: "美食", withJump: UIViewController.self),
HomeCategoryModel(withName: "养生", withJump: UIViewController.self),
HomeCategoryModel(withName: "电影", withJump: UIViewController.self),
HomeCategoryModel(withName: "手机", withJump: UIViewController.self),
HomeCategoryModel(withName: "旅游", withJump: UIViewController.self),
HomeCategoryModel(withName: "宠物", withJump: UIViewController.self),
HomeCategoryModel(withName: "情感", withJump: UIViewController.self),
]
)]extension LZRXCollectionViewSectionVC: UICollectionViewDelegate,UICollectionViewDelegateFlowLayout {
// 设置Cell的大小
func collectionView(_ collectionView: UICollectionView, layout collectionViewLayout: UICollectionViewLayout, sizeForItemAt indexPath: IndexPath) -> CGSize {
let width = dataModel[indexPath.section].items[indexPath.row].name.ga_widthForComment(fontSize: 14, height: 20*PionHeight)
return CGSize(width: width+20*PionWidth, height: 30*PionHeight)
}
//竖向滚动表示:行cell之间的间隔
func collectionView(_ collectionView: UICollectionView, layout collectionViewLayout: UICollectionViewLayout, minimumLineSpacingForSectionAt section: Int) -> CGFloat {
return 10*PionWidth
}
//竖向滚动表示:行cell之间的列间距 注意:和Cell设置大小时的冲突,一般使用设置Cell 大小就行了。特殊应用场景,在cell自适应大小的时候使用
func collectionView(_ collectionView: UICollectionView, layout collectionViewLayout: UICollectionViewLayout, minimumInteritemSpacingForSectionAt section: Int) -> CGFloat {
return 10*PionWidth
}
//foot的大小
func collectionView(_ collectionView: UICollectionView, layout collectionViewLayout: UICollectionViewLayout, referenceSizeForFooterInSection section: Int) -> CGSize {
return CGSize(width:0 , height: 0*PionHeight)
}
//header的大小
func collectionView(_ collectionView: UICollectionView, layout collectionViewLayout: UICollectionViewLayout, referenceSizeForHeaderInSection section: Int) -> CGSize {
return CGSize(width: ScreenW-20*PionWidth, height: 40*PionHeight)
}
}extension LZRXCollectionViewSectionVC:UICollectionViewDragDelegate{
//可拖动的item集合
func collectionView(_ collectionView: UICollectionView, itemsForBeginning session: UIDragSession, at indexPath: IndexPath) -> [UIDragItem] {
guard indexPath.section != 1 else {
return []
}
let item = self.dataModel[indexPath.section].items[indexPath.row].name
let itemProvider = NSItemProvider(object: item as NSString)
let dragItem = UIDragItem(itemProvider: itemProvider)
dragItem.localObject = item
//开始拖动 的indexPath
dragingIndexPath = indexPath
return [dragItem]
}
}extension LZRXCollectionViewSectionVC:UICollectionViewDropDelegate
{
//拖动的数据交换 通过coordinator我们可以获取到操作类型,是move还是copy。
func collectionView(_ collectionView: UICollectionView, performDropWith coordinator: UICollectionViewDropCoordinator) {
// 交换目标indexPath
guard let destinationIndexPath = coordinator.destinationIndexPath else {
return
}
switch coordinator.proposal.operation {
case .move:
let items = coordinator.items
// 交换的发起item和indexPath
if let item = items.first, let sourceIndexPath = item.sourceIndexPath {
//执行批量更新
collectionView.performBatchUpdates({
//move 操作后,需要把之前的位置删除掉,在新的位置进行插入
let tempItemp = self.dataModel[destinationIndexPath.section].items[sourceIndexPath.row]
self.dataModel[destinationIndexPath.section].items.remove(at: sourceIndexPath.row)
self.dataModel[destinationIndexPath.section].items.insert(tempItemp, at: destinationIndexPath.row)
collectionView.deleteItems(at: [sourceIndexPath])
collectionView.insertItems(at: [destinationIndexPath])
response?.onNext(dataModel)
})
//将项目动画化到视图层次结构中的任意位置
coordinator.drop(item.dragItem, toItemAt: destinationIndexPath)
}
break
default:
return
}
}
//设置拖动样式
func collectionView(_ collectionView: UICollectionView, dropSessionDidUpdate session: UIDropSession, withDestinationIndexPath destinationIndexPath: IndexPath?) -> UICollectionViewDropProposal {
//由于“我的频道”和“频道推荐”是禁止互相滑动的,所以,拖拽的起始dragingIndexPath和目标destinationIndexPath的section不一样,就表示跨区了,设置其为forbidden。
if dragingIndexPath?.section != destinationIndexPath?.section {
return UICollectionViewDropProposal(operation: .forbidden)
}else{
if session.localDragSession != nil {
if collectionView.hasActiveDrag {
return UICollectionViewDropProposal(operation: .move, intent: .insertAtDestinationIndexPath)
} else {
return UICollectionViewDropProposal(operation: .copy, intent: .insertAtDestinationIndexPath)
}
} else {
return UICollectionViewDropProposal(operation: .forbidden)
}
}
}
}-
//添加手势
let longPressGesture = UILongPressGestureRecognizer(target: self, action: #selector(reorderCollectionView(longPressGesture:)))
collectionView.addGestureRecognizer(longPressGesture)


//手势处理
@objc func reorderCollectionView(longPressGesture:UILongPressGestureRecognizer)  {
    switch longPressGesture.state {
    case .began:
        //要开始交互式移动item
        let piont = longPressGesture.location(in: self.collectionView)
        let selectIndexPath = collectionView.indexPathForItem(at: piont)
        if selectIndexPath != nil{
            self.collectionView.beginInteractiveMovementForItem(at: selectIndexPath!)
        }
        break
    case .changed:
        //当手势识别器跟踪到手势变化时
        let piont = longPressGesture.location(in: self.collectionView)
        collectionView.updateInteractiveMovementTargetPosition(piont)
        break
    case .ended:
        //手势结束
        collectionView.endInteractiveMovement()
        break

    default:
        collectionView.cancelInteractiveMovement()
        break
    }
}
-
-
let tapGesture = UITapGestureRecognizer()
tapGesture.rx.event.subscribe(onNext: {(tap) in
    print("点击了")
}).disposed(by: disposeBag)
self.view.addGestureRecognizer(tapGesture)
-
let swapGesture = UISwipeGestureRecognizer()
swapGesture.rx.event.subscribe(onNext: {(swap) in
    //Right = 0 ,Left =1,Up =2,Down =3
    print("方向=>\(swap.direction)")
    print("滑动的手指数=>\(swap.numberOfTouchesRequired)")
    print("响应位置=>\(swap.location(in: swap.view))")
    print("触摸点数量=>\(swap.numberOfTouches)")
    //.begin: 开始,.possible:可用,changed:改变,ended:结束,cancelled:取消,failed:失败
    print("状态=>\(swap.state)")
}).disposed(by: disposeBag)

self.view.addGestureRecognizer(swapGesture)
-
let panGesture = UIPanGestureRecognizer()
panGesture.rx.event.subscribe(onNext: {(pan) in
        print("状态==>\(pan.state)")
        if pan.state == .ended{
            let speed = pan.velocity(in: pan.view)
            print("滑动速度:\(speed)")
        }
    }).disposed(by: disposeBag)
    self.view.addGestureRecognizer(panGesture)
-
//创建图片
private lazy var imageViewSize = CGRect(x: 10*PionWidth, y: NAVBAR_HEIGHT, width: ScreenW-20*PionWidth, height: ScreenH-NAVBAR_HEIGHT)
private var center:CGPoint?
private lazy var imageView = UIImageView(frame: imageViewSize).then {
    $0.kf.setImage(with: URL(string: "https://gimg2.baidu.com/image_search/src=http%3A%2F%2Finews.gtimg.com%2Fnewsapp_bt%2F0%2F11645791963%2F641.jpg&refer=http%3A%2F%2Finews.gtimg.com&app=2002&size=f9999,10000&q=a80&n=0&g=0n&fmt=jpeg?sec=1611726545&t=20bba1377f9458ff76cef652d805ed62"))
    $0.isUserInteractionEnabled = true
    self.center = $0.center
    self.view.addSubview($0)
    self.view.sendSubviewToBack($0)
}

//缩放手势
let pichGesture = UIPinchGestureRecognizer()
imageView.addGestureRecognizer(pichGesture)
pichGesture.rx.event.subscribe(onNext: {[weak self](pinch) in
    print(pinch.scale)
    self?.imageViewSize.size.width=pinch.scale*(ScreenW-20*PionWidth)
    self?.imageViewSize.size.height=pinch.scale*(ScreenH-NAVBAR_HEIGHT)
    self?.imageView.frame = self!.imageViewSize
    self?.imageView.center = (self?.center)!
}).disposed(by: disposeBag)
-
private lazy var imageViewSize = CGRect(x: 10*PionWidth, y: NAVBAR_HEIGHT, width: ScreenW-20*PionWidth, height: ScreenH-NAVBAR_HEIGHT)
private lazy var imageView = UIImageView(frame: imageViewSize).then {
    $0.kf.setImage(with: URL(string: "https://gimg2.baidu.com/image_search/src=http%3A%2F%2Finews.gtimg.com%2Fnewsapp_bt%2F0%2F11645791963%2F641.jpg&refer=http%3A%2F%2Finews.gtimg.com&app=2002&size=f9999,10000&q=a80&n=0&g=0n&fmt=jpeg?sec=1611726545&t=20bba1377f9458ff76cef652d805ed62"))
    $0.isUserInteractionEnabled = true
    self.view.addSubview($0)
    self.view.sendSubviewToBack($0)
}

let rotationGesture = UIRotationGestureRecognizer()
imageView.addGestureRecognizer(rotationGesture)
rotationGesture.rx.event.subscribe(onNext: {[weak self](ratation) in
    print("旋转速度==>>\(ratation.velocity)")
    print("旋转角度==>>\(ratation.rotation)")
    ratation.view?.transform = (ratation.view?.transform.rotated(by: ratation.rotation))!
    //将上次的弧度置为1
    ratation.rotation=0
}).disposed(by: disposeBag)
-
UILongPressGestureRecognizer:长按手势识别器,想要成功触发长按手势,需使用一个或多个手指在视图上按压不小于minimumPressDuration设定的时长,默认0.5秒,并且长按时手指移动的距离要小于allowableMovement设定的距离,默认距离10points。let longPressGesture = UILongPressGestureRecognizer() //设置长按时长 longPressGesture.minimumPressDuration = 0.5 //设置长按手指数 longPressGesture.numberOfTouchesRequired=1 longPressGesture.rx.event.subscribe(onNext: {[weak self](longPress) in if longPressGesture.state == .began{ //长按事件开始 //可以获取我们在哪个cell上长按 tableview collectionView //let piont = longPressGesture.location(in: longPress.view) let piont = longPress.location(in: longPress.view) let longPressIndexPath = self?.collectionView.indexPathForItem(at: piont) } }).disposed(by: disposeBag) collectionView.isUserInteractionEnabled=true collectionView.addGestureRecognizer(longPressGesture)
-
UIScreenEdgePanGestureRecognizer:屏幕边缘轻扫手势识别器,继承自UIPanGestureRecognizer,前面六个手势识别器均继承自UIGestureRecognizer。屏幕边缘轻扫手势识别器只能识别在屏幕边缘附近开始的手势。与滑动手势很像,不同之处在于前者必须从屏幕边缘开始。可以使用屏幕边缘手势来启动视图控制器转换。let screenGesture = UIScreenEdgePanGestureRecognizer().then { $0.edges = .right $0.rx.event.subscribe(onNext: {[weak self](screen) in if screen.state == .began{ }else if screen.state == .changed{ }else if screen.state == .ended{ self?.lz_popViewController(animated: true) } }).disposed(by: disposeBag) } self.view.addGestureRecognizer(screenGesture)
屏幕边缘滑动手势作为一个比较冷门的手势.其实用到的地方也没想象中的那么少.
UIScreenEdgePanGestureRecognizer是UIPanGestureRecognizer的子类.属性 默认值 说明 edges UIRectEdgeNone 这个属性是边缘拖动手势支持的拖动的位置,默认是没有,不给这个属性赋值的话这个手势是没有意义的 属性值枚举值 说明 UIRectEdgeNone 设置为这个值的时候这个手势其实就"失效"了 UIRectEdgeTop 识别顶部边缘拖动手势 UIRectEdgeLeft 识别左边边缘拖动手势 UIRectEdgeBottom 识别底部边缘拖动手势 UIRectEdgeRight 识别右边边缘拖动手势 UIRectEdgeAll 识别所有方向的边缘拖动手势
-