Shader Patch Color Grading Regions - PrismaticFlower/shaderpatch GitHub Wiki
Contents
Intro
Shader Patch's color grading regions enable you to place regions in Zero Editor, associate those regions with a color grading config and have Shader Patch dynamically blend between/select the color grading parameters for the effects system based on the position of the game's camera.
When the camera is outside any region the global color grading parameters from the .spfx file are used. Color grading regions can overlap (in which case the parameters will be an equal mix of the two regions) and the camera can be inside the fade out "zone" of multiple regions at a time.
The code backing this is fairly simple but should be fast enough to handle many regions without trouble on any modern CPU.
Getting Started
In order to use color grading regions you need to have effects setup and already enabled in your map. If you haven't done that go do it now.
Next the first thing we need to do is mod Zero Editor. While color grading region configs can only be edited ingame from the developer screen we still need a way to easilly associate regions with configs and specify their fade values.
So from the root of your mod folder go into "Config\editor\region" and open "gzeditor_region_types.cfg" in your preferred text editor. Scroll down to the bottom, add this and then save. Repeat for any project you want to use color grading regions in. And optionally repeat the process in "Data" so you don't have to do it each time you make a new project.
Exact("colorgrading") {
	Shapes("Box Cyl Sph");
	File("Config", "Config", "clrfx");
	Number("FadeLength", "FadeLength");
}
Next open up Zero Editor, load your map and create a new layer called "colorgrading". The exact name (including casing) matters, spfx_munge depends on it to find your color grading regions.
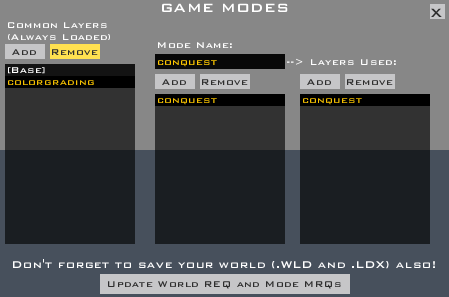
Now regions in our new layer are only going to be for Shader Patch and it's going to fetch their info at munge time. So it makes sense to make sure they don't end up in world's .lvl and count towards the region limit. To stop this happening we just need to hit "CONFIGURE" under "GAME MODES:", under "COMMON LAYERS" select our "colorgrading" layer and hit "REMOVE".
Finally we're free to start placing color grading regions. See Region Variables for a description of, well the region variables.
Also one last thing to be aware of is that the name of your world, world .fx eile and world .spfx file must all match up for color grading regions to munge. So if you're world's name is NAB they must be NAB.wld, NAB.fx and NAB.spfx. Not NAB.wld, NAB.FX and NABOO.spfx.
Region Variables
Config
Sets the name of the config to use for the region. Multiple regions can share the same config and indeed it may be a useful to have multiple regions making up the inside of a building all use the same config.
Configs do not have to exist when you munge. Any config that doesn't exist will recieve default color grading parameters. This allows you to specify the name of the config you'd like, munge, create the config ingame and then save it back out.
FadeLength
The length from the edge of region over which it's contribution fades out. Setting to 0.0 for regions that can only fade into regions using the same config will save Shader Patch a small amount of work and should be done where appropriate.
Ingame Editor
The ingame editor is likely where you'll do a lot of your work with color grading regions. It's interface for editing paramaters matches the global color grading editor.
The only key thing to be aware of is that you can use the ingame editor to save your color grading region configs back out for use by spfx_munge. For organization purpose I reccomend placing your configs in a subfolder named "colorgrading" (or "dolphins are cool", whatever you like, the name only matters to you) in your world folder. The important thing is that they be in a the same folder or a subfolder relative to your .wld file.