Writing an Effect or Adjustment - PintaProject/Pinta GitHub Wiki
This guide assumes that you have set up a basic add-in as described in Writing an Add-in.
This guide will describe how to write an effect or adjustment for Pinta. The difference between the two is somewhat arbitrary, but a general rule is that an adjustment is designed to tweak an image (like colors or constrast) while an effect provides a more dramatic change (such as blurring the image). For the rest of the guide, we'll be using the word effect, but this guide applies for adjustments as well.
As an example, we'll be building an add-in to provide a night vision effect for Pinta. The source code for the add-in is available at https://github.com/PintaProject/NightVisionEffect, and the effect can be installed from Pinta's add-in repository.
Ensure that the add-in description file (.addin.xml) has the category set to Effects. This will make it easier for users to find your effect in the Add-in Gallery. The add-in description file should now look like:
<?xml version="1.0" encoding="UTF-8" ?>
<Addin id="NightVisionEffect" version="1.2" category="Effects">
    <Header>
        <Name>Night Vision Effect</Name>
        <Description>A simple add-in that will recolour your image so that it looks like a night vision picture.</Description>
        <Author>Pinta Project</Author>
        <Url>https://github.com/PintaProject/NightVisionEffect</Url>
    </Header>
    <Dependencies>
        <Addin id="Pinta" version="2.2" />
    </Dependencies>
</Addin>
All effects inherit from Pinta.Core.BaseEffect. There is only one required method to implement: you must provide the name of your effect.
using System;
using Mono.Addins;
using Pinta.Core;

namespace NightVisionAddin
{
    public class NightVisionEffect : BaseEffect
    {
        public override string Name => AddinManager.CurrentLocalizer.GetString ("Night Vision");
    }
}Our effect doesn't do anything interesting at the moment, but we'll change that soon. The main work of an effect takes place in one of the following methods:
void Render (ImageSurface src, ImageSurface dst, ReadOnlySpan<RectangleI> rois)void Render (ImageSurface src, ImageSurface dst, RectangleI roi)void Render (ReadOnlySpan<ColorBgra> src, Span<ColorBgra> dst)ColorBgra Render (in ColorBgra color)
These allow you to work at different levels depending on your needs. In order, you can work on all rectangles of interest ("roi"), individual rectangles of interest, a single line, or a single pixel. Note that you'll only want to override one of these, and you do not want to call the base method, or else it will chain down to the more granular levels.
For our effect we are going to work at the pixel level, so here is the code we need:
protected override ColorBgra Render (in ColorBgra pixel)
{
	return new ColorBgra () {
		G = Utility.ClampToByte ((int) ((float) pixel.B * 0.1 + (float) pixel.G * 0.6 + (float) pixel.R * 0.2)),
		B = 0,
		R = 0,
		A = pixel.A
	};
}We've now written our effect, but we still need to register it with Pinta. In the IExtension subclass, we need to call PintaCore.Effects.RegisterEffect to register an instance of our BaseEffect subclass, and call PintaCore.Effects.UnregisterInstanceOfEffect to unregister that effect.
using System;
using Pinta.Core;
namespace NightVisionAddin
{
[Mono.Addins.Extension]
public class NightVisionExtension : IExtension
{
public void Initialize ()
{
PintaCore.Effects.RegisterEffect(new NightVisionEffect());
}
public void Uninitialize ()
{
PintaCore.Effects.UnregisterInstanceOfEffect (typeof (NightVisionEffect));
}
}
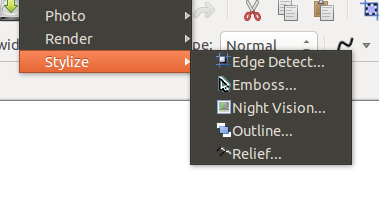
}By default, Pinta will place effects under the "General" category of the Effects menu. In the case of this effect, we'd like to place it under the "Stylize" menu. This can be done by overriding the EffectMenuCategory property:
public override string EffectMenuCategory => AddinManager.CurrentLocalizer.GetString ("Stylize");We can now run Pinta and test out our effect! The effect now shows up in the Effects->Stylize menu, and we can run it on an image to see the results:
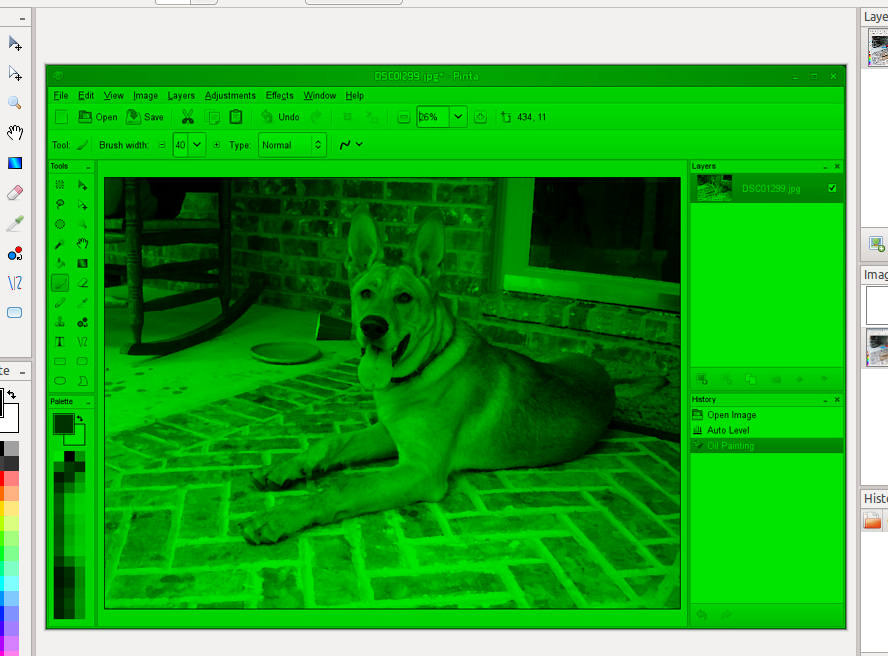
Note that all you had to do was specify the algorithm that your effect uses and Pinta handled the rest. It handled all the painting and even added your action to the history pad so the user can undo the effect, without any additional code written by you. If the user had an area selected, only those pixels were passed to your effect. Also, if you have a CPU with multiple cores, Pinta even broke the task up in to multiple threads and ran each one on a different core!