Getting Started: Writing an Addin - PintaProject/Pinta GitHub Wiki
This guide will demonstrate how to write a basic add-in. To see a complete example of an add-in, visit https://github.com/PintaProject/PintaDemoExtension.
Create a new .csproj for your addin library:
<Project Sdk="Microsoft.NET.Sdk">
  <PropertyGroup>
    <TargetFramework>net8.0</TargetFramework>
    <Nullable>enable</Nullable>

    <Version>0.1.0.0</Version>
    <Authors>Your Name</Authors>

    <!-- Don't auto-include resource files since we embed translations in the addin manifest -->
    <EnableDefaultEmbeddedResourceItems>false</EnableDefaultEmbeddedResourceItems>
  </PropertyGroup>

  <ItemGroup>
    <PackageReference Include="Mono.Addins" Version="1.4.2-alpha.4" />
  </ItemGroup>
  <ItemGroup>
    <ProjectReference Include="..\Pinta\Pinta.Core\Pinta.Core.csproj" />
  </ItemGroup>
  <ItemGroup>
    <EmbeddedResource Include=".addin.xml" />
  </ItemGroup>
</Project>In order to write an add-in, you will need to reference two libraries:
-
Mono.Addins- this is the framework that Pinta uses to support add-ins. -
Pinta.Core- this provides access to Pinta's API.
In the above example, Pinta is checked out as a submodule in a sibling directory of the add-in library (git submodule add https://github.com/PintaProject/Pinta.git). This allows you to easily build against a specific tagged release of Pinta.
You may also want to reference:
-
GirCore.Adw-1(libadwaitaandGTKbindings, if you need to do anything UI-related)
In Pinta, all add-ins implement the IExtension interface. You must provide implementations for two methods: Initialize and Uninitialize. Additionally, you must mark your add-in class with the Mono.Addins.Extension attribute to help Pinta find it.
- The
Initializemethod is called when Pinta loads the add-in, and is where you should perform any setup (such as registering an effect). - The
Uninitializemethod is called when the add-in is unloaded (for example, if it is disabled by a user), and is where you should undo any actions that were performed in theInitializemethod. - You should not perform any initialization in the constructor, as your add-in may be instantiated even if the user has it disabled.
A simple add-in looks like this:
using System;
using Pinta.Core;
namespace MyFirstAddin
{
[Mono.Addins.Extension]
public class MyFirstAddin : IExtension
{
public void Initialize ()
{
System.Console.Out.WriteLine ("Initializing my addin.");
}
public void Uninitialize ()
{
System.Console.Out.WriteLine ("Uninitializing my addin.");
}
}
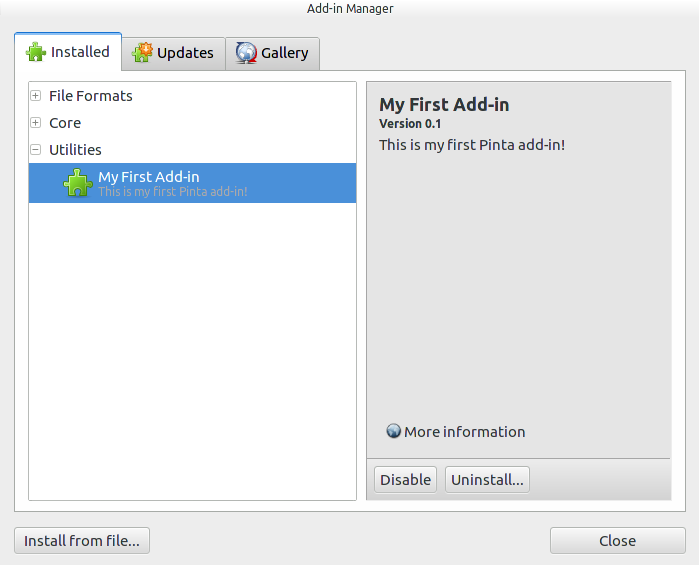
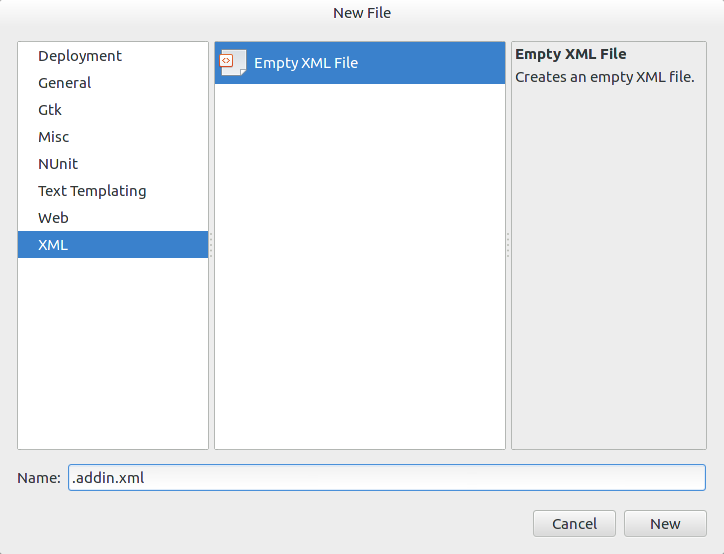
}You will also need to provide some basic information about your add-in so that Pinta can display it in the Add-in Manager dialog. Create a file named .addin.xml, add it to your add-in project, and set its Build Action to Embedded Resource.
A simple add-in description looks like this:
<?xml version="1.0" encoding="UTF-8" ?>
<Addin id="MyFirstAddin" version="0.1" category="General">
    <Header>
        <Name>My First Add-in</Name>
        <Description>This is my first Pinta add-in!</Description>
        <Author>My Name</Author>
        <Url>https://github.com/MyName/MyFirstAddin</Url>
    </Header>
    <Dependencies>
        <Addin id="Pinta" version="3.0" />
    </Dependencies>
</Addin>-
Addintakes a unique id for your add-in, a version number for your add-in, and a category. The category is used to group add-ins in the Add-in Manager. Some common categories are: Brushes, Effects, File Formats, Tools, Utilities, and Web. -
Headercontains the information that will be displayed in the Add-in Manager. -
Nameprovides a friendly name for your add-in that the user will see. -
Descriptionprovides a useful description so that users know what your add-in does. -
Authoris your name! -
Urlprovides a link to the homepage of your add-in's project. -
Dependencieslets the add-in system know which version of Pinta you require.
Now, you can compile your add-in and place it in the same directory as the Pinta executable. When you start Pinta, the "Initializing my addin." message should appear in the console, and your add-in should be visible in the Add-in Manager!