Setup Windows - Pandiora/hwinfo-remote GitHub Wiki
IMPORTANT: After you've set up everything like described here, you've to restart your Host-Machine. This will save you from banging your head against the wall.
For Windows we need additional Software to be able to read the temperatures of the Remote-PC. I decided to use HwInfo, since it is reliable.(Download) But this isn't enough to read the temperatures, since we need some interface to work with and I decided to provide the data via Webserver in json-Format. There's an AddOn for HwInfo, which exactly does this job, called RemoteSensor Monitor, Download it from HwInfo-AddOn-Page, create a folder (C:\Remote\) and put the AddOn in there.
Now copy over the content of the folder of this repository under hwinfo@pandiora\windows.
If you've done it right, your file-tree should look like this:
C:
 └ Remote
   ├ Remote Sensor Monitor
   | └ Remote Sensor Monitor.exe (and so on)
   ├ rms.vbs
   ├ AcceptRemoteShutdown - Install.reg
   ├ AcceptRemoteShutdown - Uninstall.reg
rms.vbs is a script for auto-starting HwInfo and the RemoteSensorMonitor and is needed since the RemoteSensorMonitor needs to start after HwInfo is up an running. Additionally there is a bit of code to map a network-drive and start steam, so Steam will recognize the mapped drive and the games on it correctly, but this isn't the topic here. Open the rms.vbs and change the value for strComputer which is set to 192.168.188.1 to the IP-Address of your router. Additionally, if for some reason your paths to RMS or HwInfo are different, also change the values C:\Program Files\HWiNFO64\HWINFO64.exe and C:\Remote\RemoteSensorMonitor\Remote Sensor Monitor.exe to your paths.
Now we just need to add this script to our Autostart, for this to be done open your search or start and copy over this path %APPDATA%\Microsoft\Windows\Start Menu\Programs\Startup hit enter and create a symlink to rms.vbs by right-clicking in the newly opened explorer-window, selecting New -> Shortcut -> 'Select' (rms.vbs) and click finish this step.
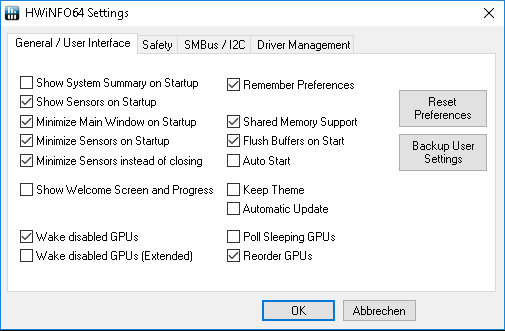
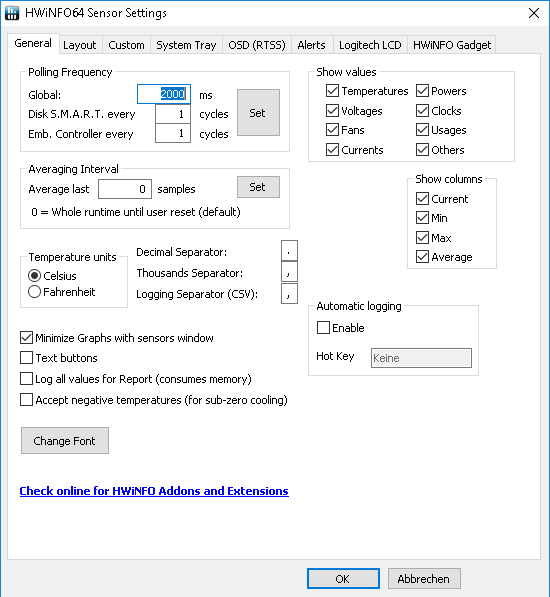
Next we have to change some settings in HwInfo like in the following screenshots (make sure the Status is installed under Driver Managmenet in the HwInfo Settings):
The previous steps should ensure everything starts automagically and the applet can read the sensor-data. Make sure you've set up the Host URL aka IP in the applet settings. If the Applet still fails to pull the sensor-data of your Host-PC, open your browser an navigate to http://<remote-ip>:55555. If there is no output probably either the port is blocked in your Windows-Firewall or in your Router. You can debug, by opening your task-manager (Host), stopping the Remote Sensor Monitor.exe and manually starting it. (navigate to your Remote-Folder we previously created -> Remote Sensor Monitor -> double-click Remote Sensor Monitor.exe) A console-Window should open, displaying more informations.
Depending the Remote-Controls we need to set up even more. First of all, you have to make sure "Wake On Lan" or some similiar option is activated in your BIOS. If you don't know how to activate WOL, please search for a guide. Also make sure samba-common and the WOL-Package of your choice (wakeonlan, wol, etherwake) is installed on your Client-Machine (where you installed your applet). Probably you already set up the corresponding Remote-Computer to allow Remote-Connections via RDP, but if not this task is mandatory. If you don't know how to set up your Remote-Host correctly, refer to this guide.
Additionally we have to change more settings to be able to shutdown and reboot the Remote-Computer. First we have to add a Registry-Key to allow Remote-Shutdowns. To make this task easier, you can find a file AcceptRemoteShutdown - Install.reg in your Remote-Folder.(C:\Remote) Double-Click it and accept the notification, which states that this key will be added to your registry. To easily remove this key, just use the other (Uninstall-)File. It could be needed that you have to manually disable the UAC. Aaaaand last but not least make sure the following services are enabled and running:
- Remotedesktopservices
- Remoteprocedurecall (RPC)
- Remoteregistry (only if nothing else works)
To give more insight into how this applet works and to debug the Remote-Controls, you can execute the correponding commands in your command-shell:
Wake On Lan:
wakeonlan 00:00:00:00:00:00wol 00:00:00:00:00:00sudo etherwake -i `ip -4 route ls | grep default | grep -Po '(?<=dev )(\S+)'` 00:00:00:00:00:00
Reboot:
net rpc shutdown -r -t 0 -C 'Reboooot' -U <user>%<password> -I <remote-ip>
Shutdown:
net rpc shutdown -f -t 0 -C 'Shutdown' -U <user>%<password> -I <remote-ip>
Depending the loooong etherwake-command: I encountered a problem, when using etherwake on my notebook, which is connected via Wifi. etherwake tries to use eth0-Interface instead of my WLAN-Card. To avoid this behaviour we grep the current active Interface (hopefully there is only one) and tell etherwake to use it, to send the Magic Packet (WOL).
Depending the reboot- and shutdown-command, which gave me headaches, since I had to REBOOT my Windows until they started to work: The parameter -r stands for reboot and, yes, -f for shutdown. -t 0 executesthe reboot/shutdown immediately. -U <user>%<password> are the login credentials of your Remote-Machine, separated by %. -I <remote-ip> obviously is the IP of your Hostmachine, which can be given as IP (4 Octets) or symbolic Name like "MYPC".