Developer's Guide - PaloAltoNetworks/minemeld GitHub Wiki
So you really want to get your hands dirty with MineMeld code ! That's great !
This page will guide you thru the procedure to set up a development environment for MineMeld. But first things first, before starting please read the overview of the MineMeld architecture and the contribution guidelines.
A tale of 2 devel environments
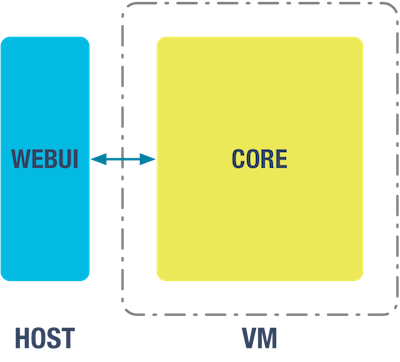
A MineMeld development environment is actually composed by 2 different devel environments:
- a core devel environment living inside an Ubuntu VM. This is for working on the core of MineMeld, i.e. adding new nodes or adding new prototypes.
- a WebUI devel environment living on the host (your laptop typically). This is for working on the MineMeld WebUI.
Procedure
Overview
Forking the repos
As a first step you have to fork the MineMeld repositories you are interested in. The code of MineMeld is split over 3 repos:
- minemeld-core contains the code for the engine and the API
- minemeld-webui contains the code for the WebUI
- minemeld-node-prototypes contains the library of node prototypes
Just go to the repo webpage on GitHub and press the Fork button.
Building the core VM
You can easily build a MineMeld core VM launching an Ansible playbook on an Ubuntu 14.04 LTS Server VM.
-
Create an Ubuntu 14.04 LTS Server VM
-
Install on the VM the packages needed for building the code:
$ sudo su - # apt-get update && apt-get upgrade # apt-get install gcc git python2.7-dev libffi-dev libssl-dev # wget https://bootstrap.pypa.io/get-pip.py # python get-pip.py # pip install ansible -
Clone the Ansible playbook from minemeld-ansible repo on the VM. Login on the VM and run the following commands:
$ sudo su - # git clone https://github.com/PaloAltoNetworks/minemeld-ansible.git -
If you have forked the
minemeld-coreorminemeld-node-prototypesrepos, change the variables in theminemeld-ansible\local.ymlfile to point to your forks. Example:# mind the indentation ! - name: minemeld playbook hosts: 127.0.0.1 connection: local sudo: yes # forks under github.com/enzobearzot82 vars: core_repo: "https://github.com/enzobearzot82/minemeld-core.git" prototype_repo: "https://github.com/enzobearzot82/minemeld-node-prototypes.git" roles: - infrastructure - minemeld_devel -
Execute the playbook on the VM:
$ sudo su - # cd minemeld-ansible # ansible-playbook -i 127.0.0.1, local.yml -
Add your VM user to the
minemeldgroup:$ sudo usermod -a -G minemeld <your VM user> -
Start the minemeld services:
$ sudo service minemeld start -
Check if the services are running:
$ sudo -u minemeld /opt/minemeld/engine/current/bin/supervisorctl -c /opt/minemeld/supervisor/config/supervisord.conf status minemeld-engine RUNNING pid 60201, uptime 0:00:31 minemeld-traced RUNNING pid 60202, uptime 0:00:31 minemeld-web RUNNING pid 60203, uptime 0:00:31 -
Note down the IP address of the VM, you'll need it for the WebUI
-
Done !
Building the WebUI
The WebUI code is compiled into a set of static files using nodejs. Instead of copying the WebUI compiled files to the VM, gulp can spin up a simple local web server for you on the fly and automatically track the changes of the WebUI code while you are developing.
-
Install nodeenv:
$ sudo pip install nodeenv -
Create a new node virtual environment and activate it:
$ nodeenv -v -n 0.12.2 --npm=2.14.7 --prebuilt -c venv $ . ./venv/bin/activate -
Clone the original
minemeld-webuirepo or your fork:$ git clone -b develop https://github.com/PaloAltoNetworks/minemeld-webui.git -
Install npm, bower and typings components:
$ cd minemeld-webui $ npm install $ export PATH=$(npm bin):$PATH $ bower install $ typings install -
Launch
gulpto serve the WebUI files:$ gulp serve --url https://<IP of the core VM> -
Login on the MineMeld WebUI using the default credentials admin / minemeld
-
Done !
BAM !
Congratulations ! You are now the owner of a complete MineMeld development environment !
Structure of the core VM
On the MineMeld core VM, the components are installed in a dedicated directory tree.
All the directories are under the common, dedicated root directory /opt/minemeld:
/opt/minemeld/engine/core
this is the clone of minemeld-core repo. Code can be directly edited in
this directory.
/opt/minemeld/engine/current
this is the virtualenv used to run supervisord and the 3 MineMeld services
/opt/minemeld/www
empty in the devel environment, could contain the WebUI static files
/opt/minemeld/prototypes
contains the clone of minemeld-node-prototypes
All the configuration files and local data are stored in a completely separated
directory tree, /opt/minemeld/local, with the following layout:
/opt/minemeld/local/config
contains the MineMeld engine, MineMeld API and MineMeld log service configuration
files
/opt/minemeld/local/prototypes
contains the libraries of locally defined prototypes
/opt/minemeld/local/library
reserved for future use
/opt/minemeld/local/data
contains the databases of indicators
/opt/minemeld/local/trace
contains the MineMeld engine logs
/opt/minemeld/local/supervisor
contains the configuration file for the supervisord watchdog service, responsible
for keeping the MineMeld engine services up and running
All the transient logs of the MineMeld components are stored in a separate
directory, called /opt/minemeld/log. These logs are automatically rotated and
purged by supervisord.