1. Gathering of Pertinent Information - P-Odd-2022/Repo-17 GitHub Wiki
Need Statement:
Automatic Pattern Drawing Bot
In an art and craft supply store, there is a need for a machine that can draw different shapes or patterns.
Introduction
- A pattern drawing bot is a machine which is used to draw various patterns and art-forms based on the users interest.
- This kind of machine reduces human effort, errors done while drawing and also the time required to draw in an optimum level.
- These machines are used in the places where variety of patterns and art-forms are needed for decorative purposes, family occasions and festivals.
Now lets look at the different bots designed by different people:
| Sl.No | Project Name | Electrical Components | Mechanical Components | Links |
|---|---|---|---|---|
| 1. | X Y Plotter Drawing robot Polograph | Arduino Uno,L293D Motor Shield,L293D Motor Driver IC,Nema 17 Stepper Motor, Servo Motor, Adapter Power Supply, Jumper Wires. | GT2 Pulley 16 Teeth, GT2 Rubber Belt (5M), Plywood, Lead Weights, Screw and Nuts, Pen, Plastic Gears | https://www.hackster.io/mertarduino/make-arduino-xy-plotter-drawing-robot-polargraph-b4fe36 |
| 2. | Mini CNC Plotter Machine | Arduino Uno,L293D Motor Shield, Mini Servo Motor | DVD drives, Fibber, Bolt, Base for machine, Scratch paper, L angle clamp, rounder, double tape, Marker Pen | https://vpmpme.files.wordpress.com/2018/07/mini-cnc-plotter-2017-18.pdf |
| 3. | DIY Pen Plotter with Automatic Tool Changer | Stepper Motor-NEMA 17, A4988 stepper driver, servo motor, Arduino CNC Shield, Arduino Uno, limit switch, DC Power Supply | Linear rod (6mm), linear Bearing (6mm), GT2 Belt, GT2 Idler Pulley, Tooth Pulley, Spacer Nuts, Bolts and nuts set | https://howtomechatronics.com/projects/diy-pen-plotter-with-automatic-tool-changer-cnc-drawing-machine |
| 4. | Easy 3D Printed Arduino CNC Drawing Machine | 12V NEMA 17 Stepper motors, Micro Servo, Elegoo Arduino Uno, Stepper Drivers, Contact Switch, Arduino CNC Shield, Electrical Wire, 12V Power Supply | Linear Bearings, GT2 Timing Belt and Pulleys, Nuts Bolts and Screws, 5V Fan, Chromed Steel Rod, Long Linear Rail with Block, Idler Wheel, Wooden Panel 36x42cm. | https://www.instructables.com/Easy-3D-Printable-Arduino-CNC-Drawing-Machine-Low-/ |
| 5. | iDraw eX V1 Drawing Machine | Arduino Nano V3, Bluetooth Module, Stepper Motor Driver, RC Micro Servo, CNC Nano Shield, 9V 2A Power Supply, 125V 1A SPDT Sub Miniature Micro Lever Switch | NEMA 17 Stepper Single Shaft, GT2 Timing Pulley 20 Teeth Bore 5mm, GT2 Timing pulley 20 teeth Bore(5mm), (8mm), GT2 Timing Belt Idler Pulley Without teeth 20 teeth Hole diameter (5mm), Gt2 Timing Belt (6mm wide) (2mm pitch) 2m, Ball bearing Flanged, Acrylic Plate CNC parts, Nuts Bolts, Screws, Rod Aluminium Spacer, Flat Washer, Spring Washer | https://blog.bluecomtech.com/56 |
X Y PLOTTER DRAWING POLOGRAPH.
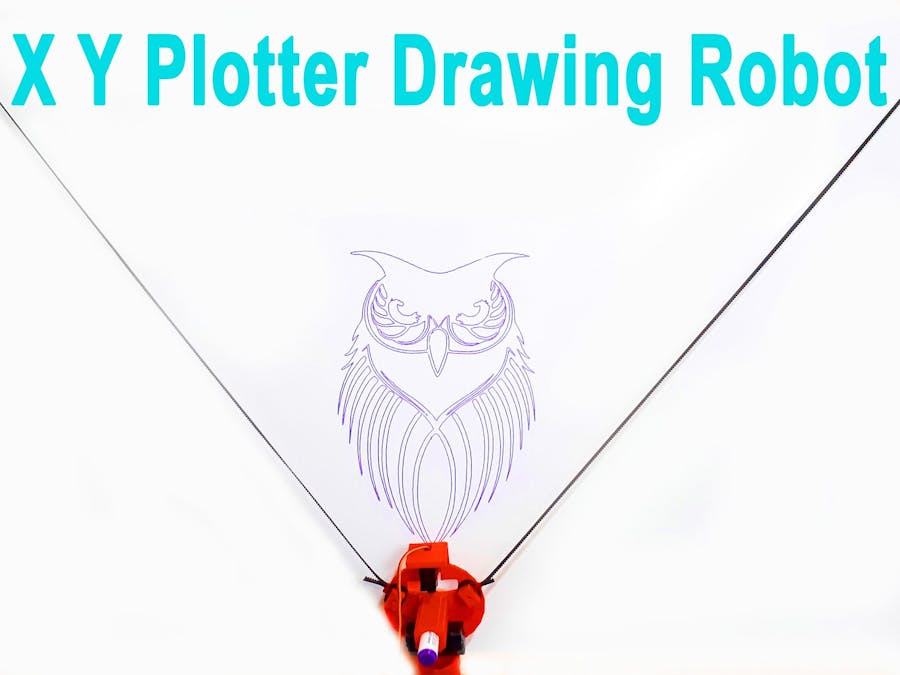
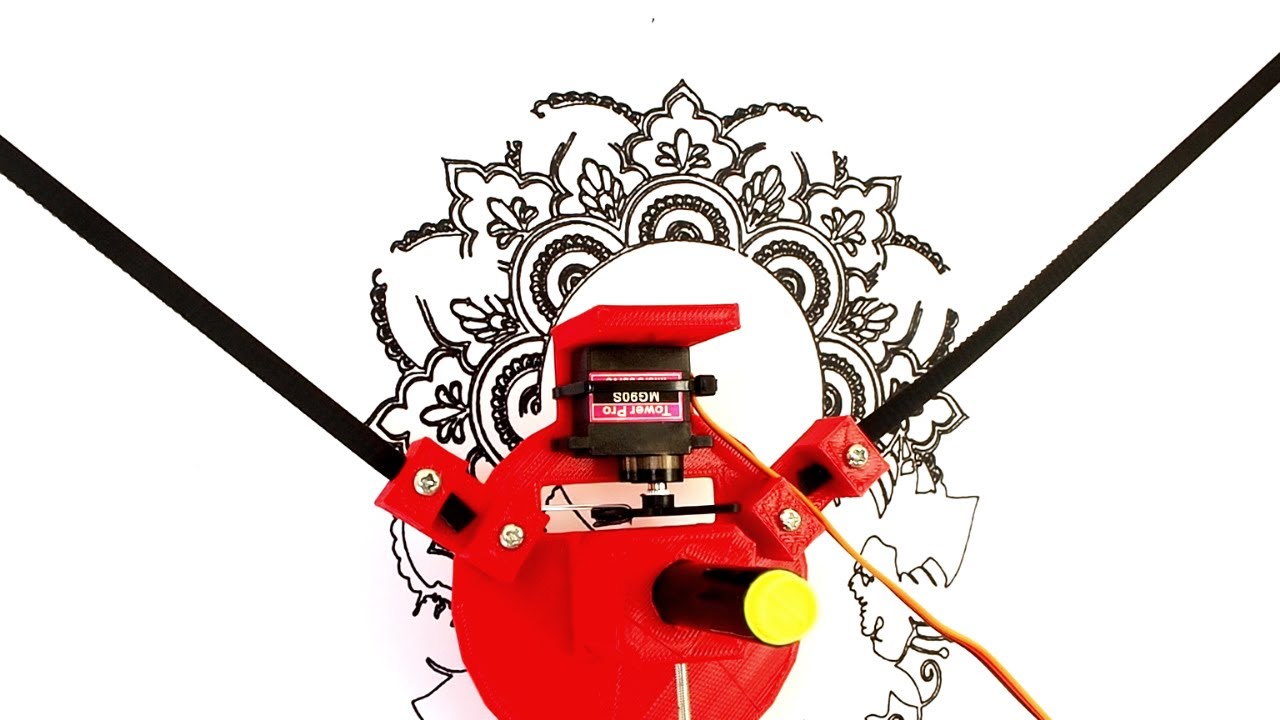
MECHANISM/ WORKING PRINCIPLE
XY plotter polograph uses bipolar coordinates to produce vector drawings using a pen suspended from strings connected to two pulleys at the top of the plotting surface. It works on the principle of Computer Numerical Control. It works with two stepper motors and a servo motor, wherein the robot plots the input given from the computer on the drawing board using ATMEGA328p microcontroller on an open-source physical computing platform Arduino. XY plotter has two axis, each of which is powered and driven by using an Arduino compactable driver A4988. In this, Arduino compatible main board with two stepper motors for ease moving of pen holder and servo motor is used to lift the pen. For this we are using the software like Arduino IDE software and G code converter.
Reference-
https://www.hackster.io/mertarduino/make-arduino-xy-plotter-drawing-robot-polargraph-b4fe36
MINI CNC PLOTTER MACHINE.

MECHANISM/WORKING PRINCIPLE.
We have supply the current in Arduino with USB DATA cable to transfer Data from Computer to Arduino Board [1], Here we have used 3 Stepper Drivers to supply the G codes in Sequence to the stepper motors. Arduino will be mounted on CNC shield. CNC shield will be distributing the Current in the command of Arduino. CNC shield will be converting the command of G codes in digital pulse by Stepper motor. In X direction Stepper motor will be move left and Right ,Y direction stepper motor will be move in front and back direction, Z direction Stepper motor will be move in Up and down[2]. We have made much difficult design via using this machine. The accuracy of this machines result is very high. So we have used in industry to reduce the cost of design printing and maintain accuracy level. Drafting and Scaling of CNC Plotter machine is very precious.
Reference
https://vpmpme.files.wordpress.com/2018/07/mini-cnc-plotter-2017-18.pdf
DIY PEN PLOTTER WITH AUTOMATIC TOOL CHANGER.

MECHANISM/WORKING PRINCIPLE.
The two main components are the MGN15H linear rails, together with their suitable sliding blocks. The motion for the X and the Y axes is provided through two GT2 Belts and some GT2 pulleys. As for the Z-axis, we have a simple reciprocating motion where the moving part slides up and down on two 6mm linear rods and suitable linear bearings. A small, hobby servo is used for gripping the pen.A homing procedure is essential for this pen plotter as the pen holders have a specific fixed position, so the machine must have a starting point. Therefore, we must have a limit switch for each axis.
Reference
EASY 3D PRINTED ARDUINO CNC DRAWING MACHINE.

MECHANISM/WORKING PRINCIPLE.
The Y axis stepper motor (this is the one underneath the moving platform) is passed through the centre hole in the lid and is then connected to the row of pins besides the driver for the Y axis on the CNC shield. The red wire on the bundle coming from the stepper motor should be closest to the outside edge of the board.The X axis stepper motor cables (this is the one attached to the board) is passed through the currently unused hole in the lid near the centre. Just like the Y axis connection, this one is connected to the row of pins besides the X axis stepper motor driver with i's red wire should also be the closest to the outside edge of the shield.
Reference
https://www.hackster.io/diy-machines/simple-3d-printable-arduino-cnc-drawing-machine-89e405
IDraw eX Drawing Machine.

MECHANISM/WORKING PRINCIPLE.
iDraw eX/A3 is based on the first-generation version of the iDraw eX, redesigned from the ground up for high performance. It features smooth rolling wheels on custom aluminum extrusions, specially designed for high stiffness and light weight. Its sturdy, rigid construction gives it finer quality output and in most applications allows it to operate with significantly higher precision and speed than competing and previous generation machines. iDraw eX is a clone of the famous Axidraw. It’s a plotter to draw. However, unlike AxiDraw, it is a drawing plotter that provides basic Bluetooth and has a hardware homing function and is easy to use. Used an “Arduino Nano” control card and a “CNC Shield” card. Using the “Inkscape” vector graphics program along with a special “plug in”, you can create several G-Code files, starting with a drawing. Universal G-code Sender (Java) will do the rest. iDraw eX machines are designed and manufactured by Zalophus’s DesignHouse, with both foreign and domestic components. iDraw eX comes with lifetime support. We stand by our machines, and we’re here to help whenever you need it.
Reference
http://shop.bluecomtech.com/en_US/idraw-ex-a3-h-bot-drawing-machine